Page 208 of 427

Your vehicle’s audio system will
disable itself if it is disconnected
f rom electrical power f or any reason.
To make it work again, you must
enter a specific code with the preset
bars. Because there are hundreds of
number combinations possible f rom
the f ive digits, making the system
work without knowing the exact
code is nearly impossible.
If you lose the card, you must obtain
the code number f rom your dealer.
To do this, you will need the audio
system’s serial number.
You should have received a radio
code card that lists your audio
system’s code and serial numbers. It
is best to store this card in a saf e
place at home. In addition, you
should write the audio system’s
serial number in this owner’s manual.If your vehicle’s battery is
disconnected or goes dead, or the
radio f use is removed, the audio
system will disable itself . If this
happens, you will see
‘‘ENTER CODE’’ in the f requency
display the next time you turn on the
system. Use the preset bars to enter
the code. The code is located on the
radio code card included in your
owner’s manual kit. When it is
entered correctly, the radio will start
playing.
If you make a mistake entering the
code, do not start over; complete the
sequence, then enter the correct
code. You have ten tries to enter the
correct code. If you are unsuccessf ul
in ten attempts, you must then leave
the system on f or 1 hour bef ore
trying again.
Radio T hef t Protection
204
�\f���—�\f���—�\f���y���\f��
�
������y���
�(���������\f�y�\f���\f���y
2009 Ridgeline
Page 209 of 427
 side
of the bar until the hour advances to
the desired time. Press and hold the
M (Preset 2) side of the bar until the
minutes advance to the desired time.
To set the")
Press and hold the H (Preset 1) side
of the bar until the hour advances to
the desired time. Press and hold the
M (Preset 2) side of the bar until the
minutes advance to the desired time.
To set the time, press the CLOCK
button until you hear a beep. The
displayed time begins to blink.
If your vehicle’s battery is
disconnected or goes dead, you may
need to set the clock.You can quickly set the time to the
nearest hour. If the displayed time is
bef ore the half hour, pressing the
clock set button until you hear a
beep, then pressing the R (Preset 3)
side of the bar sets the clock back to
the previous hour.
If the displayed time is after the half
hour, the clock sets f orward to the
beginning of the next hour.
Press the clock set button again to
enter the set time.For example:
The navigation system receives
signals f rom the global positioning
system (GPS), and the displayed
time is updated automatically by the
GPS. Ref er to the navigation system
manual f or how to adjust the time.1:06 will reset to 1:00
1:52 will reset to 2:00
On models with navigation system
On models without navigation system
Setting the Clock
Features
205
PRESET BARS
PRESET BARS
CLOCK BUTTON
CLOCK BUTTON
RT, Canadian DX, and VP models
RTS, RTL, and Canadian EX-L models without
navigation system
Model without XM satellite
radio model is shown.
�\f���—�\f���—�\f���y���
�����������y���
�(���������\f�y�\f���
�\f�y
2009 Ridgeline
Page 210 of 427
, the
hood, or the In-Bed Trunk, will cause
it to alarm. It also alarms if the radio
and navigation")
Once the security system is set,
opening any door (without using the
key or the remote transmitter), the
hood, or the In-Bed Trunk, will cause
it to alarm. It also alarms if the radio
and navigation components are
removed f rom the dashboard or the
wiring is cut.The security system will not set if
the hood, In-Bed Trunk, or any door
is not f ully closed. If the system will
not set, check the door and tailgate
open monitor and In-Bed Trunk open
indicator on the instrument panel
(see pages and ) to see if the
doors and In-Bed Trunk are f ully
closed. Since it is not part of the
monitor display, manually check the
hood.
Use the remote transmitter
to quickly check that the hood,
In-Bed Trunk, and all doors are
closed. Push the lock button twice
within 5 seconds. There should be an
audible conf irmation beep.
Do not attempt to alter this system
or add other devices to it.
The security system helps to protect
your vehicle and valuables f rom thef t.
The horn sounds and a combination
of headlights, parking lights, license
plate lights, and taillights f lash if
someone attempts to break into your
vehicleorremovetheradio.This
alarm continues f or 2 minutes, then
the system resets. To reset an
activated system before the 2
minutes have elapsed, unlock the
driver’s door with the key or the
remote transmitter.
The security system automatically
sets 15 seconds after you lock the
doors, hood, and the In-Bed Trunk.
For the system to activate, you must
lock the doors f rom the outside with
the key, driver’s lock tab, door lock
switch, or remote transmitter. The
security system indicator on the
instrument panel starts blinking
immediately to show you the system
is setting itself .
1175
If equipped
Security System
206
NOTE:SECURITY SYSTEM INDICATOR
�\f���—�\f���—�\f���y���\f��
�
������y���
�(���������\f�y�\f���
�
�y
2009 Ridgeline
Page 215 of 427

The compass may need to be
manually calibrated af ter exposure to
a strong magnetic field. If the
compassseemstocontinuallyshow
the wrong direction, do this.Drivethevehicleslowlyincircles
at less than 5 mph (8 km/h) until
the center icon turns blue. This
icon also turns blue by continuing
to drive the vehicle under normal
driving conditions. When you see
an actual heading on the compass,
calibration is completed.
In most areas, there is a variation
between magnetic north and true
north. Zone selection is required so
the compass can compensate f or this
variation. To check and select the
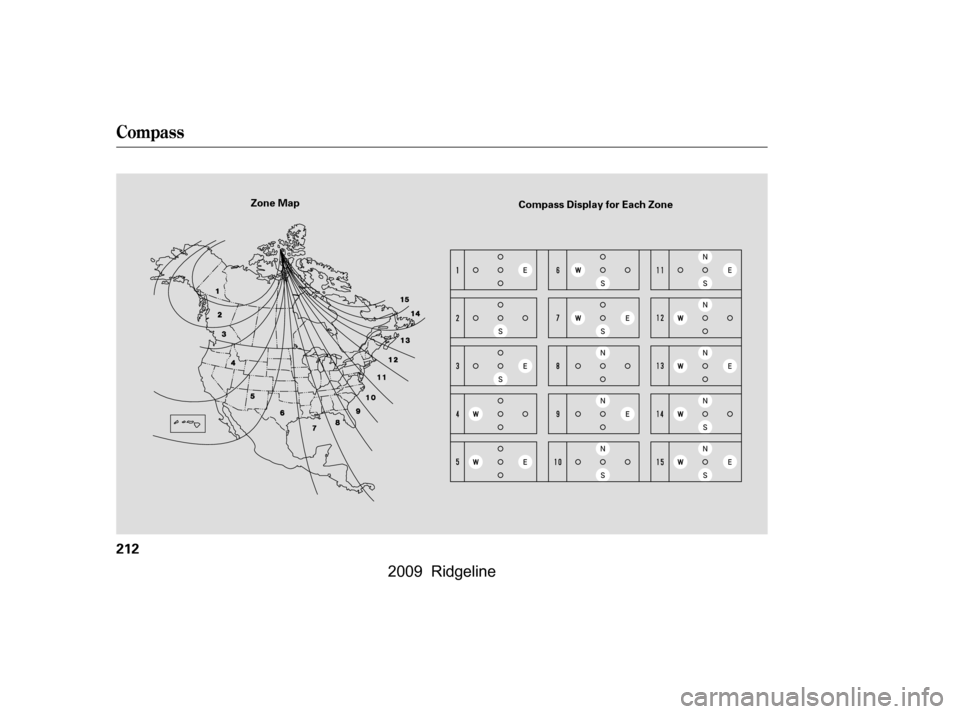
zone, do this: Find the zone f or your area on the
zone map (see page ). Each
zone number (1 through 15)
corresponds to a compass zone on
the table (see page ). Press and hold the compass
button f or about 3 seconds. When
all of the direction icons begin to
blink, release the button.
The blue direction icon(s) blink
and show the current zone.
If the zone is incorrect, press and
release the compass button
repeatedly to get to the correct
number.
The compass will return to the
normal display about 4 seconds
af ter you stop adjusting a zone
number.
Do this procedure in an open
area, away f rom buildings, power
lines, and other vehicles.
With the blue center icon
displayed, press and hold the
compass button for about 6
seconds. When the center icon
turns red, release the button. 2.
1. 2.
3.
4.
1. 5.
212
212
CONT INUED
Compass Calibration
Compass Zone Selection
Compass
Features
211
NOTE:
�����—�����—�����y������
��������y���
�(�����������y�����
���y
2009 Ridgeline
Page 216 of 427
Compass
212
Zone MapCompass Display for Each Zone
�\f���—�\f���—�\f���y���\f��
��������y���
�(���������\f�y�\f���
���y
2009 Ridgeline
Page 222 of 427

To operate the HFL, use the HFL
Talk and Back buttons on the left
side of the steering wheel.
The HFL microphone is on the
ceiling, between the f ront map lights
and the HomeLink buttons. On
models with navigation system, the
microphone is shared with the
navigation system.
When the HFL is in use, the sound
comes through the vehicle’s f ront
audio system speakers. If the audio
system is in use while operating
either of the HFL buttons or making
a call, the HFL over-rides the audio
system. To change the volume level,
use the audio system volume knob,
or the steering wheel volume
controls.
Your vehicle’s HFL system has the
cellular phonebook import f unction.
This allows you to import your
cellular phonebook to the HFL.
Using the navigation system, you can
makeacalldirectlyandstorea
desired number in the HFL f rom the
list shown on the navigation display.
For more inf ormation on how to
import the phonebook or to make a
call, see page .
The HFL can store up to 50 names
and phone numbers in its phonebook.
Withalinkedphone,youcanthen
automatically dial any name or
number in the phonebook.
You can also store the desired
number to the HFL directly f rom
your cell phone using the receive
contact f unction in the HFL.
228 HFL Buttons
Microphone
Audio System
Phonebook
BluetoothHandsFreeL ink
218
HFL BACK BUTTON HFL TALK
BUTTON
�\f���—�\f���—�\f���y���\f��
��������y���
�(���������\f�y�\f�������y
2009 Ridgeline
Page 223 of 427
When you are operating the HFL,
dialing or receiving calls with the
audio system in use, you will see the
above screen on the navigation
display.
The HFL buttons are used as
f ollows:
HFLTalk:Thisbuttonisusedbefore
you give a command, to answer
incoming calls, and to conf irm
system inf ormation.
Press and release the button, then
wait f or a beep bef ore giving a
command.
HFLBack:Thisbuttonisusedto
end a call, go back to the previous
voice control command, and to
cancel an operation.
You will also see ‘‘HANDS FREE
LINK’’ on the audio display.
‘‘ ’’ indicator will be displayed on
the audio display if your Bluetooth
-
compatible phone is linked to the
HandsFreeLink
.
Inf ormation Display
BluetoothHandsFreeL ink
Features
219
BLUETOOTH INDICATOR
�\f���—�\f���—�\f���y���\f��
��������y���
�(���������\f�y�\f�������y
2009 Ridgeline
Page 224 of 427
�Î
�Î �Î�µ
�µ �µ
�µ �µ
�Î
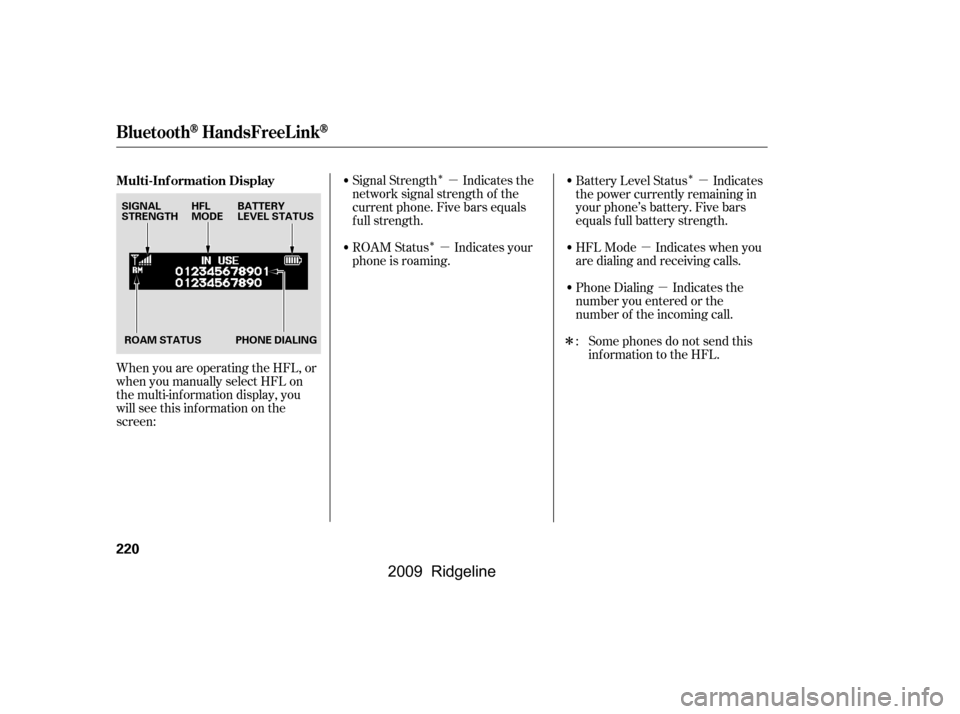
When you are operating the HFL, or
when you manually select HFL on
the multi-information display, you
will see this inf ormation on the
screen: Signal Strength Indicates the
network signal strength of the
current phone. Five bars equals
f ull strength.
ROAM Status Indicates your
phone is roaming.
Battery Level Status Indicates
the power currently remaining in
your phone’s battery. Five bars
equals f ull battery strength.
HFL Mode Indicates when you
are dialing and receiving calls.
Phone Dialing Indicates the
number you entered or the
number of the incoming call.
Some phones do not send this
inf ormation to the HFL.
:
Multi-Inf ormation Display
BluetoothHandsFreeL ink
220
SIGNAL
STRENGTH
BATTERY
LEVEL STATUS
HFL
MODE
ROAM STATUS PHONE DIALING
�\f���—�\f���—�\f���y���\f��
��������y���
�(���������\f�y�\f�������y
2009 Ridgeline