Page 149 of 578

CONT INUED
If you try to drive off with the
tailgate not closed completely, a
beeper sounds and a ‘‘DOOR &
TAILGATE OPEN’’ message is
shown on the multi-inf ormation
display.
Keep the tailgate closed at all times
while driving to avoid damaging the
tailgate and to prevent exhaust gas
f rom getting into the interior. Seeon page
.
If there is a problem in the power
tailgate system, you will see a
‘‘CHECK POWER TAILGATE’’
message on the multi-inf ormation
display. Have the system checked by
your dealer.
With this message shown on the
multi-inf ormation display, you can
still open or close the tailgate
manually.
When the tailgate or the roof is
covered with snow or ice.
Do not install any accessories on the
tailgate. It may cause the tailgate not
to f unction properly. If there is snow
or ice on the tailgate, make sure to
remove it bef ore you operate the
tailgate.
The tailgate has sensors on both
sides. Be caref ul not to damage them.
If the sensors are damaged, the
power tailgate does not f unction
properly. If you push the tailgate release
button inside the handle while the
tailgate is opening or closing, it will
stop moving. You need to open or
close it the rest of the way manually. If the power door lock system cannot
unlock the tailgate, unlock it
manually.
Use a small flat-tipped screwdriver to
remove the cover on the back of the
tailgate.
59 Unlocking the T ailgate
Carbon Monoxide Hazard
Tailgate and Glass Hatch
Inst rument s and Cont rols
145
�����—�����—�
���y�
�������������y���
�(�/���������y���
�����y
2009 Pilot
Page 172 of 578
.
Keeptheinsideandoutsidemirrors
clean and adjusted f or best visibility.
Be sure to adjust th")
You will also see a ‘‘RELEASE
PARKING BRAKE’’ message on the
multi-inf ormation display (see page).
Keeptheinsideandoutsidemirrors
clean and adjusted f or best visibility.
Be sure to adjust the mirrors bef ore
you start driving.
The inside mirror has day and night
positions. The night position reduces
glare f rom headlights behind you.
Flip the tab on the bottom edge of
the mirror to select the day or night
position. Theinsidemirrorcanautomatically
darken to reduce glare. To turn on
this feature, press the button on the
bottom of the mirror. The AUTO
indicator comes on as a reminder.
When it is on, the mirror darkens
when it senses the headlights of a
vehicle behind you, then returns to
normal visibility when the lights are
gone. Press the button again to turn
of f this f eature.
93
On LX and EX models
On Touring models
On EX-L and Touring models
Mirrors
Parking Brake, Mirrors
168
AUTO BUTTON
INDICATOR SENSOR
Driving the vehicle with the parking
brake applied can damage the rear
brakes and axles. A beeper will sound
if the vehicle is driven with the parking
brake on.
�����—�����—�
���y�
���������
���y���
�(�/���������y���
�����y
2009 Pilot
Page 175 of 578
.
Store a driving position only when
the vehicle is parked.
Turn the ignition switch to the ON
(II) position. You cannot add a
new driving position")
Adjust the seat to a comfortable
position (see page ).
Store a driving position only when
the vehicle is parked.
Turn the ignition switch to the ON
(II) position. You cannot add a
new driving position to the
memory unless the ignition switch
is in the ON (II) position. You can
recall a memorized position with
the ignition switch in any position.
Your vehicle has a memory feature
f or the driver’s seat and outside
mirror positions.
Two seat and outside mirror
positionscanbestoredinseparate
memories. You select a memorized
position by pushing the appropriate
button or using the appropriate
remote transmitter (Driver 1 or
Driver 2).
You can change the ‘‘MEMORY
POSITION LINK’’ setting on the
multi-inf ormation display (see page
). Adjust the outside mirrors f or best
visibility (see page ). Press and release the SET button
on the control panel. You will hear
a beep. Immediately press and
hold one of the memory buttons (1
or 2) until you hear two beeps.
The indicator in the memory
button will come on. The current
positions of the driver’s seat and
outside mirrors are now stored.
1.
2.
3.
4.
152
169
107
CONT INUED
On Touring modelsStoring a Driving Position in
Memory
Driving Position Memory System
Inst rument s and Cont rols
171
MEMORY BUTTONS
SET BUTTON
�����—�����—�
���y�
�����������
�y���
�(�/���������y���
�����y
2009 Pilot
Page 195 of 578

�Û
�Ý
CONT INUED
Press the button to increase
the fan speed and airflow. Press the button to decrease it.
Turning this dial clockwise increases
the temperature of the airflow. This button turns the air
conditioningonandoff.Youwillsee
A/C ON or A/C OFF in the display.
When the indicator in the button is
on, air f rom the vehicle’s interior is
sent throughout the system again.
When the indicator is off, air is
brought in f rom the outside of the
vehicle (fresh air mode).
Thesystemshouldbeleftinfresh
air mode under almost all conditions.
Keeping the system in recirculation
mode, particularly with the A/C of f ,
can cause the windows to fog up.
Switch to recirculation mode when
driving through dusty or smoky
conditions, then return to fresh air
mode. The outside air intakes f or the
heating and cooling system are at
the base of the windshield. Keep this
area clear of leaves and other debris.
Vents, Heating, and A/C
Fan Control
T emperature ControlAir Conditioning (A/C) Button Recirculation Button
Features
191
�����—�����—�
���y�
�������������y���
�(�/���������y���
�����y
2009 Pilot
Page 197 of 578
. If it moves near the red mark,
turn of f the A/C until the gauge
reads normally.
The f low-t")
Air conditioning places an extra load
on the engine. Watch the engine
coolant temperature gauge (see page). If it moves near the red mark,
turn of f the A/C until the gauge
reads normally.
The f low-through ventilation system
draws in outside air, circulates it
through the interior, then exhausts it
through vents near the rear side
panels.
The heater uses engine coolant to
warm the air. If the engine is cold, it
will be several minutes bef ore you
f eel warm air coming f rom the
system.
Set the temperature to the lower
limit.
Make sure the A/C is of f .
Select and fresh air mode.
Set the f an to the desired speed. Select and fresh air mode.
Set the f an to the desired speed.
Adjust the warmth of the air with
the temperature control dial.
Turn on the A/C by pressing the
button. You will see A/C ON in
the display.
Make sure the temperature is set
to the lower limit.
Select .
If the outside air is humid, select
recirculation mode. If the outside
air is dry, select f resh air mode.
Set the f an to the desired speed.
1.
2.
3.
4.
5.
1.
2.
3.
1.
2.
3.
4. 80
CONT INUED
Vents, Heating, and A/C
Using the A/C
Ventilation Using the Heater
Features
193
�����—�����—�
���y�
�������������y���
�(�/���������y���
�����y
2009 Pilot
Page 199 of 578
�Û�Ý
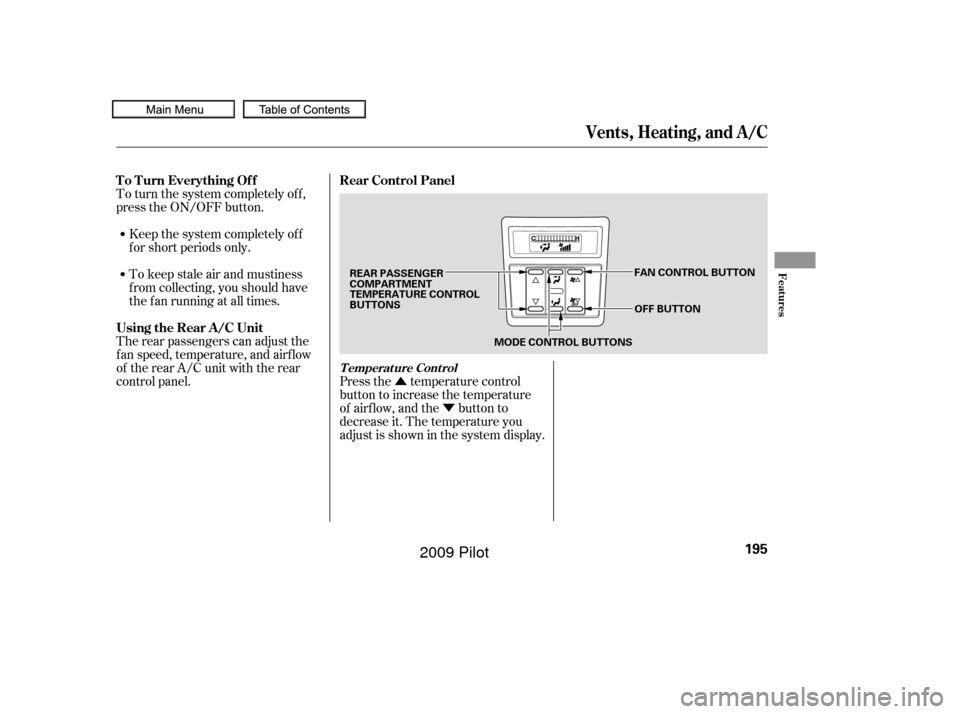
To turn the system completely off,
press the ON/OFF button.
Keep the system completely of f
f or short periods only.
To keep stale air and mustiness
f rom collecting, you should have
the f an running at all times.
The rear passengers can adjust the
f an speed, temperature, and airf low
of the rear A/C unit with the rear
control panel. Press the temperature control
button to increase the temperature
of airflow, and the button to
decrease it. The temperature you
adjust is shown in the system display.
Vents, Heating, and A/C
To Turn Everything Off
Using the Rear A/C Unit Rear Control Panel
T emperat ure Cont rol
Features
195
MODE CONTROL BUTTONS
OFF BUTTON
REAR PASSENGER
COMPARTMENT
TEMPERATURE CONTROL
BUTTONS
FAN CONTROL BUTTON
�����—�����—�
���y�
�������������y���
�(�/���������y���������y
2009 Pilot
Page 200 of 578
�Û
�Ý
Press the fan control button
to increase the f an speed and airf low.
Press the button to
decrease it. The level of the f an
speed is shown in the display. When is selected, air f lows
f rom the upper vents on the back of
the center console.
When is selected, air f lows
f rom the lower vents.To shut of f the rear A/C unit, press
the OFF button until the system
shuts off.
To turn on the rear A/C unit,
increase the f an speed and airf low.
Fan Cont rol
Mode Cont rol
Vents, Heating, and A/C
196
�����—�����—�
���y�
�������������y���
�(�/���������y�������
�y
2009 Pilot
Page 202 of 578

�Û
�Ý
Press the Auto button on the front
control panel.
Set the desired temperature with
the temperature control buttons.
You will see AUTO in the system’s
display.
The automatic climate control
system in your vehicle picks the
proper combination of air
conditioning, heating, and ventilation
to maintain the interior temperature
you select. The system also adjusts
the fan speed and airflow levels.
You can set the driver’s side
temperature, the passenger’s side
temperature, and the temperature
of the rear passenger
compartment separately. The system automatically selects
the proper mix of conditioned
and/or heated air that will, as
quickly as possible, raise or lower
the interior temperature to your
pref erence.
The driver’s side temperature, the
passenger’s side temperature and
the rear passenger compartment
temperature can be set separately.
Press the button of the
appropriate temperature control to
increase the temperature of airf low.
Press the button to decrease it.
Each set temperature is shown in the
display. The rear temperature is
showninthedisplayonthebackof
the center console.
The climate control system can also
be operated by voice control. See the
Navi section in your quick start
guide f or an overview of this system,
and the navigation system manual
f or complete details.
1.
2.
3.
On vehicles with navigation system
Using A utomatic Climate Control
Voice Control System
T emperat ure Cont rol
Climate Control System
198
�����—�����—�
���y�
���������
���y���
�(�/���������y���������y
2009 Pilot