Page 305 of 532
�Ý�Û
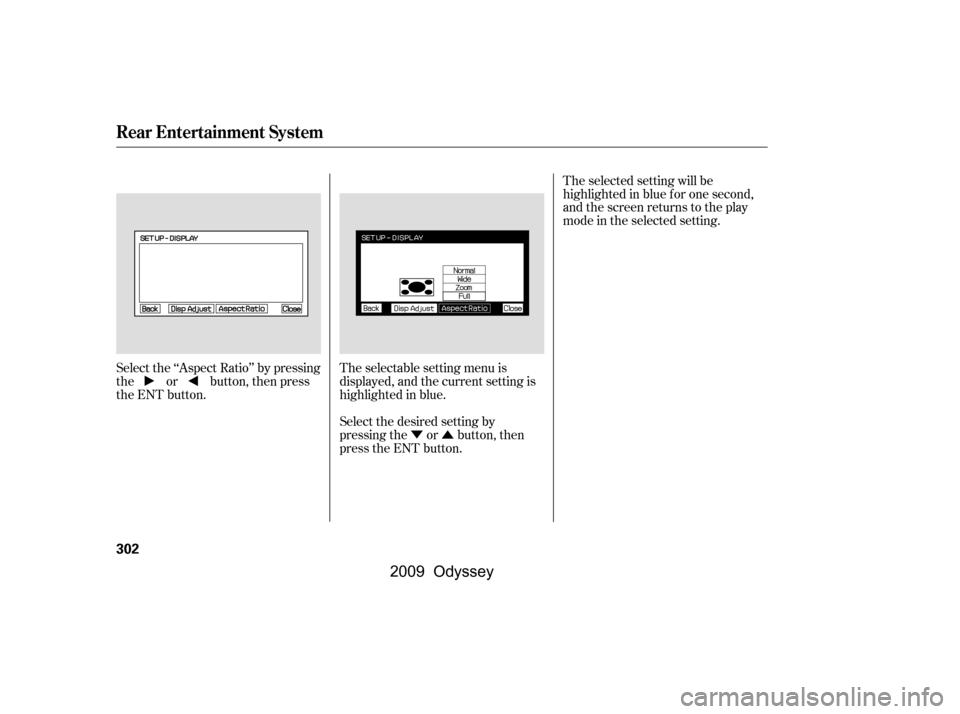
Select the ‘‘Aspect Ratio’’ by pressing
the or button, then press
the ENT button.
The selectable setting menu is
displayed, and the current setting is
highlighted in blue.
Select the desired setting by
pressing the or button, then
press the ENT button.The selected setting will be
highlighted in blue f or one second,
and the screen returns to the play
mode in the selected setting.
Rear Entertainment System
302
�\f���—�\f���—���
�y�
�
�����������y���
�(���������\f�y�\f���\f���y
2009 Odyssey
Page 319 of 532
Auxiliary input jacks and headphone
connectors f or the rear
entertainment system are under the
third row seat armrest on the driver’s
side. To access these connectors,
open the cover by pulling up on the
lever.
Remove the battery. Install the new
battery in the earpiece as shown in
the diagram next to the battery slot.
Slide the cover back into place on the
earpiece, then press down on the
back edge to lock it in place.
An improperly disposed of battery
can hurt the environment.
Always conf irm local regulations f or
battery disposal.
Each headphone uses one AAA
battery. The battery is under the
cover on the lef t earpiece. To
remove the cover, insert a coin in the
slot and twist it slightly to pry the
cover away f rom the earpiece. Pull
the cover outward, and pivot it out of
the way.
Rear Entertainment System
Auxiliary Input JacksReplacing Bat t eries
316
COVER
BATTERY LEVER
ARMREST
COIN
�\f���—�\f���—���
�y�
�
�����������y���
�(���������\f�y�\f�����
�y
2009 Odyssey
Page 321 of 532

Once the security system is set,
opening any door, the tailgate, or the
hood without using the key or the
remote transmitter, will cause it to
alarm. It also alarms if the audio unit
is removed f rom the dashboard or
the wiring is cut.The alarm will also be activated if a
passenger inside the locked vehicle
turns the ignition switch on.
The security system will not set if
the hood, tailgate, or any door is not
f ully closed. Bef ore you leave the
vehicle, make sure the doors,
tailgate, and hood are securely
closed.
To see if the system is set
af ter you exit the vehicle, press the
LOCK button on the remote
transmitter within 5 seconds. If the
system is set, the horn will beep
once.
Do not attempt to alter this system
or add other devices to it.
The security system automatically
sets 15 seconds after you lock the
doors, hood, and the tailgate. For the
system to activate, you must lock the
doorsandthetailgatefromthe
outside with the key, driver’s lock
tab, door lock master switch, or
remote transmitter. The security
system indicator on the instrument
panel starts blinking immediately to
show you the system is setting itself .
The security system helps to protect
your vehicle and valuables f rom thef t.
The horn sounds and a combination
of headlights, parking lights, side
marker lights, and taillights f lashes if
someone attempts to break into your
vehicleorremovetheradio.This
alarm continues f or 2 minutes, then
the system resets. To reset an
activated system before the 2
minutes have elapsed, unlock the
driver’s door with the key or the
remote transmitter.
On EX, EX-L and Touring models
Security System
318
NOTE:SECURITY SYSTEM INDICATOR
�\f���—�\f���—���
�y�
�
�����������y���
�(���������\f�y�\f�������y
2009 Odyssey
Page 323 of 532

Resting your f oot on the brake pedal
causes cruise control to cancel.
You can increase the set speed in
any of these ways:
Press and hold the RES/ACCEL
button. When you reach the
desired speed, release the button. You can decrease the set speed in
any of these ways:
Even with cruise control turned on,
you can still use the accelerator
pedal to speed up f or passing. Af ter
completing the pass, take your foot
of f the accelerator pedal. The vehicle
will return to the set speed.
Press and hold the SET/DECEL
button. Release the button when
you reach the desired speed.
To slow down in very small
amounts, tap the SET/DECEL
button. Each time you do this,
your vehicle will slow down about
1 mph (1.6 km/h).
Tap the brake pedal lightly with
your f oot. The CRUISE
CONTROL indicator on the
instrument panel will go out.
When the vehicle slows to the
desired speed, press the SET/
DECEL button.
Push on the accelerator pedal.
Accelerate to the desired cruising
speed, then press the SET/
DECEL button.
To increase the speed in very
small amounts, tap the RES/
ACCEL button. Each time you do
this, your vehicle will speed up
about 1 mph (1.6 km/h).
Changing the Set Speed
Cruise Control
320
�\f���—�\f���—���
�y�
�
�����������y���
�(���������\f�y�\f�������y
2009 Odyssey
Page 325 of 532

�·�µ
The HomeLink
Universal
Transceiver built into your vehicle
canbeprogrammedtooperateupto
three remote controlled devices
around your home, such as garage
doors, lighting, or home security
systems.
Bef ore programming your
HomeLink to operate a garage door
opener, conf irm that the opener has
an external entrapment protection
system, such as an ‘‘electronic eye,’’
or other saf ety and reverse stop
f eatures.
If your garage door was
manuf actured bef ore April 1, 1982,
you may not be able to program
HomeLink to operate it. These units
do not have safety features that
cause the motor to stop and reverse
it if an obstacle is detected during
closing, increasing the risk of injury. Do not use HomeLink with any
garage door opener that lacks saf ety
stop and reverse f eatures.
Units manuf actured between April 1,
1982 and January 1, 1993 may be
equipped with saf ety stop and
reverse f eatures. If your unit does
not have an external entrapment
protection system, an easy test to
conf irm the f unction and
perf ormance of the saf ety stop and
reverse f eature is to lay a 2 4
under the closing door. The door
should stop and reverse upon
contacting the piece of wood.
As an additional safety feature,
garage door openers manuf actured
af ter January 1, 1993 are required to
have external entrapment protection
systems, such as an electronic eye,
which detect an object obstructing
the door.
Refer to the safety information thatcame with your garage door opener
to test that the safety features are
f unctioning properly. If you do not
have this information, contact the
manuf acturer of the equipment.
Bef ore programming HomeLink to a
garage door or gate opener, make
sure that people and objects are out
of thewayof thedevicetoprevent
potential injury or damage.
When programming a garage door
opener, park just outside the garage.
If you just
received your vehicle and have not
trained any of the buttons in
HomeLink bef ore, you should erase
any previously learned codes bef ore
training the first button. To do this,
press and hold the two outside
buttons on the HomeLink
transceiver for about 20 seconds,
until the red indicator f lashes.
Release the buttons, then proceed to
step 1.
On EX, EX-L and Touring models
HomeL inkUniversal Transceiver
General Inf ormation
Important Saf ety PrecautionsT raining HomeL ink
Bef ore you begin
322
�\f���—�\f���—���
�y�
�
�������
�\f�y���
�(���������\f�y�\f�������y
2009 Odyssey
Page 330 of 532

Ensure that you use the HFL
buttons, not the NAVI buttons, to
give HFL voice commands.
To operate HFL, use the HFL Talk
and Back buttons on the left side of
the steering wheel.
When HFL is in use, the sound
comes through the vehicle’s f ront
audio system speakers. If the audio
system is in use while operating
either of the HFL buttons or making
a call, HFL overrides the audio
system. To change the volume level,
use the audio system volume knob or
the steering wheel volume controls.
The HFL microphone is on the
ceiling, between the f ront map lights
and the HomeLink buttons. On
models with navigation system, the
microphone is shared with the
navigation system.
HFL and the navigation system have
separate voice recognition systems.
When HFL is in use, a voice
command f or the navigation system
will not be recognized even if you
press the navigation Talk button. In
this case, you will hear two short
beeps, and the HFL system has no
prompt.
BluetoothHandsFreeL ink
HFL Buttons
Audio System
Microphone
Features
327
NOTE:
HFL BACK
BUTTON
HFL TALK
BUTTON
NAVI VOICE CONTROL BUTTONS
�\f���—�\f���—���
�y�
�
���������
�y���
�(���������\f�y�\f�������y
2009 Odyssey
Page 369 of 532
You can turn the monitor on and of f
by pressing the monitor of f button
when the shif t lever is in reverse.
The monitor turns on everytime you
shif t to reverse, even if you turned it
of f the last time.Monitor brightness is adjusted
automatically by sensors. If you use
the monitor continuously at high
temperature, the monitor will
gradually dim.
If a bright light (such as sunlight) is
shining on the inside mirror, the
image may be dif f icult to see.
The inside mirror will be hot when
you use the monitor f or an extended
period of time.
On U.S. EX-L without navigation system
and Canadian EX-L models
Rearview Camera and Monitor
366
REAR VIEW MONITOR
SENSOR
SENSOR MONITOR OFF BUTTON
�\f���—�\f���—���
�y�
����\f����\f���y���
�(���������\f�y�\f�����
�y
2009 Odyssey
Page 373 of 532

Park the vehicle, and set the
parking brake. Pull the hood
release handle located under the
lower lef t corner of the dashboard.
The hood will pop up slightly.
Screw the f uel f ill cap back on
until it clicks at least once.
Stop f illing the tank af ter the f uel
nozzle automatically clicks of f . Do
not try to ‘‘top off’’ the tank. This
leaves some room in the f uel tank
for the fuel to expand with
temperature changes.
If you do not properly tighten the
cap, you will see a ‘‘CHECK FUEL
CAP’’ message on the inf ormation
display (see page ).
even
though the tank is not full, there may
be a problem with your vehicle’s f uel
vapor recovery system. The system
helps keep f uel vapor f rom going
into the atmosphere. Try f illing at
another pump. If this does not f ix the
problem, consult your dealer. If you do not properly tighten the
cap, you will see a ‘‘TIGHTEN
FUEL CAP’’ message on the multi-
inf ormation display (see page
).
Push the f uel f ill door closed until
it latches. 1.
6.
5.
4.
80
92
If the f uel nozzle keeps clicking of f On LX, EX, EX-L and Canadian DX
models
On Touring models
Service Station Procedures
Opening and Closing the Hood
370
HOOD RELEASE HANDLE
Pull
�\f���—�\f���—���
�y�
����\f��������y���
�(���������\f�y�\f�������y
2009 Odyssey