Page 210 of 532
The ignition switch light comes on
when you open the driver’s door, and
stays on several seconds af ter you
close the door.
The cargo area light has a three-
position switch. In the OFF position,
the light does not come on. In the
center position, it comes on when
you open the tailgate. In the ON
position, it stays on continuously. Ignition Switch L ight
Cargo Area Light
Interior Lights
Inst rument s and Cont rols
207
OFF
ON
Rear
�\f���—�\f���—���
�y�
�
����
������y���
�(���������\f�y�\f���
���y
2009 Odyssey
Page 223 of 532
The direction and quantity of airf low
f rom each rear ceiling vent is
adjustable.
To adjust the direction of air coming
f rom a rear ceiling vent, move the
tab in the center of each vent back-
and-forth, and rotate the vent with
the tab. The lever next to each vent
can be opened and closed to regulate
the amount of airf low.Theclimatecontrolsystemhasthree
sensors. A sunlight sensor is in the
top of the dashboard, and a
temperature sensor is next to the
steering column. There is also a rear
sensor on the rear sidewall near the
exhaust vent. Do not cover the
sensors or spill any liquid on them.
On EX, EX-L and Touring models
Sunlight and T emperature
Sensors
Rear Ceiling Vents
Vents, Heating, and A/C, Climate Control Sensors
220
SUNLIGHT SENSOR TEMPERATURE SENSOR
TAB
LEVER
�\f���—�\f���—���
�y�
�
���������\f�y���
�(���������\f�y�\f�������y
2009 Odyssey
Page 259 of 532
. The audio system
illuminates when the parking lights
are on, even i")
�µ
�µ �´�µ
You can use the instrument panel
brightness control knob to adjust the
illumination of the audio system (see
page ). The audio system
illuminates when the parking lights
are on, even if the system is turned
of f .
To adjust the treble
and bass, touch or on each
side of the treble or bass adjustment
bar. The adjustment bar shows you
the current setting.
These modes adjust
the strength of the sound coming
f rom each speaker. Lef t/Right
balance adjusts the side-to-side
strength, while Front/Rear f ader
adjust the f ront-to-back strength. To
adjust the left/right balance, touch
the ‘‘L’’ or ‘‘R’’ icon.
To adjust the front/rear fader, touch
the ‘‘FR’’ or ‘‘RR’’ icon.
To see the audio display when you
are f inished adjusting the sound,
wait 5 seconds.
You can also adjust the sound from
the navigation screen.
To adjust the sound, push the
AUDIO button, then enter the sound
grid by touching the SOUND icon on
the display. 139
A udio System L ighting
Treble/Bass
L ef t/Right Balance and Front/
Rear FaderA djust ing t he Sound
Playing the A M/FM Radio (Models with navigation system)
256
�\f���—�\f���—���
�y�
�
�����������y���
�(���������\f�y�\f�����
�y
2009 Odyssey
Page 302 of 532

�Ý�Û
When you select ‘‘PERSONAL
SURROUND’’ by pressing the or button, the personal
surround setup menu is displayed
above the ‘‘PERSONAL
SURROUND’’ icon. You can adjust these display
settings:
Back Light
Contrast
Brightness
Tint
Color
To adjust the display, select
‘‘Display’’ by pressing the or
button, and enter your
selection by pressing the ENT
button. The display changes as
shown above.
Selecting one of the sound ef f ects,
Cinema,Music,orVoice,fromthe
personal surround menu allows you
to change the sound in your
headphones to match the disc you
are playing.
Select ‘‘Cinema,’’ ‘‘Music,’’ or ‘‘Voice’’
by pressing the or button, and
enter your selection by pressing the
ENT button. The ‘‘PERSONAL
SURROUND’’ logo is displayed in
the upper right corner of the screen.
If you select ‘‘Of f ,’’ the logo
disappears, and there will be no
special sound ef f ect.
CONT INUED
Personal Surround
Display
Rear Entertainment System
Features
299
�\f���—�\f���—���
�y�
�
���������
�y���
�(���������\f�y�\f���\f���y
2009 Odyssey
Page 305 of 532
�Ý�Û
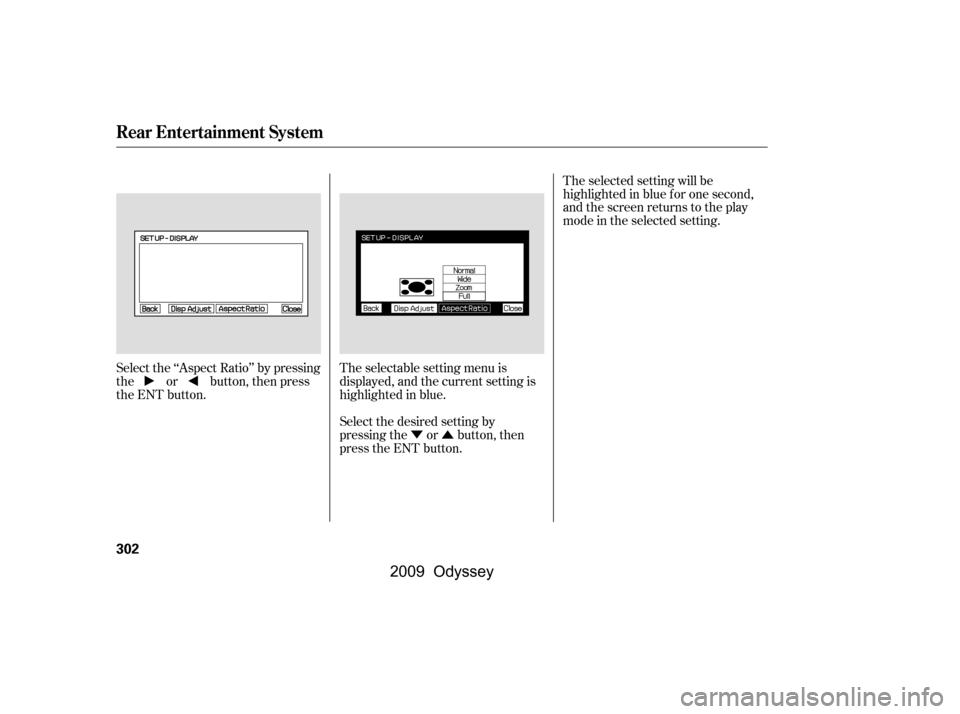
Select the ‘‘Aspect Ratio’’ by pressing
the or button, then press
the ENT button.
The selectable setting menu is
displayed, and the current setting is
highlighted in blue.
Select the desired setting by
pressing the or button, then
press the ENT button.The selected setting will be
highlighted in blue f or one second,
and the screen returns to the play
mode in the selected setting.
Rear Entertainment System
302
�\f���—�\f���—���
�y�
�
�����������y���
�(���������\f�y�\f���\f���y
2009 Odyssey
Page 319 of 532
Auxiliary input jacks and headphone
connectors f or the rear
entertainment system are under the
third row seat armrest on the driver’s
side. To access these connectors,
open the cover by pulling up on the
lever.
Remove the battery. Install the new
battery in the earpiece as shown in
the diagram next to the battery slot.
Slide the cover back into place on the
earpiece, then press down on the
back edge to lock it in place.
An improperly disposed of battery
can hurt the environment.
Always conf irm local regulations f or
battery disposal.
Each headphone uses one AAA
battery. The battery is under the
cover on the lef t earpiece. To
remove the cover, insert a coin in the
slot and twist it slightly to pry the
cover away f rom the earpiece. Pull
the cover outward, and pivot it out of
the way.
Rear Entertainment System
Auxiliary Input JacksReplacing Bat t eries
316
COVER
BATTERY LEVER
ARMREST
COIN
�\f���—�\f���—���
�y�
�
�����������y���
�(���������\f�y�\f�����
�y
2009 Odyssey
Page 369 of 532
You can turn the monitor on and of f
by pressing the monitor of f button
when the shif t lever is in reverse.
The monitor turns on everytime you
shif t to reverse, even if you turned it
of f the last time.Monitor brightness is adjusted
automatically by sensors. If you use
the monitor continuously at high
temperature, the monitor will
gradually dim.
If a bright light (such as sunlight) is
shining on the inside mirror, the
image may be dif f icult to see.
The inside mirror will be hot when
you use the monitor f or an extended
period of time.
On U.S. EX-L without navigation system
and Canadian EX-L models
Rearview Camera and Monitor
366
REAR VIEW MONITOR
SENSOR
SENSOR MONITOR OFF BUTTON
�\f���—�\f���—���
�y�
����\f����\f���y���
�(���������\f�y�\f�����
�y
2009 Odyssey
Page 379 of 532

Your dealer has Honda accessories
that allow you to personalize your
vehicle. These accessories have
been designed and approved f or your
vehicle, and are covered by warranty.
Bef ore installing any accessory:
Make sure the accessory does not
obscure any lights, or interf ere
with proper vehicle operation or
perf ormance.
Modif ying your vehicle, or installing
some non-Honda accessories, can
make it unsaf e. Bef ore you make any
modif ications or add any accessories,
be sure to read the f ollowing
inf ormation.
Be sure electronic accessories do
not overload electrical circuits
(see page ) or interf ere with
the proper operation of your
vehicle.
Although non-Honda accessories
may f it on your vehicle, they may not
meet f actory specif ications, and
could adversely af f ect your vehicle’s
handling and stability.
Bef ore installing any electronic
accessory, have the installer
contact your dealer for assistance.
If possible, have your dealer
inspect the f inal installation.
Do not install accessories on the
side pillars or across the rear
windows. Accessories installed in
theseareasmayinterferewith
proper operation of the side
curtain airbags.
When properly installed, cellular
phones, alarms, two-way radios, and
low-powered audio systems should
not interf ere with your vehicle’s
computer controlled systems, such
as your airbags, anti-lock brakes, and
tire pressure monitoring system.
482
A ccessories
A ccessories and Modif ications
376
Improper accessories or
modifications can affect your
vehicle’s handling, stability, and
performance, and cause a
crash in which you can be hurt
or killed.
Follow all instructions in this
owner’s manual regarding
accessories and modifications.
�����—�����—���
�y�
�������������y���
�(�����������y�������
�y
2009 Odyssey