2009 HONDA ODYSSEY trip
[x] Cancel search: tripPage 2 of 153

2Navigation System
Table of Contents
Icon Options ....................................60
Going Off the Route ......................62
Off-road Tracking..........................62
Viewing/Saving the Current Location ......................................63
Pop-Ups and Disclaimers ..............64
Changing the Route .......................65
Change Route By Screen .................65
Waypoints ........................................65
Reroute: Avoid Streets .....................67
Reroute: Detour ...............................67
Reroute: Change Routing
Method..........................................67
Cancel Current Route ......................67
Back to Current Route .....................67
Changing Your Destination ...........68
Find Nearest (Voice command) .......68
Go Home (Voice command) ............68
Using Joystick to Change Destination ...................................68
Entering a Destination from the Menu Screen (while en route) ................69
Continue Trip Screen.....................69
Information Features ................70
Information Screen ........................70
Cellular Phonebook .......................70
Calendar .........................................71
Entering Your Schedule ...................71
Calculator.......................................72
Unit Conversion ...............................73
Voice Command Help ...................73
Map Legend ...................................74
Key to Zagat Ratings .....................75
System Setup ..............................76
Setup Mode ....................................76
Setup Screen (first) ........................76
Brightness ........................................76
Volume .............................................76
Display .............................................77
Guidance Prompts ....... ....................78
Contrast ...........................................78
Setup Screen (second) ...................79
Personal Information .....................79
Address Book ...................................79
Home Address ..................................83
PIN Number .....................................83
User Name .......................................84
Previous Destinations ......................84
Routing & Guidance ......................85
Rerouting .........................................85 Unverified Area Routing ..................86
Edit Avoid Area................................90
Edit Waypoint Search Area..............92
Guidance Mode ....
............................93
Vehicle ...........................................93
Off-road Tracking ............................93
Correct Vehicle Position..................94
System Information .......................95
Basic Settings.................................95
Keyboard Layout.. ............................95
Units (mile or km) ............................95
Voice Recognition Fe edback ...........95
Clock Adjustment ..........................96
Auto Daylight Saving Time ..............96
Auto Time Zone by GPS ...................97
Daylight Saving Time (DST) Selection
(Change DST Schedule) ...............97
Time Adjustment ..............................97
Color ..............................................98
Map Color ........................................98
Menu Color ......................................98
Rearview Camera...........................99
Rearview Camera Brightness Adjustment ....................................99
2009 Odyssey
Page 42 of 153

42Navigation System
If desired, use the ZOOM buttons to
change the map scale. When you have
the crosshairs on the desired icon, map
feature, or road, push in on the joystick.
The address of the location you have
selected will appear at the top of the
screen.
NOTE:
The selected icon or road segment is
displayed on the 1/2 mile (800 meter) or
less map scale.
If this is the desired address, push in on
the joystick again. If not, use the
joystick to reposition the crosshairs,
then push in on th e joystick again to
display the new address.
If you selected a single icon or road
segment, push in on the joystick again to
select the new address. If you selected
multiple icons within the cursor radius,
select an item from the list on the
screen.
Once you select an address, the system
then displays the Calculate route to
screen (see Driving to Your Destination
on page47).By Previous Destinations
Every time you route to a destination,
that destination is saved by the system.
Up to 50 destinations can be stored.
Select Previous Destinations from
the Enter destination by screen to
choose one of those destinations.
After you select Previous
Destinations , the display lists the last
50 destinations entered, with the most
recent appearing first. NOTE:
If
Previous Destinations is
grayed out, there are no Previous
Destinations entered.
When finishing a “Today’s Destinations” trip, the Today’s
Destinations list entries are stored to
this list, beginning with the date (e.g.,
item 1 shown on the previous screen).
Because both the Home address and personal Address Book list can be
protected by a PIN, they do not show
up in the previous destination list.
Entering a Destination
2009 Odyssey
Page 43 of 153

Navigation System43
Entering a Destination
Scroll through the list and say the line
number (1-6) of the destination, or touch
the desired destination you want.
Once you select the desired destination,
the system then displays the Calculate
route to screen (see Driving to Your
Destination on page47).
NOTE:
Prior to departure, you can set areas to avoid. The system then includes
them in its calculations for the
destination you have entered. See
Edit Avoid Area on page90.
For information on the available voice commands, see Voice
Command Index on page136.By Today’s Destinations
You can create a “trip” by combining up
to five destinations previously selected
on the Calculate route to screen.
Select Today’s Destinations from
the Enter destination by screen and the
display changes to:
NOTE:
If Today’s Destinations is grayed
out, there are no Today’s Destinations
entered.
Editing Today’s Destinations
List
If you change your plans, you can
modify the Today’s Destinations list
order by distance, or by order of entry.
Say or select Input to sort the list by the
entry order, and say or select Distance
to sort the list by the distance order. To
delete a destination, say or select
Delete and the display changes to
Select a destination to delete screen.
Select the destination to delete and say
or select Done to perform the deletion,
and the display returns to the previous
screen. To cancel the deletion, press the
CANCEL button.
NOTE:
For information on the available voice
commands, see Voice Command Index
on page136.
2009 Odyssey
Page 44 of 153

44Navigation System
Entering a Destination
Adding Destinations to the List
After you have used any of the other
selections from the Enter destination
by screen to select a destination, the
display changes to:
To add this to the Today’s Destinations
list, select ADD TO Today’s Dest.
NOTE:
If ADD TO Today’s Dest is grayed
out, the Today’s Destinations list is
already full (five destinations have been
stored). The display then changes to show you
all the current entries on the Today’s
Destinations list. Press the
MENU
button to return to the Enter
destination by screen.
The system automatically sorts the
destinations stored in the Today’s
Destinations list for the best path.
If the displayed list shows your plans,
select the first des tination. The system
will guide you to the destination
according to the order of the list. When
you reach the destination, it will be
automatically removed from the list. NOTE:
When finishing a “Today’s
Destinations” trip, the Today’s
Destinations list entries are stored to
the Previous Destinations list,
beginning with the date (e.g., item 1
shown below). This entry contains all
the destinations that
were included in
the Today’s Destinations itinerary. This
allows you to reselect the entire Today’s
Destinations content at a later date.
2009 Odyssey
Page 47 of 153
Navigation System47
Driving to Your Destination
Driving to Your Destination
A route typically has three phases.
Initial route calculation ( Calculate
route to screen) (see page47).
Change the route while en route (see page65).
Resume the route when restarting the engine (see Continue Trip Screen on
page69).
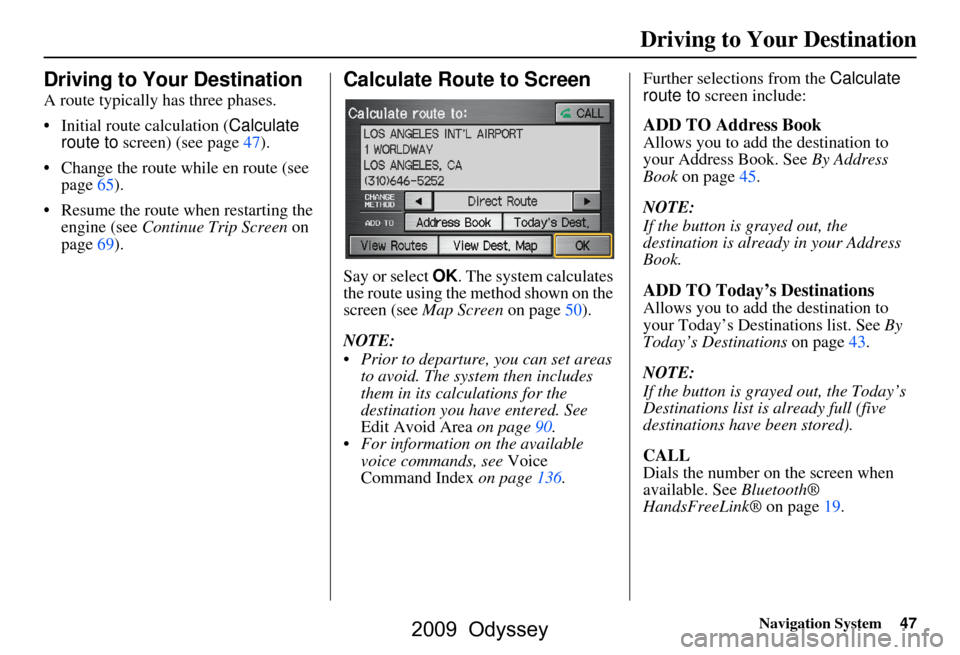
Calculate Route to Screen
Say or select OK. The system calculates
the route using the method shown on the
screen (see Map Screen on page50).
NOTE:
Prior to departure, you can set areas to avoid. The system then includes
them in its calculations for the
destination you have entered. See
Edit Avoid Area on page90.
For information on the available voice commands, see Voice
Command Index on page136. Further selections from the
Calculate
route to screen include:
ADD TO Address Book
Allows you to add the destination to
your Address Book. See By Address
Book on page45.
NOTE:
If the button is grayed out, the
destination is already in your Address
Book.
ADD TO Today’s Destinations
Allows you to add the destination to
your Today’s Destinations list. See By
Today’s Destinations on page43.
NOTE:
If the button is grayed out, the Today’s
Destinations list is already full (five
destinations have been stored).
CALL
Dials the number on the screen when
available. See Bluetooth®
HandsFreeLink® on page19.
2009 Odyssey
Page 48 of 153

48Navigation System
Driving to Your Destination
Changing the Routing Method
The system lets you select the way you
want to drive to your destination. Before
selecting OK to calculate a route, you
can change the routing method by using
the CHANGE METHOD scroll bar
back ( ) or forward ( ) buttons. The
route choices will appear in the address
box.
NOTE:
When you are en route and want to
change the routing method, press the
MENU button, and select Change
Routing Method on the Change
route by screen. “Direct Route” (the factory default) is
the route that is the quickest (least
time) and is usually the best choice. If
you choose any other method, it
becomes the new default for all future
routing. Make sure to check the
routing method if the displayed route
is not what you expected to see.
“Easy Route” produces a route with the least turns.
“Maximize Freeways,” “Minimize Freeways,” and “Minimize Toll
Roads” are also available.
NOTE:
If the trip is greater than 100 miles, then
“Minimize Freeways” and “Minimize
Toll Roads” may be grayed out. This is
normal. The generated route may not be the
route you would choose. For safety
reasons, the system
generally applies the
following rules to your route:
It tries to avoid shortcuts through residential areas.
Right turns are favored over left turns or U-turns.
Restricted turns (turns that cannot be made during certain hours) are not
used for routing.
2009 Odyssey
Page 49 of 153

Navigation System49
Viewing the Routes
Touching View Routes on the
Calculate route to screen allows you to
scroll through and view the various
routes (Direct, Easy, Maximize
Freeways, etc.) to your destination. If
you select View Routes, the display
changes to:
NOTE:
The selected route method and pertinent details are shown at the top
of the screen.
It may take several minutes (the system displays an hourglass while it
is calculating) to show all route
methods, and it is not unusual for the
different methods to pick the same
route. Voice commands cannot be
used while the system is calculating. If the trip is greater than 100 miles,
then “Minimize Freeways” and
“Minimize Toll Roads” may be
grayed out. This is normal.
Zoom IN/OUT to view route details is not available on this screen. After you
choose a route method, you can then
zoom in or out on the map screen to
view your route in details.
Say or select Summary to display the
distance and time to go for each route.
Based on the route data, you can change
the routing by using the Next and Prev.
buttons. Once you confirm your
selection, say or select OK on the
screen.
NOTE:
Distances and times shown for each
method in the Summary are
approximate. After calculating the route with the new
method, the system displays a map of
your current locatio
n. The calculated
route will be highlighted as a blue line,
and a voice prompt will tell you how to
proceed along the highlighted route.
Touch Voice to have the guidance
repeated.
Driving to Your Destination
2009 Odyssey
Page 53 of 153

Navigation System53
Guidance Screen
The guidance screen offers an alternative
way to view your route information.
Many of the icons and screen features are
similar to those on the
map screen. While
driving to your destination, press the
MAP/GUIDE button to switch between
the map and guidance screens. The guidance screen shows you:
Milestone to Destination – The
position of the small circular icon shows
your trip progress. As you get closer to
your destination, the indicator will
approach “DEST.”
Vehicle Heading – The black portion of
the compass symbol indicates north.
NOTE:
The map and voice guidance in unverified areas differ from those in
verified areas.
Current maneuvers and those within 1000 feet will show on the
Countdown bar, indicating the
distance until the next maneuver.
Guidance Screen Legend
Vehicle Heading (bla ck indicates north) ( see page 53 )
Distance to Next Driving Maneuver
Street Name of Next
Driving Maneuver
Distance to Destination
(see page
54)
Direction List
(see page
54)
Current Street (see page6)
Voice Button
(announces ne xt driving instruction)
(see page
51)
Milestone to Destination
(see page
53) Scroll: to view guidance maneuvers
Freeway Exit Information
(see page 55)
Direction of Destinatio n, “as the crow flies” (see page
54)
Time to Destination
(see page
54)
Driving to Your Destination
2009 Odyssey