2009 HONDA FIT fuse
[x] Cancel search: fusePage 4 of 352

2009 Fit Online Reference Owner's Manual
Contents
Owner's Identification Form
Introduction .............................................................................................................................\
............................. i
A Few Words About Safety ......................................................................\
........................................................ iii
Your Vehicle at a Glance (main controls) ....................................................\
................................................ 3
Driver and Passenger Safety (seat belts, SRS, and child protection) ......................\
.............................. 5
Instruments and Controls
(indicators, gauges, dashboard, steering wheel, and other convenience items)
............. 57
Features (heating and cooling, audio, steering wheel, security, and cruise control) ................................. 109
Before Driving (fuel, vehicle break-in, and cargo loading) ...........................................\
........................... 197
Driving (engine and transmission operation) .........................................\
....................................................... 213
Maintenance (minder, fluid checking, minor services, and vehicle storage)........................................... 243
Taking Care of the Unexpected (flat tire, dead battery, overheating, and fuses) .............................. 283
Technical Information (vehicle specifications, tires, and emissions controls) ....................................... 315
Warranty and Customer Relations (U. S. and Canada only) (warranty and contact information) ... 331
Index ....................................................................................................................................\
.................................... I
Service Information Summary ( fluid capacities and tire pressures)
\
\
1 00X31-TK6-6003
Page 194 of 352

Your vehicle's audio system will
disable itself if it is disconnected
from electrical power for any reason.
To make it work again, you must
enter a specific digit code using the
preset buttons. Because there are
hundreds of number combinations
possible from specific digits, making
the system work without knowing
the exact code is nearly impossible.
You should have received a card that
lists your audio system's code and
serial numbers. It is best to store this
card in a safe place at home. In
addition, you should write the audio
system's serial number in this
owner's manual.
If you lose the card, you must obtain
the code number from a dealer. To
do this, you will need the system's
serial number.If your vehicle's battery is
disconnected or goes dead, or the
radio fuse is removed, the audio
system will disable itself. If this
happens, you will see
‘‘ENTER
CODE ’’in the frequency display the
next time you turn on the system.
Use the preset buttons to enter the
code. On vehicles with navigation
system, touch the Done icon to set
the code. The code is on the radio
code card included in your owner's
manual kit. When it is entered
correctly, the radio will start playing.
If you make a mistake entering the
code, do not start over; complete the
sequence, then enter the correct
code. You have 10 tries to enter the
correct code. If you are unsuccessful
in 10 attempts, you must then leave
the system on for 1 hour before
trying again.
Radio Theft Protection
191
Features
2009 Fit
Page 242 of 352
5. Release the parking brake.Manual transmission:1. Move the shifter into the Neutralposition.
2. Release the parking brake.
Leave the ignition switch in the
ACCESSORY (I) position so the
steering wheel does not lock. Make
sure the radio and any items plugged
into the accessory power sockets are
turned off so you do not run down
the battery.
When you stop towing your vehicle
and shift out of the neutral position,
you may not be able to move the shift
lever from neutral to reverse or Park.
If this happens, press the brake pedal
and turn the ignition switch to the
ON (II) position, then shift out of
neutral.
Extended TowingIf you tow more than 8 hours in one
day, you should repeat the above
procedure at least every 8 hours
(when you stop for fuel, etc.)Failure to follow the recommended
instructions exactly will result in severe
automatic transmission damage. If you
cannot shift the transmission or start
the engine, your vehicle must be
transported on a flat-bed truck or
trailer. When towing your vehicle for long
periods, remove the 20A Accessory
Socket and 30A Radio fuses to
reduce drain on battery. These fuses
are located in the interior fuse box
and are shown as number 13 and 61
below.
CONTINUED
Towing Your Vehicle Behind a Motorhome
239
Driving
2009 Fit
Page 243 of 352
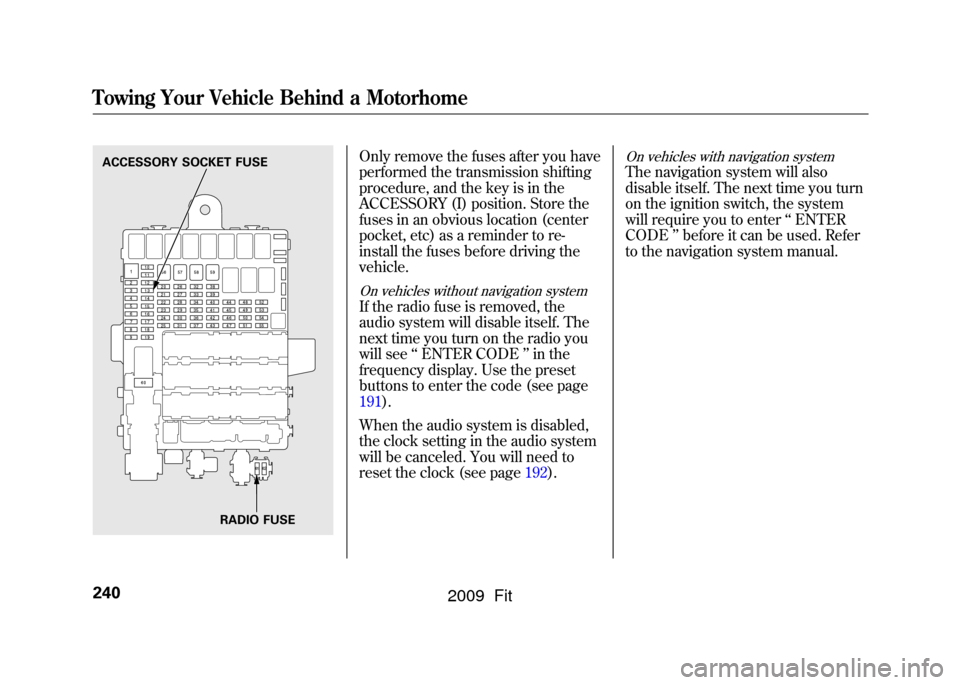
Only remove the fuses after you have
performed the transmission shifting
procedure, and the key is in the
ACCESSORY (I) position. Store the
fuses in an obvious location (center
pocket, etc) as a reminder to re-
install the fuses before driving the
vehicle.On vehicles without navigation systemIf the radio fuse is removed, the
audio system will disable itself. The
next time you turn on the radio you
will see‘‘ENTER CODE ’’in the
frequency display. Use the preset
buttons to enter the code (see page
191).
When the audio system is disabled,
the clock setting in the audio system
will be canceled. You will need to
reset the clock (see page 192).
On vehicles with navigation systemThe navigation system will also
disable itself. The next time you turn
on the ignition switch, the system
will require you to enter‘‘ENTER
CODE ’’before it can be used. Refer
to the navigation system manual.
ACCESSORY SOCKET FUSE
RADIO FUSETowing Your Vehicle Behind a Motorhome240
2009 Fit
Page 286 of 352
This section covers the more
common problems that motorists
experience with their vehicles. It
gives you information about how to
safely evaluate the problem and what
to do to correct it. If the problem has
stranded you on the side of the road,
you may be able to get going again. If
not, you will also find instructions on
getting your vehicle towed.Compact Spare Tire
....................
284
Changing a Flat Tire
...................
285
Temporarily Repairing a Flat Tire
.........................................
291
If the Engine Won't Start
.............
297
Jump Starting
..............................
299
If the Engine Overheats
..............
301
Low Oil Pressure Indicator
.........
303
Charging System Indicator
.........
303
Malfunction Indicator Lamp
........
304
Brake System Indicator
...............
305
Fuses
..........................................
306
Fuse Locations
............................
309
Emergency Towing
.....................
311
If Your Vehicle Gets Stuck
..........
312
Taking Care of the Unexpected
283
Taking Care of the Unexpected
2009 Fit
Page 301 of 352
●Turn the ignition switch to the
START (III) position. If the
headlights do not dim, check the
condition of the fuses. If the fuses
are OK, there is probably
something wrong with the
electrical circuit for the ignition
switch or starter motor. You will
need a qualified technician to
determine the problem. See
Emergency Towingon page311.
If the headlights dim noticeably or go
out when you try to start the engine,
either the battery is discharged or
the connections are corroded. Check
the condition of the battery and
terminal connections (see page 279).
You can then try jump starting the
vehicle from a booster battery (see
page 299). The Starter Operates Normally
In this case, the starter motor's speed
sounds normal, or even faster than
normal, when you turn the ignition
switch to the START (III) position,
but the engine does not run.
●Are you using a properly coded
key? An improperly coded key will
cause the immobilizer system
indicator in the instrument panel
to blink rapidly (see page79).●Are you using the proper starting
procedure? Refer to
Starting the
Engine on page216.
●Do you have fuel? Check the fuel
gauge; the low fuel indicator may
not be working.●There may be an electrical
problem, such as no power to the
fuel pump. Check all the fuses (see
page306).
If you find nothing wrong, you will
need a qualified technician to find the
problem. See Emergency Towing on
page311.
If the Engine Won't Start298
2009 Fit
Page 303 of 352
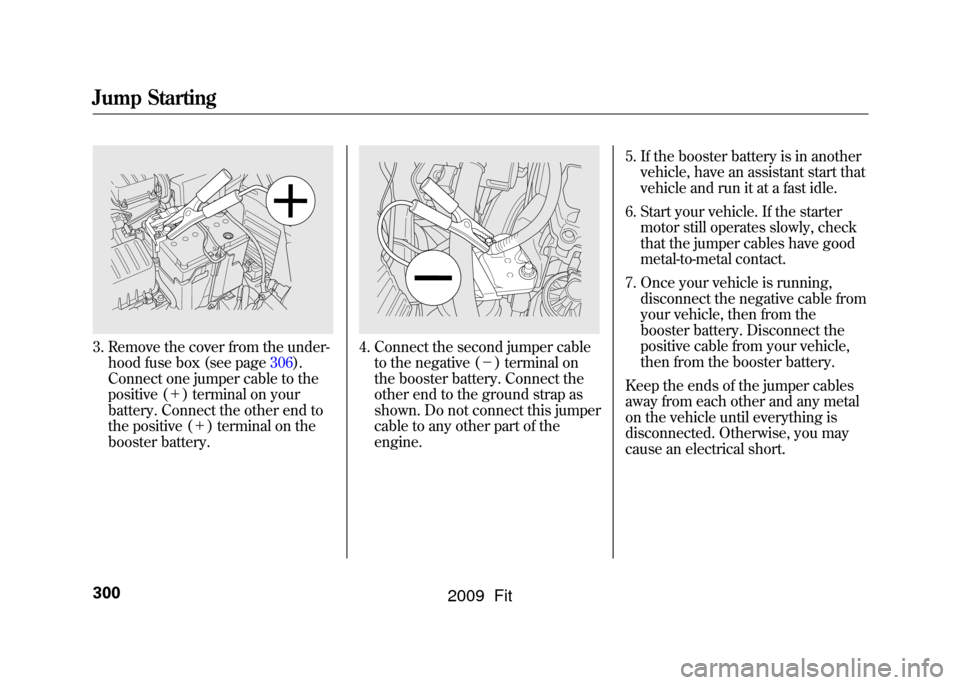
3. Remove the cover from the under-hood fuse box (see page306).
Connect one jumper cable to the
positive ( +) terminal on your
battery. Connect the other end to
the positive ( +) terminal on the
booster battery.
4. Connect the second jumper cable to the negative ( -) terminal on
the booster battery. Connect the
other end to the ground strap as
shown. Do not connect this jumper
cable to any other part of the
engine. 5. If the booster battery is in another
vehicle, have an assistant start that
vehicle and run it at a fast idle.
6. Start your vehicle. If the starter motor still operates slowly, check
that the jumper cables have good
metal-to-metal contact.
7. Once your vehicle is running, disconnect the negative cable from
your vehicle, then from the
booster battery. Disconnect the
positive cable from your vehicle,
then from the booster battery.
Keep the ends of the jumper cables
away from each other and any metal
on the vehicle until everything is
disconnected. Otherwise, you may
cause an electrical short.
Jump Starting300
2009 Fit
Page 309 of 352
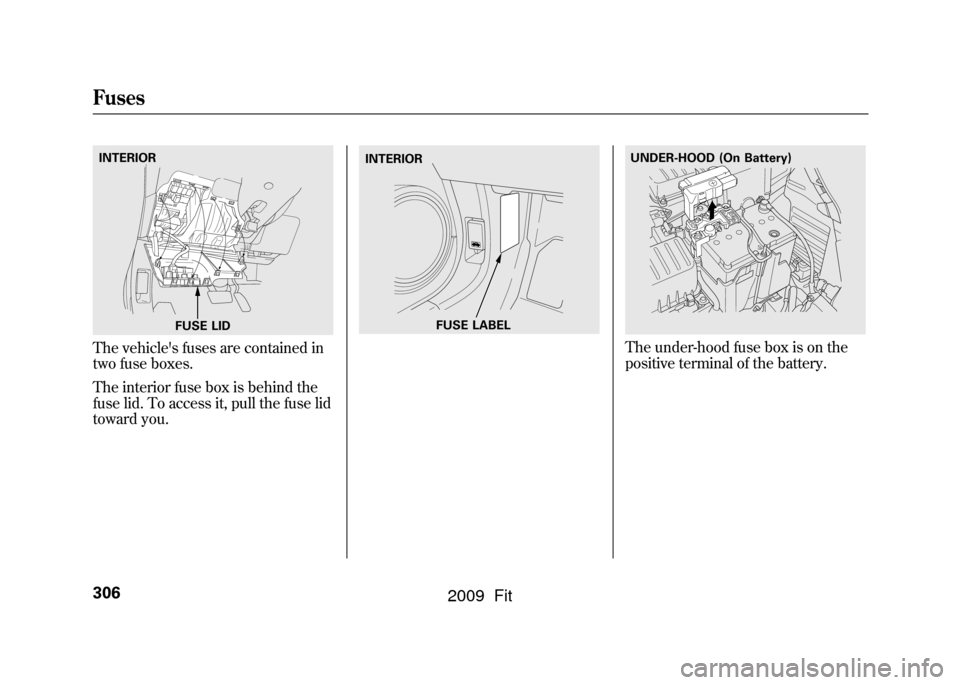
The vehicle's fuses are contained in
two fuse boxes.
The interior fuse box is behind the
fuse lid. To access it, pull the fuse lid
toward you.
The under-hood fuse box is on the
positive terminal of the battery.
INTERIORFUSE LID
FUSE LABEL
INTERIOR
UNDER-HOOD (On Battery)
Fuses306
2009 Fit