2009 HONDA FIT ignition
[x] Cancel search: ignitionPage 105 of 352

3. Push the appropriate edge of theadjustment switch to move the
mirror right, left, up, or down.
4. When you finish, move the selector switch to the center (off)
position. This turns the adjustment
switch off to keep your settings.
Heated MirrorsOn Canadian Sport and LX modelsThe outside mirrors are heated to
remove fog and frost. With the
ignition switch in the ON (II)
position, turn on the heaters by
pressing the button. The indicator in
the button comes on as a reminder.
Press the button again to turn the
heaters off. Pressing this button also
turns the rear window defogger on
and off. Parking Brake
To apply the parking brake, pull the
lever up fully. To release it, pull up
slightly, push the button, and lower
the lever. The parking brake
indicator on the instrument panel
should go out when the parking
brake is fully released (see page60).
HEATED MIRROR BUTTON
PARKING BRAKE LEVER
Mirrors, Parking Brake102
2009 Fit
Page 109 of 352

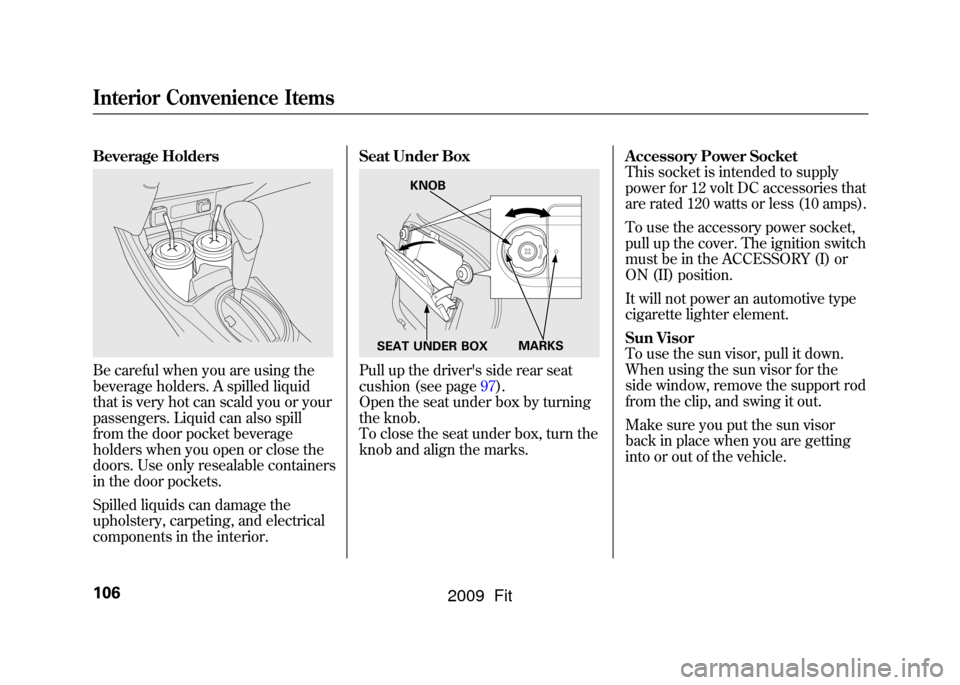
Beverage HoldersBe careful when you are using the
beverage holders. A spilled liquid
that is very hot can scald you or your
passengers. Liquid can also spill
from the door pocket beverage
holders when you open or close the
doors. Use only resealable containers
in the door pockets.
Spilled liquids can damage the
upholstery, carpeting, and electrical
components in the interior.Seat Under Box
Pull up the driver's side rear seat
cushion (see page97).
Open the seat under box by turning
the knob.
To close the seat under box, turn the
knob and align the marks.
Accessory Power Socket
This socket is intended to supply
power for 12 volt DC accessories that
are rated 120 watts or less (10 amps).
To use the accessory power socket,
pull up the cover. The ignition switch
must be in the ACCESSORY (I) or
ON (II) position.
It will not power an automotive type
cigarette lighter element.
Sun Visor
To use the sun visor, pull it down.
When using the sun visor for the
side window, remove the support rod
from the clip, and swing it out.
Make sure you put the sun visor
back in place when you are getting
into or out of the vehicle.
KNOB
MARKS
SEAT UNDER BOX
Interior Convenience Items106
2009 Fit
Page 110 of 352

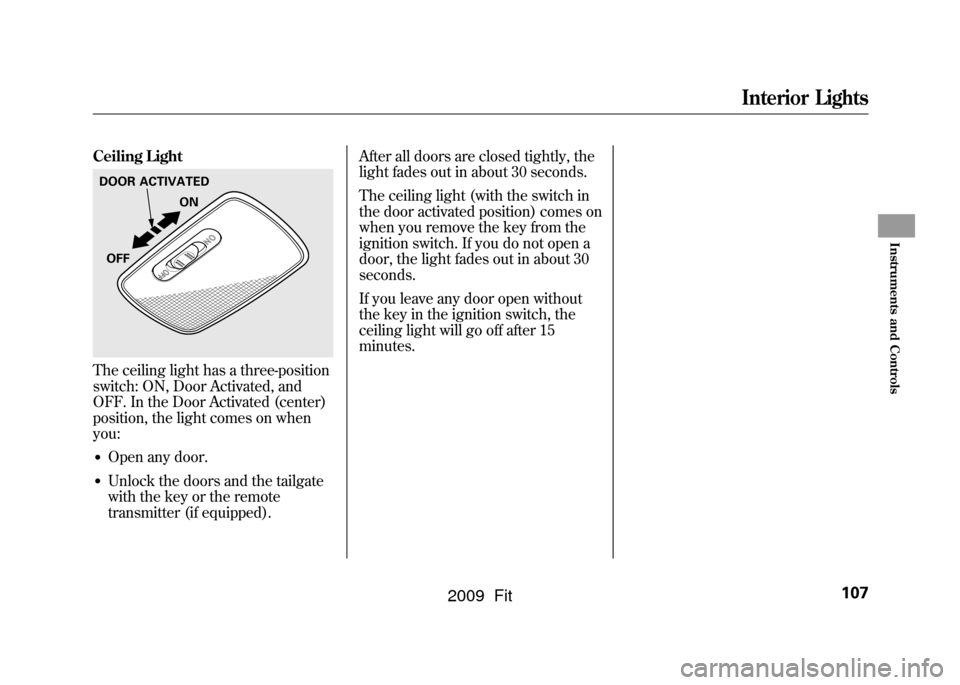
Ceiling LightThe ceiling light has a three-position
switch: ON, Door Activated, and
OFF. In the Door Activated (center)
position, the light comes on when
you:●Open any door.●Unlock the doors and the tailgate
with the key or the remote
transmitter (if equipped).After all doors are closed tightly, the
light fades out in about 30 seconds.
The ceiling light (with the switch in
the door activated position) comes on
when you remove the key from the
ignition switch. If you do not open a
door, the light fades out in about 30
seconds.
If you leave any door open without
the key in the ignition switch, the
ceiling light will go off after 15
minutes.DOOR ACTIVATED
ON
OFF
Interior Lights
107
Instruments and Controls
2009 Fit
Page 119 of 352

To Play the FM/AM Radio
The ignition switch must be in the
ACCESSORY (I) or ON (II) position.
Turn the system on by pushing the
FM/AM button. Adjust the volume
by turning the VOL/SELECT knob.
The band and frequency that the
radio was last tuned to are displayed.
To change bands, press the FM/AM
button. On the FM band, ST will be
displayed if the station is
broadcasting in stereo. Stereo
reproduction in AM is not available.
To Select a Station
You can use any of five methods to
find radio stations on the selected
band: tune, seek, scan, the preset
buttons, and auto select.TUNE
-Use the TUNE/SEEK
button to tune to a desired
frequency. Press the
button to
tune to a higher frequency, and the
button to tune to a lower
frequency.
You can also operate the tune
function by using the VOL/SELECT
knob.
Press the VOL/ SELECT knob and
you will see ‘‘SEL ’’in the display.
Turn the knob right to tune to a
higher frequency, or left to tune to a
lower frequency.
To turn it off, press the VOL/
SELECT knob or
button, or
PLAY button.
The system will return to the normal
display about 10 seconds after you
stop adjusting the tune mode. SEEK
-The SEEK function
searches up and down from the
current frequency to find a station
with a strong signal. To activate it,
press and hold the
or
side of
the TUNE/SEEK button until you
hear a beep, then release it.
SCAN -The scan function samples
all stations with strong signals on the
selected band. To activate it, press
the SCAN button, then release it.
You will see SCAN in the display.
The system will scan for a station
with a strong signal. When it finds
one, it will stop and play that station
for about 10 seconds.
If you do nothing, the system will
then scan for the next strong station
and play it for 10 seconds. When it
plays a station you want to listen to,
press the SCAN button again.
Playing the FM/AM Radio (Models without navigation system)116
2009 Fit
Page 126 of 352

To Play a Disc
To load or play discs, the ignition
switch must be in the ACCESSORY
(I) or ON (II) position.
You operate the in-dash disc player
with the same controls used for the
radio. To select the disc player, press
the CD button. You will see‘‘CD ’’in
the display. The folder or track
numbers are shown in the display.
You can also select the displayed
information with the TITLE button
(see page 123).The system will
continuously play a disc until you
change modes.Do not use discs with adhesive labels.
The label can curl up and cause the
disc to jam in the unit. The in-dash disc player can also play
CD-Rs and CD-RWs compressed in
CD-TEXT, MP3, and WMA formats.
When playing a disc in MP3 or
WMA, you will see
‘‘MP3 ’’or
‘‘ WMA ’’in the display. You can see
up to 99 folders, and select up to 999
tracks/files. NOTE: If a file on an MP3 or WMA
disc is protected by digital rights
management (DRM), the audio unit
displays UNSUPPORTED, and then
skips to the next file.
If you have a disc that is a
combination of CD-DA tracks and
MP3/WMA files, you can choose the
format to listen by pressing the CD
button.
Video CDs and DVDs will not work
in this unit.
A disc compressed in AAC format
cannot be played in this audio
system.
CONTINUED
Playing a Disc (Models without navigation system)
123
Features
2009 Fit
Page 130 of 352

SCAN-The scan function samples
all the tracks on the disc in the order
they are recorded on the disc (all
files in the selected folder in MP3 or
WMA mode). To activate the scan
feature, press the SCAN button. You
will see ‘‘SCAN ’’in the display. You
will get a 10 second sampling of each
track/file in the disc/folder. Press
and hold the SCAN button to get out
of scan mode and play the last track
sampled.
In MP3/WMA modeFOLDER-SCAN -This feature,
when activated, samples the first file
in each folder on the disc in the
order they are recorded. To activate
the folder scan feature, press the
SCAN button repeatedly. You will
see ‘‘F-SCAN ’’in the display. The
system will then play the first file in
the main folders for about 10
seconds. If you do nothing, the
system will then play the following
first files for 10 seconds each. When
the system samples the first file of all
folders, F-SCAN is cancelled, and the
system plays normally.
Each time you press the SCAN
button, the mode changes from
track/file scan to folder scan, then to
normal playing. To Stop Playing a Disc
Press the eject button (
)to
remove the disc. If you eject the disc,
but do not remove it from the slot,
the system will automatically reload
it after 10 seconds and put it in pause
mode. To begin playing, press the
CD button.
Press the FM/AM button to switch
to the radio while a disc is playing.
Press the CD button to play the disc.
If you turn the system off while a disc
is playing, either with the power (
)
button or by turning off the ignition
switch, the disc will stay in the drive.
When you turn the system back on,
the disc will begin playing where it
left off.
Protecting Discs
For information on how to handle
and protect compact discs, see page
186.
Playing a Disc (Models without navigation system)
127
Features
2009 Fit
Page 133 of 352

To Play an iPod
ꭂ
This audio system can operate the
audio files on the iPod
ꭂwith the
same controls used for the in-dash
disc player. To play an iPod, connect
it to the USB adapter cable in the
upper glove box by using your dock
connector, then press the AUX
button. The ignition switch must be
in the ACCESSORY (I) or ON (II)
position. The iPod will also be
recharged with the ignition switch in
these positions.
The audio system reads and plays
sound files to be playable on the
iPod. The system cannot operate an
iPod as a mass storage device. The
system will only play songs stored on
the iPod with iTunes.
iPod and iTunes are registered
trademarks owned by Apple Inc.
iPods that are compatible with your
audio system are listed below.
Model Firmware
ꭧ
iPod 5G Ver. 1.2 or more
iPod classic Ver. 1.0 or more
iPod nano Ver. 1.2 or more
iPod nano 2nd
generation Ver. 1.1.2 or more
iPod nano 3rd
generation Ver. 1.0 or more
iPod touch Ver. 1.1.1 or more
iPhone Ver. 1.1.1 or moreꭧ: Use the latest firmware.
Use only compatible iPods with the
latest firmware. iPods that are not
compatible will not work in this audio
unit.
NOTE:●Do not connect your iPod using a
HUB.●Do not keep the iPod in the
vehicle. Direct sunlight and high
heat will damage it.
●Do not use an extension cable
between the USB adapter cable
equipped with your vehicle and
your dock connector.●We recommend backing up your
data before playing it.
In AAC format, DRM (digital rights
management) files cannot be played.
If the system finds a DRM file, the
audio unit displays UNPLAYABLE,
and then skips to the next file.
Playing an iPod
®
(Models without navigation system)
130
2009 Fit
Page 140 of 352

To Play a USB Flash Memory
Device
This audio system can operate the
audio files on a USB flash memory
device with the same controls used
for the in-dash disc player. To play a
USB flash memory device, connect it
to the USB adapter cable in the
upper glove box, then press the AUX
button. The ignition switch must be
in the ACCESSORY (I) or ON (II)
position.
The audio system reads and plays
the audio files on the USB flash
memory device in MP3, WMA or
AAC
ꭧformats. Depending on the
format, the display shows MP3,
WMA or AAC when a USB flash
memory device is playing. The USB
flash memory device limit is up to
700 folders or up to 65535 files.
ꭧ : Only AAC format files recorded
with iTunes are playable on this
audio unit. The recommended USB flash
memory devices are 256 Mbyte or
higher. Some digital audio players
may be compatible as well.
Some USB flash memory device
(such as devices with security
lockout features, etc.) will not work
in this audio unit.
NOTE:
●Do not use a device such as a card
reader or hard drive as the device
or your files may be damaged.●Do not connect your USB flash
memory device using a HUB.●Do not use an extension cable to
the USB adapter cable equipped
with your vehicle.●Do not keep the USB flash
memory device in the vehicle.
Direct sunlight and high heat will
damage it.
●We recommend backing up your
data before playing a USB flash
memory device.●Depending on the type and
number of files, it may take some
time before they begin to play.●Depending on the software the
files were made with, it may not be
possible to play some files, or
display some text data.
The specifications for compatible
MP3 files are: – Sampling frequency:
32/44.1/48 kHz (MPEG1)
16/22.05/24 kHz (MPEG2)
– Bit rate:
32/40/48/56/64/80/96/112/128/
160/192/224/256/320/VBR kbps
(MPEG1)
8/16/24/32/40/48/56/64/80/96/
112/128/144/160/VBR kbps
(MPEG2)
CONTINUED
Playing a USB Flash Memory Device (Models without navigation system)
137
Features
2009 Fit