Page 253 of 352

However, service at a dealer is not
mandatory to keep your warranties in
effect. Maintenance may be done by
any qualified service facility or
person who is skilled in this type of
automotive service. Make sure to
have the service facility or person
reset the display as previously
described. Keep all receipts as proof
of completion, and have the person
who does the work fill out your
Honda Service History or Canadian
Maintenance Log. Check your
warranty booklet for more
information.
We recommend using Honda parts
and fluids whenever you have
maintenance done. These are
manufactured to the same high
quality standards as the original
components, so you can be confident
of their performance and durability.U.S. Vehicles:
Maintenance,
replacement, or repair of
emissions control devices and
systems may be done by any
automotive repair establishment
or individual using parts that are
‘‘ certified ’’to EPA standards.
According to state and federal
regulations, failure to perform
maintenance on the items marked
with# will not void your emissions
warranties. However, all
maintenance services should be
performed in accordance with the
intervals indicated by the information
display.
Owner's Maintenance Checks
You should check the following
items at the specified intervals. If you
are unsure of how to perform any
check, turn to the appropriate page
listed.
●Engine oil level -Check every
time you fill the fuel tank. See page
201.●Engine coolant level -Check the
radiator reserve tank every time
you fill the fuel tank. See page202.●Automatic transmission -Check
the fluid level monthly. See page
259.●Brakes -Check the fluid level
monthly. See page 261.●Tires-Check the tire pressure
monthly. Examine the tread for
wear and foreign objects. See page
274.●Lights -Check the operation of
the headlights, parking lights,
taillights, high-mount brake light,
and license plate lights monthly.
See page 262.
Maintenance Minder250
2009 Fit
Page 254 of 352

SymbolMaintenance Main Items
A
●Replace engine oil
ꭧ 1
B
●Replace engine oil and oil filter●Inspect front and rear brakes●Check parking brake adjustment●Inspect these items:●Tie rod ends, steering gear box, and boots●Suspension components●Driveshaft boots●Brake hoses and lines (including ABS)●All fluid levels and condition of fluids●Exhaust system
#
●Fuel lines and connections
#
ꭧ 1: If the message ‘‘SERVICE ’’does not appear more than 12 months after the
display is reset, change the engine oil every year.
# : See information on maintenance and emissions warranty on page 249.
NOTE:
●Independent of maintenance message in the information display, replace
the brake fluid every 3 years.●Inspect idle speed every 160,000 miles (256,000 km).●Adjust the valves during services A, B, 1, 2, or 3 only if they are noisy.
Symbol Maintenance Sub Items
1
●Rotate tires
2●Replace air cleaner element If you drive in dusty conditions, replace every 15,000
miles (24,000 km).●Replace dust and pollen filterIf you drive primarily in urban areas that have high
concentrations of soot in the air from industry and from
diesel-powered vehicles, replace every 15,000 miles
(24,000 km).●Inspect drive belt
3●Replace transmission fluid Driving in mountainous areas at very low vehicle
speeds results in higher transmission temperatures.
This requires transmission fluid changes more
frequently than recommended by the maintenance
minder. If you regularly drive your vehicle under these
conditions, have the transmission fluid changed at
60,000 miles (100,000 km), then every 30,000 miles
(48,000 km). (For A/T only)
If you tow a FIT behind a motorhome, the transmission
fluid must be changed every 2 years or 30,000 miles
(48,000 km), whichever comes first. (For A/T only)
4●Replace spark plugs●Inspect valve clearance
5●Replace engine coolant
Maintenance Minder
Maintenance Minder
251
2009 Fit
Page 257 of 352
Synthetic Oil
You may use a synthetic motor oil if
it meets the same requirements
given for a conventional motor oil, it
displays the API Certification Seal,
and it is the proper weight. You must
follow the oil and filter change
intervals shown on the information
display.
Engine Oil Additives
Your vehicle does not require any oil
additives. Additives may adversely
affect the engine or transmission
performance and durability.Changing the Engine Oil and
Filter
Always change the oil and filter
according to the maintenance
messages shown on the information
display. The oil and filter collect
contaminants that can damage your
engine if they are not removed
regularly.
Changing the oil and filter requires
special tools and access from
underneath the vehicle. The vehicle
should be raised on a service station-
type hydraulic lift for this service.
Unless you have the knowledge and
proper equipment, you should have
this maintenance done by a skilled
mechanic.
1. Run the engine until it reaches
normal operating temperature,
then shut it off.
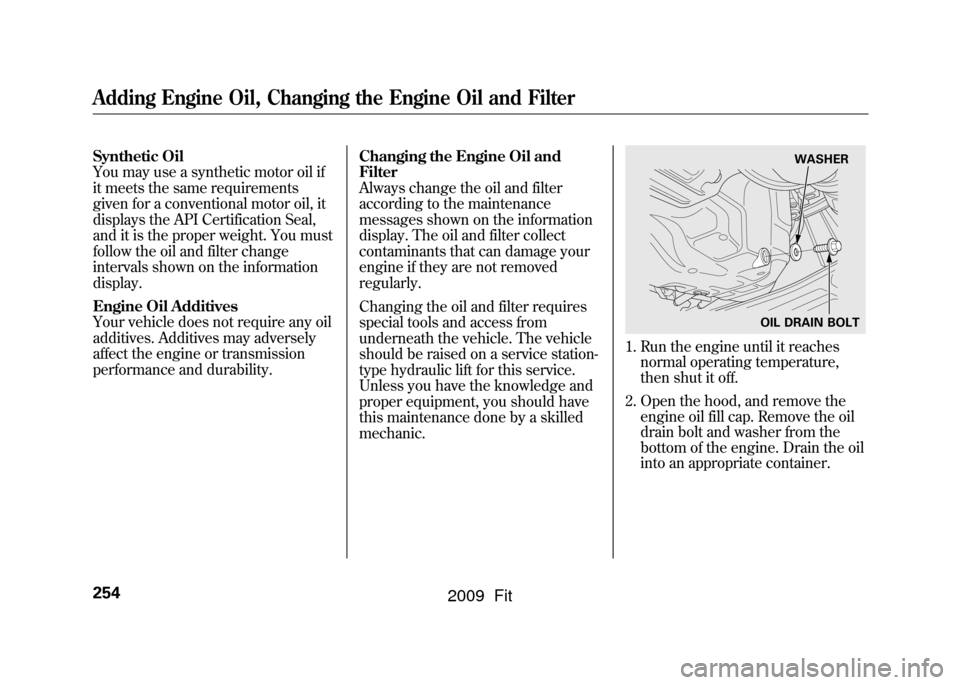
2. Open the hood, and remove the engine oil fill cap. Remove the oil
drain bolt and washer from the
bottom of the engine. Drain the oil
into an appropriate container.
WASHER
OIL DRAIN BOLT
Adding Engine Oil, Changing the Engine Oil and Filter254
2009 Fit
Page 271 of 352
If you remove the driver's floor mat,
make sure to re-anchor it when you
put it back in your vehicle.
If you use a non-Honda floor mats,
make sure they fit properly and that
they can be anchored securely. Do
not put additional floor mats on top of
the anchored mat.Audio Antenna
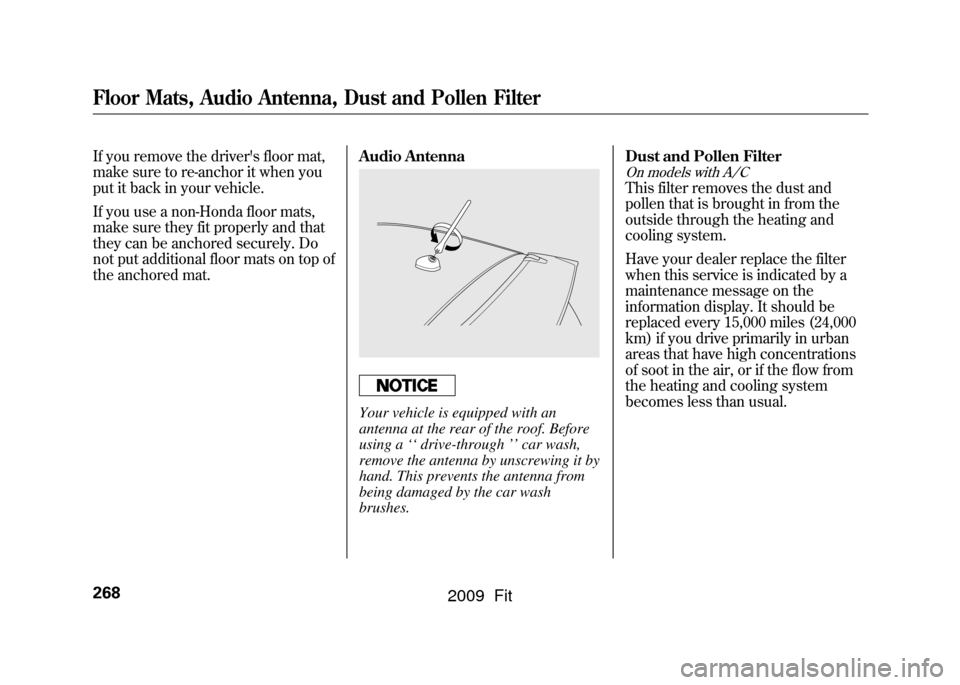
Your vehicle is equipped with an
antenna at the rear of the roof. Before
using a
‘‘drive-through ’’car wash,
remove the antenna by unscrewing it by
hand. This prevents the antenna from
being damaged by the car wash
brushes. Dust and Pollen Filter
On models with A/CThis filter removes the dust and
pollen that is brought in from the
outside through the heating and
cooling system.
Have your dealer replace the filter
when this service is indicated by a
maintenance message on the
information display. It should be
replaced every 15,000 miles (24,000
km) if you drive primarily in urban
areas that have high concentrations
of soot in the air, or if the flow from
the heating and cooling system
becomes less than usual.
Floor Mats, Audio Antenna, Dust and Pollen Filter268
2009 Fit
Page 278 of 352
Tire Inspection
Every time you check inflation, you
should also examine the tires for
damage, foreign objects, and wear.
You should look for:●Bumps or bulges in the tread or
side of the tire. Replace the tire if
you find either of these conditions.●Cuts, splits, or cracks in the side of
the tire. Replace the tire if you can
see fabric or cord.●Excessive tread wear.
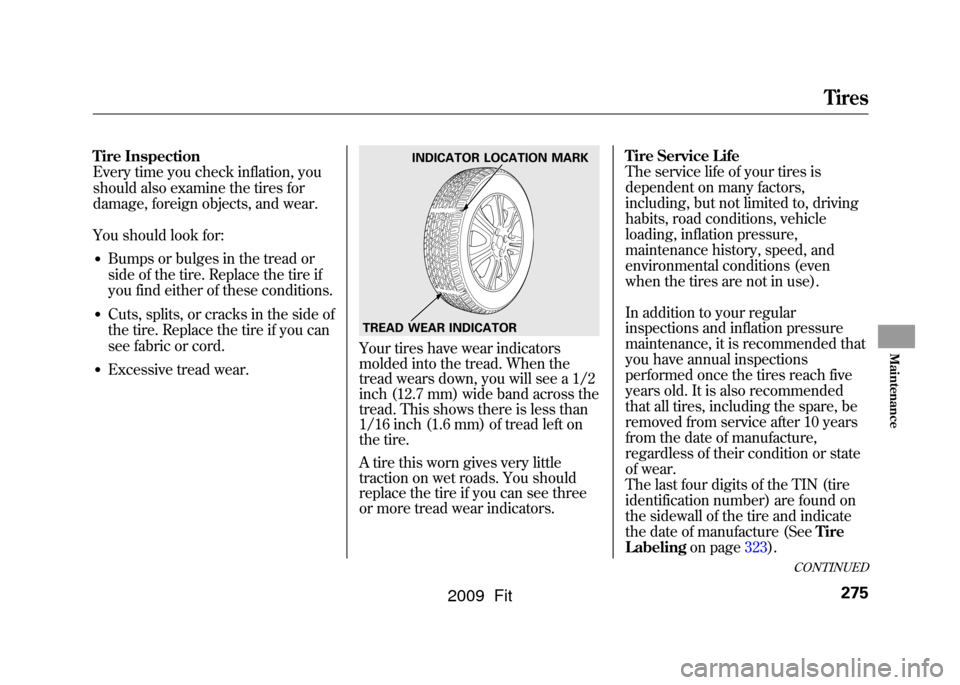
Your tires have wear indicators
molded into the tread. When the
tread wears down, you will see a 1/2
inch (12.7 mm) wide band across the
tread. This shows there is less than
1/16 inch (1.6 mm) of tread left on
the tire.
A tire this worn gives very little
traction on wet roads. You should
replace the tire if you can see three
or more tread wear indicators.Tire Service Life
The service life of your tires is
dependent on many factors,
including, but not limited to, driving
habits, road conditions, vehicle
loading, inflation pressure,
maintenance history, speed, and
environmental conditions (even
when the tires are not in use).
In addition to your regular
inspections and inflation pressure
maintenance, it is recommended that
you have annual inspections
performed once the tires reach five
years old. It is also recommended
that all tires, including the spare, be
removed from service after 10 years
from the date of manufacture,
regardless of their condition or state
of wear.
The last four digits of the TIN (tire
identification number) are found on
the sidewall of the tire and indicate
the date of manufacture (See
Tire
Labeling on page323).
INDICATOR LOCATION MARK
TREAD WEAR INDICATOR
CONTINUED
Tires
275
Maintenance
2009 Fit
Page 291 of 352
14. Put on the spare tire. Put thewheel nuts back on finger-tight,
then tighten them in a crisscross
pattern with the wheel nut wrench
until the wheel is firmly against the
hub. Do not try to tighten the
wheel nuts fully.
15. Lower the vehicle to the ground, and remove the jack.
16. Tighten the wheel nuts securely in the same crisscross pattern. Have
the wheel nut torque checked at
the nearest automotive service
facility.
Tighten the wheel nuts to:
80 lbf·ft (108 N·m, 11 kgf·m)
17.
On Sport model and Canadian LX model with manual transmission:Remove the center cap before
storing the flat tire.
18. Remove the strap loop from the legs of the head restraint and
lower the cargo area floor lid.
19. Pull the floor lid toward you and remove the tabs.
20. Pull the floor lid out.
TAB
FLOOR LID
Changing a Flat Tire288
2009 Fit
Page 294 of 352
How to Use the Tire Repair KitAll Canadian models with automatictransmissionTo reduce weight, your vehicle is
equipped with a tire repair kit instead
of a spare tire. This kit will allow you
to temporarily repair a flat tire under
the following conditions:●Only one tire is flat.●The puncture is smaller than 3/
16ths of an inch (4 mm).●The puncture is located within the
tread.●The wheel rim is not damaged.●The tire bead is seated.
When making a temporary repair,
carefully follow all instructions in this
owner's manual and in the
instructions that came with the kit. If you have a flat tire while driving,
park the vehicle on a level surface in
a safe place, put the transmission in
Park (P), set the parking brake, and
turn the hazard lights on.
Thoroughly examine the tire for a
puncture or other damage.
If a puncture is wider than 3/16ths of
an inch (4 mm), or is located in the
tire sidewall, do not attempt to repair
the tire. Have your vehicle towed to a
Honda service center. In Canada or
the continental U.S.A. simply call 1-
800-465-PLUS (7587) for Honda Plus
Roadside Assistance.
If the damage is smaller than 3/16ths
of an inch (4 mm) and within the tire
tread, proceed with the following
instructions.
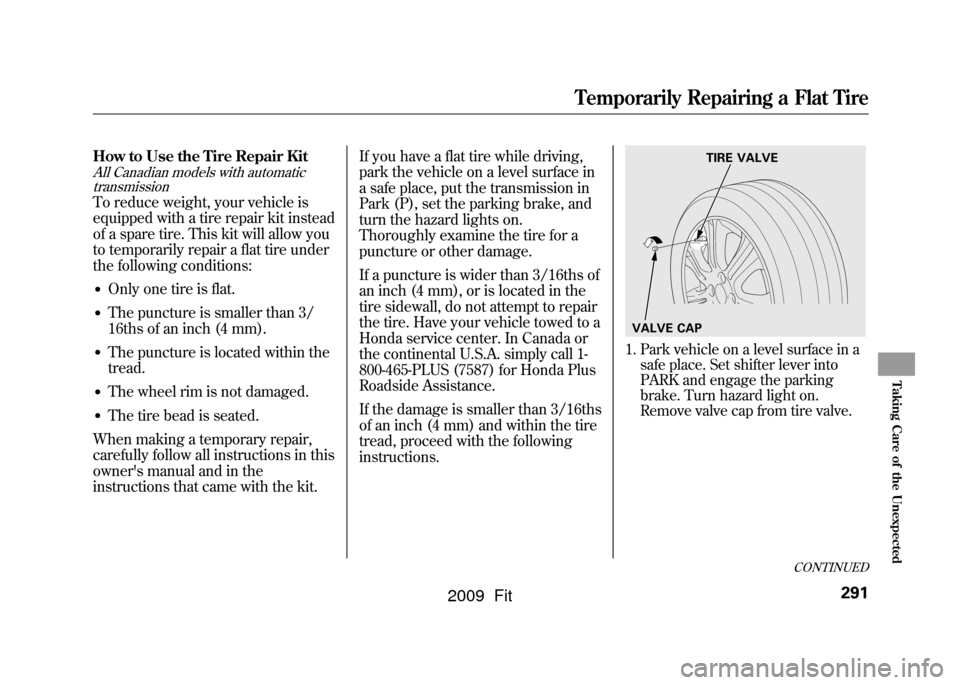
1. Park vehicle on a level surface in a
safe place. Set shifter lever into
PARK and engage the parking
brake. Turn hazard light on.
Remove valve cap from tire valve.
TIRE VALVE
VALVE CAP
CONTINUED
Temporarily Repairing a Flat Tire
291
Taking Care of the Unexpected
2009 Fit
Page 295 of 352
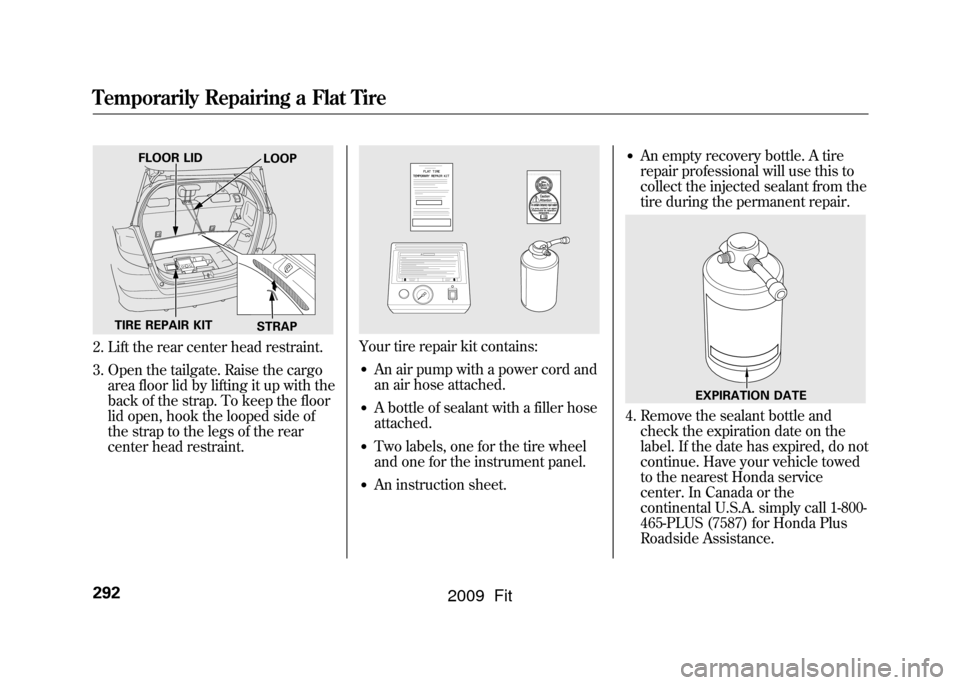
2. Lift the rear center head restraint.
3. Open the tailgate. Raise the cargoarea floor lid by lifting it up with the
back of the strap. To keep the floor
lid open, hook the looped side of
the strap to the legs of the rear
center head restraint.
Your tire repair kit contains:●An air pump with a power cord and
an air hose attached.●A bottle of sealant with a filler hose
attached.●Two labels, one for the tire wheel
and one for the instrument panel.●An instruction sheet.
●An empty recovery bottle. A tire
repair professional will use this to
collect the injected sealant from the
tire during the permanent repair.
4. Remove the sealant bottle and check the expiration date on the
label. If the date has expired, do not
continue. Have your vehicle towed
to the nearest Honda service
center. In Canada or the
continental U.S.A. simply call 1-800-
465-PLUS (7587) for Honda Plus
Roadside Assistance.
FLOOR LID LOOP
TIRE REPAIR KIT STRAP
EXPIRATION DATE
Temporarily Repairing a Flat Tire292
2009 Fit