Page 243 of 352
Only remove the fuses after you have
performed the transmission shifting
procedure, and the key is in the
ACCESSORY (I) position. Store the
fuses in an obvious location (center
pocket, etc) as a reminder to re-
install the fuses before driving the
vehicle.On vehicles without navigation systemIf the radio fuse is removed, the
audio system will disable itself. The
next time you turn on the radio you
will see‘‘ENTER CODE ’’in the
frequency display. Use the preset
buttons to enter the code (see page
191).
When the audio system is disabled,
the clock setting in the audio system
will be canceled. You will need to
reset the clock (see page 192).
On vehicles with navigation systemThe navigation system will also
disable itself. The next time you turn
on the ignition switch, the system
will require you to enter‘‘ENTER
CODE ’’before it can be used. Refer
to the navigation system manual.
ACCESSORY SOCKET FUSE
RADIO FUSETowing Your Vehicle Behind a Motorhome240
2009 Fit
Page 246 of 352

This section explains why it is
important to keep your vehicle well
maintained and how to follow basic
maintenance safety precautions.
This section also includes
instructions on how to read the
maintenance minder messages on
the information display, and
instructions for simple maintenance
tasks you may want to take care of
yourself.
If you have the skills and tools to
perform more complex maintenance
tasks on your vehicle, you may want
to purchase the service manual. See
page335for information on how to
obtain a copy, or see your dealer.Maintenance Safety
.....................
244
Maintenance Minder
..................
245
Fluid Locations
...........................
252
Adding Engine Oil
......................
253
Changing the Engine Oil and Filter
.......................................
254
Engine Coolant
...........................
256
Windshield Washers
...................
258
Transmission Fluid
.....................
259
Automatic Transmission Fluid
...................................
259
Manual Transmission Fluid
....
260
Brake and Clutch Fluid
...............
261
Lights
..........................................
262
Cleaning the Seat Belts
...............
267
Floor Mats
..................................
267
Audio Antenna
............................
268
Dust and Pollen Filter
.................
268
Wiper Blades
..............................
269
Tires
...........................................
273
Checking the Battery
..................
279
Vehicle Storage
...........................
281
Maintenance
243
Maintenance
2009 Fit
Page 255 of 352
CLUTCH FLUID
(Manual
Transmission only)
(Gray cap)
RADIATOR CAP
ENGINE OIL FILL CAP
AUTOMATIC TRANSMISSION
FLUID DIPSTICK (Yellow loop)
WASHER FLUID
(Blue cap)
ENGINE OIL DIPSTICK
(Orange loop) ENGINE COOLANT
RESERVOIR BRAKE FLUID
(Black cap)
Fluid Locations252
2009 Fit
Page 263 of 352

Use only Honda Genuine ATF-Z1
(Automatic Transmission Fluid). Do not
mix with other transmission fluids.
Using transmission fluid other than
Honda Genuine ATF-Z1 may cause
deterioration in transmission operation
and durability, and could result in
damage to the transmission.
Damage resulting from the use of
transmission fluid other than Honda
Genuine ATF-Z1 is not covered by the
Honda new vehicle warranty.
6. Insert the dipstick all the way backinto the transmission securely as
shown in the illustration.
If you are not sure how to add fluid,
contact your dealer. Manual Transmission Fluid
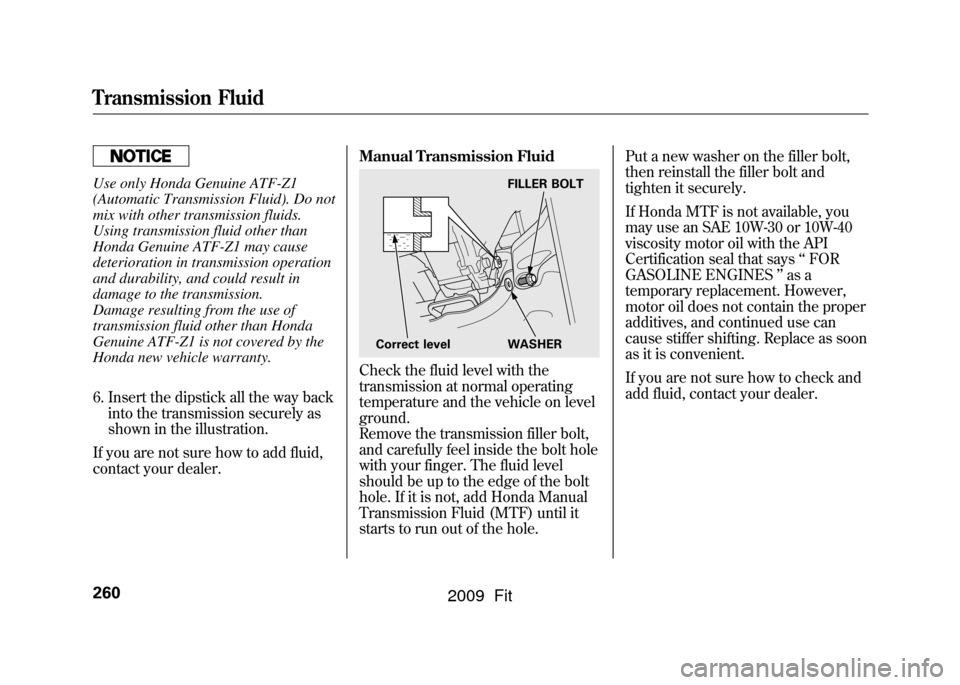
Check the fluid level with the
transmission at normal operating
temperature and the vehicle on level
ground.
Remove the transmission filler bolt,
and carefully feel inside the bolt hole
with your finger. The fluid level
should be up to the edge of the bolt
hole. If it is not, add Honda Manual
Transmission Fluid (MTF) until it
starts to run out of the hole.Put a new washer on the filler bolt,
then reinstall the filler bolt and
tighten it securely.
If Honda MTF is not available, you
may use an SAE 10W-30 or 10W-40
viscosity motor oil with the API
Certification seal that says
‘‘FOR
GASOLINE ENGINES ’’as a
temporary replacement. However,
motor oil does not contain the proper
additives, and continued use can
cause stiffer shifting. Replace as soon
as it is convenient.
If you are not sure how to check and
add fluid, contact your dealer.
FILLER BOLT
Correct level WASHER
Transmission Fluid260
2009 Fit
Page 264 of 352

Check the brake fluid level in the
reservoirs monthly.
There are up to two reservoirs,
depending on the model. They are:●Brake fluid reservoir (all models)●Clutch fluid reservoir
(manual transmission models
only)
Replace the brake fluid according to
the time recommendation in the
maintenance minder schedule.
Always use Honda Heavy Duty
Brake Fluid DOT 3. If it is not
available, you should use only DOT 3
or DOT 4 fluid, from a sealed
container, as a temporary
replacement.
Using any non-Honda brake fluid can
cause corrosion and decrease the life
of the system. Have the brake
system flushed and refilled with
Honda Heavy Duty Brake Fluid
DOT 3 as soon as possible. Brake fluid marked DOT 5 is not
compatible with your vehicle's
braking system and can cause
extensive damage.
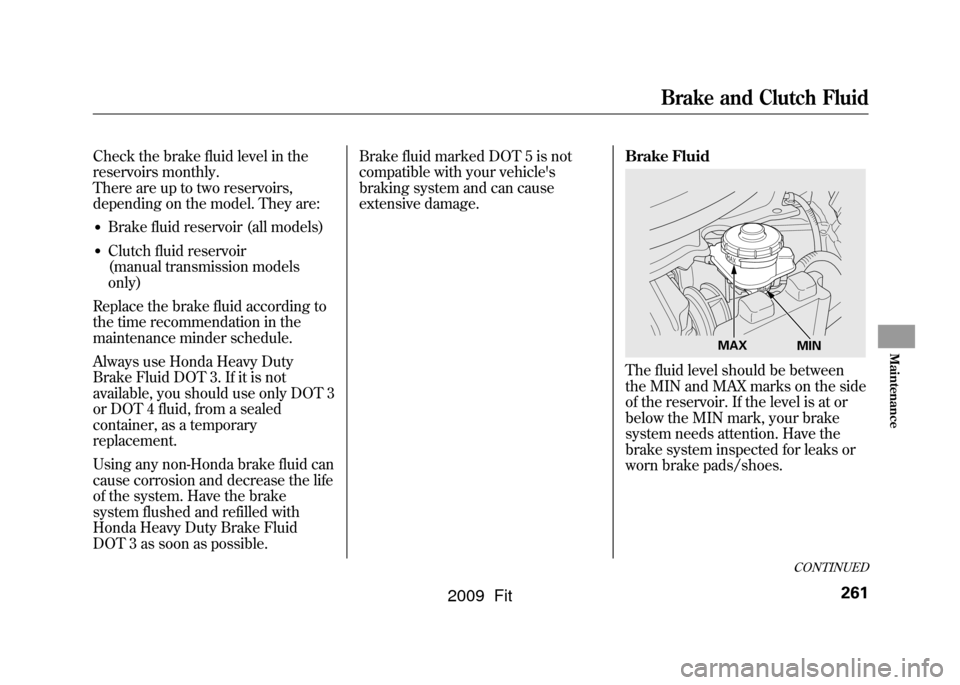
Brake Fluid
The fluid level should be between
the MIN and MAX marks on the side
of the reservoir. If the level is at or
below the MIN mark, your brake
system needs attention. Have the
brake system inspected for leaks or
worn brake pads/shoes.
MAX
MIN
CONTINUED
Brake and Clutch Fluid
261
Maintenance
2009 Fit
Page 265 of 352

Clutch FluidManual Transmission onlyThe fluid level should be between
the MIN and MAX marks on the side
of the reservoir. If it is not, add brake
fluid to bring it up to that level. Use
the same fluid specified for the brake
system.
A low fluid level can indicate a leak in
the clutch system. Have this system
inspected as soon as possible.Headlight Aiming
The headlights were properly aimed
when your vehicle was new. If you
regularly carry heavy items in the
cargo area, readjustment may be
required. Adjustments should be
done by your dealer or another
qualified mechanic.
Replacing a Headlight Bulb
Your vehicle has halogen headlight
bulbs. When replacing a bulb, handle
it by its base, and protect the glass
from contact with your skin or hard
objects. If you touch the glass, clean
it with denatured alcohol and a clean
cloth.
Halogen headlight bulbs get very hot
when lit. Oil, perspiration, or a scratch
on the glass can cause the bulb to
overheat and shatter.
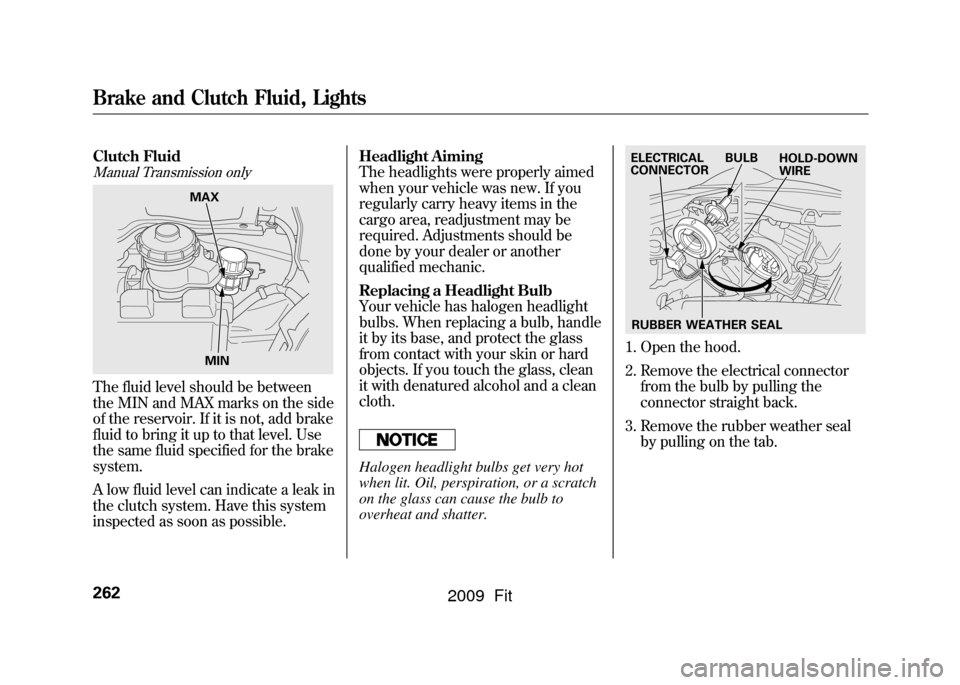
1. Open the hood.
2. Remove the electrical connector
from the bulb by pulling the
connector straight back.
3. Remove the rubber weather seal by pulling on the tab.
MAX
MIN
BULB
ELECTRICAL
CONNECTOR
RUBBER WEATHER SEAL HOLD-DOWN
WIRE
Brake and Clutch Fluid, Lights262
2009 Fit
Page 284 of 352

If you need to park your vehicle for
an extended period (more than 1
month), there are several things you
should do to prepare it for storage.
Proper preparation helps prevent
deterioration and makes it easier to
get your vehicle back on the road. If
possible, store your vehicle indoors.●Fill the fuel tank.●Wash and dry the exterior
completely.●Clean the interior. Make sure the
carpeting, floor mats, etc., are
completely dry.●Leave the parking brake off. Put
the transmission in reverse
(manual) or Park (automatic).●Block the rear wheels.
●If the vehicle is to be stored for a
longer period, it should be
supported on jackstands so the
tires are off the ground.●Leave one window open slightly (if
the vehicle is being stored
indoors).●Disconnect the battery.●Support the front and rear wiper
blade arms with a folded towel or
rag so they do not touch the
windshield.●To minimize sticking, apply a
silicone spray lubricant to all door
and tailgate seals. Also, apply a
vehicle body wax to the painted
surfaces that mate with the door
and tailgate seals.
●Cover the vehicle with a
‘‘breathable ’’cover, one made
from a porous material such as
cotton. Non-porous materials, such
as plastic sheeting, trap moisture,
which can damage the paint.●If possible, periodically run the
engine until it reaches full
operating temperature (the cooling
fans cycle on and off twice).
Preferably, do this once a month.
Vehicle Storage
281
Maintenance
2009 Fit
Page 288 of 352

Except all Canadian models withautomatic transmissionIf you have a flat tire while driving,
stop in a safe place to change it.
Drive slowly along the shoulder until
you get to an exit or an area to stop
that is far away from the traffic lanes.
The vehicle can easily roll off
the jack, seriously injuring
anyone underneath.
Follow the directions for
changing a tire exactly, and
never get under the vehicle
when it is supported only by the
jack.
1. Park the vehicle on firm, level, and non-slippery ground. Put the
transmission in Park (automatic)
or reverse (manual). Apply the
parking brake.
2. Turn on the hazard warning lights, and turn the ignition switch to the
LOCK (0) position. Have all
passengers get out of the vehicle
while you change the tire.
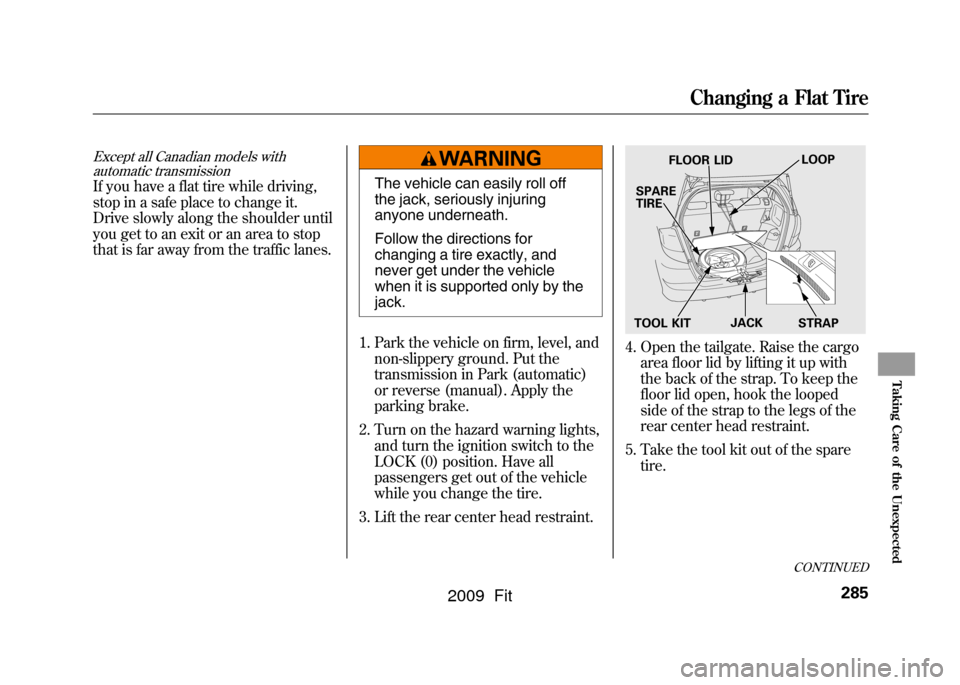
3. Lift the rear center head restraint.
4. Open the tailgate. Raise the cargo area floor lid by lifting it up with
the back of the strap. To keep the
floor lid open, hook the looped
side of the strap to the legs of the
rear center head restraint.
5. Take the tool kit out of the spare tire.
FLOOR LID LOOP
SPARE
TIRE
TOOL KIT JACK
STRAP
CONTINUED
Changing a Flat Tire
285
Taking Care of the Unexpected
2009 Fit