2009 HONDA FIT fuel
[x] Cancel search: fuelPage 207 of 352

Fuel Economy Factors
The following factors can lower your
vehicle's fuel economy:●Aggressive driving (hard
acceleration and braking)●Excessive idling, accelerating and
braking in stop-and-go traffic●Cold engine operation (engines
are more efficient when warmed
up)●Driving with a heavy load or the air
conditioner running●Improperly inflated tiresImproving Fuel Economy
Vehicle MaintenanceA properly maintained vehicle
maximizes fuel economy. Poor
maintenance can significantly reduce
fuel economy. Always maintain your
vehicle according to the maintenance
messages displayed on the
information display (see
Owner's
Maintenance Checks on page250).
For example:●Use the recommended viscosity
motor oil, displaying the API
Certification Seal (see page
253).●Maintain proper tire inflation -
An under-inflated tire increases
‘‘ rolling resistance, ’’which
reduces fuel economy.●Avoid carrying excess weight in
your vehicle -It puts a heavier
load on the engine, increasing fuel
consumption.
●Keep your vehicle clean -In
particular, a build-up of snow or
mud on your vehicle's underside
adds weight and rolling resistance.
Frequent cleaning helps your fuel
economy.
Drive Efficiently●Drive moderately -Rapid
acceleration, abrupt cornering, and
hard braking increase fuel
consumption.●Observe the speed limit -
Aerodynamic drag has a big effect
on fuel mileage at speeds above 45
mph (75 km/h). Reduce your
speed and you reduce the drag.
Trailers, car top carriers, roof
racks and bike racks are also big
contributors to increased drag.●Always drive in the highest gear
possible -If your vehicle has a
manual transmission, you can
boost your fuel economy by up
shifting as early as possible.
Fuel Economy204
2009 Fit
Page 208 of 352

●Avoid excessive idling-Idling
results in 0 miles per gallon.●Minimize the use of the air
conditioning system -The A/C
puts an extra load on the engine
which makes it use more fuel. Use
the fresh-air ventilation when
possible.●Plan and combine trips -
Combine several short trips into
one. A warmed-up engine is more
fuel efficient than a cold one.
Calculating Fuel Economy
Measuring TechniquesDirect calculation is the
recommended source of information
about your actual fuel economy.
Using frequency of fill-ups or taking
fuel gauge readings are NOT
accurate measures of fuel economy.
Fuel economy may improve over the
first several thousand miles.
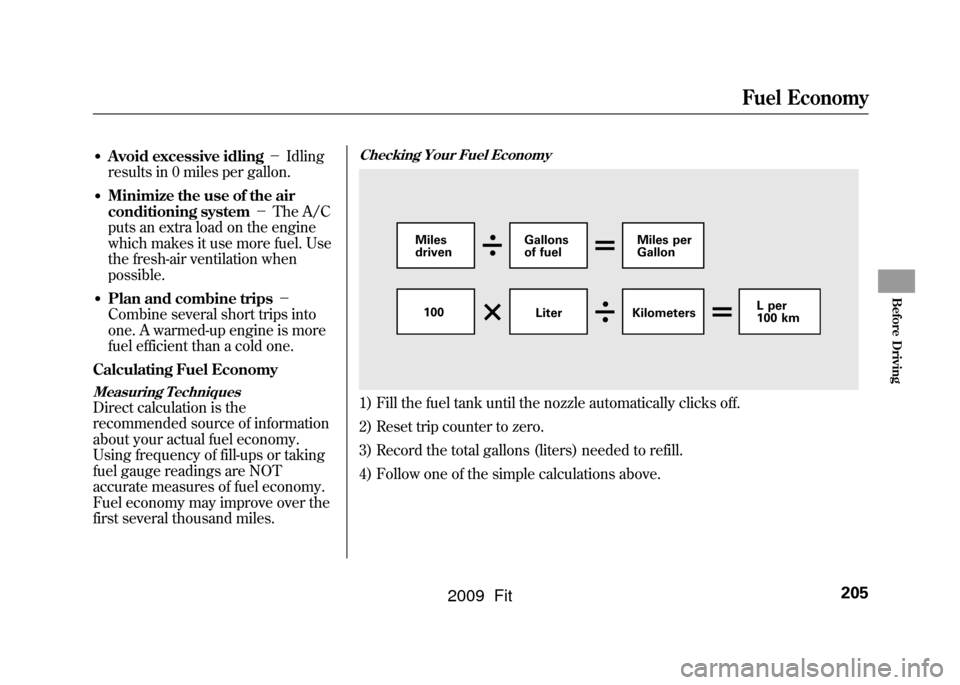
Checking Your Fuel Economy1) Fill the fuel tank until the nozzle automatically clicks off.
2) Reset trip counter to zero.
3) Record the total gallons (liters) needed to refill.
4) Follow one of the simple calculations above.
Miles
driven Gallons
of fuel Miles per
Gallon
100 LiterKilometers L per
100 km
Fuel Economy
205
Before Driving
2009 Fit
Page 219 of 352

1. Apply the parking brake.
2. In cold weather, turn off allelectrical accessories to reduce the
drain on the battery.
3.
Manual transmission:Press the clutch pedal down all the
way. The START (III) position
does not function unless the clutch
pedal is pressed.Automatic transmission:Make sure the shift lever is in
Park. Press on the brake pedal. 4. Without touching the accelerator
pedal, turn the ignition key to the
START (III) position. Do not hold
the key in the START (III) position
for more than 15 seconds at a time.
If the engine does not start right
away, pause for at least 10 seconds
before trying again.
The immobilizer system protects your
vehicle from theft. If an improperly-
coded key (or other device) is used, the
engine's fuel system is disabled. For
more information, see page79.
5. If the engine does not start within15 seconds, or starts but stalls
right away, repeat step 4 with the
accelerator pedal pressed halfway
down. If the engine starts, release
pressure on the accelerator pedal
so the engine does not race. 6. If the engine fails to start, press
the accelerator pedal all the way
down, and hold it there while
starting to clear flooding. If the
engine still does not start, return to
step 5.
The engine is harder to start in cold
weather. Also, the thinner air found at
altitudes above 8,000 feet (2,400
meters) adds to this problem.
Starting the Engine216
2009 Fit
Page 221 of 352

Recommended Shift Points
Drive in the highest gear that lets the
engine run and accelerate smoothly.
This will give you good fuel economy
and effective emissions control. The
following shift points are
recommended:Shift up Normal acceleration
1st to 2nd
2nd to 3rd 3rd to 4th4th to 5th 15 mph (24 km/h)
27 mph (43 km/h)
39 mph (62 km/h)
53 mph (85 km/h) Engine Speed Limiter
If you exceed the maximum speed
for the gear you are in, the engine
speed will enter into the
tachometer's red zone. If this occurs,
you may feel the engine cut in and
out. This is caused by a limiter in the
engine's computer controls. The
engine will run normally when you
reduce the rpm below the red zone.
The engine speed limiter only works
when you upshift; engine speed is
not limited during downshifts. Before
downshifting, make sure the engine
will not go into the tachometer's red
zone.Manual Transmission218
2009 Fit
Page 228 of 352

Downshifting with the paddle shifter
allows you to increase the engine
braking when going down steep or
long hills, and provides more power
when climbing uphills. You can
upshift the transmission manually to
reduce the rpm. Driving in the
higher gear helps fuel economy.
The transmission control system
monitors the accelerator pedal use
and your driving conditions. When
you press the accelerator pedal as in
normal driving, the system judges
that you are driving at a constant
cruising speed without using the
paddle shifters. Under these
conditions, D-paddle shift mode is
canceled, and the transmission
automatically returns to drive mode
(D).The transmission remains in the
selected gear if you do not
accelerate.
Each time you pull either paddle
shifter, the transmission shifts one
gear up or down. If you want to shift
up or down more than two gears, pull
the paddle shifter twice, pause, and
then pull it again.
The automatic transmission will not
allow you to shift up or down if:
●You downshift before the engine
speed falls below the upper limit of
the lower gear.
If you try to do this, the gear position
indicator will flash the number of the
lower gear several times, then return
to a higher gear.
Here are the speed ranges for
downshifting. To shift
from Speed range
5 → 4 under 112 mph
(181 km/h)
4 → 3 under 79 mph (127 km/h)
3 → 2 under 51 mph (82 km/h)
2 → 1 under 20 mph (32 km/h)
●You upshift before the engine
speed rises above the lower limit
of the higher gear.●You pull both paddle shifters at the
same time.
The transmission downshifts to first
gear and returns to drive mode (D)
when the vehicle comes to a
complete stop or the vehicle speed is
about 6 mph (10 km/h).
CONTINUED
Driving with the Paddle Shifters (Sport only)
225
Driving
2009 Fit
Page 230 of 352

When you accelerate from a stop, the
transmission starts in first gear, and
you must manually upshift between
first and fifth gears. Make sure you
upshift before the engine speed
reaches the tachometer's red zone.
The transmission remains in the
selected gear (5, 4, 3, 2, or 1). There
is no automatic downshift when you
push the accelerator pedal to the
floor.
When you are driving in 4th or 5th
gear, the transmission downshifts to
the lower gear under the following
conditions:●The vehicle slows down to a
certain speed.●You press the brake pedal.Downshifting with the paddle shifter
allows you to increase the engine
braking when going down steep or
long hills, and provides more power
when climbing uphills. You can
upshift the transmission manually to
reduce the rpm. Driving in the
higher gear helps fuel economy.
The transmission also shifts
automatically as the vehicle comes to
a complete stop. It downshifts to first
gear when the vehicle speed reaches
6 mph (10 km/h) or less.
The automatic transmission will not
allow you to shift up or down if:
●You downshift before the engine
speed falls below the upper limit of
the lower gear.
If you try to do this, the gear position
indicator will flash the number of the
lower gear several times, then return
to a higher gear. If the vehicle speed decreases below
the redline of the selected lower gear
while the indicator is flashing, the
transmission downshifts, and the
indicator displays the selected gear.
●You upshift before the engine
speed rises above the lower limit
of the higher gear.●You pull both paddle shifters at the
same time.
CONTINUED
Driving with the Paddle Shifters (Sport only)
227
Driving
2009 Fit
Page 233 of 352

Your vehicle is equipped with front
disc brakes. The brakes on the rear
wheels are drum. A power assist
helps reduce the effort needed on the
brake pedal. The anti-lock brake
system (ABS) helps you retain
steering control when braking very
hard.
Resting your foot on the pedal keeps
the brakes applied lightly, builds up
heat, and reduces their effectiveness
and reduces brake pad life. In
addition, fuel economy can be
reduced. It also keeps your brake
lights on all the time, confusing
drivers behind you.
Constant application of the brakes
when going down a long hill builds
up heat and reduces their
effectiveness. Use the engine to
assist the brakes by taking your foot
off the accelerator and downshifting
to a lower gear.Check your brakes after driving
through deep water. Apply the
brakes moderately to see if they feel
normal. If not, apply them gently and
frequently until they do. Be extra
cautious and alert in your driving.
Braking System Design
The hydraulic system that operates
the brakes has two separate circuits.
Each circuit works diagonally across
the vehicle (the left-front brake is
connected with the right-rear brake,
etc.). If one circuit should develop a
problem, you will still have braking
at two wheels.
Brake Pad Wear Indicators
If the front brake pads need
replacing, you will hear a distinctive,
metallic screeching sound when you
apply the brake pedal. If you do not
have the brake pads replaced, they
will screech all the time. It is normal
for the brakes to occasionally squeal
or squeak when you apply them.Braking System230
2009 Fit
Page 238 of 352

U.S. models onlyYour vehicle is equipped with a tire
pressure monitoring system (TPMS)
that turns on every time you start the
engine and monitors the pressure in
your tires while driving.
Each tire has its own pressure sensor
(not including the spare tire). If the
air pressure of a tire becomes
significantly low, the sensor in that
tire immediately sends a signal that
causes the low tire pressure indicator
to come on.
Low Tire Pressure
Indicator
When the low tire pressure indicator
is on, one or more of your tires is
significantly underinflated. You
should stop and check your tires as
soon as possible, and inflate them to
the proper pressure as indicated on
the vehicle's tire information placard.
If you think you can safely drive a
short distance to a service station,
proceed slowly, and inflate the tire to
the recommended pressure shown
on the driver's doorjamb.
If the tire is flat, or if the tire pressure
is too low to continue driving, replace
the tire with the compact spare tire
(see page284). If you cannot make the low tire
pressure indicator go out after
inflating the tires to the specified
values, have your dealer check the
system as soon as possible.
Driving on a significantly under-
inflated tire causes the tire to
overheat and can lead to tire failure.
Under-inflation also reduces fuel
efficiency and tire tread life, and may
affect the vehicle's handling and
stopping ability.
Because tire pressure varies by
temperature and other conditions,
the low tire pressure indicator may
come on unexpectedly.
CONTINUED
Tire Pressure Monitoring System (TPMS)
235
Driving
2009 Fit