2009 HONDA ELEMENT set date
[x] Cancel search: set datePage 3 of 150

Navigation System3
Table of Contents
Honda Automobile Customer
Service ......................................102
Visiting Your Dealer ...................103
Obtaining a Navigation Update DVD .........................................103
Changing the DVD ......................104
PC Card Operation ......................105
Inserting the PC Card....................105
Voice Control of PC Card
Functions ....................................105
CD/CD-R Operation ....................105
Voice Control of CD Functions .....106
Coverage Areas .........................107
Map Coverage .............................107
U.S. Detailed Coverage Areas.......107
Canada Detailed Coverage Areas ..........................................112
Operation in Alaska and Hawaii ......................................120
Alaska ............................................120
Hawaii ...........................................120
Shipping a Vehicle To or From
Hawaii ........................................121
Frequently Asked Questions ................................122
Troubleshooting ........................132 Glossary ....................................134
Glossary .......................................134
Voice Command Index ............137
Global Commands .......................137
Navigation General
Commands ................................137
Navigation Display Commands ................................138
Find Place Commands .................139
Radio Voice Commands ..............140
CD Voice Commands ..................141
PC Card Voice Commands ..........141
AUX Voice Commands ...............141
Information Screen Voice Commands ................................142
Setup Screen (first) Commands ................................142
On-Screen Commands .................143
On-Screen Commands Assist .........143
Index .........................................145
2009 Element
Page 11 of 150

Navigation System11
Getting Started
Joystick/ENT button
Moves left, right, up, and down to move
the highlighting around the display, to
scroll through lists, or to look around a
displayed map. After making a selection
in a menu or list, push in on the joystick
to enter the selection into the system.
In almost all cases, you can enter a
selection into the system by using the
voice control system, highlighting the
item and pushing in on the joystick, or
by touching the appropriate item you
wish to select.
INFO button
Displays the screen for selecting Voice
Command Help , Map Legend,
Calendar, and Calculator. See
page
68.
MAP/GUIDE button
Displays the map. When en route,
switches between the map, guidance ,
and Direction list screens. See page
18
or 49.
MENU button
Displays the Enter destination by
screen. When en r oute, displays the
Change route by screen. SETUP button
Displays the
Setup screens to change
and update informa tion in the system.
See page
72 .
CANCEL button
Cancels the current sc reen and returns to
the previous screen display.
NOTE:
The NAVI BACK button on the steering
wheel performs the same basic function.
ZOOM (IN)/ (OUT) buttons
Press ZOOM to zoom in (to show
more detail), or ZOOM to zoom out
(to show more area and less detail)
while a map screen is displayed.
ZOOM IN reduces the scale (showing
less area with greater detail). ZOOM
OUT increases the scale (showing more
area with less detail).
AUDIO button
Press to display the audio screen.
For information on audio system
features, see the Audio section of the
vehicle Owner’s manual. Other buttons
See the Audio sectio
n of the vehicle
Owner's manual.
Screen
All selections and instructions are
displayed on the screen. In addition, the
display is a “touch screen” – you can
enter information into the system by
touching the images (icons) on the
screen with your finger.
For example, if you need to enter a
street name, a keyboard will be
displayed. You can type in the street
name by saying or selecting the
individual character s on the screen.
Clean the screen with a soft damp cloth.
You may use a mild cl eaner intended for
use on liquid crystal displays (LCDs).
Harsher chemicals may damage the
screen.
NOTE:
Whenever you shift to R (Reverse), the
rear view behind the vehicle is shown on
the navigation system screen.
2009 Element
Page 53 of 150

Navigation System53
Driving to Your Destination
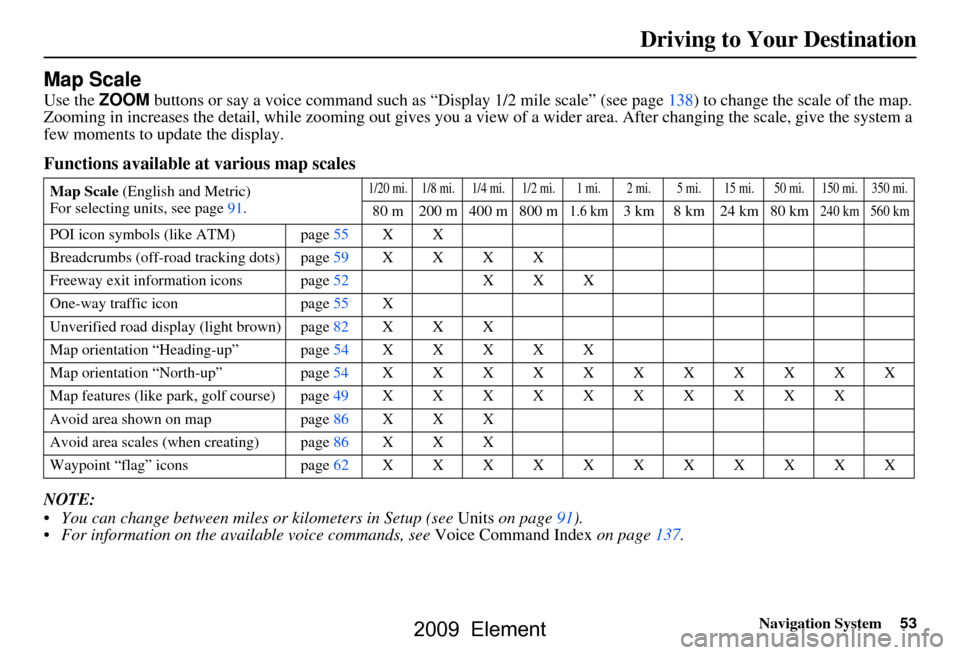
Map Scale
Use the ZOOM buttons or say a voice command such as “Display 1/2 m ile scale” (see page138) to change the scale of the map.
Zooming in increases the detail, while zooming out gives you a vi ew of a wider area. After changing the scale, give the system a
few moments to update the display.
Functions available at various map scales
NOTE:
You can change between miles or kilometers in Setup (see Units on page
91 ).
For information on the available voice commands, see Voice Command Index on page137.
Map Scale (English and Metric)
For selecting uni ts, see page
91.1/20 mi. 1/8 mi. 1/4 mi. 1/2 mi. 1 mi. 2 mi. 5 mi. 15 mi. 50 mi. 150 mi. 350 mi.
80 m 200 m 400 m 800 m1.6 km3 km 8 km 24 km 80 km240 km 560 km
POI icon symbols (like ATM) page 55 X X
Breadcrumbs (off-road tracking dots)page59XXXX
Freeway exit information icons page
52 X X X
One-way traffic icon page
55 X
Unverified road display (light brown) page
82 X X X
Map orientation “Heading-up” page54XXXXX
Map orientation “North-up” page54XXXXXXXXXXX
Map features (like park, golf course)page49XXXXXXXXXX
Avoid area shown on map page
86 X X X
Avoid area scales (w hen creating) page
86 X X X
Waypoint “flag” icons page
62 XXXXXXXXXXX
2009 Element
Page 70 of 150

70Navigation System
Information Features
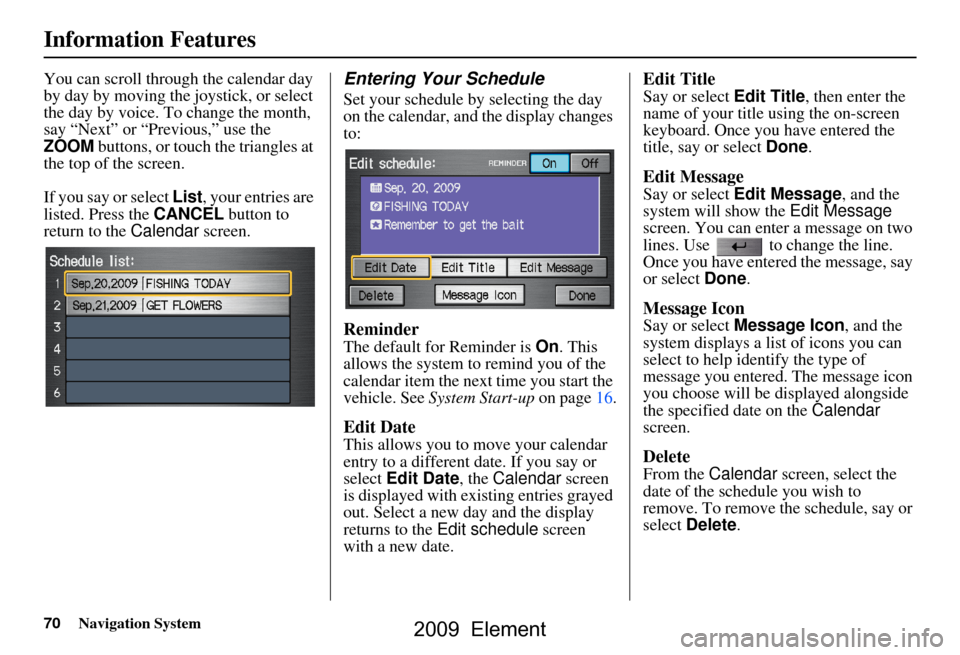
You can scroll through the calendar day
by day by moving the joystick, or select
the day by voice. To change the month,
say “Next” or “Previous,” use the
ZOOM buttons, or touch the triangles at
the top of the screen.
If you say or select List, your entries are
listed. Press the CANCEL button to
return to the Calendar screen.Entering Your Schedule
Set your schedule by selecting the day
on the calendar, and the display changes
to:
Reminder
The default for Reminder is On. This
allows the system to remind you of the
calendar item the next time you start the
vehicle. See System Start-up on page16.
Edit Date
This allows you to move your calendar
entry to a different date. If you say or
select Edit Date , the Calendar screen
is displayed with existing entries grayed
out. Select a new day and the display
returns to the Edit schedule screen
with a new date.
Edit Title
Say or select Edit Title , then enter the
name of your title using the on-screen
keyboard. Once you have entered the
title, say or select Done.
Edit Message
Say or select Edit Message , and the
system will show the Edit Message
screen. You can enter a message on two
lines. Use to change the line.
Once you have entered the message, say
or select Done.
Message Icon
Say or select Message Icon , and the
system displays a list of icons you can
select to help identify the type of
message you entered. The message icon
you choose will be displayed alongside
the specified date on the Calendar
screen.
Delete
From the Calendar screen, select the
date of the schedule you wish to
remove. To remove the schedule, say or
select Delete .
2009 Element
Page 72 of 150

72Navigation System
System Setup
Setup Mode
The Setup function consists of two
different screens that allow you to
change and update information in the
system. To display the Setup screens,
use the voice control system and say
“Setup” or press the SETUP button. To
change to another Setup screen, say or
select More in the upper right corner of
the screen.
On any of the Setup screens, you can
use the voice control system to select
any item on the screen.
NOTE:
If some items appear to be grayed out and cannot be selected, it is because
you did not select OK on the initial
Disclaimer screen. See System Start-
up on page16.
For information on the available voice commands, see Voice
Command Index on page137.
Setup Screen (first)
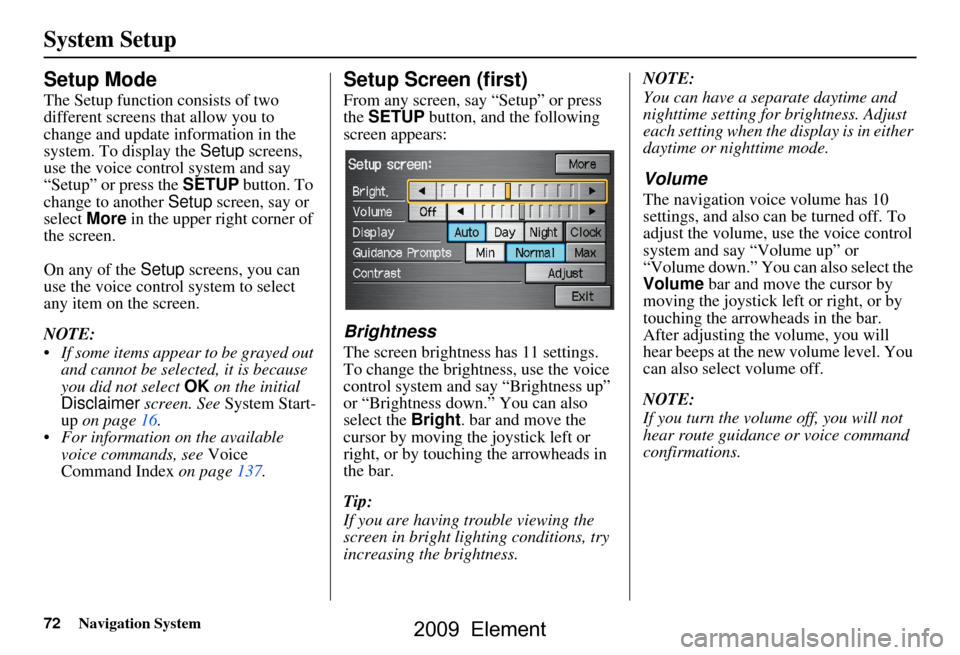
From any screen, say “Setup” or press
the SETUP button, and the following
screen appears:
Brightness
The screen brightness has 11 settings.
To change the brightness, use the voice
control system and say “Brightness up”
or “Brightness down.” You can also
select the Bright. bar and move the
cursor by moving the joystick left or
right, or by touching the arrowheads in
the bar.
Tip:
If you are having trouble viewing the
screen in bright li ghting conditions, try
increasing the brightness. NOTE:
You can have a separate daytime and
nighttime setting for brightness. Adjust
each setting when the display is in either
daytime or nighttime mode.
Volume
The navigation voice volume has 10
settings, and also can be turned off. To
adjust the volume, us
e the voice control
system and say “Volume up” or
“Volume down.” You can also select the
Volume bar and move the cursor by
moving the joystick left or right, or by
touching the arrowh eads in the bar.
After adjusting the volume, you will
hear beeps at the new volume level. You
can also select volume off.
NOTE:
If you turn the volume off, you will not
hear route guidance or voice command
confirmations.
2009 Element
Page 80 of 150

80Navigation System
System Setup
4. If you have entered the PIN correctly, the display changes to the Please re-
enter new PIN screen. Enter the
same number, then touch Done to
validate the number you have
selected.
5. If you have entered the same number both times, the display returns to the
Edit personal information screen. If
not, “incorrect PIN” appears in the
upper right corner of the screen. Enter
your PIN again.
NOTE:
If you wish to remove your PIN, return
to the same screen and, after entering
your PIN, touch the Do not use PIN
button.Go Home PIN
1. Select Go Home PIN , and the
system displays the Enter your new
PIN screen.
2. Enter your PIN in the same way as entering the Address Book PIN.
NOTE:
The factory default is no PIN. If you
choose to use a PIN, you will have to
enter it whenever you say “Go Home”
at the map screen or select Go Home
on the Enter destination by screen.
User Name
You can change User 1 and User 2 to
a desired name. Choose either User 1 or
User 2 on the Select the user name to
edit screen. Enter the name, and say or
select Done to leave the screen.
Previous Destinations
Allows you to delete some or all of your
previous destinations.
1. Select this option, and the display
changes to:
2. Scroll through the list and find the address you want to delete.
3. Select the address to delete by saying the line number, using the joystick, or
touching it on the screen.
NOTE:
To cancel the deletion of Previous
Destinations, press the CANCEL
button before performing step 4.
2009 Element
Page 91 of 150

Navigation System91
System Setup
System Information
From the Setup screen (second), say or
select System Information and the
following screen appears:
This information is for dealer use only.
For ordering updates, use the version
number stamped on the label (as Ver. X.
XX) of the navigation DVD. See
Obtaining a Navigation Update DVD on
page103.
When finished, say or select Return to
return to the previous screen.
Basic Settings
From the Setup screen (second), say or
select Basic Settings and the
following screen appears:
Keyboard Layout
Allows you to select the displayed
keypad screen: Alphabet or
QWERTY .
Units (mile or km)
Allows you to select the units for the
entire system ( mile or km).
Voice Recognition Feedback
Allows you to turn voice control system
prompts On or Off . When Off, you will
not hear the voice control system
confirmations or prompts.
2009 Element
Page 92 of 150

92Navigation System
System Setup
Clock Settings
From the Setup screen (second), say or
select Clock Settings and the
following screen appears:
Clock Adjustment
When you select Clock Adjustment ,
the following screen appears: This screen allows you to set or adjust
the following:
Auto Daylight Saving Time
(Default = On)
Auto Time Zone by GPS (Default = On)
DST (Daylight Saving Time) Selection
(change DST schedule)
Time Adjustment (adjust your clock)
Reset button (resets this screen’s
settings to factory defaults)Auto Daylight Saving Time
Sets automatic daylight saving time On
or Off . If set to On, the clock will
automatically “spring ahead” or “fall
back” by one hour when a daylight
saving time change occurs. If you reside
in a state or area where daylight saving
time is not used, then you may want to
turn this feature off. NOTE:
If you set Auto Daylig
ht Saving Time to
On , the daylight savi ng time function is
activated even in an area that does not
use daylight saving time.
The federal government mandated that
starting in 2007, daylight saving time
begins in March and ends in November
instead of the old schedule from April to
October. The schedule is subject to
review and possible cancellation in
2008-2009.
The schedules for the time changes are
stored in the software and can be
selected in the DST schedule
selection screen. Therefore, your clock
will change based on the daylight saving
time schedule.
NOTE:
The automatic clock setting feature
relies on a satellite signal. It will not
work in Hawaii and Alaska.
2009 Element