Page 310 of 373

Replace your tires with radial tires of
the same size, load range, speed
rating, and maximum cold tire
pressure rating (as shown on the
tire’s sidewall).
Mixing radial and bias-ply tires on
your vehicle can reduce braking
ability, traction, and steering
accuracy. Using tires of a dif f erent
size or construction can cause the
ABS and vehicle stability assist
system (VSA) to work inconsistently.
The ABS and VSA system work by
comparing the speed of each wheel.
When replacing tires, use the same
size originally supplied with the
vehicle. Tire size and construction
can af f ect wheel speed and may
cause the system to activate.It is best to replace all f our tires at
thesametime.If thatisnotpossible
or necessary, replace the two f ront
tires or two rear tires as a pair.
Replacing just one tire can seriously
af f ect your vehicle’s handling.
If you ever replace a wheel, make
sure that the wheel’s specif ications
match those of the original wheels.
Also be sure you use only TPMS
specif ic wheels. If you do not, the
tire pressure monitoring system will
notworkonthattire.
Replacement wheels are available at
your dealer.
Wheels:
Tires:
See page f or DOT tire quality
grading inf ormation, and page
f or tire size and labeling
inf ormation. 338
340
Tires
Replacing T ires and Wheels
Wheel and T ire Specif ications
306
17x61/2J
225/65R17 102T
Installing improper tires on your
vehicle can affect handling and
stability. This can cause a crash
in which you can be seriously
hurt or killed.
Always use the size and type of
tires recommended in this
owner’s manual.
�\f���—�\f���—�����y�
�������������y���
�(�,�������\f�y�\f���
�
�y
2009 CR- V
Page 311 of 373

�´
CONT INUED
Tires marked ‘‘M S’’ or ‘‘All
Season’’ on the sidewall have an all-
weather tread design suitable for
most winter driving conditions.
For the best perf ormance in snowy
or icy conditions, you should install
snow tires or tire chains. They may
be required by local laws under
certain conditions.
If you mount snow tires on your
vehicle, make sure they are radial
tires of the same size and load range
as original tires. Mount snow tires on
all f our wheels. The traction
provided by snow tires on dry roads
maybelowerthanyouroriginaltires.
Check with the tire dealer f or
maximum speed recommendations.Mount tire chains on your tires when
required by driving conditions or
local laws. Install them only on the
f ront tires.
Because your vehicle has limited tire
clearance, Honda strongly
recommends using the chains listed
below, made by Security Chain
Company (SCC).
Cable-type: SCC Radial Chain
CH2612T
Tires
Winter Driving
Snow T ires
T ire ChainsMaint enance
307
Using the wrong chains, or not
properly installing chains, can
damage the brake lines and
cause a crash in which you can
be seriously injured or killed.
Follow all instructions in this
owner’s manual regarding the
selection and use of tire chains.
�\f���—�\f���—�����y�
���������\f���y���
�(�,�������\f�y�\f���
���y
2009 CR- V
Page 312 of 373
When installing cables, f ollow the
manuf acturer’s instructions, and
mount them as tight as you can.
Make sure they are not contacting
the brake lines or suspension. Drive
slowly with them installed. If you
hear them coming into contact with
the body or chassis, stop and
investigate. Remove them as soon as
you begin driving on cleared roads.Clean the wheels as you would the
rest of the exterior. Wash them with
thesamesolution,andrinsethem
thoroughly.
Aluminum alloy wheels have a
protective clear-coat that keeps the
aluminum f rom corroding and
tarnishing. Cleaning the wheels with
harsh chemicals (including some
commercial wheel cleaners) or a stif f
brush can damage the clear-coat. To
clean the wheels, use a mild
detergent and a sof t brush or sponge.
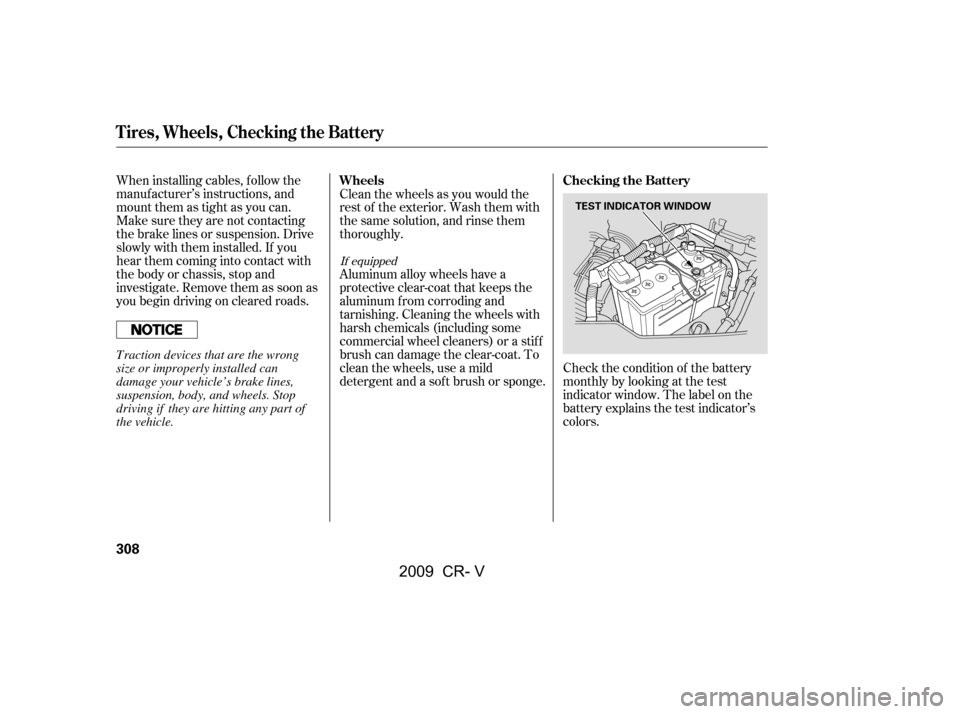
Check the condition of the battery
monthlybylookingatthetest
indicator window. The label on the
battery explains the test indicator’s
colors.
If equipped
Wheels
Checking the Battery
Tires, Wheels, Checking the Battery
308
TEST INDICATOR WINDOW
Traction devices that are the wrong
size or improperly installed can
damage your vehicle’s brake lines,
suspension, body, and wheels. Stop
driving if they are hitting any part of
the vehicle.
�\f���—�\f���—�����y�
���������
���y���
�(�,�������\f�y�\f���
���y
2009 CR- V
Page 314 of 373

Fill the f uel tank.Block the rear wheels.
If the vehicle is to be stored f or a
longer period, it should be
supported on jackstands so the
tires are of f the ground.
Cover the vehicle with a
‘‘breathable’’ cover, one made
f rom a porous material such as
cotton. Non-porous materials, such
as plastic sheeting, trap moisture,
which can damage the paint.
If you need to park your vehicle f or
an extended period (more than 1
month), there are several things you
should do to prepare it f or storage.
Proper preparation helps prevent
deterioration and makes it easier to
get your vehicle back on the road. If
possible, store your vehicle indoors. Leave one window open slightly (if
the vehicle is being stored
indoors).
Disconnect the battery.
Support the f ront and rear wiper
blade arms with a f olded towel or
ragsotheydonottouchthe
windshield.
To minimize sticking, apply a
silicone spray lubricant to all door
and tailgate seals. Also, apply a
vehiclebodywaxtothepainted
surfaces that mate with the door
and tailgate seals.If possible, periodically run the
engine until it reaches f ull
operating temperature (the
cooling f ans cycle on and of f
twice). Pref erably, do this once a
month.
Wash and dry the exterior
completely.
Cleantheinterior.Makesurethe
carpeting, floor mats, etc., are
completely dry.
Leave the parking brake off. Put
the transmission in Park.
Vehicle Storage
310
�\f���—�\f���—�����y�
�����������\f�y���
�(�,�������\f�y�\f���
���y
2009 CR- V
Page 316 of 373
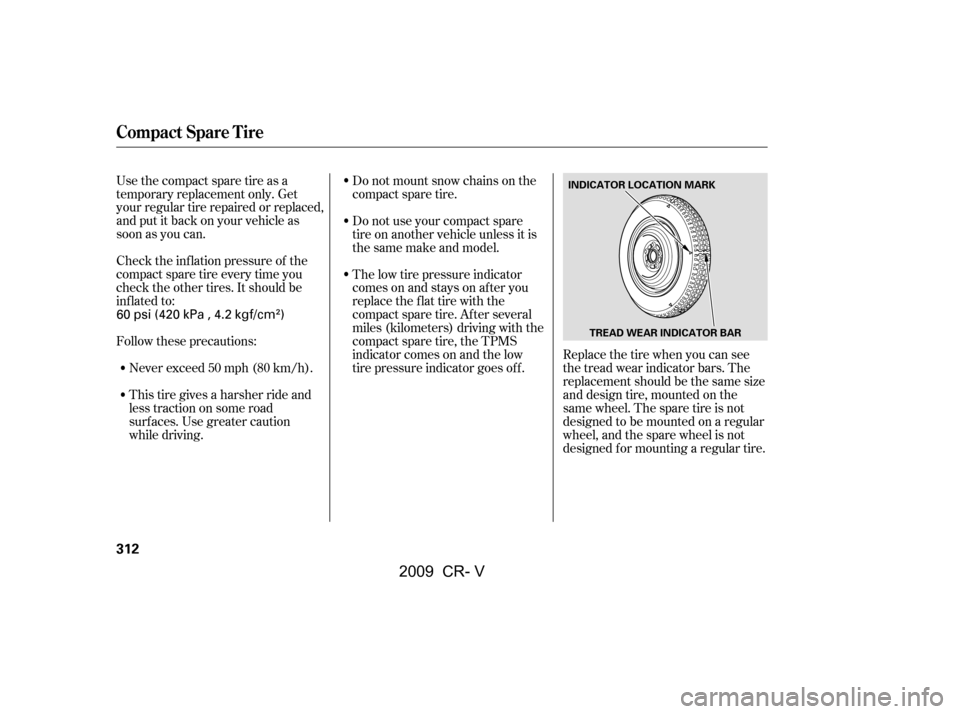
Replace the tire when you can see
the tread wear indicator bars. The
replacement should be the same size
and design tire, mounted on the
same wheel. The spare tire is not
designed to be mounted on a regular
wheel, and the spare wheel is not
designed f or mounting a regular tire.
Do not mount snow chains on the
compact spare tire.
Use the compact spare tire as a
temporary replacement only. Get
your regular tire repaired or replaced,
and put it back on your vehicle as
soon as you can.
Check the inf lation pressure of the
compact spare tire every time you
check the other tires. It should be
inf lated to:
Follow these precautions:
Never exceed 50 mph (80 km/h).
This tire gives a harsher ride and
less traction on some road
surf aces. Use greater caution
while driving. Do not use your compact spare
tire on another vehicle unless it is
thesamemakeandmodel.
The low tire pressure indicator
comes on and stays on af ter you
replace the flat tire with the
compact spare tire. Af ter several
miles (kilometers) driving with the
compact spare tire, the TPMS
indicator comes on and the low
tire pressure indicator goes of f .
Compact Spare Tire
312
INDICATOR LOCATION MARK
TREAD WEAR INDICATOR BAR
60 psi (420 kPa , 4.2 kgf/cm)
�\f���—�\f���—�����y�
�������������y���
�(�,�������\f�y�\f���
���y
2009 CR- V
Page 318 of 373
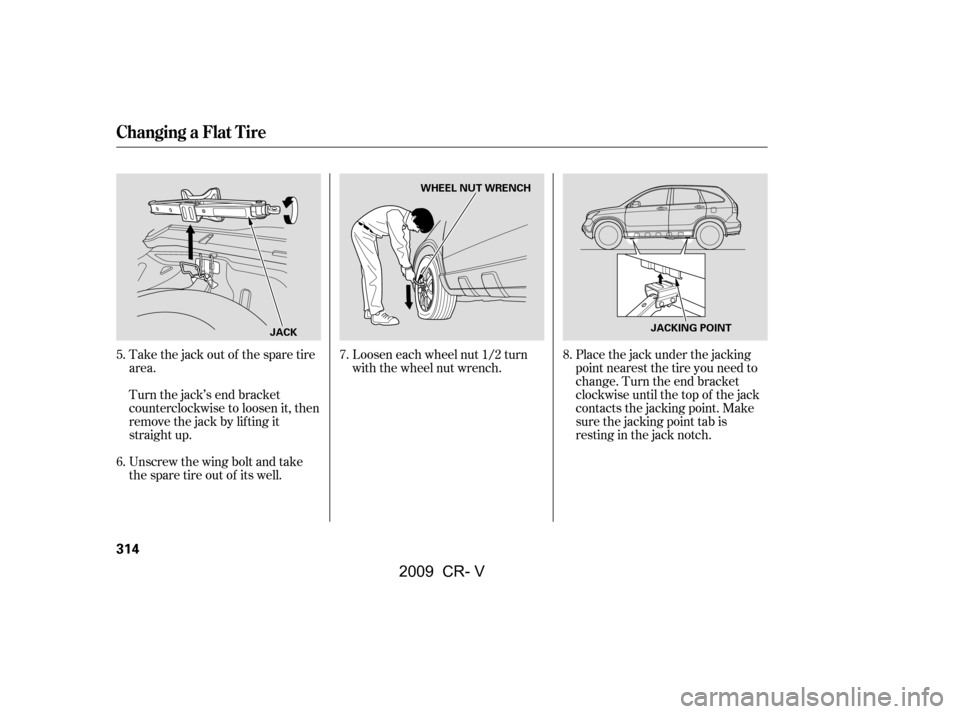
Take the jack out of the spare tire
area.
Turn the jack’s end bracket
counterclockwise to loosen it, then
remove the jack by lif ting it
straight up.
Unscrew the wing bolt and take
the spare tire out of its well.Loosen each wheel nut 1/2 turn
with the wheel nut wrench.
Placethejackunderthejacking
point nearest the tire you need to
change. Turn the end bracket
clockwise until the top of the jack
contacts the jacking point. Make
sure the jacking point tab is
restinginthejacknotch.
6.
5. 7.8.
Changing a Flat Tire
314
JACKWHEEL NUT WRENCH
JACKING POINT
�\f���—�\f���—�����y�
���������\f�\f�y���
�(�,�������\f�y�\f���
���y
2009 CR- V
Page 319 of 373
CONT INUED
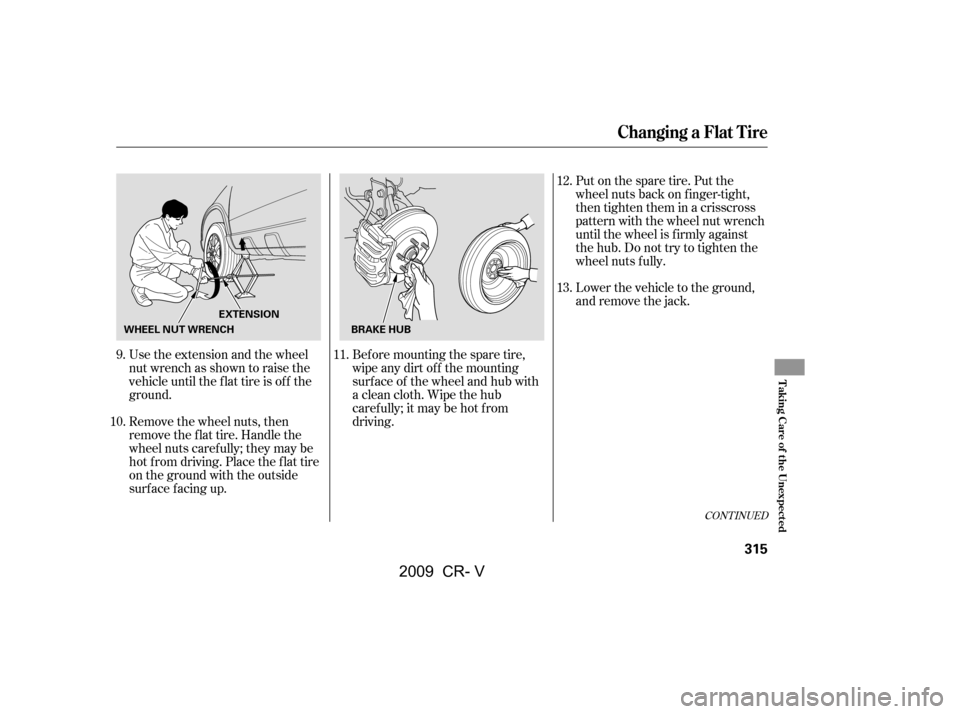
Use the extension and the wheel
nut wrench as shown to raise the
vehicle until the f lat tire is of f the
ground.
Remove the wheel nuts, then
remove the f lat tire. Handle the
wheel nuts caref ully; they may be
hot from driving. Place the flat tire
on the ground with the outside
surface facing up.Bef ore mounting the spare tire,
wipeanydirtoff themounting
surface of the wheel and hub with
a clean cloth. Wipe the hub
carefully;itmaybehotfrom
driving.Put on the spare tire. Put the
wheel nuts back on f inger-tight,
then tighten them in a crisscross
pattern with the wheel nut wrench
until the wheel is f irmly against
the hub. Do not try to tighten the
wheel nuts f ully.
Lower the vehicle to the ground,
and remove the jack.
9.
10. 11.13.
12.
Changing a Flat Tire
T aking Care of t he Unexpect ed
315
EXTENSION
BRAKE HUB
WHEEL NUT WRENCH
�\f���—�\f���—�����y�
���������\f���y���
�(�,�������\f�y�\f�����\f�y
2009 CR- V
Page 320 of 373
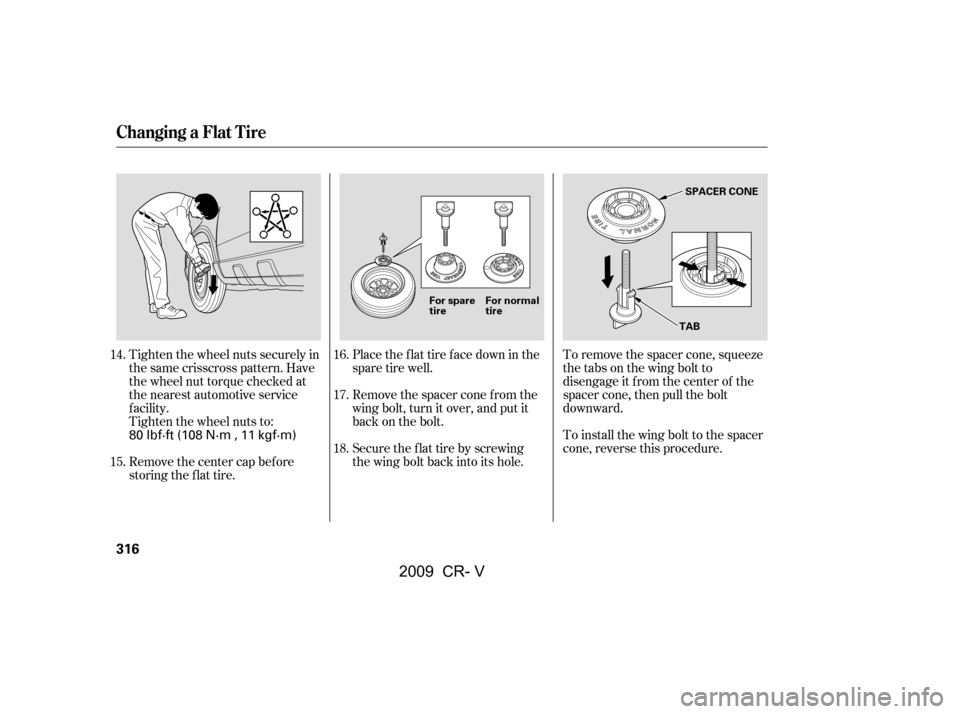
Tighten the wheel nuts securely in
the same crisscross pattern. Have
the wheel nut torque checked at
the nearest automotive service
f acility.
Tighten the wheel nuts to:
Remove the center cap before
storing the f lat tire.Place the flat tire face down in the
spare tire well.
Remove the spacer cone f rom the
wing bolt, turn it over, and put it
back on the bolt.
Securetheflattirebyscrewing
the wing bolt back into its hole.
To remove the spacer cone, squeeze
the tabs on the wing bolt to
disengage it f rom the center of the
spacer cone, then pull the bolt
downward.
To install the wing bolt to the spacer
cone, reverse this procedure.
16.
17.
15.
14.
18.
Changing a Flat Tire
316
For spare
tireFor normal
tire SPACER CONE
TAB
80 lbf·ft (108 N·m , 11 kgf·m)
�\f���—�\f���—�����y�
���������
���y���
�(�,�������\f�y�\f�����
�y
2009 CR- V