Page 104 of 420

The inside mirror can automatically
darken to reduce glare. To turn on
this feature, press the button on the
bottom of the mirror. The AUTO
indicator comes on as a reminder.
When it is on, the mirror darkens
when it senses the headlights of a
vehicle behind you, then returns to
normal visibility when the lights are
gone. Press the button again to turn
of f this f eature.
Keeptheinsideandoutsidemirrors
clean and adjusted f or best visibility.
Be sure to adjust the mirrors bef ore
you start driving.
The inside mirror has day and night
positions. The night position reduces
glare f rom headlights behind you.
Flip the tab on the bottom edge of
the mirror to select the day or night
position.
LX, LX-P, EX and EX V6
EX-L and EX-L V6
Mirrors
Inst rument s and Cont rols
101
AUTO BUTTON
INDICATOR SENSOR
TAB
There is also a sensor on the back of
the mirror. Items hung on the mirror
may block this sensor and af f ect its
perf ormance.
�\f���—�\f���—�\f���y�
���������\f���y���
�)���\f���
�\f�y�\f�
�\f���y
2009 Accord Sedan
Page 220 of 420

With the system set, you can still
open the trunk with the remote
transmitter without triggering the
alarm. The alarm will sound if the
trunk lock is f orced, or the trunk is
opened with the trunk release lever
or the emergency trunk opener.
The security system helps to protect
your vehicle and valuables f rom thef t.
The horn sounds and a combination
of headlights, parking lights, side
marker lights and taillights f lashes if
someone attempts to break into your
vehicle or remove the audio unit.
This alarm continues for two
minutes, then the system resets. To
reset an alarming system bef ore the
two minutes have elapsed, unlock
the driver’s door with the key or the
remote transmitter.
The security system automatically
sets 15 seconds after you lock the
doors, hood, and trunk. For the
system to activate, you must lock the
doors f rom the outside with the key,
driver’s lock tab, door lock master
switch, or remote transmitter. The
security system indicator on the
instrument panel starts blinking
immediately to show you the system
is setting itself . Once the security system is set,
opening any door (without using the
key or the remote transmitter), the
hood, or the trunk will cause the
system to alarm. It also alarms if the
audio unit is removed f rom the
dashboard or the wiring is cut.
The security system will not set if
the hood, trunk, or any door is not
f ully closed. If the system will not set,
check the door and trunk open
indicators on the instrument panel
(see page ) to see if the doors and
trunk are f ully closed. Since it is not
part of the monitor display, manually
check the hood.
60
CONT INUED
Except LX
Security System
Features
217
SECURITY SYSTEM INDICATOR
�\f���—�\f���—�\f���y�
������
��\f���y���
�)���\f���
�\f�y�\f�������y
2009 Accord Sedan
Page 315 of 420

�µ�µ�µ
�µ
�µ
�µ
�Ì Engine oil level Check every
time you fill the fuel tank. See
page .
Engine coolant level Check the
radiator reserve tank every time
you f ill the f uel tank. See page .
Automatic transmission Check
the f luid level monthly. See page
.
Brakes Check the f luid level
monthly. See page .
Tires Check the tire pressure
monthly. Examine the tread f or
wear and foreign objects. See page .
Lights Check the operation of
the headlights, parking lights,
taillights, high-mount brake light,
and license plate lights monthly.
See page .
Youshouldcheckthefollowing
items at the specif ied intervals. If
you are unsure of how to perf orm
any check, turn to the appropriate
page listed. U.S. Vehicles:
According to state and federal
regulations, f ailure to perf orm
maintenance on the items marked
with will not void your emissions
warranties. However, all
maintenance services should be
perf ormed in accordance with the
intervals indicated by the
inf ormation display.
However, service at a dealer is not
mandatory to keep your warranties
in effect. Maintenance may be done
by any qualif ied service f acility or
person who is skilled in this type of
automotive service. Make sure to
have the service f acility or person
reset the display as previously
described. Keep all receipts as proof
of completion, and have the person
who does the work f ill out your
Honda Service History or Canadian
Maintenance Log. Check your
warranty booklet f or more
inf ormation.
We recommend using Honda parts
and fluids whenever you have
maintenance done. These are
manuf actured to the same high
quality standards as the original
components, so you can be conf ident
of their perf ormance and durability.
323
326
343
329
266
267
Maintenance Minder
Owner’s Maintenance Checks Maintenance, replacement, or
repair of emissions control
devices and systems may be done
by any automotive repair
establishment or individual using
parts that are ‘‘certif ied’’ to EPA
standards.
312
�����—�����—�����y�
�������������y���
�)�������
���y�����
���y
2009 Accord Sedan
Page 332 of 420
Theheadlightswereproperlyaimed
when your vehicle was new. If you
regularly carry heavy items in the
trunk or pull a trailer, readjustment
may be required. Adjustments
should be done by your dealer or
other qualif ied technician.Your vehicle has halogen headlight
bulbs. When replacing a bulb, handle
it by its base, and protect the glass
f rom contact with your skin or hard
objects. If you touch the glass, clean
it with denatured alcohol and a clean
cloth.
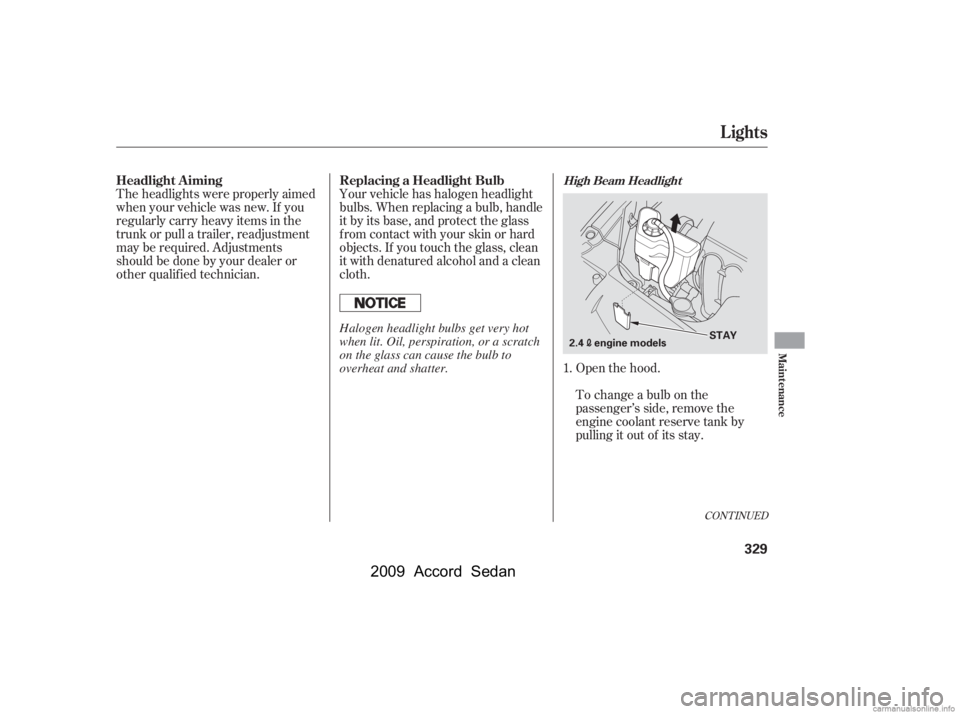
Open the hood.
To change a bulb on the
passenger’s side, remove the
engine coolant reserve tank by
pulling it out of its stay.
1.
CONT INUED
Headlight A iming
Replacing a Headlight Bulb
Lights
High Beam Headlight
Maint enance
329
2.4engine modelsSTAY
Halogen headlight bulbs get very hot
when lit. Oil, perspiration, or a scratch
on the glass can cause the bulb to
overheat and shatter.
�\f���—�\f���—�\f���y�
���������\f���y���
�)���\f���
�\f�y�\f�������y
2009 Accord Sedan
Page 334 of 420
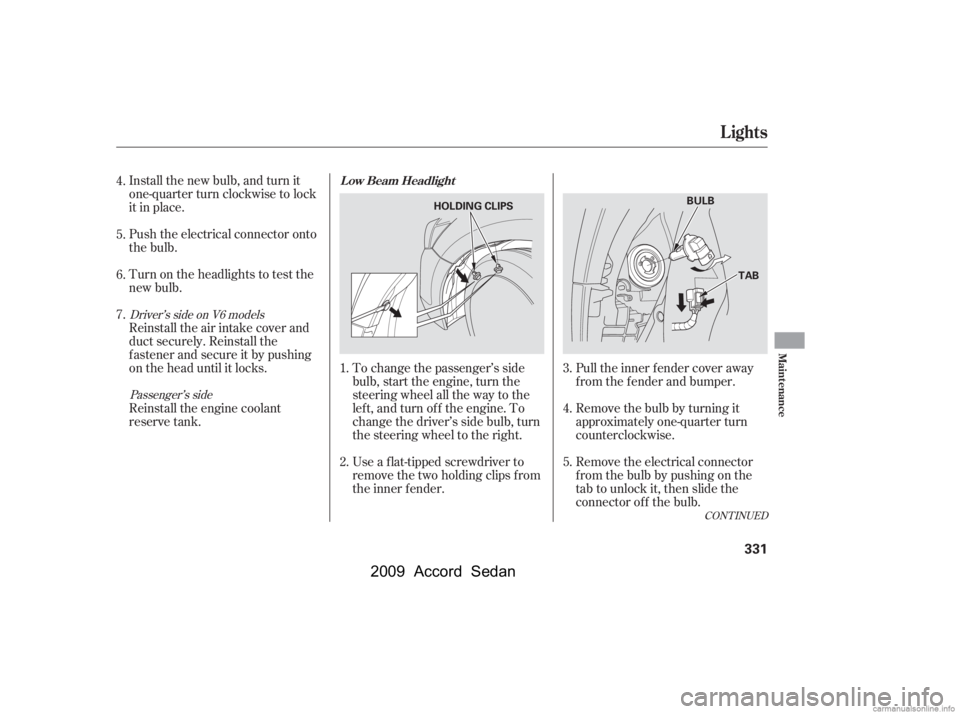
To change the passenger’s side
bulb, start the engine, turn the
steering wheel all the way to the
lef t, and turn of f the engine. To
change the driver’s side bulb, turn
the steering wheel to the right.
Install the new bulb, and turn it
one-quarter turn clockwise to lock
it in place.
Push the electrical connector onto
the bulb.
Turn on the headlights to test the
new bulb.
Reinstall the engine coolant
reserve tank.
Remove the electrical connector
f rom the bulb by pushing on the
tab to unlock it, then slide the
connector of f the bulb.
Remove the bulb by turning it
approximately one-quarter turn
counterclockwise.
Pull the inner f ender cover away
f rom the f ender and bumper.
Use a f lat-tipped screwdriver to
remove the two holding clips f rom
the inner f ender.
Reinstall the air intake cover and
duct securely. Reinstall the
f astener and secure it by pushing
on the head until it locks.
6.
5.
3.
4.
5.
1.
2.
7.
4.
CONT INUED
Passenger’s side
Driver’s side on V6 models L ow Beam Headlight
Lights
Maint enance
331
HOLDING CLIPS
BULB
TAB
�\f���—�\f���—�\f���y�
�������������y���
�)���\f���
�\f�y�\f�������y
2009 Accord Sedan
Page 335 of 420
Install the new bulb, and turn it
one-quarter turn clockwise to lock
it in place.
Push the electrical connector onto
the bulb.
Put the inner f ender cover in place.
Install the two holding clips. Lock
each one in place by pushing on
the center.
Turn on the headlights to test the
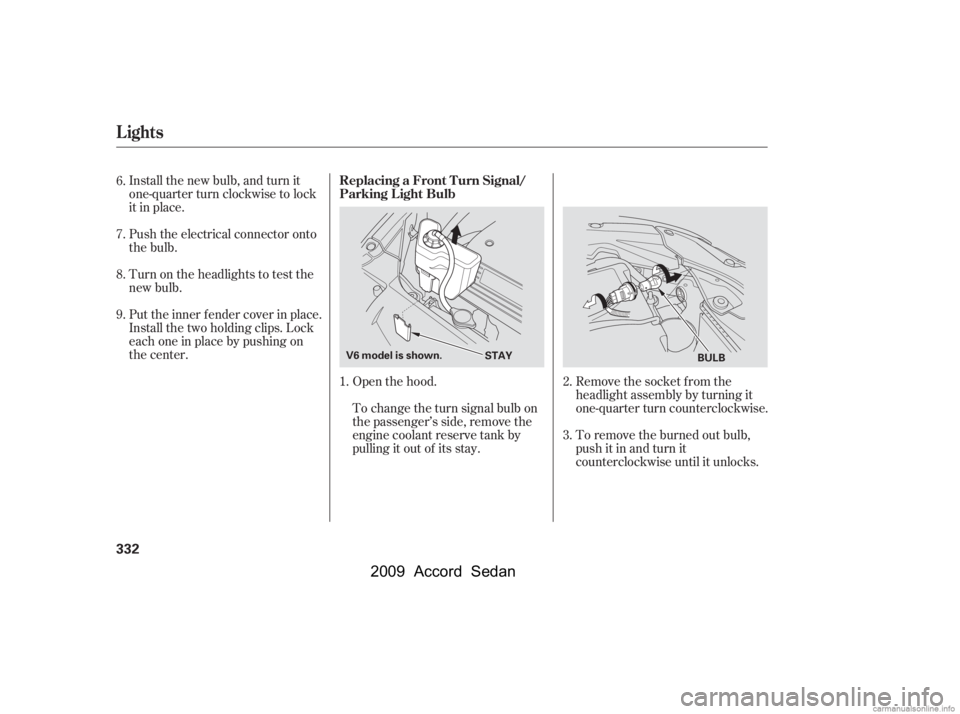
new bulb.Open the hood.
To change the turn signal bulb on
the passenger’s side, remove the
engine coolant reserve tank by
pulling it out of its stay.Remove the socket from the
headlight assembly by turning it
one-quarter turn counterclockwise.
To remove the burned out bulb,
push it in and turn it
counterclockwise until it unlocks.
1. 2.
8.
7.
6.
9.
3.
Lights
Replacing a Front T urn Signal/
Parking L ight Bulb
332
BULB
STAY
V6 model is shown.
�\f���—�\f���—�\f���y�
�������������y���
�)���\f���
�\f�y�\f�������y
2009 Accord Sedan
Page 336 of 420
Install the new bulb and turn it
clockwise to lock it in place.
Turn on the lights to make sure
the new bulb is working.
Reinstall the coolant reserve tank.To change the bulb on the driver’s
side, start the engine, turn the
steering wheel all the way to the
right, then turn of f the engine. To
change the bulb on the passenger’s
side, turn the steering wheel to the
lef t.
Insert the socket back into the
headlight assembly. Turn it
clockwise to lock it in place.
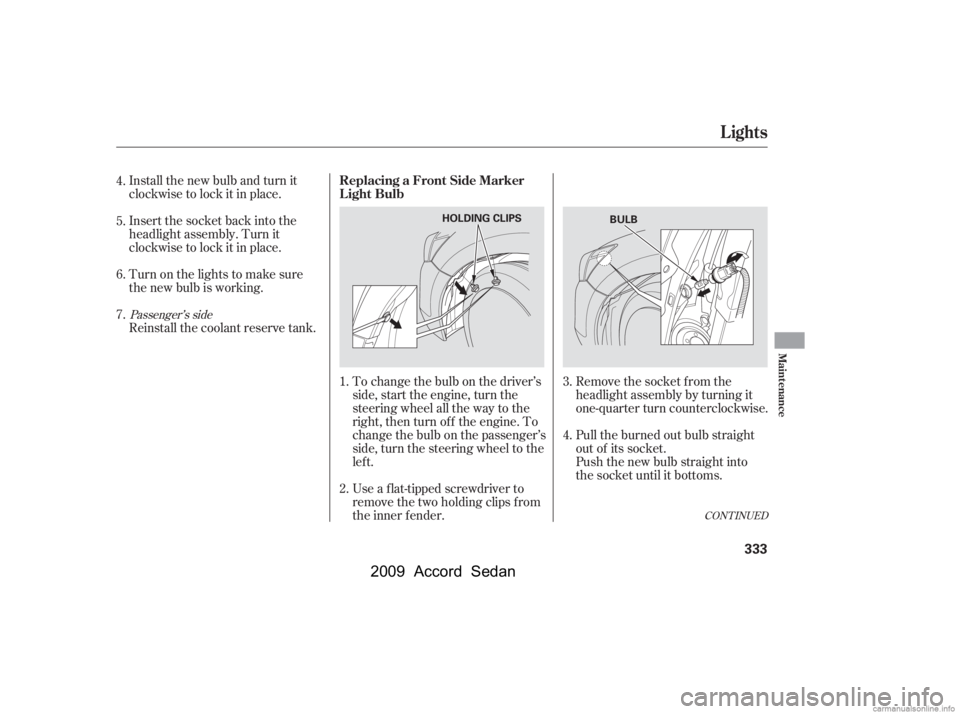
Use a f lat-tipped screwdriver to
remove the two holding clips f rom
the inner f ender.Remove the socket from the
headlight assembly by turning it
one-quarter turn counterclockwise.
Pull the burned out bulb straight
out of its socket.
Push the new bulb straight into
the socket until it bottoms.
6.
1.
7.
5.
4.
2.3.
4.
CONT INUED
Passenger’s side
Lights
Replacing a Front Side Marker
Light Bulb
Maint enance
333
HOLDING CLIPS
BULB
�\f���—�\f���—�\f���y�
�������������y���
�)���\f���
�\f�y�\f�������y
2009 Accord Sedan
Page 337 of 420
Insert the socket back into the
headlight assembly. Turn it
clockwise to lock it in place.
Turn on the lights to make sure
the new bulb is working.
Reinstall the inner f ender cover.
Then reinstall the holding clips,
andlocktheminplacebypushing
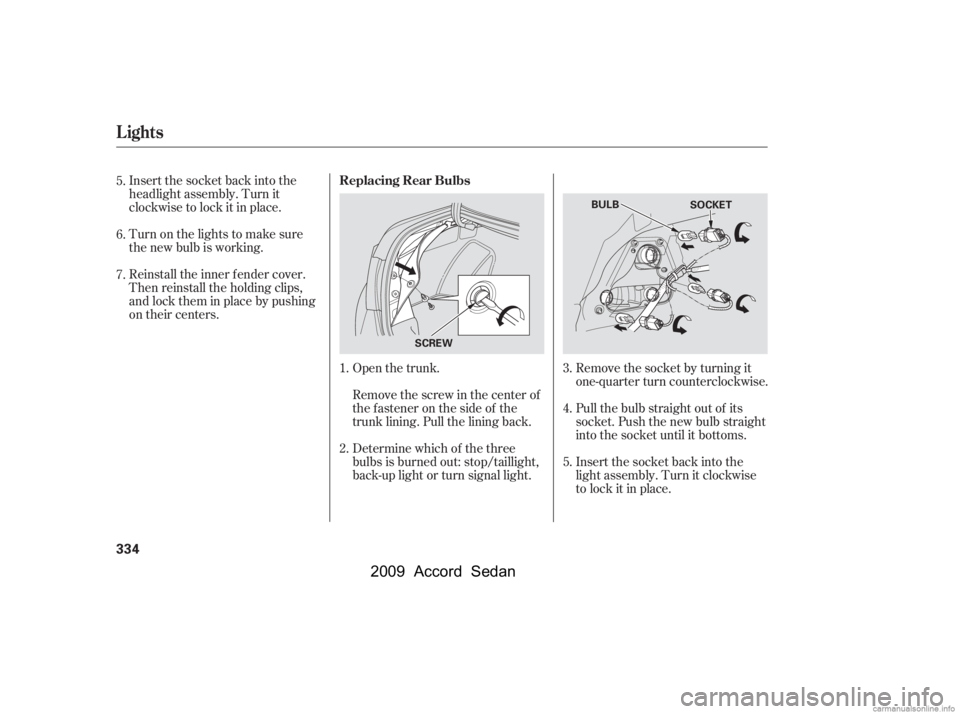
on their centers.Open the trunk.
Remove the screw in the center of
the fastener on the side of the
trunk lining. Pull the lining back.
Determine which of the three
bulbs is burned out: stop/taillight,
back-up light or turn signal light.Pull the bulb straight out of its
socket. Push the new bulb straight
into the socket until it bottoms.
Remove the socket by turning it
one-quarter turn counterclockwise.
Insert the socket back into the
light assembly. Turn it clockwise
to lock it in place.
5.
6.
7.
2.
1.4.
3.
5.
Lights
Replacing Rear Bulbs
334
SCREW SOCKET
BULB
�\f���—�\f���—�\f���y�
�������������y���
�)���\f���
�\f�y�\f�������y
2009 Accord Sedan