2009 GMC SIERRA trailer
[x] Cancel search: trailerPage 407 of 596

Maintenance When Trailer Towing
The vehicle needs service more often when pulling a
trailer. See this manual’s Maintenance Schedule or Index
for more information. Things that are especially important
in trailer operation are automatic transmission �uid,
engine oil, axle lubricant, belts, cooling system and brake
system. It is a good idea to inspect these before and
during the trip.
Check periodically to see that all hitch nuts and bolts
are tight.
Trailer Wiring Harness
The vehicle is equipped with one of the following
wiring harnesses for towing a trailer or hauling a
slide-in camper.
Basic Trailer Wiring
All regular, extended cab and crew cab pickups have a
seven-wire trailer towing harness.
For vehicles not equipped with heavy duty trailering,
the harness is secured to the vehicle’s frame behind the
spare tire mount. The harness requires the installation
of a trailer connector, which is available through
your dealer/retailer.
If towing a light-duty trailer with a standard four-way
round pin connector, an adapter is available from your
dealer/retailer.
4-81
Page 408 of 596

Heavy-Duty Trailer Wiring Harness
Package
For vehicles equipped with heavy duty trailering, the
harness is connected to a bracket on the hitch platform.
The seven-wire harness contains the following trailer
circuits:
Yellow: Left Stop/Turn Signal
Dark Green: Right Stop/Turn Signal
Brown: Taillamps
White: Ground
Light Green: Back-up Lamps
Red: Battery Feed*
Dark Blue: Trailer Brake**The fuses for these two circuits are installed in
the underhood electrical center, but the wires are
not connected. They should be connected by your
dealer/retailer or a quali�ed service center. The fuse
and wire for the ITBC is factory installed and connected
if the vehicle is equipped with an ITBC. The fuse for
the battery feed is not required if the vehicle has
an auxiliary battery. If the vehicle does not have an
auxiliary battery, have your dealer/retailer or authorized
service center install the required fuse.
If charging a remote (non-vehicle) battery, press the
tow/haul mode button located at the end of the shift lever.
This will boost the vehicle system voltage and properly
charge the battery. If the trailer is too light for tow/haul
mode, turn on the headlamps as a second way to boost
the vehicle system and charge the battery.
4-82
Page 409 of 596

Camper/Fifth-Wheel Trailer Wiring Package
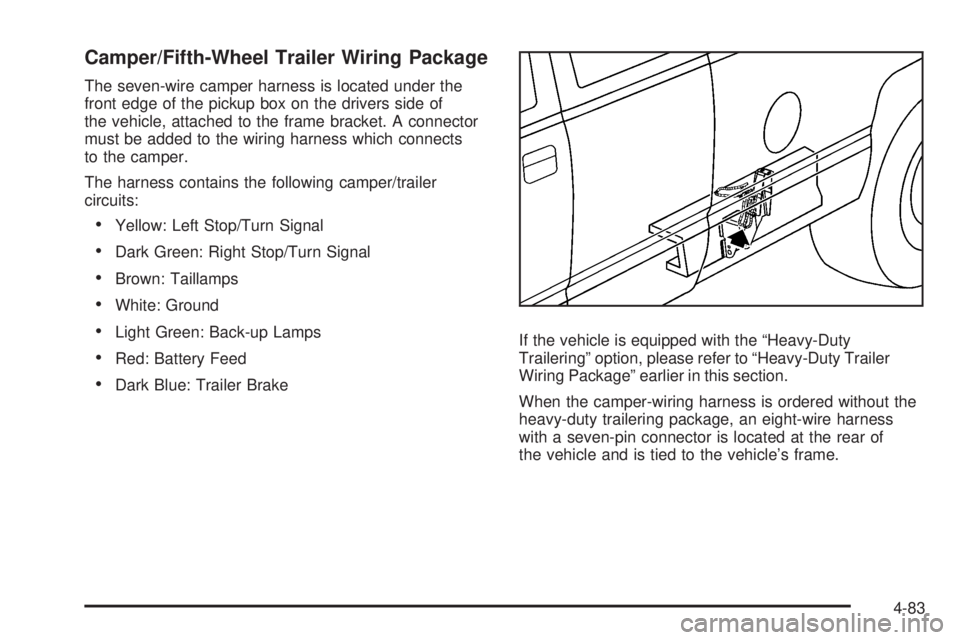
The seven-wire camper harness is located under the
front edge of the pickup box on the drivers side of
the vehicle, attached to the frame bracket. A connector
must be added to the wiring harness which connects
to the camper.
The harness contains the following camper/trailer
circuits:
Yellow: Left Stop/Turn Signal
Dark Green: Right Stop/Turn Signal
Brown: Taillamps
White: Ground
Light Green: Back-up Lamps
Red: Battery Feed
Dark Blue: Trailer BrakeIf the vehicle is equipped with the “Heavy-Duty
Trailering” option, please refer to “Heavy-Duty Trailer
Wiring Package” earlier in this section.
When the camper-wiring harness is ordered without the
heavy-duty trailering package, an eight-wire harness
with a seven-pin connector is located at the rear of
the vehicle and is tied to the vehicle’s frame.
4-83
Page 410 of 596

Electric Brake Control Wiring
Provisions
These wiring provisions are included with the vehicle as
part of the trailer wiring package. These provisions are
for an electric brake controller. The instrument panel
contains blunt cut wires behind the steering column for
the trailer brake controller. The harness contains the
following wires:
Dark Blue: Brake Signal to Trailer Connector
Red/Black: Battery
Light Blue/White: Brake Switch
White: Ground
It should be installed by your dealer/retailer or a
quali�ed service center.
If the vehicle is equipped with an ITBC, the blunt cuts
exist, but are not connected further in the harness.
If an aftermarket trailer brake controller is installed,
the ITBC must be disconnected. Do not power
both ITBC and aftermarket controllers to control
the trailer brakes at the same time.
Auxiliary Battery
The auxiliary battery provision can be used to supply
electrical power to additional equipment that may be
added, such as a slide-in camper. If the vehicle has this
provision, this relay will be located on the drivers side of
the vehicle, next to the underhood electrical center.Be sure to follow the proper installation instructions
that are included with any electrical equipment that
is installed.
Notice:Leaving electrical equipment on for
extended periods will drain the battery. Always turn
off electrical equipment when not in use and do
not use equipment that exceeds the maximum
amperage rating for the auxiliary battery provision.
Trailer Recommendations
Subtract the hitch loads from the Cargo Weight Rating
(CWR). CWR is the maximum weight of the load the
vehicle can carry. It does not include the weight of the
people inside, but you can �gure about 150 lbs. (68 kg)
for each passenger. The total cargo load must not be
more than the vehicles CWR.
Weigh the vehicle with the trailer attached, so
the GVWR or GAWR are not exceeded. If using a
weight-distributing hitch, weigh the vehicle without
the spring bars in place.
The best performance is obtained by correctly spreading
out the weight of the load and choosing the correct
hitch and trailer brakes.
For more information seeTowing a Trailer on page 4-51.
4-84
Page 432 of 596

How to Check Automatic Transmission
Fluid
Because this operation can be a little difficult, you may
choose to have this done at the dealer/retailer service
department.
If you do it yourself, be sure to follow all the instructions
here or you could get a false reading on the dipstick.
Notice:Too much or too little �uid can damage your
transmission. Too much can mean that some of the
�uid could come out and fall on hot engine parts or
exhaust system parts, starting a �re. Too little �uid
could cause the transmission to overheat. Be sure
to get an accurate reading if you check your
transmission �uid.
Wait at least 30 minutes before checking the
transmission �uid level if you have been driving:
When outside temperatures are above 90°F (32°C).
At high speed for quite a while.
In heavy traffic — especially in hot weather.
While pulling a trailer.
To get the right reading, the �uid should be at normal
operating temperature, which is 180°F to 200°F
(82°C to 93°C).Get the vehicle warmed up by driving about 15 miles
(24 km) when outside temperatures are above 50°F
(10°C). If it is colder than 50°F (10°C), drive the vehicle
in 3 (Third) until the engine temperature gage moves
and then remains steady for 10 minutes.
A cold �uid check can be made after the vehicle has
been sitting for eight hours or more with the engine off,
but this is used only as a reference. Let the engine
run at idle for �ve minutes if outside temperatures are
50°F (10°C) or more. If it is colder than 50°F (10°C), you
may have to idle the engine longer. Should the �uid
level be low during this cold check, you must check the
�uid hot before adding �uid. Checking the �uid hot
will give you a more accurate reading of the �uid level.
Checking the Fluid Level
Prepare the vehicle as follows:
1. Park the vehicle on a level place. Keep the engine
running.
2. With the parking brake applied, place the shift lever
in P (Park).
3. With your foot on the brake pedal, move the shift
lever through each gear range, pausing for about
three seconds in each range. Then, position
the shift lever in P (Park).
4. Let the engine run at idle for three minutes or more.
5-22
Page 446 of 596

If No Steam Is Coming From The
Engine Compartment
The ENGINE OVERHEATED STOP ENGINE or the
ENGINE OVERHEATED IDLE ENGINE message, along
with a low coolant condition, can indicate a serious
problem.
If you get an engine overheat warning, but see or hear
no steam, the problem may not be too serious.
Sometimes the engine can get a little too hot when you:
Climb a long hill on a hot day.
Stop after high-speed driving.
Idle for long periods in traffic.
Tow a trailer. SeeTowing a Trailer on page 4-51.If you get the ENGINE OVERHEATED STOP ENGINE or
the ENGINE OVERHEATED IDLE ENGINE message
with no sign of steam, try this for a minute or so:
1. Turn the air conditioning off.
2. Turn the heater on to the highest temperature and
to the highest fan speed. Open the windows as
necessary.
3. If you are stopped in a traffic jam, apply the brake,
shift to N (Neutral); otherwise, shift to the highest
gear while driving—D(Drive) or 3 (Third).
If the temperature overheat gage is no longer in the
overheat zone or an overheat warning no longer displays,
the vehicle can be driven. Continue to drive the vehicle
slow for about 10 minutes. Keep a safe vehicle distance
from the car in front of you. If the warning does not come
back on, continue to drive normally.
If the warning continues, pull over, stop, and park the
vehicle right away.
If there is no sign of steam, idle the engine for
�ve minutes while parked. If the warning is still
displayed, turn off the engine until it cools down.
Also, see “Overheated Engine Protection Operating
Mode” later in this section.
5-36
Page 447 of 596

Overheated Engine Protection
Operating Mode
If an overheated engine condition exists and the
REDUCED ENGINE POWER message is displayed, an
overheat protection mode which alternates �ring groups
of cylinders helps prevent engine damage. In this mode,
you will notice a loss in power and engine performance.
This operating mode allows the vehicle to be driven to a
safe place in an emergency. Driving extended miles (km)
and/or towing a trailer in the overheat protection mode
should be avoided.
Notice:After driving in the overheated engine
protection operating mode, to avoid engine damage,
allow the engine to cool before attempting any repair.
The engine oil will be severely degraded. Repair the
cause of coolant loss, change the oil and reset the oil
life system. SeeEngine Oil on page 5-15.
Engine Fan Noise
If the vehicle has a clutched engine cooling fan, when the
clutch is engaged, the fan spins faster to provide more air
to cool the engine. In most everyday driving conditions,
the fan is spinning slower and the clutch is not fully
engaged. This improves fuel economy and reduces fan
noise. Under heavy vehicle loading, trailer towing, and/or
high outside temperatures, the fan speed increases as
the clutch more fully engages, so you may hear an
increase in fan noise. This is normal and should not be
mistaken as the transmission slipping or making extra
shifts. It is merely the cooling system functioning properly.
The fan will slow down when additional cooling is not
required and the clutch disengages.
You may also hear this fan noise when you start the
engine. It will go away as the fan clutch partially
disengages.
If the vehicle has electric cooling fans, you may hear
the fans spinning at low speed during most everyday
driving. The fans may turn off if no cooling is required.
Under heavy vehicle loading, trailer towing, and/or
high outside temperatures, or if you are operating the
air conditioning system, the fans may change to
high speed and you may hear an increase in fan noise.
This is normal and indicates that the cooling system
is functioning properly. The fans will change to low
speed when additional cooling is no longer required.
5-37
Page 536 of 596

Underhood Fuse Block
If your vehicle has the DURAMAX®Diesel engine, see
the DURAMAX®Diesel manual for more information.
If the vehicle is a Two-mode Hybrid, see the Two-mode
Hybrid manual for more information.
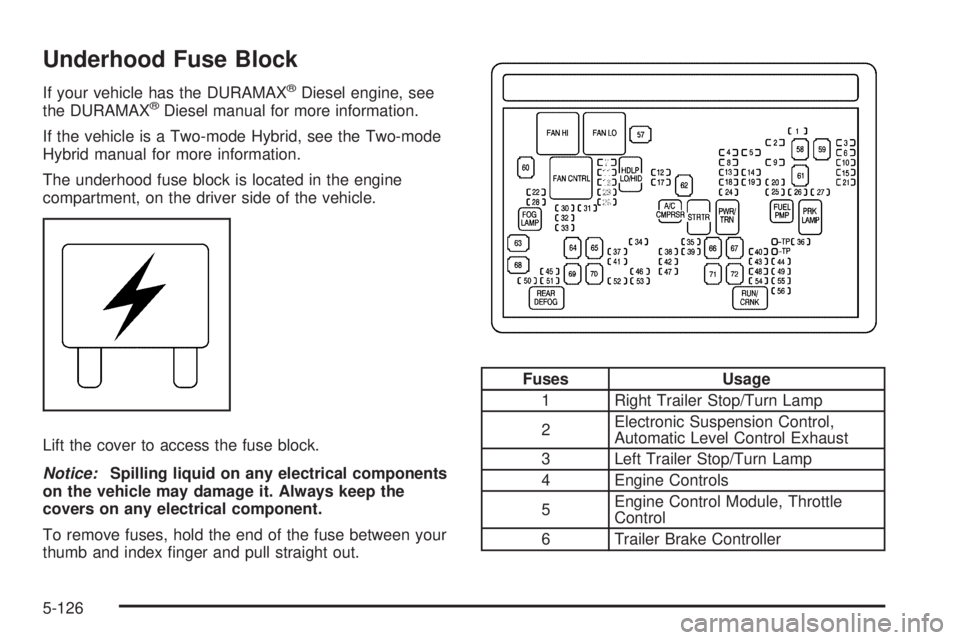
The underhood fuse block is located in the engine
compartment, on the driver side of the vehicle.
Lift the cover to access the fuse block.
Notice:Spilling liquid on any electrical components
on the vehicle may damage it. Always keep the
covers on any electrical component.
To remove fuses, hold the end of the fuse between your
thumb and index �nger and pull straight out.
Fuses Usage
1 Right Trailer Stop/Turn Lamp
2Electronic Suspension Control,
Automatic Level Control Exhaust
3 Left Trailer Stop/Turn Lamp
4 Engine Controls
5Engine Control Module, Throttle
Control
6 Trailer Brake Controller
5-126