2009 GMC SIERRA spare tire
[x] Cancel search: spare tirePage 488 of 596

If your vehicle has DIC buttons, tire pressure levels can
be viewed by the driver. For additional information and
details about the DIC operation and displays seeDIC
Operation and Displays (With DIC Buttons) on page 3-53
orDIC Operation and Displays (Without DIC Buttons) on
page 3-59andDIC Warnings and Messages on
page 3-66.
The low tire pressure warning light may come on in cool
weather when the vehicle is �rst started, and then
turn off as you start to drive. This could be an early
indicator that the air pressure in the tire(s) are getting
low and need to be in�ated to the proper pressure.
A Tire and Loading Information label, attached to your
vehicle, shows the size of your vehicle’s original
equipment tires and the correct in�ation pressure for
your vehicle’s tires when they are cold. SeeLoading the
Vehicle on page 4-32, for an example of the Tire and
Loading Information label and its location on your
vehicle. Also seeInflation - Tire Pressure on page 5-73.
Your vehicle’s TPMS can warn you about a low tire
pressure condition but it does not replace normal
tire maintenance. SeeTire Inspection and Rotation on
page 5-81andTires on page 5-65.
Notice:Liquid tire sealants could damage the Tire
Pressure Monitor System (TPMS) sensors. Sensor
damage caused by using a tire sealant is not
covered by your warranty. Do not use liquid tire
sealants.TPMS Malfunction Light and Message
The TPMS will not function properly if one or more of the
TPMS sensors are missing or inoperable. When the
system detects a malfunction, the low tire warning light
�ashes for about one minute and then stays on for
the remainder of the ignition cycle. A DIC warning
message is also displayed. The low tire warning light
and DIC warning message come on at each ignition
cycle until the problem is corrected. Some of the
conditions that can cause the malfunction light and DIC
message to come on are:
One of the road tires has been replaced with the
spare tire. The spare tire does not have a TPMS
sensor. The TPMS malfunction light and DIC
message should go off once you re-install the road
tire containing the TPMS sensor.
The TPMS sensor matching process was started
but not completed or not completed successfully
after rotating the vehicle’s tires. The DIC message
and TPMS malfunction light should go off once
the TPMS sensor matching process is performed
successfully. See “TPMS Sensor Matching Process”
later in this section.
5-78
Page 491 of 596

Tire Inspection and Rotation
We recommend that you regularly inspect your
vehicle’s tires, including the spare tire, for signs of
wear or damage. SeeWhen It Is Time for New
Tires on page 5-83for more information.
Tires should be rotated every 5,000 to 8,000 miles
(8 000 to 13 000 km). SeeScheduled Maintenance
(Gasoline Engine) on page 6-4.
The purpose of a regular tire rotation is to achieve
a uniform wear for all tires on the vehicle. This
will ensure that your vehicle continues to perform
most like it did when the tires were new.
Any time you notice unusual wear, rotate your tires
as soon as possible and check wheel alignment.
Also check for damaged tires or wheels. SeeWhen
It Is Time for New Tires on page 5-83andWheel
Replacement on page 5-89.
If your vehicle has dual rear wheels, also seeDual
Tire Operation on page 5-75.If your vehicle has single rear wheels and the
tread design for the front tires is the same as the
rear tires, use the rotation pattern shown here
when rotating the tires.
5-81
Page 493 of 596

Make certain that all wheel nuts are properly
tightened. See “Wheel Nut Torque” under
Capacities and Specifications on page 5-129.
{CAUTION:
Rust or dirt on a wheel, or on the parts to
which it is fastened, can make wheel nuts
become loose after time. The wheel could
come off and cause an accident. When you
change a wheel, remove any rust or dirt from
places where the wheel attaches to the
vehicle. In an emergency, you can use a
cloth or a paper towel to do this; but be sure
to use a scraper or wire brush later, if
needed, to get all the rust or dirt off. See
Changing a Flat Tire on page 5-92.
If your vehicle has a Tire Pressure Monitor
System (TPMS), reset the TPMS sensors after
rotating the tires. SeeTire Pressure Monitor
Operation on page 5-77.
Make sure the spare tire, if your vehicle has one,
is stored securely. Push, pull, and then try to
rotate or turn the tire. If it moves, tighten the cable.
SeeStoring a Flat or Spare Tire and Tools on
page 5-109.
When It Is Time for New Tires
Various factors, such as maintenance, temperatures,
driving speeds, vehicle loading, and road conditions,
in�uence when you need new tires.
One way to tell when it is
time for new tires is to
check the treadwear
indicators, which appear
when your tires have
only 1/16 inch (1.6 mm) or
less of tread remaining.
Some commercial
truck tires may not have
treadwear indicators.
5-83
Page 494 of 596

You need new tires if any of the following statements
are true:
You can see the indicators at three or more places
around the tire.
You can see cord or fabric showing through the
tire’s rubber.
The tread or sidewall is cracked, cut, or snagged
deep enough to show cord or fabric.
The tire has a bump, bulge, or split.
The tire has a puncture, cut, or other damage that
cannot be repaired well because of the size or
location of the damage.
The rubber in tires degrades over time, even if they are
not being used. This is also true for the spare tire, if
your vehicle has one. Multiple conditions affect how fast
this aging takes place, including temperatures, loading
conditions, and in�ation pressure maintenance. With
proper care and maintenance tires will typically wear out
before they degrade due to age. If you are unsure
about the need to replace your tires as they get older,
consult the tire manufacturer for more information.
Buying New Tires
GM has developed and matched speci�c tires for your
vehicle. The original equipment tires installed on your
vehicle, when it was new, were designed to meet
General Motors Tire Performance Criteria Speci�cation
(TPC spec) system rating. If you need replacement tires,
GM strongly recommends that you get tires with the same
TPC Spec rating. This way, your vehicle will continue to
have tires that are designed to give the same
performance and vehicle safety, during normal use, as
the original tires.
GM’s exclusive TPC Spec system considers over a
dozen critical speci�cations that impact the overall
performance of your vehicle, including brake system
performance, ride and handling, traction control, and tire
pressure monitoring performance. GM’s TPC Spec
number is molded onto the tire’s sidewall near the tire
size. If the tires have an all-season tread design,
the TPC spec number will be followed by a MS, for mud
and snow. SeeTire Sidewall Labeling on page 5-66
for additional information.
GM recommends replacing tires in sets of four (or six if
your vehicle has dual rear wheels). This is because
uniform tread depth on all tires will help keep your vehicle
performing most like it did when the tires were new.
Replacing less than a full set of tires can affect the
braking and handling performance of your vehicle. See
Tire Inspection and Rotation on page 5-81for information
on proper tire rotation.
5-84
Page 496 of 596

Different Size Tires and Wheels
If you add wheels or tires that are a different size than
your original equipment wheels and tires, this could
affect the way your vehicle performs, including its
braking, ride and handling characteristics, stability, and
resistance to rollover. Additionally, if your vehicle
has electronic systems such as anti-lock brakes, rollover
airbags, traction control, and electronic stability control,
the performance of these systems can be affected.
{CAUTION:
If you add different sized wheels, your vehicle may
not provide an acceptable level of performance
and safety if tires not recommended for those
wheels are selected. You may increase the
chance that you will crash and suffer serious
injury. Only use GM speci�c wheel and tire
systems developed for your vehicle, and have
them properly installed by a GM certi�ed
technician.
SeeBuying New Tires on page 5-84andAccessories
and Modifications on page 5-4for additional information.
Uniform Tire Quality Grading
Quality grades can be found where applicable on
the tire sidewall between tread shoulder and
maximum section width. For example:
Treadwear 200 Traction AA
Temperature A
The following information relates to the system
developed by the United States National
Highway Traffic Safety Administration (NHTSA),
which grades tires by treadwear, traction, and
temperature performance. This applies only to
vehicles sold in the United States. The grades are
molded on the sidewalls of most passenger car
tires. The Uniform Tire Quality Grading (UTQG)
system does not apply to deep tread, winter-type
snow tires, space-saver, or temporary use spare
tires, tires with nominal rim diameters of
10 to 12 inches (25 to 30 cm), or to some
limited-production tires.
While the tires available on General Motors
passenger cars and light trucks may vary with
respect to these grades, they must also conform
to federal safety requirements and additional
General Motors Tire Performance Criteria (TPC)
standards.
5-86
Page 503 of 596

A. Wheel Block
B. Flat Tire
The following information explains how to use the jack
and change a tire.
Removing the Spare Tire and Tools
A. Wing Nut Retaining
Tool Kit
B. Tool Kit
C. Wheel BlocksD. Jack
E. Jack Knob
F. Wing Nut Retaining
Wheel Blocks
Crew Cab
5-93
Page 505 of 596

For regular cab models, the equipment you will need is
behind the passenger’s seat. For extended and crew
cab models, the equipment is on the shelf behind
the passenger’s side second row seat.
1. Turn the knob on the jack counterclockwise to lower
the jack head to release the jack from its holder.
2. Remove the wheel blocks and the wheel block
retainer by turning the wing nut counterclockwise.
3. Remove the wing nut used to retain the storage
bag and tools by turning it counterclockwise.
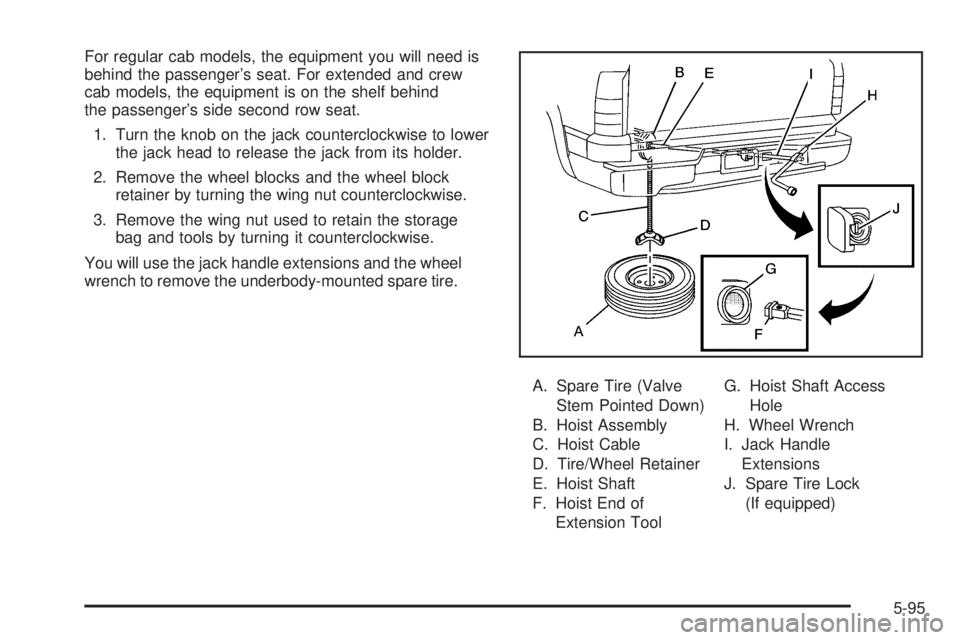
You will use the jack handle extensions and the wheel
wrench to remove the underbody-mounted spare tire.
A. Spare Tire (Valve
Stem Pointed Down)
B. Hoist Assembly
C. Hoist Cable
D. Tire/Wheel Retainer
E. Hoist Shaft
F. Hoist End of
Extension ToolG. Hoist Shaft Access
Hole
H. Wheel Wrench
I. Jack Handle
Extensions
J. Spare Tire Lock
(If equipped)
5-95
Page 506 of 596

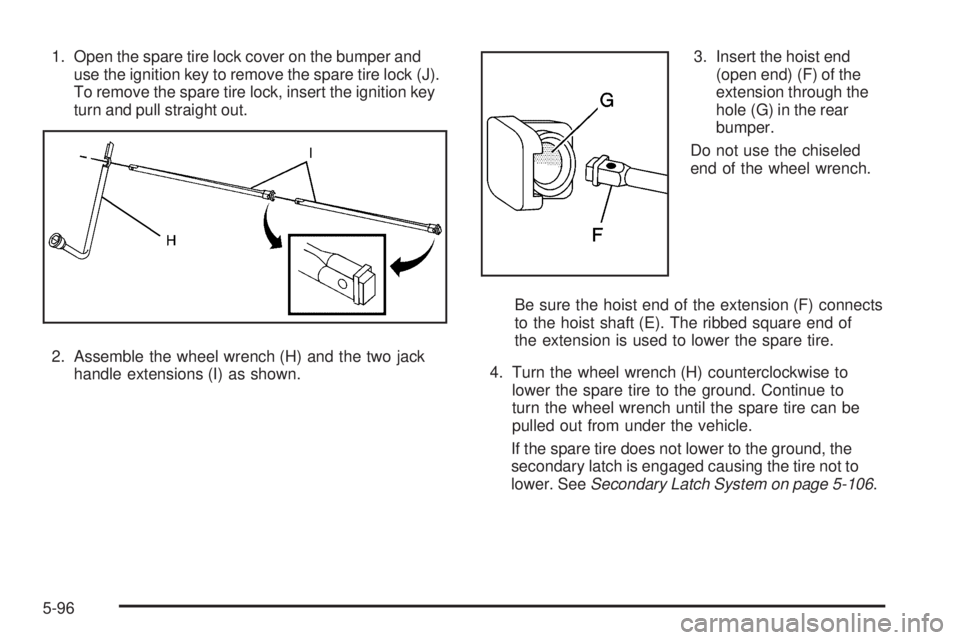
1. Open the spare tire lock cover on the bumper and
use the ignition key to remove the spare tire lock (J).
To remove the spare tire lock, insert the ignition key
turn and pull straight out.
2. Assemble the wheel wrench (H) and the two jack
handle extensions (I) as shown.3. Insert the hoist end
(open end) (F) of the
extension through the
hole (G) in the rear
bumper.
Do not use the chiseled
end of the wheel wrench.
Be sure the hoist end of the extension (F) connects
to the hoist shaft (E). The ribbed square end of
the extension is used to lower the spare tire.
4. Turn the wheel wrench (H) counterclockwise to
lower the spare tire to the ground. Continue to
turn the wheel wrench until the spare tire can be
pulled out from under the vehicle.
If the spare tire does not lower to the ground, the
secondary latch is engaged causing the tire not to
lower. SeeSecondary Latch System on page 5-106.
5-96