2009 GMC SIERRA 1500 seats
[x] Cancel search: seatsPage 249 of 602

4. Press the trip/fuel button until the vehicle heading, for
example, N for North, is displayed in the DIC. Or, if
the vehicle does not have DIC buttons, press and
hold the trip odometer reset stem for two seconds to
select the next available variance zone. Repeat this
step until the appropriate variance zone is displayed.
5. If calibration is necessary, calibrate the compass.
See “Compass Calibration Procedure” following.
Compass Calibration
The compass can be manually calibrated. Only calibrate
the compass in a magnetically clean and safe location,
such as an open parking lot, where driving the vehicle in
circles is not a danger. It is suggested to calibrate away
from tall buildings, utility wires, manhole covers, or other
industrial structures, if possible.
If CAL should ever appear in the DIC display, the
compass should be calibrated.
If the DIC display does not show a heading, for example,
N for North, or the heading does not change after making
turns, there may be a strong magnetic �eld interfering
with the compass. Such interference may be caused by a
magnetic CB or cell phone antenna mount, a magnetic
emergency light, magnetic note pad holder, or any other
magnetic item. Turn off the vehicle, move the magnetic
item, then turn on the vehicle and calibrate the compass.To calibrate the compass, use the following procedure:
Compass Calibration Procedure
1. Before calibrating the compass, make sure the
compass zone is set to the variance zone in which
the vehicle is located. See “Compass Variance
(Zone) Procedure” earlier in this section.
Do not operate any switches such as window,
sunroof, climate controls, seats, etc. during
the calibration procedure.
2. Press the vehicle information button until PRESS
V
TO CALIBRATE COMPAS (Compass) displays. Or,
if the vehicle does not have DIC buttons, press the
trip odometer reset stem until CALIBRATE
COMPASS displays.
3. Press the set/reset button to start the compass
calibration. Or, if the vehicle does not have DIC
buttons, press and hold the trip odometer reset stem
for two seconds to start the compass calibration.
4. The DIC will display CALIBRATING: DRIVE IN
CIRCLES. Drive the vehicle in tight circles at less
than 5 mph (8 km/h) to complete the calibration. The
DIC will display CALIBRATION COMPLETE for a
few seconds when the calibration is complete. The
DIC display will then return to the previous menu.
3-65
Page 365 of 602

{CAUTION:
Things you put inside your vehicle can strike
and injure people in a sudden stop or turn, or
in a crash.
Put things in the cargo area of your
vehicle. Try to spread the weight evenly.
Never stack heavier things, like
suitcases, inside the vehicle so that some
of them are above the tops of the seats.
Do not leave an unsecured child restraint
in your vehicle.
When you carry something inside the
vehicle, secure it whenever you can.
Do not leave a seat folded down unless
you need to.
There is also important loading information for
off-road driving in this manual. See “Loading Your
Vehicle for Off-Road Driving“ underOff-Road
Driving on page 4-13.Two-Tiered Loading
Depending on the model of your pick-up, you can
create an upper load platform by positioning
two or four 2 inches (5 cm) by 6 inches (15 cm)
wooden planks across the width of the pickup box.
The planks must be inserted in the pickup box
depressions. The length of the planks must allow
for at least a 3/4 inch (2 cm) bearing surface
on each end of the plank.
When using this upper load platform, be sure the
load is securely tied down to prevent it from
shifting. The load’s center of gravity should be
positioned in a zone over the rear axle. The zone
is located in the area between the front of each
wheel well and the rear of each wheel well.
The center of gravity height must not extend above
the top of the pickup box �areboard.
Any load that extends beyond the vehicle’s
taillamp area must be properly marked according
to local laws and regulations.
Remember not to exceed the Gross Axle Weight
Rating (GAWR) of the front or rear axle.
4-39
Page 483 of 602

Tire Terminology and De�nitions
Air Pressure:The amount of air inside the
tire pressing outward on each square inch of
the tire. Air pressure is expressed in pounds
per square inch (psi) or kilopascal (kPa).
Accessory Weight
:This means the combined
weight of optional accessories. Some examples of
optional accessories are, automatic transmission,
power steering, power brakes, power windows,
power seats, and air conditioning.
Aspect Ratio
:The relationship of a tire’s height
to its width.
Belt
:A rubber coated layer of cords that is
located between the plies and the tread. Cords
may be made from steel or other reinforcing
materials.
Bead
:The tire bead contains steel wires wrapped
by steel cords that hold the tire onto the rim.
Bias Ply Tire
:A pneumatic tire in which the plies
are laid at alternate angles less than 90 degrees
to the centerline of the tread.Cold Tire Pressure
:The amount of air pressure
in a tire, measured in pounds per square inch (psi)
or kilopascals (kPa) before a tire has built up heat
from driving. SeeInflation - Tire Pressure on
page 5-76.
Curb Weight
:The weight of a motor vehicle
with standard and optional equipment including
the maximum capacity of fuel, oil, and coolant,
but without passengers and cargo.
DOT Markings
:A code molded into the sidewall
of a tire signifying that the tire is in compliance
with the U.S. Department of Transportation (DOT)
motor vehicle safety standards. The DOT code
includes the Tire Identi�cation Number (TIN), an
alphanumeric designator which can also identify
the tire manufacturer, production plant, brand,
and date of production.
GVWR
:Gross Vehicle Weight Rating.
SeeLoading the Vehicle on page 4-34.
GAWR FRT
:Gross Axle Weight Rating for the
front axle. SeeLoading the Vehicle on page 4-34.
GAWR RR
:Gross Axle Weight Rating for the
rear axle. SeeLoading the Vehicle on page 4-34.
5-73
Page 516 of 602

{CAUTION:
Wheel nuts that are improperly or incorrectly
tightened can cause the wheels to become loose or
come off. The wheel nuts should be tightened with
a torque wrench to the proper torque speci�cation
after replacing. Follow the torque speci�cation
supplied by the aftermarket manufacturer when
using accessory locking wheel nuts. SeeCapacities
and Specifications on page 5-131for original
equipment wheel nut torque speci�cations.
Notice:Improperly tightened wheel nuts can
lead to brake pulsation and rotor damage. To avoid
expensive brake repairs, evenly tighten the wheel
nuts in the proper sequence and to the proper torque
speci�cation. SeeCapacities and Specifications on
page 5-131for the wheel nut torque speci�cation.12. Tighten the nuts �rmly in a crisscross sequence as
shown by turning the wheel wrench clockwise.
Have a technician check the wheel nut tightness of
all wheels with a torque wrench after the �rst 100 miles
(160 km) and then 1,000 miles (1600 km) after that.
Repeat this service whenever you have a tire removed
or serviced. SeeCapacities and Specifications on
page 5-131for more information.
When you reinstall the regular wheel and tire, you
must also reinstall either the center cap, or bolt-on hub
cap, depending on what your vehicle is equipped with.
For center caps, place the cap on the wheel and tap it
into place until it seats �ush with the wheel. The cap only
goes on one way. Be sure to line up the tab on the center
cap with the indentation on the wheel. For bolt-on hub
caps, align the plastic nut caps with the wheel nuts and
then tighten by hand. Then use the wheel wrench to
tighten.
5-106
Page 535 of 602

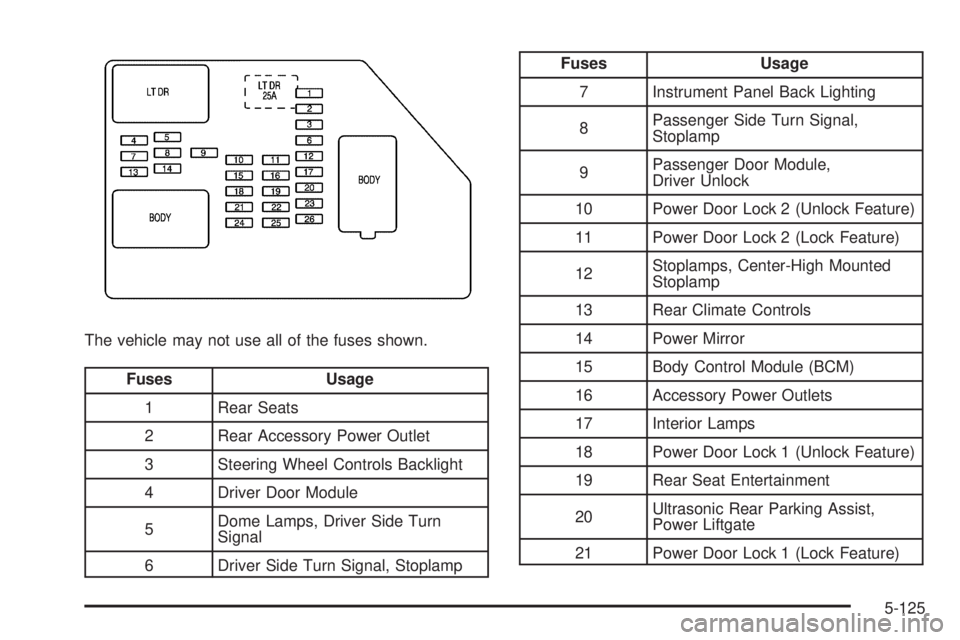
The vehicle may not use all of the fuses shown.
Fuses Usage
1 Rear Seats
2 Rear Accessory Power Outlet
3 Steering Wheel Controls Backlight
4 Driver Door Module
5Dome Lamps, Driver Side Turn
Signal
6 Driver Side Turn Signal, Stoplamp
Fuses Usage
7 Instrument Panel Back Lighting
8Passenger Side Turn Signal,
Stoplamp
9Passenger Door Module,
Driver Unlock
10 Power Door Lock 2 (Unlock Feature)
11 Power Door Lock 2 (Lock Feature)
12Stoplamps, Center-High Mounted
Stoplamp
13 Rear Climate Controls
14 Power Mirror
15 Body Control Module (BCM)
16 Accessory Power Outlets
17 Interior Lamps
18 Power Door Lock 1 (Unlock Feature)
19 Rear Seat Entertainment
20Ultrasonic Rear Parking Assist,
Power Liftgate
21 Power Door Lock 1 (Lock Feature)
5-125
Page 536 of 602

Fuses Usage
22 Driver Information Center (DIC)
23 Rear Wiper
24 Cooled Seats
25Driver Seat Module, Remote
Keyless Entry System
26Driver Power Door Lock
(Unlock Feature)
Circuit Breaker Usage
LT DRDriver Side Power Window Circuit
Breaker
Harness
ConnectorUsage
LT DR Driver Door Harness Connection
BODY Harness Connector
BODY Harness Connector
Center Instrument Panel Fuse Block
The center instrument panel fuse block is located
underneath the instrument panel, to the left of the
steering column.
Top View
Harness
ConnectorUsage
BODY 2 Body Harness Connector 2
BODY 1 Body Harness Connector 1
5-126
Page 560 of 602

Usage Fluid/Lubricant
Front Axle
(1500,
2500 HD,
and 3500 HD
Series)SAE 75W-90 Synthetic
Axle Lubricant
(GM Part No. U.S. 89021677,
in Canada 89021678) meeting
GM Speci�cation 9986115.
Rear AxleSAE 75W-90 Synthetic
Axle Lubricant
(GM Part No. U.S. 89021677,
in Canada 89021678) meeting
GM Speci�cation 9986115.
Transfer Case
(Four-Wheel
Drive)DEXRON
®-VI Automatic
Transmission Fluid.
Front Axle
Propshaft
Spline or
One-Piece
Propshaft
Spline
(Two-Wheel
Drive with
4-Speed
Auto. Trans.)Spline Lubricant, Special Lubricant
(GM Part No. U.S. 12345879,
in Canada 10953511) or
lubricant meeting requirements
of GM 9985830.
Rear Driveline
Center SplineChassis Lubricant
(GM Part No. U.S. 12377985,
in Canada 88901242) or lubricant
meeting requirements of NLGI #2,
Category LB or GC-LB.
Usage Fluid/Lubricant
Hood HingesMulti-Purpose Lubricant, Superlube
(GM Part No. U.S. 12346241,
in Canada 10953474).
Body Door
Hinge Pins,
Tailgate Hinge
and Linkage,
Folding Seats,
and Fuel
Door HingeMulti-Purpose Lubricant, Superlube
(GM Part No. U.S. 12346241,
in Canada 10953474).
Tailgate Handle
Pivot Points,
Hinges, Latch
Bolt, and
LinkageMulti-Purpose Lubricant, Superlube
(GM Part No. U.S. 12346241,
in Canada 10953474).
Weatherstrip
ConditioningWeatherstrip Lubricant
(GM Part No. U.S. 3634770,
in Canada 10953518) or
Dielectric Silicone Grease
(GM Part No. U.S. 12345579,
in Canada 992887).
Weatherstrip
SqueaksSynthetic Grease with
Te�on, Superlube
(GM Part No. U.S. 12371287,
in Canada 10953437).
6-16
Page 593 of 602

Fuses
Center Instrument Panel Fuse Block.............5-126
Fuses and Circuit Breakers.........................5-124
Instrument Panel Fuse Block.......................5-124
Underhood Fuse Block...............................5-127
Windshield Wiper.......................................5-123
G
Gage
Oil Pressure...............................................3-48
Speedometer..............................................3-35
Tachometer.................................................3-35
Voltmeter Gage...........................................3-41
Gages
Engine Coolant Temperature.........................3-44
Fuel..........................................................3-51
Trip Odometer.............................................3-35
Garage Door Opener.......................................2-73
Gasoline
Octane........................................................ 5-7
Speci�cations............................................... 5-7
Glove Box.....................................................2-80
GM Mobility Reimbursement Program.................. 7-7
H
Halogen Bulbs................................................5-61
Hazard Warning Flashers................................... 3-8
Head Restraints............................................... 1-3
Headlamp
Aiming .......................................................5-58
Headlamps....................................................5-61
Bulb Replacement.......................................5-61
Daytime Running Lamps (DRL).....................3-17
Exterior Lamps............................................3-16
Flash-to-Pass..............................................3-10
High/Low Beam Changer..............................3-10
On Reminder..............................................3-17
Pickup Box Identi�cation and Fender Marker
Lamps ....................................................5-63
Heated Seats................................................... 1-8
Heater...................................................3-24, 3-25
Engine Coolant...........................................2-27
Highbeam On Light.........................................3-50
High-Speed Operation, Tires.............................5-77
Highway Hypnosis...........................................4-28
Hill and Mountain Roads..................................4-28
7