2009 GMC SAVANA PASSENGER air condition
[x] Cancel search: air conditionPage 4 of 406
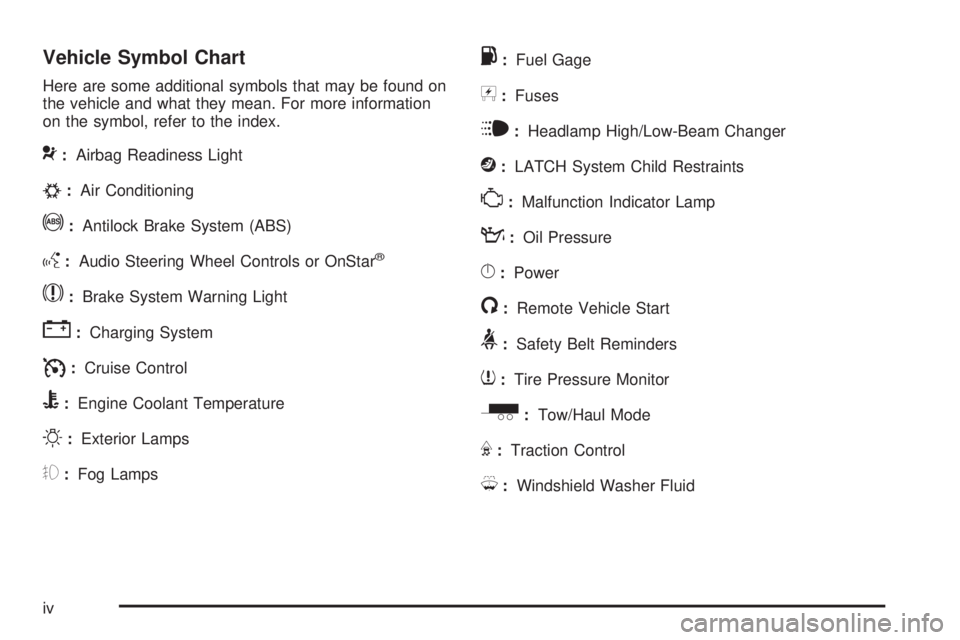
Vehicle Symbol Chart
Here are some additional symbols that may be found on
the vehicle and what they mean. For more information
on the symbol, refer to the index.
9:Airbag Readiness Light
#:Air Conditioning
!:Antilock Brake System (ABS)
g:Audio Steering Wheel Controls or OnStar®
$:Brake System Warning Light
":Charging System
I:Cruise Control
B:Engine Coolant Temperature
O:Exterior Lamps
#:Fog Lamps
.:Fuel Gage
+:Fuses
i:Headlamp High/Low-Beam Changer
j:LATCH System Child Restraints
*:Malfunction Indicator Lamp
::Oil Pressure
}:Power
/:Remote Vehicle Start
>:Safety Belt Reminders
7:Tire Pressure Monitor
_:Tow/Haul Mode
F:Traction Control
M:Windshield Washer Fluid
iv
Page 30 of 406
Shoulder Belt Height Adjuster
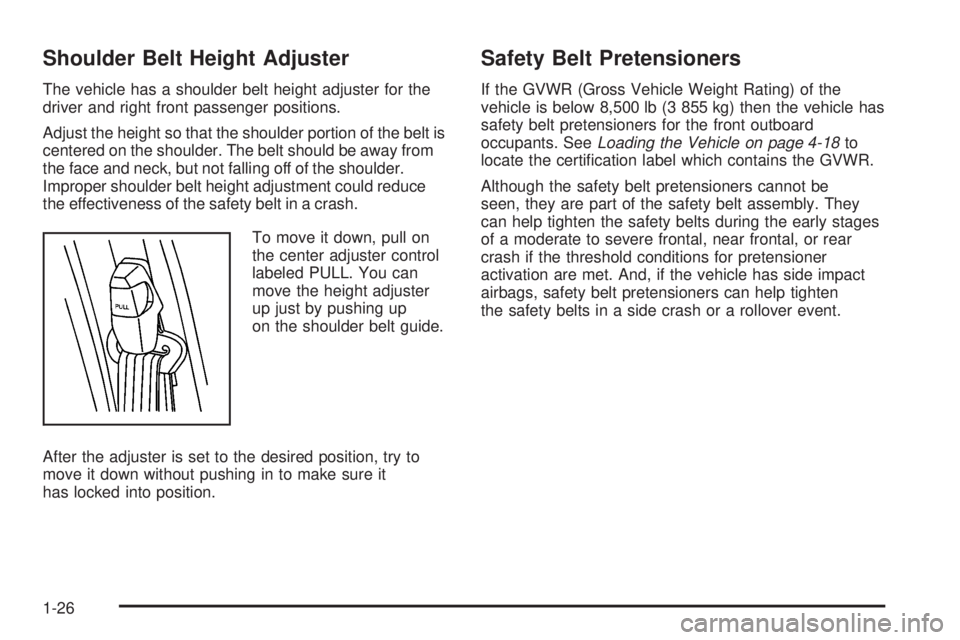
The vehicle has a shoulder belt height adjuster for the
driver and right front passenger positions.
Adjust the height so that the shoulder portion of the belt is
centered on the shoulder. The belt should be away from
the face and neck, but not falling off of the shoulder.
Improper shoulder belt height adjustment could reduce
the effectiveness of the safety belt in a crash.
To move it down, pull on
the center adjuster control
labeled PULL. You can
move the height adjuster
up just by pushing up
on the shoulder belt guide.
After the adjuster is set to the desired position, try to
move it down without pushing in to make sure it
has locked into position.
Safety Belt Pretensioners
If the GVWR (Gross Vehicle Weight Rating) of the
vehicle is below 8,500 lb (3 855 kg) then the vehicle has
safety belt pretensioners for the front outboard
occupants. SeeLoading the Vehicle on page 4-18to
locate the certification label which contains the GVWR.
Although the safety belt pretensioners cannot be
seen, they are part of the safety belt assembly. They
can help tighten the safety belts during the early stages
of a moderate to severe frontal, near frontal, or rear
crash if the threshold conditions for pretensioner
activation are met. And, if the vehicle has side impact
airbags, safety belt pretensioners can help tighten
the safety belts in a side crash or a rollover event.
1-26
Page 54 of 406
Securing a Child Restraint in the
Right Front Seat Position (With
Passenger Sensing System)
Your vehicle has airbags. A rear seat is a safer place to
secure a forward-facing child restraint. SeeWhere to
Put the Restraint on page 1-39.
In addition, the vehicle has a passenger sensing system
which is designed to turn off the right front passenger
frontal airbag under certain conditions. SeePassenger
Sensing System on page 1-71andPassenger Airbag
Status Indicator on page 3-29for more information,
including important safety information.
A label on the sun visor says, “Never put a rear-facing
child seat in the front.” This is because the risk to
the rear-facing child is so great, if the airbag deploys.
{CAUTION:
A child in a rear-facing child restraint can be
seriously injured or killed if the right front
passenger airbag inflates. This is because the
back of the rear-facing child restraint would be
very close to the inflating airbag. A child in a
forward-facing child restraint can be seriously
injured or killed if the right front passenger airbag
inflates and the passenger seat is in a forward
position.
Even if the passenger sensing system has turned
off the right front passenger frontal airbag, no
system is fail-safe. No one can guarantee that an
airbag will not deploy under some unusual
circumstance, even though it is turned off.
CAUTION: (Continued)
1-50
Page 72 of 406
This switch should only be turned to the off position if
the person in the right front passenger position is a
member of a passenger risk group identified by
the national government as follows:
Infant.An infant (less than 1 year old) must
ride in the front seat because:
•
My vehicle has no rear seat;
•My vehicle has a rear seat too small to
accommodate a rear-facing infant seat; or
•The infant has a medical condition which, according
to the infant’s physician, makes it necessary for the
infant to ride in the front seat so that the driver
can constantly monitor the child’s condition.
Child age 1 to 12.A child age 1 to 12 must
ride in the front seat because:
•
My vehicle has no rear seat;
•Although children ages 1 to 12 ride in the rear seat(s)
whenever possible, children ages 1 to 12 sometimes
must ride in the front because no space is available
in the rear seat(s) of my vehicle; or
•The child has a medical condition which, according to
the child’s physician, makes it necessary for the child
to ride in the front seat so that the driver can
constantly monitor the child’s condition.
Medical Condition.A passenger has a
medical condition which, according to his or
her physician:
•
Causes the passenger airbag to pose a special risk
for the passenger; and
•Makes the potential harm from the passenger
airbag in a crash greater than the potential
harm from turning off the airbag and allowing the
passenger, even if belted, to hit the dashboard
or windshield in a crash.
1-68
Page 75 of 406

Passenger Sensing System
If the instrument panel has one of the indicators
pictured in the following illustrations, the vehicle has a
passenger sensing system unless there is an airbag
off switch located on the instrument panel. If there
is an airbag off switch, the vehicle does not have
a passenger sensing system. SeeAirbag Off Switch
on page 1-67for more information.
The passenger airbag status indicator will be visible on
the instrument panel when the vehicle is started.
The words ON and OFF, or the symbol for on and off,
will be visible during the system check. When the
system check is complete, either the word ON or the
word OFF, or the symbol for on or the symbol for off, will
be visible. SeePassenger Airbag Status Indicator on
page 3-29.The passenger sensing system will turn off the right
front passenger frontal airbag under certain conditions.
The driver airbag and roof-rail airbags, if equipped,
are not part of the passenger sensing system.
The passenger sensing system works with sensors that
are part of the right front passenger seat. The sensors
are designed to detect the presence of a properly-seated
occupant and determine if the right front passenger
frontal airbag should be enabled (may inflate) or not.
Accident statistics show that children are safer if
they are restrained in the rear rather than the front seat.
We recommend that children be secured in a rear
seat, including: an infant or a child riding in a rear-facing
child restraint; a child riding in a forward-facing child
seat; an older child riding in a booster seat; and children,
who are large enough, using safety belts.
United States
Canada
1-71
Page 108 of 406
R (Reverse):Use this gear to back up.
Notice:Shifting to R (Reverse) while the vehicle is
moving forward could damage the transmission.
The repairs would not be covered by the vehicle
warranty. Shift to R (Reverse) only after the vehicle
is stopped.
To rock the vehicle back and forth to get out of snow,
ice or sand without damaging the transmission, see
If Your Vehicle is Stuck in Sand, Mud, Ice, or Snow on
page 4-17.
N (Neutral):In this position, the engine does not
connect with the wheels. To restart the engine when the
vehicle is already moving, use N (Neutral) only. Also,
use N (Neutral) when the vehicle is being towed.
{CAUTION:
Shifting into a drive gear while the engine is
running at high speed is dangerous. Unless your
foot is firmly on the brake pedal, the vehicle could
move very rapidly. You could lose control and hit
people or objects. Do not shift into a drive gear
while the engine is running at high speed.Notice:Shifting out of P (Park) or N (Neutral) with
the engine running at high speed may damage
the transmission. The repairs would not be covered
by the vehicle warranty. Be sure the engine is
not running at high speed when shifting the vehicle.
D (Drive):This position is for normal driving. It
provides the best fuel economy. If you need more
power for passing, and you are:
•Going less than about 35 mph (55 km/h), push the
accelerator pedal about halfway down.
•Going about 35 mph (55 km/h) or more, push the
accelerator all the way down.
You will shift down to the next gear and have more
power.
Downshifting the transmission in slippery road conditions
could result in skidding, see “Skidding” underLoss of
Control on page 4-11.
3 (Third):This position is also used for normal driving.
However it reduces vehicle speed more than D (Drive)
without using the brakes. You might choose 3 (Third)
instead of D (Drive) when driving on hilly, winding roads,
when towing a trailer, so there is less shifting between
gears and when going down a steep hill.
You should use 3 (Third) (or a lower gear as needed)
when towing a trailer to minimize heat build-up and
extend the life of the transmission.
2-24
Page 119 of 406

Instrument Panel Overview...............................3-4
Hazard Warning Flashers................................3-6
Horn .............................................................3-6
Tilt Wheel.....................................................3-6
Turn Signal/Multifunction Lever.........................3-7
Turn and Lane-Change Signals........................3-7
Headlamp High/Low-Beam Changer..................3-8
Flash-to-Pass.................................................3-8
Windshield Wipers..........................................3-8
Windshield Washer.........................................3-9
Cruise Control................................................3-9
Exterior Lamps.............................................3-12
Headlamps on Reminder................................3-13
Daytime Running Lamps (DRL).......................3-14
Automatic Headlamp System..........................3-14
Instrument Panel Brightness...........................3-15
Dome Lamps ...............................................3-15
Dome Lamp Override....................................3-15
Entry/Exit Lighting.........................................3-16
Reading Lamps............................................3-16
Electric Power Management...........................3-16
Battery Run-Down Protection..........................3-17
Accessory Power Outlet(s).............................3-17
Ashtray(s) and Cigarette Lighter......................3-18Climate Controls............................................3-18
Climate Control System.................................3-18
Outlet Adjustment.........................................3-20
Rear Heating System....................................3-21
Rear Air Conditioning and Heating System.......3-22
Warning Lights, Gages, and Indicators............3-23
Instrument Panel Cluster................................3-24
Speedometer and Odometer...........................3-25
Trip Odometer..............................................3-25
Safety Belt Reminders...................................3-26
Airbag Readiness Light
..................................3-27
Airbag Off Light............................................3-28
Passenger Airbag Status Indicator...................3-29
Charging System Light..................................3-30
Voltmeter Gage............................................3-31
Brake System Warning Light..........................3-31
Antilock Brake System (ABS) Warning Light.....3-32
StabiliTrak
®Indicator Light.............................3-33
Engine Coolant Temperature Gage..................3-33
Tire Pressure Light.......................................3-34
Malfunction Indicator Lamp.............................3-34
Oil Pressure Gage........................................3-37
Oil Pressure Light.........................................3-38
Section 3 Instrument Panel
3-1
Page 136 of 406
Ashtray(s) and Cigarette Lighter
If your vehicle has this feature it is located in the center
console or on the instrument panel. Pull up on the
ashtray door to open it if it is in the console or pull the
door open it if it is on the instrument panel.
Notice:If papers, pins, or other �ammable items
are put in the ashtray, hot cigarettes or other
smoking materials could ignite them and possibly
damage the vehicle. Never put �ammable items
in the ashtray.
To remove the ashtray, pull it out from the console or
from the slide out door. To reinstall the ashtray,
slide it back to the original position.
To use the cigarette lighter, if the vehicle has one, push
it in all the way, and let go. When it is ready for use,
it will pop back out by itself.
Do not use the lighter to plug in accessory devices.
Use the power outlets provided.
Notice:Holding a cigarette lighter in while it is
heating does not let the lighter back away from the
heating element when it is hot. Damage from
overheating can occur to the lighter or heating
element, or a fuse could be blown. Do not hold a
cigarette lighter in while it is heating.
Climate Controls
Climate Control System
The heating, cooling, and ventilation for the vehicle can
be controlled with this system.
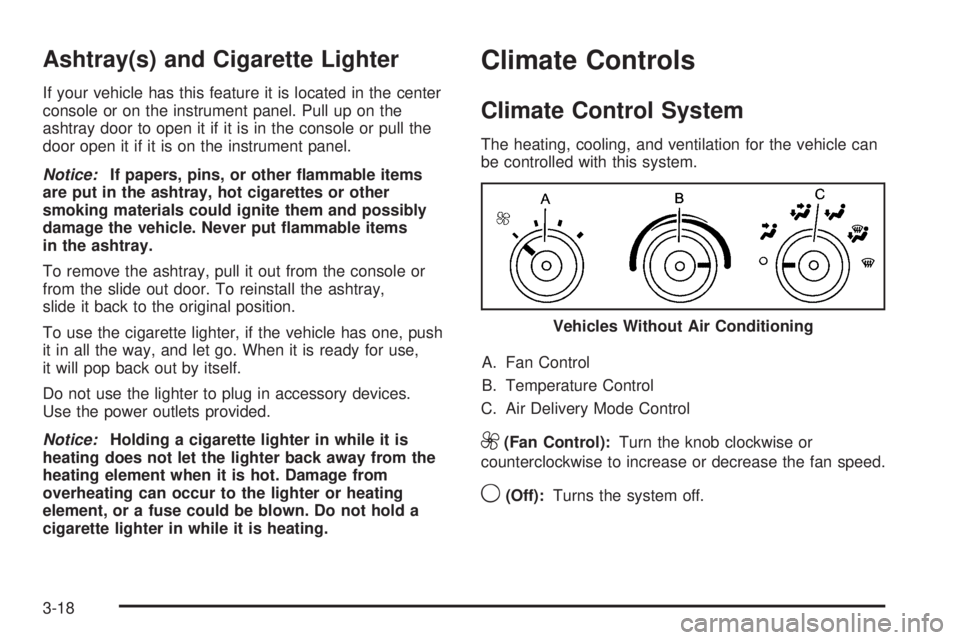
A. Fan Control
B. Temperature Control
C. Air Delivery Mode Control
9(Fan Control):Turn the knob clockwise or
counterclockwise to increase or decrease the fan speed.
9(Off):Turns the system off. Vehicles Without Air Conditioning
3-18