2009 GMC SAVANA check oil
[x] Cancel search: check oilPage 241 of 404

3. When the wheel chocks are in place, release the
brake pedal until the chocks absorb the load.
4. Reapply the brake pedal. Then apply the parking
brake and shift into P (Park) for vehicles with an
automatic transmission or into gear for vehicles with
a manual transmission.
5. Release the brake pedal.
Leaving After Parking on a Hill
1. Apply and hold the brake pedal while you:
•start the engine,
•shift into a gear, and
•release the parking brake.
2. Let up on the brake pedal.
3. Drive slowly until the trailer is clear of the chocks.
4. Stop and have someone pick up and store the
chocks.
Maintenance When Trailer Towing
The vehicle needs service more often when pulling a
trailer. See this manual’s Maintenance Schedule or Index
for more information. Things that are especially important
in trailer operation are automatic transmission fluid,
engine oil, axle lubricant, belts, cooling system and brake
system. It is a good idea to inspect these before and
during the trip.
Check periodically to see that all hitch nuts and bolts
are tight.
Trailer Wiring Harness
The optional heavy-duty trailer wiring package includes
a wiring harness, with a seven-pin connector at the
rear of the vehicle and a four-wire harness assembly
under the driver side of the instrument panel. The
four-wire harness assembly comes without a connector.
If the vehicle does not have a trailer hitch, the
seven-wire harness assembly with connector is taped
together and located in a frame pocket at the driver side
rear left corner of the frame.
4-37
Page 243 of 404

Service............................................................5-3
Accessories and Modifications..........................5-3
California Proposition 65 Warning.....................5-4
California Perchlorate Materials Requirements......5-4
Doing Your Own Service Work.........................5-4
Adding Equipment to the Outside of the
Vehicle......................................................5-5
Fuel................................................................5-5
Gasoline Octane............................................5-6
Gasoline Specifications....................................5-6
California Fuel...............................................5-6
Additives.......................................................5-7
Fuel E85 (85% Ethanol)..................................5-8
Fuels in Foreign Countries...............................5-9
Filling the Tank............................................5-10
Filling a Portable Fuel Container.....................5-12
Checking Things Under the Hood....................5-12
Hood Release..............................................5-13
Engine Compartment Overview.......................5-14
Engine Oil...................................................5-15
Engine Oil Life System..................................5-18
Engine Air Cleaner/Filter................................5-20
Automatic Transmission Fluid.........................5-21
Cooling System............................................5-24
Engine Coolant.............................................5-25Radiator Pressure Cap..................................5-31
Engine Overheating.......................................5-31
Engine Fan Noise.........................................5-33
Power Steering Fluid.....................................5-34
Windshield Washer Fluid................................5-35
Brakes........................................................5-36
Battery........................................................5-39
Jump Starting...............................................5-40
All-Wheel Drive..............................................5-44
Rear Axle
.......................................................5-45
Front Axle......................................................5-46
Noise Control System.....................................5-47
Tampering with Noise Control System
Prohibited.................................................5-47
Bulb Replacement..........................................5-48
Halogen Bulbs..............................................5-48
Headlamps..................................................5-48
Front Turn Signal, Sidemarker and
Parking Lamps..........................................5-50
Center High-Mounted
Stoplamp (CHMSL)....................................5-51
Taillamps.....................................................5-51
Replacement Bulbs.......................................5-52
Windshield Wiper Blade Replacement..............5-53
Section 5 Service and Appearance Care
5-1
Page 251 of 404

If you do switch fuels, it is recommended that you add
as much fuel as possible — do not add less than
three gallons (11 L) when refueling. You should
drive the vehicle immediately after refueling for at
least seven miles (11 km) to allow the vehicle to
adapt to the change in ethanol concentration.
E85 has less energy per gallon than gasoline, so you
will need to refill the fuel tank more often when using E85
than when you are using gasoline. SeeFilling the Tank
on page 5-10.
Notice:Some additives are not compatible with
E85 fuel and can harm the vehicle’s fuel system.
Do not add anything to E85. Damage caused
by additives would not be covered by the vehicle
warranty.Notice:This vehicle was not designed for fuel
that contains methanol. Do not use fuel containing
methanol. It can corrode metal parts in the fuel
system and also damage plastic and rubber parts.
That damage would not be covered under the
vehicle warranty.
Fuels in Foreign Countries
If you plan on driving in another country outside the
United States or Canada, the proper fuel might be hard
to find. Never use leaded gasoline or any other fuel
not recommended in the previous text on fuel. Costly
repairs caused by use of improper fuel would not
be covered by the vehicle warranty.
To check the fuel availability, ask an auto club, or
contact a major oil company that does business in
the country where you will be driving.
5-9
Page 254 of 404

Filling a Portable Fuel Container
{CAUTION:
Never fill a portable fuel container while it is in
the vehicle. Static electricity discharge from the
container can ignite the fuel vapor. You can be
badly burned and the vehicle damaged if this
occurs. To help avoid injury to you and others:
•Dispense fuel only into approved containers.
•Do not fill a container while it is inside a
vehicle, in a vehicle’s trunk, pickup bed,
or on any surface other than the ground.
•Bring the fill nozzle in contact with the inside
of the fill opening before operating the nozzle.
Contact should be maintained until the filling
is complete.
•Do not smoke while pumping fuel.
•Do not use a cellular phone while
pumping fuel.
Checking Things Under
the Hood
{CAUTION:
Things that burn can get on hot engine or fuel
operated heater (FOH) parts and start a fire.
These include liquids like fuel, oil, coolant, brake
fluid, windshield washer and other fluids, and
plastic or rubber. You or others could be burned.
Be careful not to drop or spill things that will burn
onto a hot engine or fuel operated heater (FOH).
5-12
Page 257 of 404

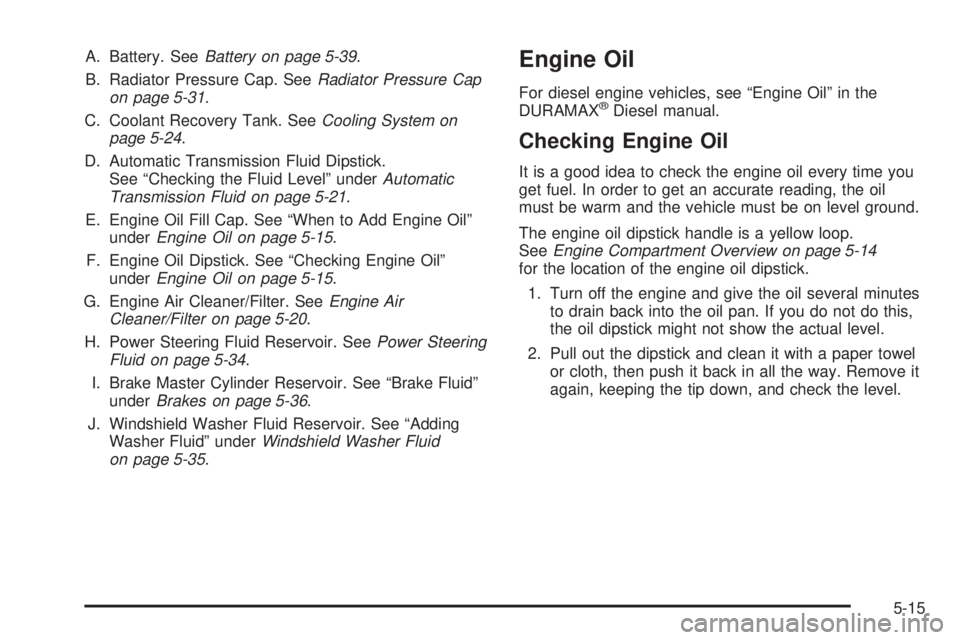
A. Battery. SeeBattery on page 5-39.
B. Radiator Pressure Cap. SeeRadiator Pressure Cap
on page 5-31.
C. Coolant Recovery Tank. SeeCooling System on
page 5-24.
D. Automatic Transmission Fluid Dipstick.
See “Checking the Fluid Level” underAutomatic
Transmission Fluid on page 5-21.
E. Engine Oil Fill Cap. See “When to Add Engine Oil”
underEngine Oil on page 5-15.
F. Engine Oil Dipstick. See “Checking Engine Oil”
underEngine Oil on page 5-15.
G. Engine Air Cleaner/Filter. SeeEngine Air
Cleaner/Filter on page 5-20.
H. Power Steering Fluid Reservoir. SeePower Steering
Fluid on page 5-34.
I. Brake Master Cylinder Reservoir. See “Brake Fluid”
underBrakes on page 5-36.
J. Windshield Washer Fluid Reservoir. See “Adding
Washer Fluid” underWindshield Washer Fluid
on page 5-35.Engine Oil
For diesel engine vehicles, see “Engine Oil” in the
DURAMAX®Diesel manual.
Checking Engine Oil
It is a good idea to check the engine oil every time you
get fuel. In order to get an accurate reading, the oil
must be warm and the vehicle must be on level ground.
The engine oil dipstick handle is a yellow loop.
SeeEngine Compartment Overview on page 5-14
for the location of the engine oil dipstick.
1. Turn off the engine and give the oil several minutes
to drain back into the oil pan. If you do not do this,
the oil dipstick might not show the actual level.
2. Pull out the dipstick and clean it with a paper towel
or cloth, then push it back in all the way. Remove it
again, keeping the tip down, and check the level.
5-15
Page 260 of 404

Engine Oil Additives / Engine Oil
Flushes
Do not add anything to the oil. The recommended
oils with the starburst symbol that meet GM Standard
GM6094M are all you need for good performance and
engine protection.
Engine oil system flushes are not recommended and
could cause engine damage not covered by the vehicle
warranty.
Engine Oil Life System
When to Change Engine Oil
This vehicle has a computer system that lets you know
when to change the engine oil and filter. This is based
on engine revolutions and engine temperature, and not
on mileage. Based on driving conditions, the mileage
at which an oil change will be indicated can vary
considerably. For the oil life system to work properly,
you must reset the system every time the oil is changed.When the system has calculated that oil life has been
diminished, it will indicate that an oil change is necessary.
A CHANGE ENGINE OIL SOON message will come on.
SeeDIC Warnings and Messages on page 3-50. Change
the oil as soon as possible within the next 600 miles
(1 000 km). It is possible that, if you are driving under the
best conditions, the oil life system might not indicate that
an oil change is necessary for over a year. However, the
engine oil and filter must be changed at least once a year
and at this time the system must be reset. Your dealer/
retailer has trained service people who will perform this
work using genuine parts and reset the system. It is also
important to check the oil regularly and keep it at the
proper level.
If the system is ever reset accidentally, you must
change the oil at 3,000 miles (5 000 km) since the
last oil change. Remember to reset the oil life system
whenever the oil is changed.
5-18
Page 263 of 404

To inspect or replace the engine air cleaner/filter, do the
following:
1. Unhook the retainer clips and remove the cover.
2. Lift the filter out of the engine air cleaner/filter
housing. Care should be taken to dislodge as
little dirt as possible.
3. Clean the engine air cleaner/filter housing.
4. Inspect or replace the engine air cleaner/filter. Make
sure that the filter fits properly into the housing.
5. Reinstall the cover and fasten the retaining clips.
{CAUTION:
Operating the engine with the air cleaner/filter
off can cause you or others to be burned. The air
cleaner not only cleans the air; it helps to stop
flames if the engine backfires. If it is not there and
the engine backfires, you could be burned. Do not
drive with it off, and be careful working on the
engine with the air cleaner/filter off.Notice:If the air cleaner/�lter is off, a back�re
can cause a damaging engine �re. And, dirt
can easily get into the engine, which will damage it.
Always have the air cleaner/�lter in place when
you are driving.
Automatic Transmission Fluid
If your vehicle has the DURAMAX Diesel engine, see
the DURAMAX Diesel manual for more information.
When to Check and Change Automatic
Transmission Fluid
A good time to check your automatic transmission fluid
level is when the engine oil is changed.
Change the fluid and filter at the intervals listed in
Additional Required Services on page 6-6, and be sure
to use the transmission fluid listed inRecommended
Fluids and Lubricants on page 6-13.
5-21
Page 269 of 404

Checking Coolant
The vehicle must be on a level surface when checking
the coolant level.
Check to see if coolant is visible in the coolant recovery
tank. If the coolant inside the coolant recovery tank is
boiling, do not do anything else until it cools down.
If coolant is visible but the coolant level is not at or
above the COLD FILL mark, add a 50/50 mixture of
clean, drinkable water and DEX-COOL
®coolant at the
coolant recovery tank, but be sure the cooling system
is cool before this is done. See for more information
When the engine is cold, the coolant level should be at
or above the COLD FILL mark. If it is not, there could
be a leak in the cooling system.
If the coolant is low, add the coolant or take the vehicle
to a dealer/retailer for service.
How to Add Coolant to the Recovery
Tank for Gasoline Engines
If your vehicle has a diesel engine, see “How to
Add Coolant to the Coolant Recovery Tank” under
“Van Models” in the Cooling System section of the
DURAMAX
®Diesel Supplement for the proper coolant
fill procedure.
{CAUTION:
You can be burned if you spill coolant on hot
engine parts. Coolant contains ethylene glycol
and it will burn if the engine parts are hot enough.
Do not spill coolant on a hot engine.
Notice:This vehicle has a speci�c coolant �ll
procedure. Failure to follow this procedure could
cause the engine to overheat and be severely
damaged.
If coolant is needed, add the proper DEX-COOL
®
coolant mixture at the coolant recovery tank.
5-27