Page 80 of 414

Adding Equipment to Your
Airbag-Equipped Vehicle
Q:Is there anything I might add to or change
about the vehicle that could keep the airbags
from working properly?
A:Yes. If you add things that change the vehicle’s
frame, bumper system, height, front end or side
sheet metal, they may keep the airbag system from
working properly. Changing or moving any parts
of the front seats, safety belts, the airbag sensing
and diagnostic module, steering wheel, instrument
panel, roof-rail airbag modules, ceiling headliner
or pillar garnish trim, front sensors, or airbag wiring
can affect the operation of the airbag system.
In addition, the vehicle has a passenger sensing
system for the right front passenger position, which
includes sensors that are part of the passenger’s
seat. The passenger sensing system may not
operate properly if the original seat trim is replaced
with non-GM covers, upholstery or trim, or with GM
covers, upholstery or trim designed for a different
vehicle. Any object, such as an aftermarket seat
heater or a comfort enhancing pad or device,installed under or on top of the seat fabric, could also
interfere with the operation of the passenger sensing
system. This could either prevent proper deployment
of the passenger airbag(s) or prevent the passenger
sensing system from properly turning off the
passenger airbag(s). SeePassenger Sensing
System on page 1-70.
If you have any questions, call Customer Assistance.
The phone numbers and addresses for Customer
Assistance are in Step Two of the Customer
Satisfaction Procedure in this manual. SeeCustomer
Satisfaction Procedure on page 7-2.
Q:Because I have a disability, I have to get my
vehicle modi�ed. How can I �nd out whether
this will affect my airbag system?
A:If you have questions, call Customer Assistance.
The phone numbers and addresses for Customer
Assistance are in Step Two of the Customer
Satisfaction Procedure in this manual. See
Customer Satisfaction Procedure on page 7-2.
In addition, your dealer/retailer and the service manual
have information about the location of the airbag
sensors, sensing and diagnostic module and airbag
wiring.
1-76
Page 152 of 414

Airbag Readiness Light
The system checks the airbag’s electrical system for
possible malfunctions. If the light stays on it indicates
there is an electrical problem. The system check
includes the airbag sensor, the pretensioners, the airbag
modules, the wiring and the crash sensing and
diagnostic module. For more information on the airbag
system, seeAirbag System on page 1-62.
The airbag readiness light
�ashes for a few seconds
when the engine is
started. If the light does
not come on then, have it
�xed immediately.{CAUTION:
If the airbag readiness light stays on after the
vehicle is started or comes on while driving, it
means the airbag system might not be working
properly. The airbags in the vehicle might not
in�ate in a crash, or they could even in�ate
without a crash. To help avoid injury, have the
vehicle serviced right away.
If there is a problem with the airbag system, an airbag
Driver Information Center (DIC) message can also come
on. SeeDIC Warnings and Messages on page 3-38
for more information.
3-24
Page 247 of 414

Leaving After Parking on a Hill
1. Apply and hold the brake pedal while you:
Start the engine
Shift into a gear
Release the parking brake
2. Let up on the brake pedal.
3. Drive slowly until the trailer is clear of the chocks.
4. Stop and have someone pick up and store the
chocks.
Maintenance When Trailer Towing
The vehicle needs service more often when pulling a
trailer. SeeScheduled Maintenance on page 6-4or the
Index for more information. Things that are especially
important in trailer operation are automatic transmission
�uid, engine oil, axle lubricant, belts, cooling system and
brake system. It is a good idea to inspect these before
and during the trip.
Check periodically to see that all hitch nuts and bolts
are tight.
Trailer Wiring Harness
The vehicle may be equipped with a four-pin trailer
towing harness. This harness has a four-pin trailer
connector that is attached to a bracket on the hitch
platform. The four-wire harness contains the following
trailer circuits:
Yellow: Left Stop/Turn Signal
Green: Right Stop/Turn Signal
Brown: Taillamps/Park lamps
White: Ground
Trailer Recommendations
Subtract the hitch loads from the Cargo Weight Rating
(CWR). CWR is the maximum weight of the load the
vehicle can carry. It does not include the weight of the
people inside, but you can �gure about 150 lbs. (68 kg)
for each passenger. The total cargo load must not be
more than the vehicles CWR.
Weigh the vehicle with the trailer attached, so the GVWR
or GAWR are not exceeded. If using a weight-distributing
hitch, weigh the vehicle without the spring bars in place.
The best performance is obtained by correctly spreading
out the weight of the load and choosing the correct hitch
and trailer brakes.
For more information seeTowing a Trailer on page 4-47.
4-57
Page 357 of 414

Windshield Wiper Fuses
The windshield wiper motor is protected by a circuit
breaker and a fuse. If the motor overheats due to heavy
snow, etc., the wiper will stop until the motor cools.
If the overload is caused by some electrical problem,
have it �xed.
Fuses and Circuit Breakers
The wiring circuits in the vehicle are protected from
short circuits by a combination of fuses and circuit
breakers. This greatly reduces the chance of �res
caused by electrical problems.
Look at the silver-colored band inside the fuse. If the
band is broken or melted, replace the fuse. Be sure you
replace a bad fuse with a new one of the identical size
and rating.
If you ever have a problem on the road and do not have
a spare fuse, you can borrow one that has the same
amperage. Just pick some feature of the vehicle that you
can get along without — like the radio or cigarette
lighter — and use its fuse, if it is the correct amperage.
Replace it as soon as you can.
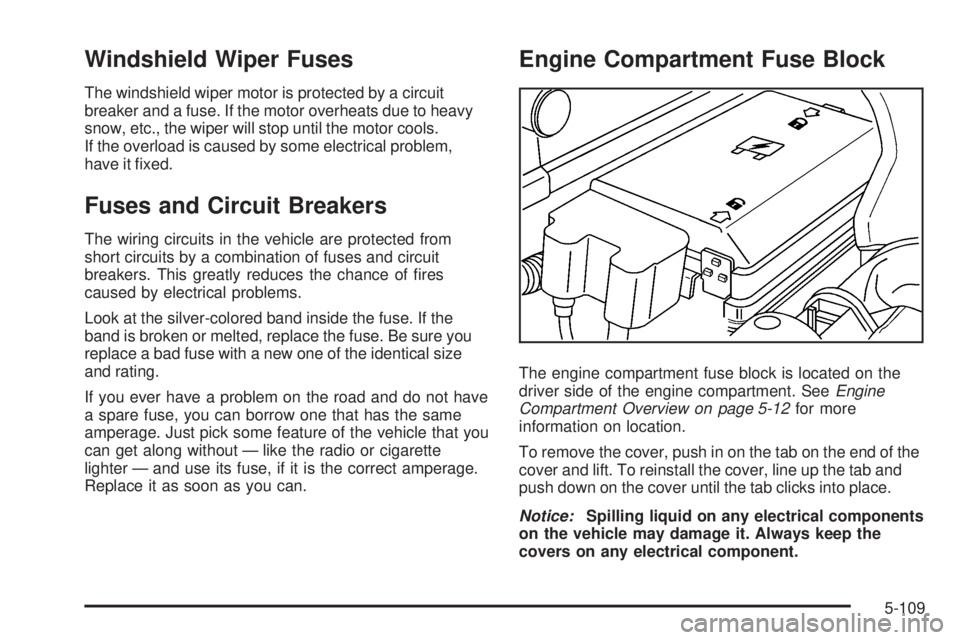
Engine Compartment Fuse Block
The engine compartment fuse block is located on the
driver side of the engine compartment. SeeEngine
Compartment Overview on page 5-12for more
information on location.
To remove the cover, push in on the tab on the end of the
cover and lift. To reinstall the cover, line up the tab and
push down on the cover until the tab clicks into place.
Notice:Spilling liquid on any electrical components
on the vehicle may damage it. Always keep the
covers on any electrical component.
5-109