2009 FORD TAURUS ECO mode
[x] Cancel search: ECO modePage 41 of 336

MP3 track and folder structure
Your MP3 system recognizes MP3 individual tracks and folder structure
as follows:
•There are two different modes for MP3 disc playback: MP3 track mode
(system default) and MP3 folder mode. For more information on track
and folder mode, refer toSample MP3 structurein the following
section.
•MP3 track mode ignores any folder structure on the MP3 disc. The
player numbers each MP3 track on the disc (noted by the .mp3 file
extension) from T001 to a maximum of T255.
Note:The maximum number of playable MP3 files may be less
depending on the structure of the CD and exact model of radio
present.
•MP3 folder mode represents a folder structure consisting of one level
of folders. The CD player numbers all MP3 tracks on the disc (noted
by the .mp3 file extension) and all folders containing MP3 files, from
F001 (folder) T001 (track) to F253 T255.
•Creating discs with only one level of folders will help with navigation
through the disc files.
2009 Taurus(500)
Owners Guide, 1st Printing
USA(fus)
Entertainment Systems
41
Page 46 of 336

Your vehicle may be equipped with a Family Entertainment System
(FES) which allows you to listen to audio CDs, MP3 discs, watch DVDs
and to plug in and play a variety of standard video game systems. The
DVD player is capable of playing standard DVDs, CDs, MP3s and is
compatible with CD-R/W, CD-R and certain CD-ROM media.
Please review this material to become familiar with the FES features and
controls as well as the very important safety information.
Quick start
Your Family Entertainment System includes a DVD system, two sets of
wireless infrared (IR) headphones and a wireless infrared (IR) remote
control.
To play a DVD in the DVD system:
The DVD system can play DVD-Video, DVD-R, DVD-R/W discs as well as
audio CDs and video CDs. To ensure proper disc operation, check the
disc for finger prints, scratches and cleanliness. Clean with a soft cloth,
wiping from center to edge.
1. Ensure that the vehicle is on or the ignition is in accessory mode.
2. Insert a DVD into the system, label-side up to turn on the system. It
will load automatically.
3. Press the power button on the
DVD player, then press Play
to
begin to play the disc.
If a DVD is already loaded into the
system, press PLAY on the DVD
player.
Note:If sound can be heard, but no video is present, press VIDEO to
select the video source (DVD or aux-inputs).
Press VIDEO to change the source
displayed on the screen. Press
repeatedly to cycle through:
DVD-DISC, DVD-AUX, NON-DVD,
OFF.
Press the power button to turn the
system off. The indicator light will
turn off indicating the system is off.
Note:The audio from the DVD system will play over all vehicle speakers
and can be adjusted by the radio volume control.
2009 Taurus(500)
Owners Guide, 1st Printing
USA(fus)
Entertainment Systems
46
Page 47 of 336
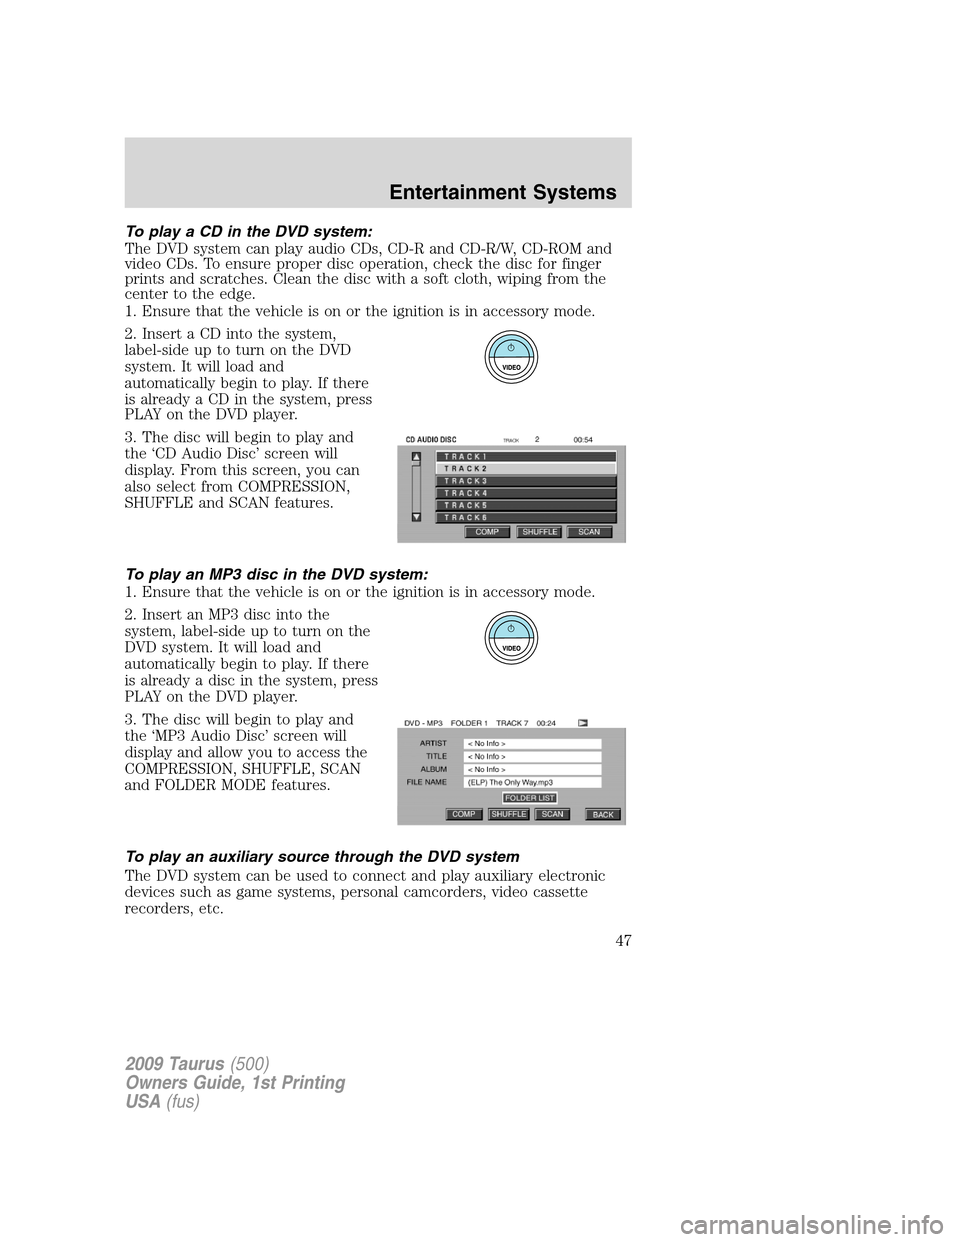
To play a CD in the DVD system:
The DVD system can play audio CDs, CD-R and CD-R/W, CD-ROM and
video CDs. To ensure proper disc operation, check the disc for finger
prints and scratches. Clean the disc with a soft cloth, wiping from the
center to the edge.
1. Ensure that the vehicle is on or the ignition is in accessory mode.
2. Insert a CD into the system,
label-sideuptoturnontheDVD
system. It will load and
automatically begin to play. If there
is already a CD in the system, press
PLAY on the DVD player.
3. The disc will begin to play and
the ‘CD Audio Disc’ screen will
display. From this screen, you can
also select from COMPRESSION,
SHUFFLE and SCAN features.
To play an MP3 disc in the DVD system:
1. Ensure that the vehicle is on or the ignition is in accessory mode.
2. Insert an MP3 disc into the
system, label-side up to turn on the
DVD system. It will load and
automatically begin to play. If there
is already a disc in the system, press
PLAY on the DVD player.
3. The disc will begin to play and
the ‘MP3 Audio Disc’ screen will
display and allow you to access the
COMPRESSION, SHUFFLE, SCAN
and FOLDER MODE features.
To play an auxiliary source through the DVD system
The DVD system can be used to connect and play auxiliary electronic
devices such as game systems, personal camcorders, video cassette
recorders, etc.
2009 Taurus(500)
Owners Guide, 1st Printing
USA(fus)
Entertainment Systems
47
Page 50 of 336
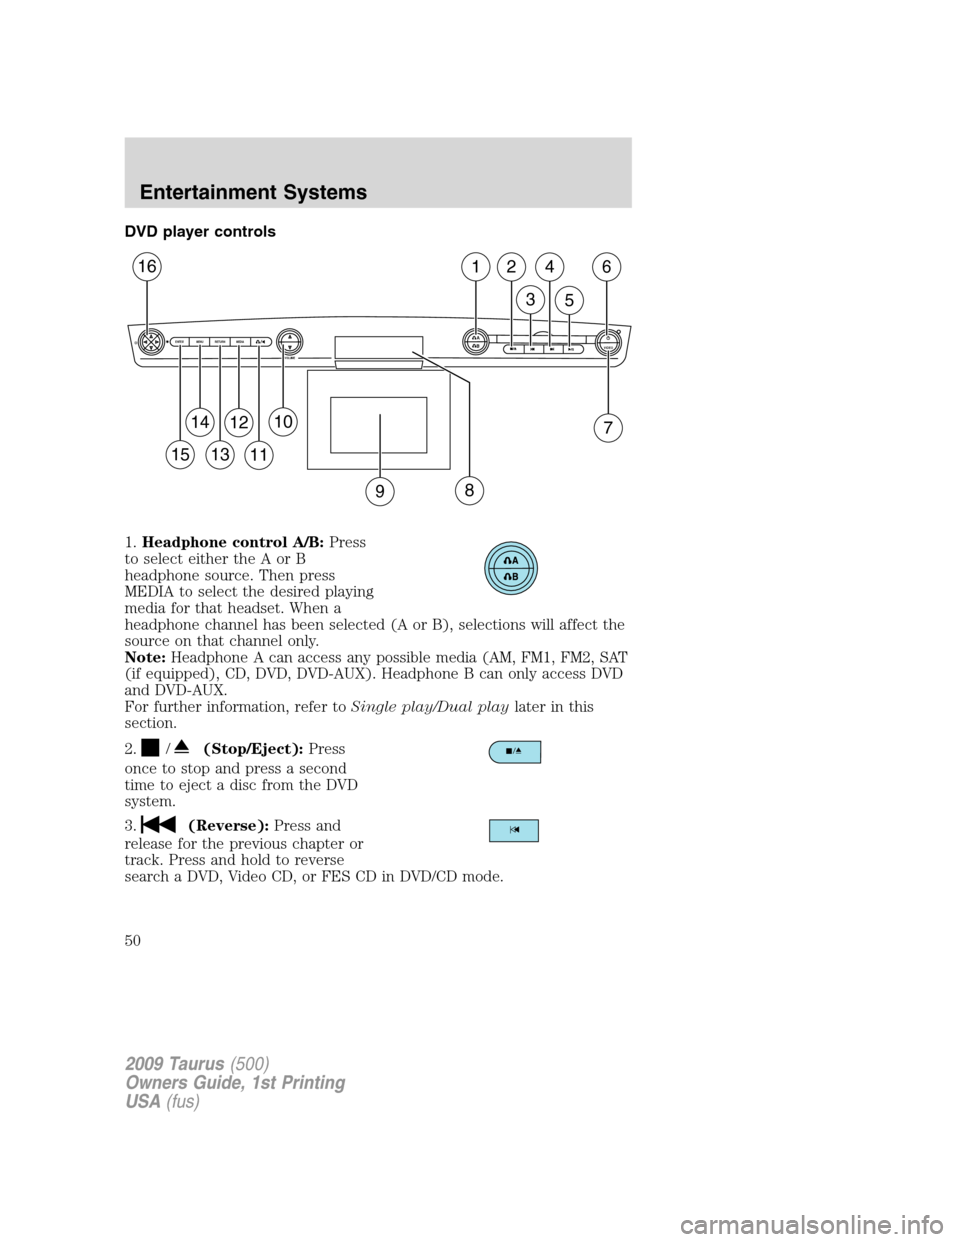
DVD player controls
1.Headphone control A/B:Press
to select either the A or B
headphone source. Then press
MEDIA to select the desired playing
media for that headset. When a
headphone channel has been selected (A or B), selections will affect the
source on that channel only.
Note:Headphone A can access any possible media (AM, FM1, FM2, SAT
(if equipped), CD, DVD, DVD-AUX). Headphone B can only access DVD
and DVD-AUX.
For further information, refer toSingle play/Dual playlater in this
section.
2.
/(Stop/Eject):Press
once to stop and press a second
time to eject a disc from the DVD
system.
3.
(Reverse):Press and
release for the previous chapter or
track. Press and hold to reverse
search a DVD, Video CD, or FES CD in DVD/CD mode.
A
BVIDEOVOLUME MEDIA RETURN MENU ENTER
1
7
2
3
4
5
6
9
10
11
12
13
14
15
16
8
2009 Taurus(500)
Owners Guide, 1st Printing
USA(fus)
Entertainment Systems
50
Page 59 of 336
Wired headphones
WARNING:Do not leave children unattended in the vehicle and
do not let children operate the system while unsupervised. If
wired headphones or auxiliary systems are used, children may become
entangled in the cords and seriously injure themselves.
WARNING:The driver should never use the headphones while
driving the vehicle. Using headphones may prevent the driver
from hearing audible warnings such as horns or emergency sirens,
which could result in a crash causing serious injury. Give your full
attention to driving and to the road.
You may purchase wired headphones for your FES (Family
Entertainment System). Plug them into the 3.5 mm headphone jack(s)
located on the left and right sides of the system. (Channel A is located
on the left side and Channel B is located on the right side.) These
headphones will be active when in Dual Play mode.
To listen to the audio on wired headphones (not included), connect the
wired headphones into the headphone jacks on the sides of the DVD
system. The wired headphone jack for Channel A is located on the left
side of the FES and is labeled
A. Headphones plugged into this
headphone jack will hear audio from the audio source selected to be the
Channel A source. The wired headphone jack for Channel B is located on
the right side of the FES and is labeled
B. Headphones plugged into
this headphone jack will hear audio from the audio source selected to be
the Channel B source.
Adjust the headphone volume using
the volume control on the DVD
system.
Operation
Single play/Dual play
Your DVD and audio system work together with the infrared headphones
and wired headphones (not included) to allow the rear seat passengers
to listen to the radio (and other media sources) over the headphones.
This enables the front and rear seat passengers to listen to a variety of
sources a variety of ways.
2009 Taurus(500)
Owners Guide, 1st Printing
USA(fus)
Entertainment Systems
59
Page 64 of 336
COMP (Compression):Compression brings soft and loud CD passages
together for a more consistent listening level when in CD mode. Press to
turn the feature on/off.
SHUFFLE:Press to hear all tracks on the current CD in random order.
Press again to stop.
SCAN:Press for a brief sampling of all tracks on the current CD. Press
again to stop.
Playing MP3 discs
To play an MP3 disc on your DVD system:
1. Ensure that the vehicle is on or the ignition is in accessory mode.
2. Ensure that the DVD system is on.
3. Insert the MP3 disc into the DVD system, label side up.
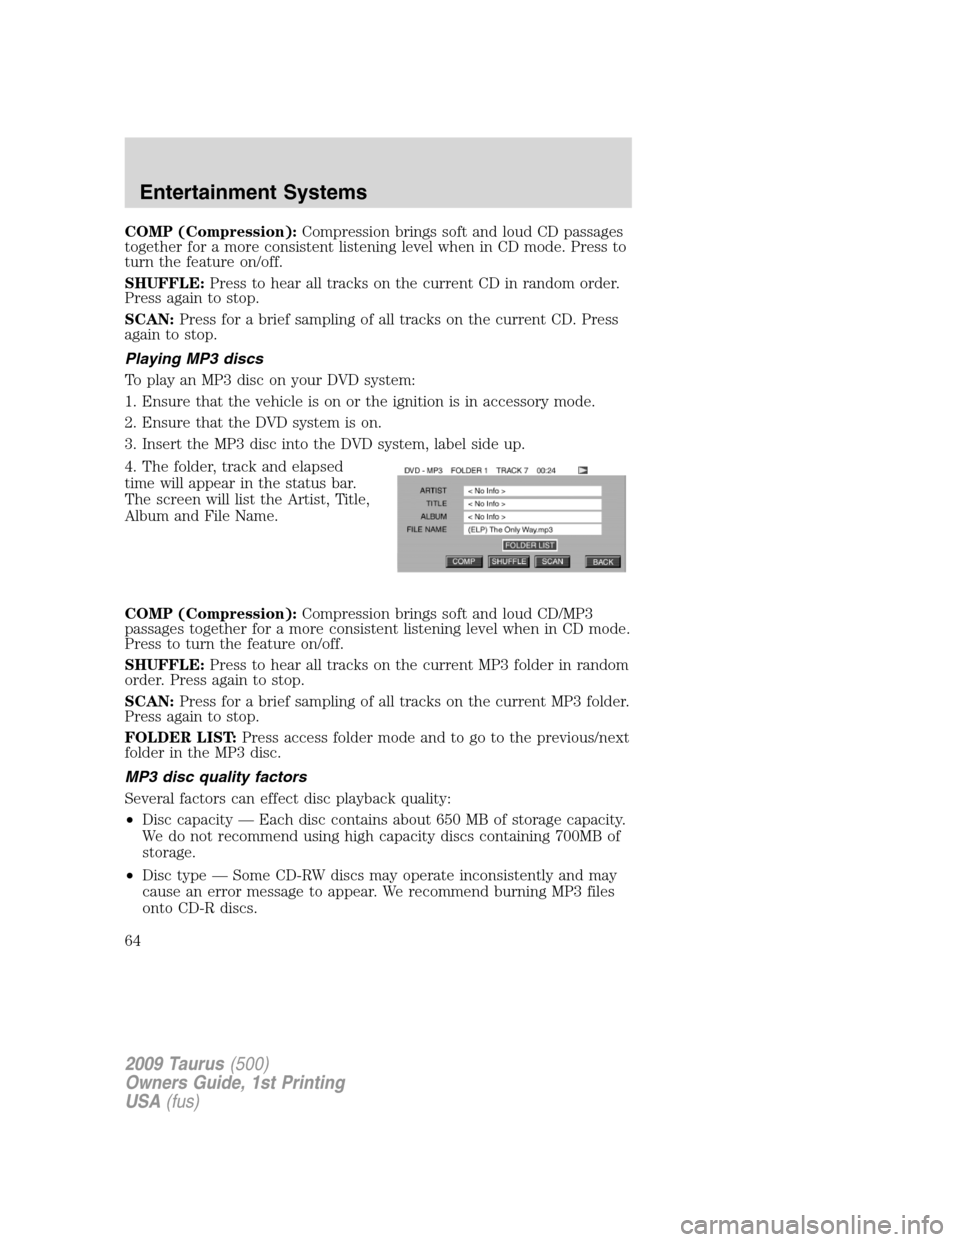
4. The folder, track and elapsed
time will appear in the status bar.
The screen will list the Artist, Title,
Album and File Name.
COMP (Compression):Compression brings soft and loud CD/MP3
passages together for a more consistent listening level when in CD mode.
Press to turn the feature on/off.
SHUFFLE:Press to hear all tracks on the current MP3 folder in random
order. Press again to stop.
SCAN:Press for a brief sampling of all tracks on the current MP3 folder.
Press again to stop.
FOLDER LIST:Press access folder mode and to go to the previous/next
folder in the MP3 disc.
MP3 disc quality factors
Several factors can effect disc playback quality:
•Disc capacity — Each disc contains about 650 MB of storage capacity.
We do not recommend using high capacity discs containing 700MB of
storage.
•Disc type — Some CD-RW discs may operate inconsistently and may
cause an error message to appear. We recommend burning MP3 files
onto CD-R discs.
2009 Taurus(500)
Owners Guide, 1st Printing
USA(fus)
Entertainment Systems
64
Page 66 of 336

scratch protection film attached, and CDs with homemade paper
(adhesive) labels should not be inserted into the FES DVD
system. The label may peel and cause the CD or DVD to become
jammed. It is recommended that homemade CDs or DVDs be
identified with permanent felt tip marker rather than adhesive
labels. Ball point pens may damage CDs or DVDs. Please contact
your authorized dealer for further information.
Playing a DVD
1. Ensure that the vehicle is on or the ignition is in accessory mode.
2. Ensure that the navigation system is on.
3. Insert a DVD label-side up into the system.
4. Use the DVD bezel controls to:
Press to play or pause a DVD.
Press to stop or eject a DVD.
Press and release to go to the
previous chapter. Press and hold for
a fast reverse search.
Press and release to go to the next
chapter. Press and hold for a fast
forward search.
Press when not in menu mode to
adjust brightness, or when in menu
mode to navigate through the menu
selections.
Press to adjust volume levels.
Slow play
1. With a DVD playing, press pause.
2009 Taurus(500)
Owners Guide, 1st Printing
USA(fus)
Entertainment Systems
66
Page 67 of 336
2. Press and hold the reverse or
advance button to enter into slow
play mode. Once in slow play mode,
press and release the reverse or advance button repeatedly to cycle
through 1/4 and 1/2. These will display on the status bar on top of the
screen as the screens cycle through at this rate.
Frame by frame
1. With a DVD playing, press pause.
2. Press the right cursor button. The
DVD will advance one frame. Each
press of the right cursor button will
advance the DVD video by one
frame.
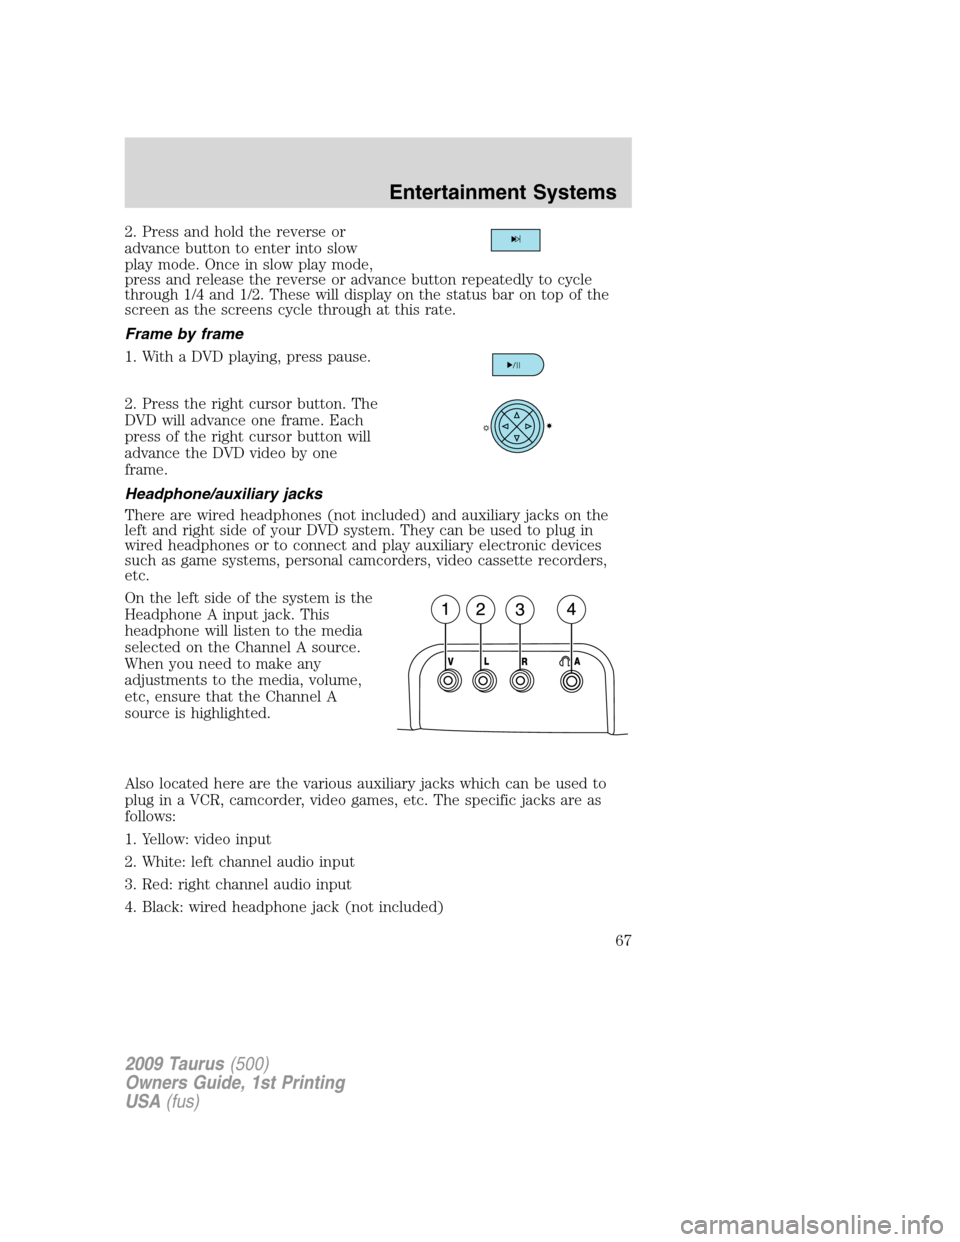
Headphone/auxiliary jacks
There are wired headphones (not included) and auxiliary jacks on the
left and right side of your DVD system. They can be used to plug in
wired headphones or to connect and play auxiliary electronic devices
such as game systems, personal camcorders, video cassette recorders,
etc.
On the left side of the system is the
Headphone A input jack. This
headphone will listen to the media
selected on the Channel A source.
When you need to make any
adjustments to the media, volume,
etc, ensure that the Channel A
source is highlighted.
Also located here are the various auxiliary jacks which can be used to
plug in a VCR, camcorder, video games, etc. The specific jacks are as
follows:
1. Yellow: video input
2. White: left channel audio input
3. Red: right channel audio input
4. Black: wired headphone jack (not included)
2009 Taurus(500)
Owners Guide, 1st Printing
USA(fus)
Entertainment Systems
67