2009 FORD SUPER DUTY mirror
[x] Cancel search: mirrorPage 164 of 418
Programming a personal entry code and keypad association to
memory seats, mirrors and pedals
To create your own personal entry code:
1. Enter the factory set code.
2. Within five seconds press the 1•2 on the keypad.
3. Enter your personal 5-digit code. Each number must be entered
within five seconds of each other.
4. To associate the entry code with a memory setting, enter a sixth digit
to indicate which driver should be set in a memory recalled by the
personal entry code:
•Pressing 1•2 recalls Driver 1 settings.
•Pressing 3•4 recalls Driver 2 settings.
•Pressing other keypad buttons or not pressing a keypad button as a
sixth digit does not set a driver and will not recall a memory setting.
Note:The factory-set code cannot be associated with a memory
setting.
5. The doors will again lock then unlock to confirm that your personal
keycode has been programmed to the module.
Tips:
•Do not set a code that uses five of the same number.
•Do not use five numbers in sequential order.
•The factory set code will work even if you have set your own personal
code.
Erasing personal code
1. Enter the factory set 5–digit code.
2. Within five seconds, press the 1•2 on the keypad and release.
3. Press and hold the 1•2 for two seconds. This must be done within
five seconds of completing Step 2.
Your personal code is now erased and only the factory set 5–digit code
will work.
Anti-scan feature
If an incorrect code has been entered seven times (35 consecutive
button presses), the keypad will go into an anti-scan mode. This mode
disables the keypad for one minute and the keypad lamp will flash during
this time.
2009 F-250/350/450/550(f23)
Owners Guide, 1st Printing
USA(fus)
Locks and Security
164
Page 174 of 418
WARNING:Persons who are unable to feel pain to the skin
because of advanced age, chronic illness, diabetes, spinal cord
injury, medication, alcohol use, exhaustion, or other physical
conditions, must exercise care when using the seat heater. The seat
heater may cause burns even at low temperatures, especially if used
for long periods of time. Do not place anything on the seat that
insulates against heat, such as a blanket or cushion, because this may
cause the seat heater to overheat. Do not puncture the seat with pins,
needles, or other pointed objects because this may damage the heating
element which may cause the seat heater to overheat. An overheated
seat may cause serious personal injury.
Note:Do not do the following:
•Place heavy objects on the seat.
•Operate the seat heater if water or any other liquid is spilled on the
seat. Allow the seat to dry thoroughly.
To operate the heated seats, do the following (engine must be running):
Push
to activate; pushagain to deactivate.
The indicator light on the control will illuminate when activated.
Memory seats/power mirrors/adjustable pedals (if equipped)
This system allows automatic
positioning of the driver seat, power
mirrors, and adjustable pedals to
two programmable positions.
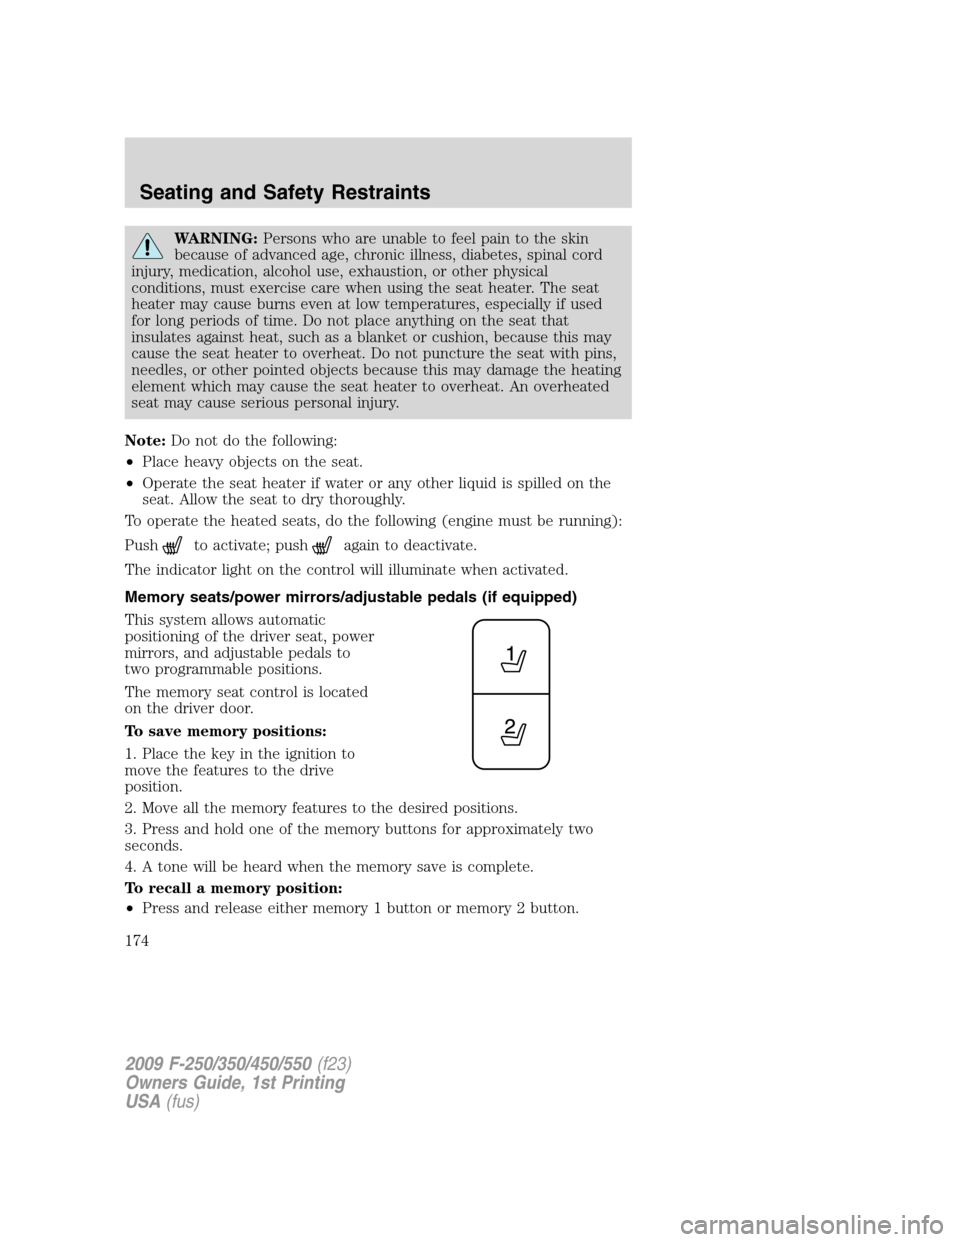
The memory seat control is located
on the driver door.
To save memory positions:
1. Place the key in the ignition to
move the features to the drive
position.
2. Move all the memory features to the desired positions.
3. Press and hold one of the memory buttons for approximately two
seconds.
4. A tone will be heard when the memory save is complete.
To recall a memory position:
•Press and release either memory 1 button or memory 2 button.
2009 F-250/350/450/550(f23)
Owners Guide, 1st Printing
USA(fus)
Seating and Safety Restraints
174
Page 269 of 418
Servicing after towing
If you tow a trailer for long distances, your vehicle will require more
frequent service intervals. Refer to yourscheduled maintenance
informationfor more information.
Trailer towing safety tips
General
•Ensure that the trailer, safety chains and 7–pin electrical connectors
are securely fastened.
•Make sure the truck receiver, draw bar, and coupler are properly
connected and adjusted.
•Check rear view and side mirrors for proper visibility especially when
towing trailer wider than the truck.
•When towing, operate the vehicle at lower speeds than you would
when not towing a trailer. The likelihood of trailer sway is greater at
higher speeds.
•If you will be towing a trailer frequently in hot weather, hilly
conditions, at GCWR, or any combination of these factors, consider
refilling your rear axle with synthetic gear lubricant if not already so
equipped. Refer toMaintenance Product Specifications and
Capacitiesin theMaintenance and Specificationschapter for the
proper axle lubricant. Remember that regardless of the rear axle
lubricant used, do not tow a trailer for the first 500 miles (800 km) of
a new vehicle, and that the first 500 miles of towing be done at no
faster than 70 mph (113 km/h) with no full-throttle starts.
•When turning make wide turns to allow trailer tires to properly clear
any obstacles.
•Be prepared for trailer sway due to buffeting when larger vehicles
pass in either direction.
Loading
•Keep the center-of-gravity low for best handling.
•Trailer loads should be evenly distributed front to back and left to
right.
•The load distribution within the trailer should be such that 10%–15%
of the trailer weight is on the hitch. (15%–25% for fifth-wheel or
gooseneck towing.)
•Never exceed truck, trailer, receiver, ball, tongue, tire or coupler
loading recommendations.
2009 F-250/350/450/550(f23)
Owners Guide, 1st Printing
USA(fus)
Tires, Wheels and Loading
269
Page 292 of 418
REAR-VIEW CAMERA SYSTEM (IF EQUIPPED)
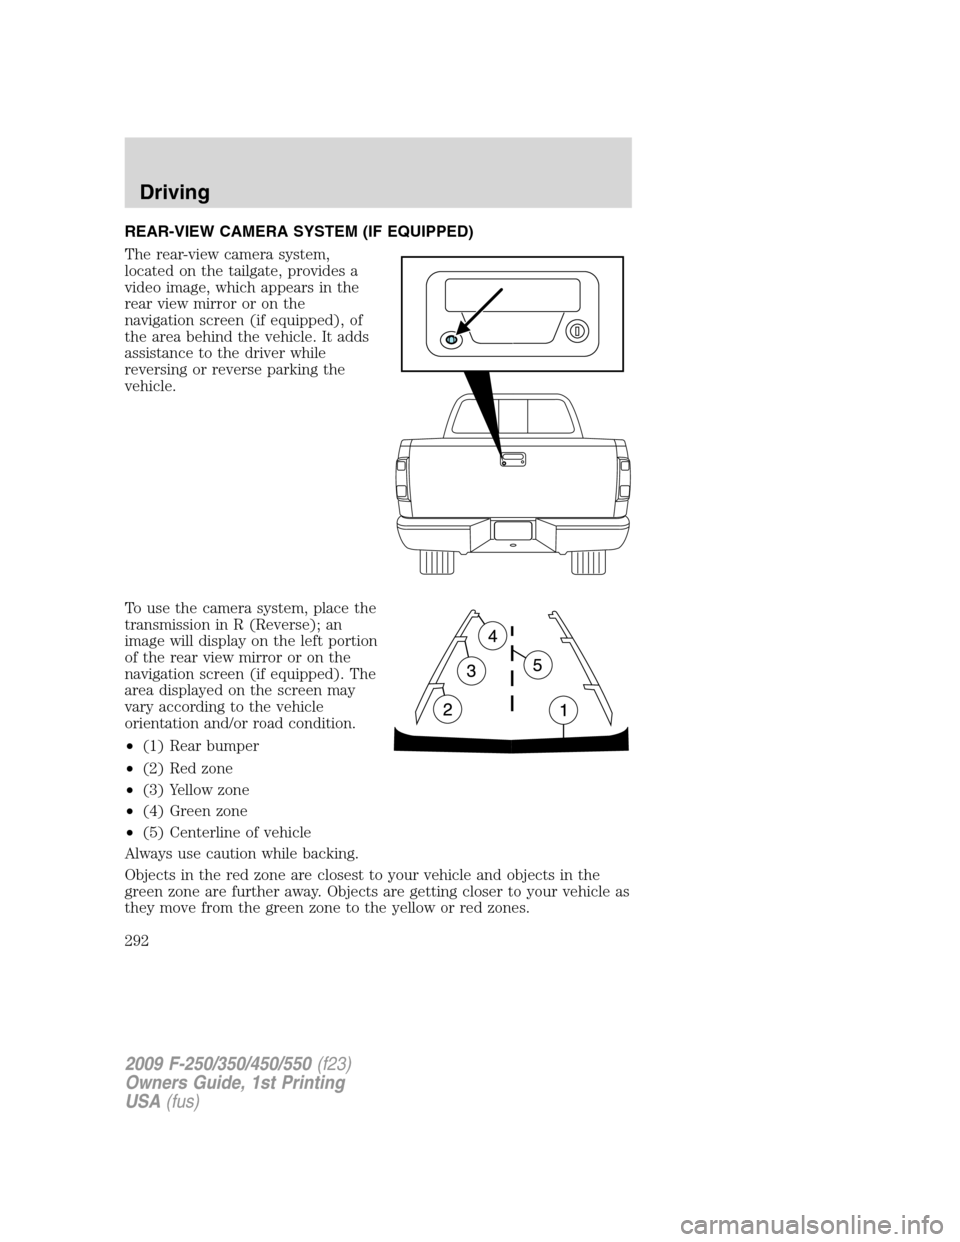
The rear-view camera system,
located on the tailgate, provides a
video image, which appears in the
rear view mirror or on the
navigation screen (if equipped), of
the area behind the vehicle. It adds
assistance to the driver while
reversing or reverse parking the
vehicle.
To use the camera system, place the
transmission in R (Reverse); an
image will display on the left portion
of the rear view mirror or on the
navigation screen (if equipped). The
area displayed on the screen may
vary according to the vehicle
orientation and/or road condition.
•(1) Rear bumper
•(2) Red zone
•(3) Yellow zone
•(4) Green zone
•(5) Centerline of vehicle
Always use caution while backing.
Objects in the red zone are closest to your vehicle and objects in the
green zone are further away. Objects are getting closer to your vehicle as
they move from the green zone to the yellow or red zones.
2009 F-250/350/450/550(f23)
Owners Guide, 1st Printing
USA(fus)
Driving
292
Page 293 of 418
Use the side mirrors and rear view mirror to get better coverage on both
sides and rear of the vehicle.
When shifting out of R (Reverse) and into any other gear, the image will
remain on for a few seconds before it shuts off to assist in parking or
trailer hookup.
If equipped with the Navigation system, after shifting out of R (Reverse)
and into any gear other than P (Park), the image will remain until the
vehicle speed reaches 5 mph (8 km/h), only if the rear camera delay
feature is on, or until any navigation radio button is depressed.
Note:The default setting for the rear camera delay is off. Push the
“Settings” button found on the navigation screen (if equipped) to set the
rear camera delay feature to on or off.
When towing, the camera system will only see what is being towed
behind the vehicle; this might not provide adequate coverage as it
usually provides in normal operation and some objects might not be
seen.
The camera lens for the camera system is located on the tailgate, near
the tailgate handle. Keep the lens clean so the video image remains clear
and undistorted. Clean the lens with a soft, lint-free cloth and
non-abrasive cleaner.
Note:If the camera system image is not clear or seems distorted, it may
be covered with water droplets, snow, mud or any other substance. If
this occurs, clean the camera lens before using the camera system.
WARNING:The camera system is a reverse aid supplement
device that still requires the driver to use it in conjunction with
the rear view mirror and the side mirrors for maximum coverage.
WARNING:Objects that are close to either corner of the
bumper or under the bumper, might not be seen on the screen
due to the limited coverage of the camera system.
WARNING:Backup as slow as possible since higher speeds
might limit your reaction time to stop the vehicle.
WARNING:Do not use the camera system with the tailgate
open.
2009 F-250/350/450/550(f23)
Owners Guide, 1st Printing
USA(fus)
Driving
293
Page 319 of 418

Fuse/Relay
LocationFuse Amp
RatingProtected Circuits
10 15A Cargo lamp, Puddle lamp, Switch
backlight
11 10A Not used (spare)
12 7.5A Power mirror switch, Driver
power seat (Memory)
13 5A Not used (spare)
14 10A Upfitter relay #3 feed
15 10A Climate control head
16 15A Upfitter Relay #4 Feed
17 20A All lock motor feeds
18 20A Heated seat relay feed
19 25A Not used (spare)
20 15A Adjustable pedals, Datalink
21 15A Fog lamp relay feed, Cornering
lamps
22 15A Park lamp relay feed
23 15A High beam headlight relay feed
24 20A Horn relay feed
25 10A Power telescoping mirror switch
Demand lamps - underhood and
illuminated visor (battery saver)
26 10A Cluster
27 20A Ignition switch feed, Passenger
compartment fuses 28, 42, 43, 44,
and 45, Engine compartment
starter relay coil #57 (Diesel
engine), Accessory shutoff control
module (if equipped) (Diesel
engine), Engine compartment
starter relay diode (gasoline
engines)
28 5A Radio
29 5A Not used (spare)
30 5A Not used (spare)
2009 F-250/350/450/550(f23)
Owners Guide, 1st Printing
USA(fus)
Roadside Emergencies
319
Page 320 of 418

Fuse/Relay
LocationFuse Amp
RatingProtected Circuits
31 10A Not used (spare)
32 10A Restraints Control Module (RCM),
Passenger Airbag Deactivation
Indicator
33 10A Trailer tow brake controller,
Trailer tow battery charge relay
coil
34 5A Not used (spare)
35 10A Reverse Sensing System (RSS),
4x4 module, 4x4 solenoid,
Traction control switch, Tow/Haul
switch (Diesel engine)
36 5A Passive Anti-Theft System (PATS)
transceiver, Cluster control
37 10A Dual automatic or Manual climate
control, PTC control
38 20A Subwoofer
39 20A Radio, Navigation radio and
amplifier
40 20A 4x4 module, Satellite radio
module, SYNC
41 15A Radio, Electrochromatic rear view
mirror, Lock switch illumination
42 10A Heated seat relay coil, Upfitter
switch relay coils, Heated mirror
relay coil
43 10A Fuel tank selector switch, 4x4
module
44 10A Run customer access feed (PTO)
45 5A Front wiper logic, Blower motor
relay coil
46 7.5A Not used (spare)
47 30A Circuit
BreakerPower windows, Moon roof,
Power Sliding Backlite
48 Relay Delayed accessory
2009 F-250/350/450/550(f23)
Owners Guide, 1st Printing
USA(fus)
Roadside Emergencies
320
Page 321 of 418
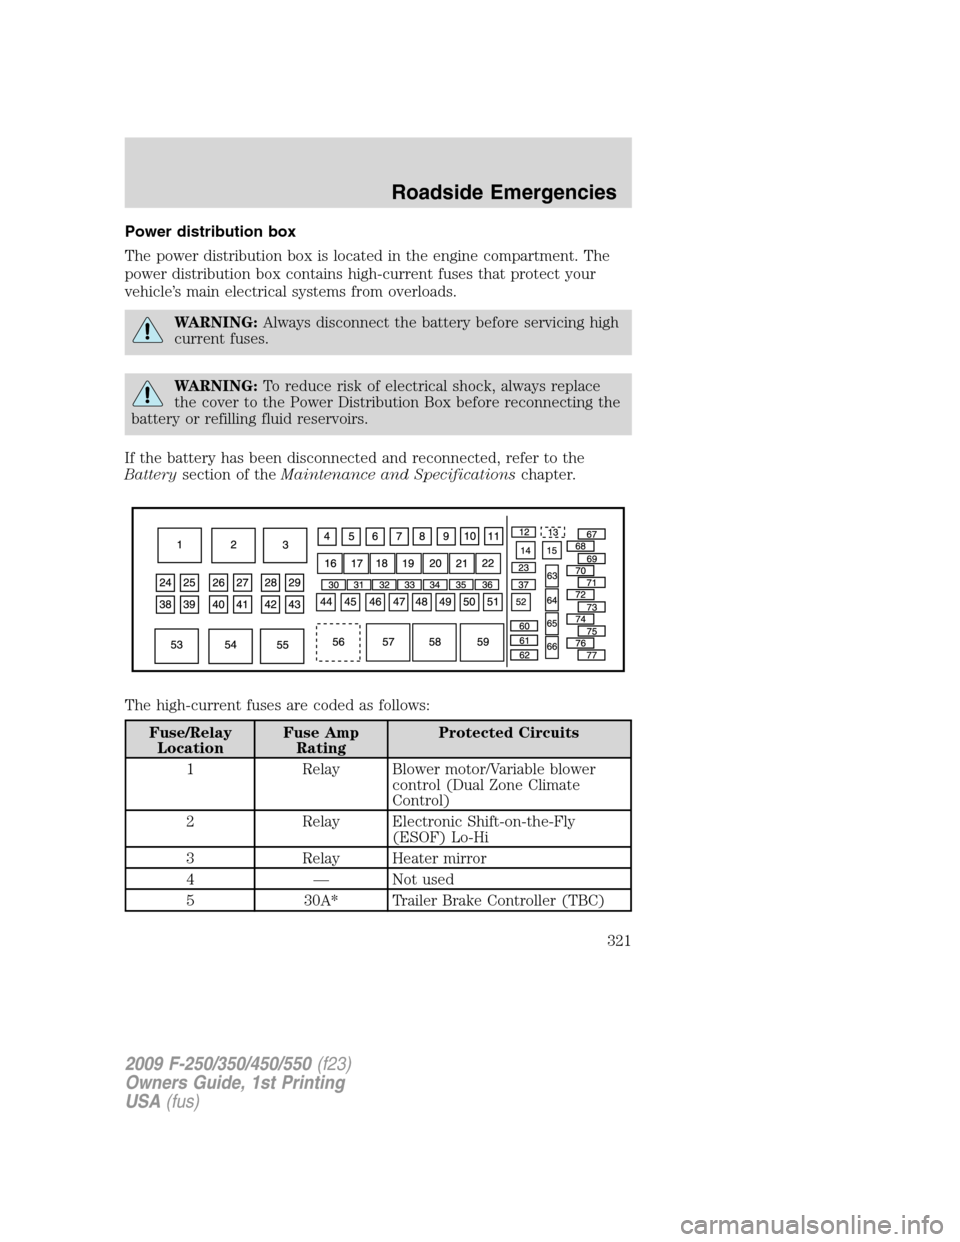
Power distribution box
The power distribution box is located in the engine compartment. The
power distribution box contains high-current fuses that protect your
vehicle’s main electrical systems from overloads.
WARNING:Always disconnect the battery before servicing high
current fuses.
WARNING:To reduce risk of electrical shock, always replace
the cover to the Power Distribution Box before reconnecting the
battery or refilling fluid reservoirs.
If the battery has been disconnected and reconnected, refer to the
Batterysection of theMaintenance and Specificationschapter.
The high-current fuses are coded as follows:
Fuse/Relay
LocationFuse Amp
RatingProtected Circuits
1 Relay Blower motor/Variable blower
control (Dual Zone Climate
Control)
2 Relay Electronic Shift-on-the-Fly
(ESOF) Lo-Hi
3 Relay Heater mirror
4 — Not used
5 30A* Trailer Brake Controller (TBC)
2009 F-250/350/450/550(f23)
Owners Guide, 1st Printing
USA(fus)
Roadside Emergencies
321