2009 FORD FUSION (AMERICAS) warning
[x] Cancel search: warningPage 37 of 312

19.CD slot:When prompted by the
system, insert a CD label side up.
Auxiliary input jack (Line in)
WARNING:Driving while distracted can result in loss of vehicle
control, accident and injury. Ford strongly recommends that
drivers use extreme caution when using any device that may take their
focus off the road. The driver’s primary responsibility is the safe
operation of their vehicle. Only use cell phones and other devices not
essential to the driving task when it is safe to do so.
Your vehicle is equipped with an
Auxiliary Input Jack (AIJ). The
Auxiliary Input Jack provides a way
to connect your portable music
player to the in-vehicle audio
system. This allows the audio from a
portable music player to be played
through the vehicle speakers with
high fidelity. To achieve optimal
performance, please observe the
following instructions when
attaching your portable music device to the audio system.
If your vehicle is equipped with a navigation system, refer toAuxiliary
input jacksection in theAudio featureschapter of yourNavigation
systemsupplement.
Required equipment:
1. Any portable music player designed to be used with headphones
2. An audio extension cable with stereo male 1/8 in. (3.5 mm)
connectors at each end
To play your portable music player using the auxiliary input jack:
1. Begin with the vehicle parked and the radio turned off.
2. Ensure that the battery in your portable music player is new or fully
charged and that the device is turned off.
3. Attach one end of the audio extension cable to the headphone output
of your player and the other end of the audio extension cable to the AIJ
in your vehicle.
4. Turn the radio on, using either a tuned FM station or a CD loaded into
the system. Adjust the volume to a comfortable listening level.
2009 Fusion(fsn)
Owners Guide
USA(fus)
Entertainment Systems
37
Page 38 of 312
5. Turn the portable music player on and adjust the volume to 1/2 the
volume.
6. Press AUX on the vehicle radio repeatedly until LINE, LINE IN or
SYNC LINE IN appears in the display.
You should hear audio from your portable music player, although it may
be low.
7. Adjust the sound on your portable music player until it reaches the
level of the FM station or CD by switching back and forth between the
AUX and FM or CD controls.
Troubleshooting:
1. Do not connect the audio input jack to a line level output. Line level
outputs are intended for connection to a home stereo and are not
compatible with the AIJ. The AIJ will only work correctly with devices
that have a headphone output with a volume control.
2. Do not set the portable music player’s volume level higher than is
necessary to match the volume of the CD or FM radio in your audio
system as this will cause distortion and will reduce sound quality. Many
portable music players have different output levels, so not all players
should be set at the same levels. Some players will sound best at full
volume and others will need to be set at a lower volume.
3. If the music sounds distorted at lower listening levels, turn the
portable music player volume down. If the problems persists, replace or
recharge the batteries in the portable music player.
4. The portable music player must be controlled in the same manner
when it is used with headphones as the AIJ does not provide control
(play, pause, etc.) over the attached portable music player.
5. For safety reasons, connecting or adjusting the settings on your
portable music player should not be attempted while the vehicle is
moving. Also, the portable music player should be stored in a secure
location, such as the center console or the glove box, when the vehicle is
in motion. The audio extension cable must be long enough to allow the
portable music player to be safely stored while the vehicle is in motion.
USB port (if equipped)
WARNING:Driving while distracted can result in loss of vehicle
control, accident and injury. Ford strongly recommends that
drivers use extreme caution when using any device that may take their
focus off the road. The driver’s primary responsibility is the safe
operation of their vehicle. Only use cell phones and other devices not
essential to the driving task when it is safe to do so.
2009 Fusion(fsn)
Owners Guide
USA(fus)
Entertainment Systems
38
Page 54 of 312

3. Turn the ignition switch to on and then back to off.
4. Turn the headlamp switch to the autolamp position. The headlamps
will turn on.
5. Wait the desired amount of time for the exit delay you want (up to
three minutes), then turn the headlamp switch to off. The headlamps
will turn off.
Fog lamp control (if equipped)
With the ignition on, the fog lamps
can be turned on when the
headlamp control is pulled toward
you and is in any of the following
positions:
•Parking lamps
•Low beams
•Autolamps (when active)
The fog lamp indicator light will
illuminate when the fog lamps have been turned on. The fog lamps will
not operate when the high beams are active.
Daytime running lamps (DRL) (if equipped)
Turns the headlamps on with a reduced output.
To activate:
•the ignition must be in the on position,
•the headlamp control is in the off, autolamps or parking lamp position
and
•the transmission must be out of the P (Park) position.
WARNING:Always remember to turn on your headlamps at
dusk or during inclement weather. The Daytime Running Lamp
(DRL) system does not activate the tail lamps and generally may not
provide adequate lighting during these conditions. Failure to activate
your headlamps under these conditions may result in a collision.
2009 Fusion(fsn)
Owners Guide
USA(fus)
Lights
54
Page 61 of 312
WARNING:Handle a halogen headlamp bulb carefully and keep
out of children’s reach. Grasp the bulb only by its plastic base
and do not touch the glass. The oil from your hand could cause the
bulb to break the next time the headlamps are operated.
7. For ease of bulb socket installation into the lamp assembly, hold the
bulb socket at 15 degrees clockwise from a vertical position. Use the two
lead wires oriented up to represent the vertical reference position.
8. From the 15 degree position, rotate the bulb socket clockwise to a
locked position.
9. Tuck the two lead wires into the lamp housing to assure that they are
not pinched when installing the protective rubber cap.
10. Install the protective cap/grill to the housing circular ring by pushing
and pressing it forward.
11. Re-apply pressure around the complete circular ring on the housing
to make sure the protective cap is completely seated.
12. Reconnect the washer bottle neck by reversing Step 3 (Passenger
side only).
13. Turn the headlamps on and make sure they work properly. If the
headlamp was correctly aligned before you changed the bulb, you should
not need to align it again.
Lowbeam bulb (upper) replacement
1. Make sure headlamp switch is in the off position, then open the hood.
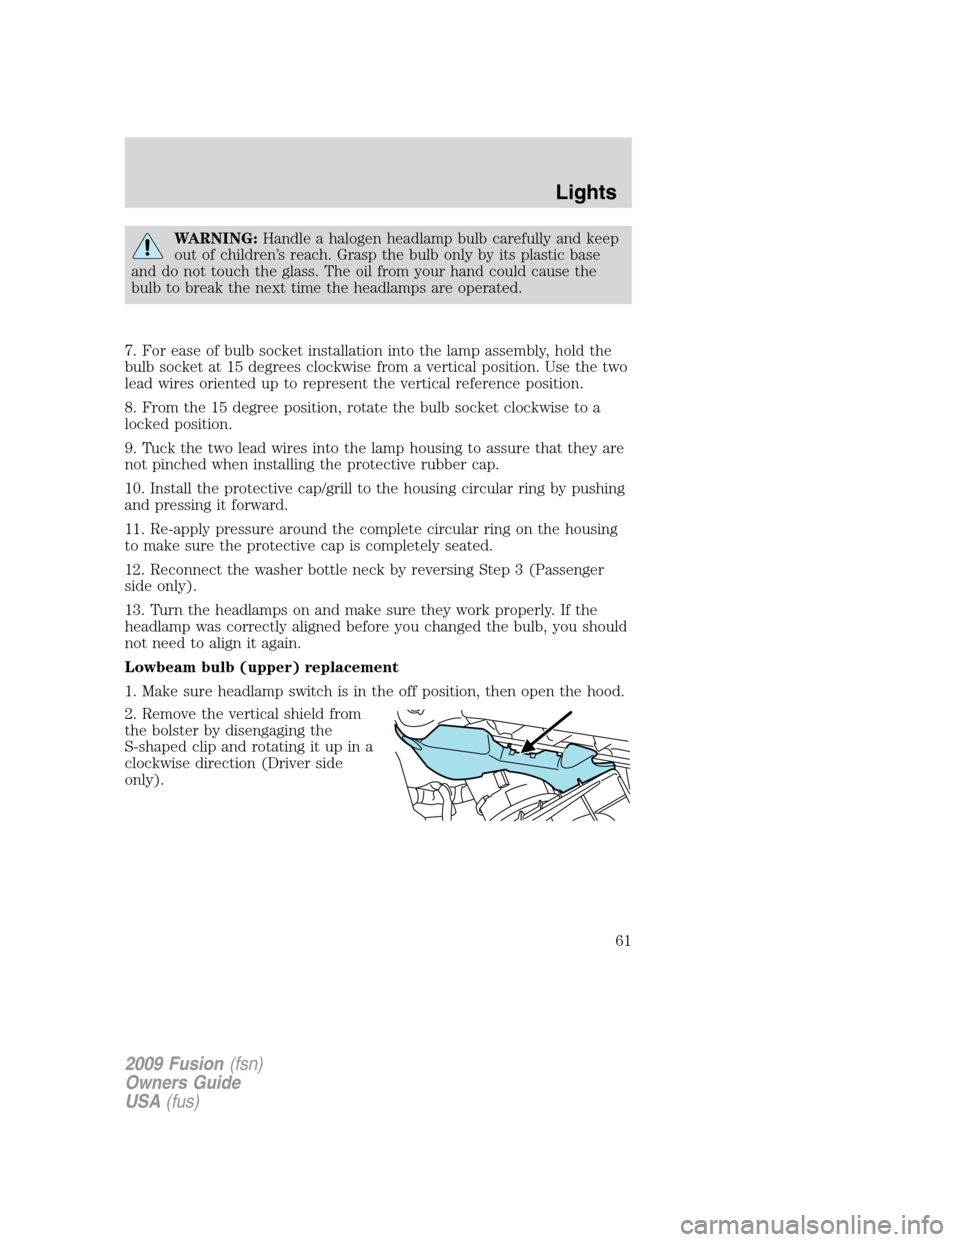
2. Remove the vertical shield from
the bolster by disengaging the
S-shaped clip and rotating it up in a
clockwise direction (Driver side
only).
2009 Fusion(fsn)
Owners Guide
USA(fus)
Lights
61
Page 63 of 312
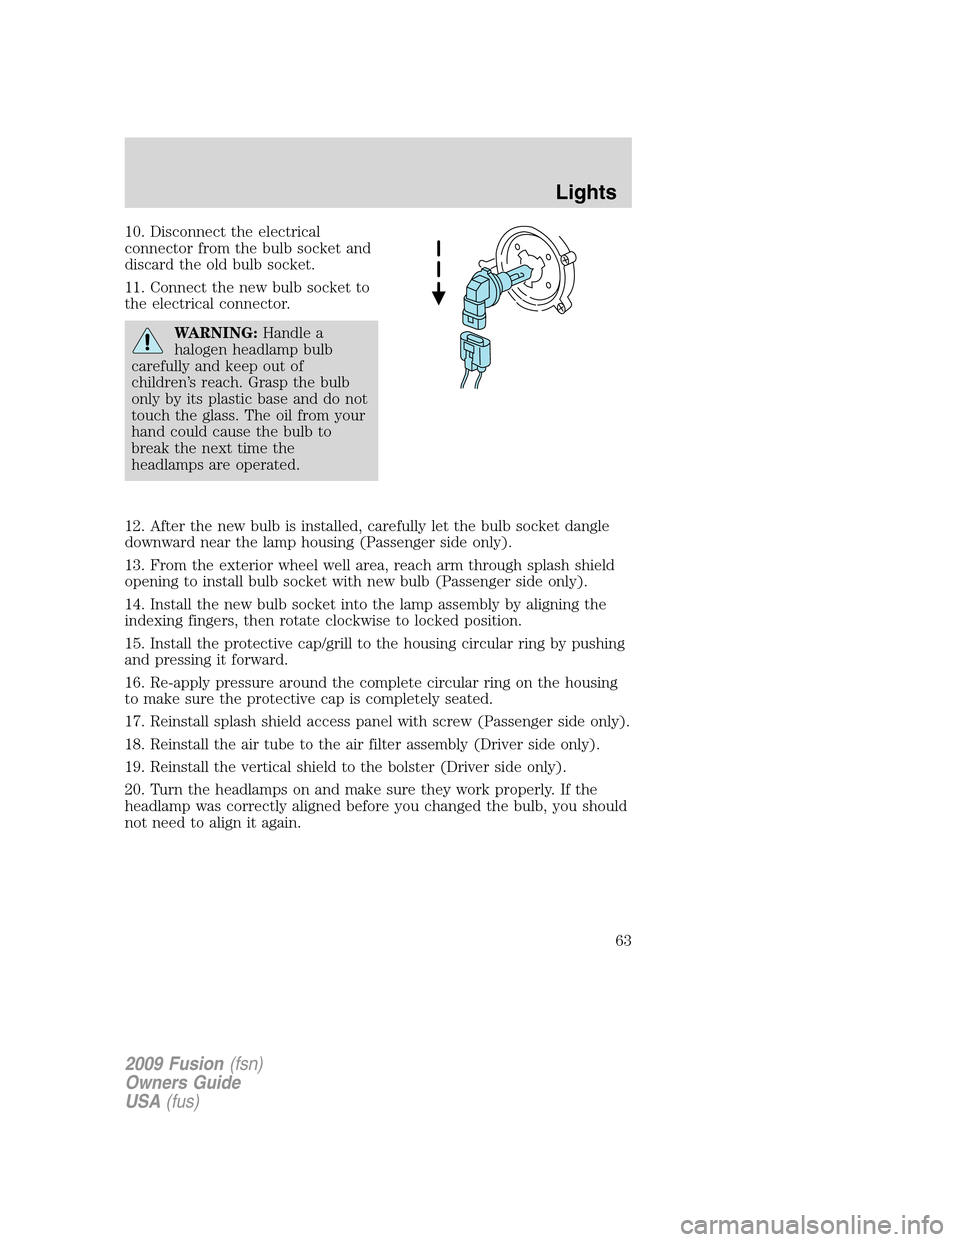
10. Disconnect the electrical
connector from the bulb socket and
discard the old bulb socket.
11. Connect the new bulb socket to
the electrical connector.
WARNING:Handle a
halogen headlamp bulb
carefully and keep out of
children’s reach. Grasp the bulb
only by its plastic base and do not
touch the glass. The oil from your
hand could cause the bulb to
break the next time the
headlamps are operated.
12. After the new bulb is installed, carefully let the bulb socket dangle
downward near the lamp housing (Passenger side only).
13. From the exterior wheel well area, reach arm through splash shield
opening to install bulb socket with new bulb (Passenger side only).
14. Install the new bulb socket into the lamp assembly by aligning the
indexing fingers, then rotate clockwise to locked position.
15. Install the protective cap/grill to the housing circular ring by pushing
and pressing it forward.
16. Re-apply pressure around the complete circular ring on the housing
to make sure the protective cap is completely seated.
17. Reinstall splash shield access panel with screw (Passenger side only).
18. Reinstall the air tube to the air filter assembly (Driver side only).
19. Reinstall the vertical shield to the bolster (Driver side only).
20. Turn the headlamps on and make sure they work properly. If the
headlamp was correctly aligned before you changed the bulb, you should
not need to align it again.
2009 Fusion(fsn)
Owners Guide
USA(fus)
Lights
63
Page 69 of 312
TILT/TELESCOPE STEERING WHEEL
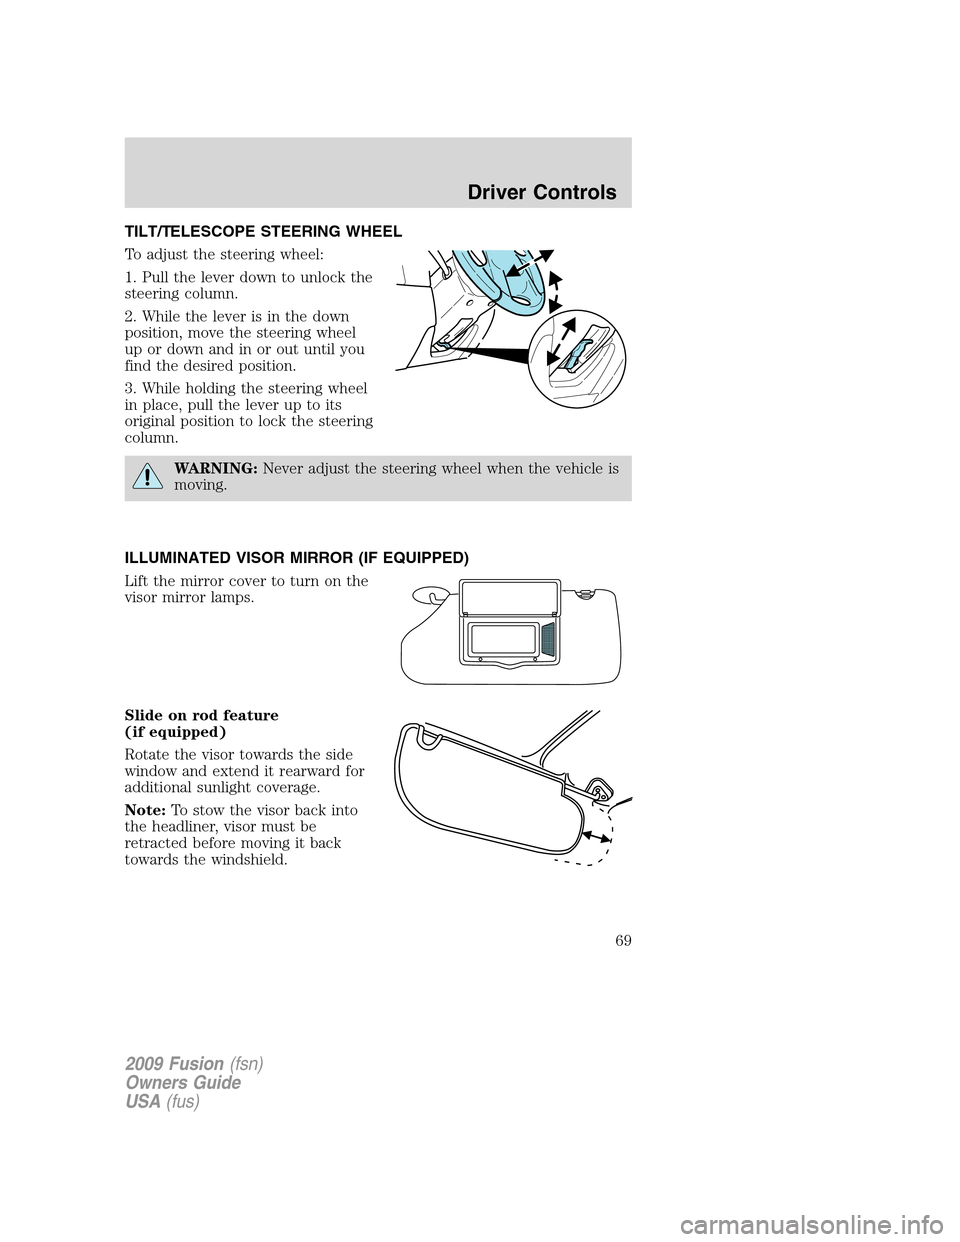
To adjust the steering wheel:
1. Pull the lever down to unlock the
steering column.
2. While the lever is in the down
position, move the steering wheel
up or down and in or out until you
find the desired position.
3. While holding the steering wheel
in place, pull the lever up to its
original position to lock the steering
column.
WARNING:Never adjust the steering wheel when the vehicle is
moving.
ILLUMINATED VISOR MIRROR (IF EQUIPPED)
Lift the mirror cover to turn on the
visor mirror lamps.
Slide on rod feature
(if equipped)
Rotate the visor towards the side
window and extend it rearward for
additional sunlight coverage.
Note:To stow the visor back into
the headliner, visor must be
retracted before moving it back
towards the windshield.
2009 Fusion(fsn)
Owners Guide
USA(fus)
Driver Controls
69
Page 70 of 312
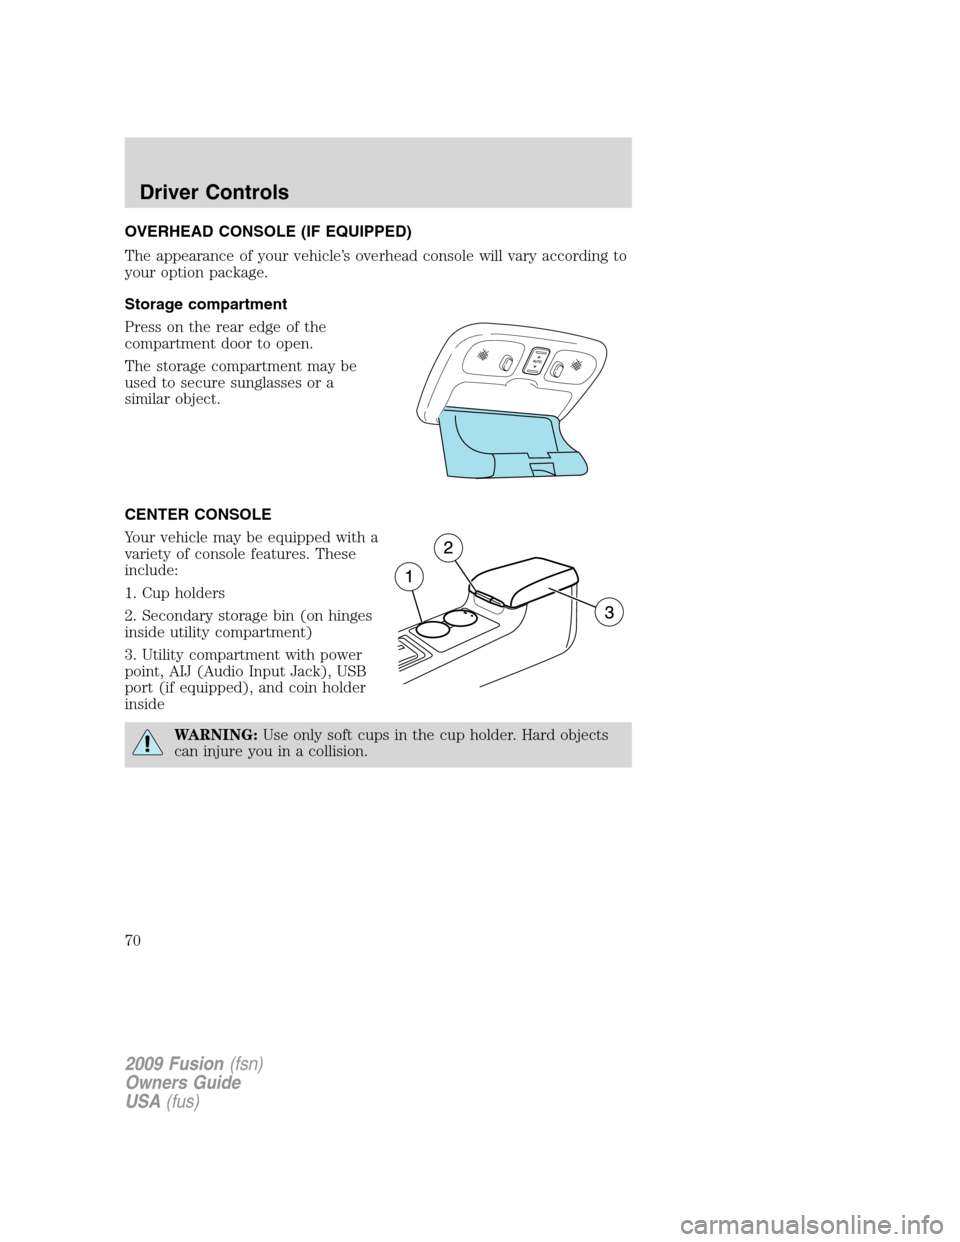
OVERHEAD CONSOLE (IF EQUIPPED)
The appearance of your vehicle’s overhead console will vary according to
your option package.
Storage compartment
Press on the rear edge of the
compartment door to open.
The storage compartment may be
used to secure sunglasses or a
similar object.
CENTER CONSOLE
Your vehicle may be equipped with a
variety of console features. These
include:
1. Cup holders
2. Secondary storage bin (on hinges
inside utility compartment)
3. Utility compartment with power
point, AIJ (Audio Input Jack), USB
port (if equipped), and coin holder
inside
WARNING:Use only soft cups in the cup holder. Hard objects
can injure you in a collision.
2009 Fusion(fsn)
Owners Guide
USA(fus)
Driver Controls
70
Page 72 of 312

To prevent the fuse from being blown, do not use the power point(s)
over the vehicle capacity of 12 VDC/180W. If the power point or cigar
lighter socket is not working, a fuse may have blown. Refer toFuses and
relaysin theRoadside Emergencieschapter for information on
checking and replacing fuses.
To have full capacity usage of your power point, the engine is required to
be running to avoid unintentional discharge of the battery. To prevent
the battery from being discharged:
•do not use the power point longer than necessary when the engine is
not running,
•do not leave battery chargers, video game adapters, computers and
other devices plugged in overnight or when the vehicle is parked for
extended periods.
Always keep the power point caps closed when not being used.
Cigar/Cigarette lighter (if equipped)
Do not plug optional electrical accessories into the cigarette lighter
socket.
Do not hold the lighter in with your hand while it is heating, this will
damage the lighter element and socket. The lighter will be released from
its heating position when it is ready to be used.
Improper use of the lighter can cause damage not covered by your
warranty.
POWER WINDOWS
WARNING:Do not leave children unattended in the vehicle and
do not let children play with the power windows. They may
seriously injure themselves.
WARNING:When closing the power windows, you should verify
they are free of obstructions and ensure that children and/or
pets are not in the proximity of the window openings.
2009 Fusion(fsn)
Owners Guide
USA(fus)
Driver Controls
72