2009 FORD FREESTYLE oil
[x] Cancel search: oilPage 127 of 358

TIRE PRESSURE MONITOR FAULT— Displayed when the Tire
Pressure Monitoring System is malfunctioning. If the warning stays on or
continues to come on, contact your authorized dealer as soon as
possible.
TIRE PRESSURE SENSOR FAULT— Displayed when a tire pressure
sensor is malfunctioning, or your spare tire is in use. For more
information on how the system operates under these conditions, refer to
Tire Pressure Monitoring System (TPMS)in theTires, Wheels and
Loadingchapter. If the warning stays on or continues to come on,
contact your authorized dealer as soon as possible.
LIFTGATE AJAR— Displayed when the liftgate is not completely
closed.
WASHER FLUID LEVEL LOW— Indicates the washer fluid reservoir
is less than one quarter full. Check the washer fluid level. Refer to
Windshield washer fluidin theMaintenance and Specifications
chapter.
OIL LIFE CHANGE SOON— Displayed when the engine oil life
remaining is 10% or less. When oil life left is between 10% and 0%, the
XX% OIL LIFE CHANGE SOON message will be displayed.
OIL CHANGE REQUIRED— Displayed when the oil life left reaches
0%, the OIL CHANGE REQUIRED message will be displayed.
MANUAL LIFTGATE
The liftgate area is only intended for cargo, not passengers. You can open
and close the liftgate from outside the vehicle. The liftgate cannot be
opened from the cargo area control button, only closed.
Note:In the event of a power failure, the latch can be accessed and
released from the inside using the access panel on the liftgate trim.
To open the liftgate, push the
control button located in the top of
the liftgate pull cup handle to
unlatch the liftgate, then pull on the
outside handle to access the cargo
area.
•Do not open the liftgate in a
garage or other enclosed area
with a low ceiling. If the liftgate is
opened, the liftgate could be
damaged against a low ceiling.
2009 Taurus X(219)
Owners Guide, 2nd Printing
USA(fus)
Driver Controls
127
ProCarManuals.com
Page 218 of 358
Move a child to a different seating location if the shoulder belt does not
stay positioned on the shoulder during use.
Follow all instructions provided by the manufacturer of the booster seat.
WARNING:Never place, or allow a child to place, the shoulder
belt under a child’s arm or behind the back because it reduces
the protection for the upper part of the body and may increase the risk
of injury or death in a collision.
Child restraint and safety belt maintenance
Inspect the vehicle safety belts and child safety seat systems periodically
to make sure they work properly and are not damaged. Inspect the
vehicle and child seat safety belts to make sure there are no nicks, tears
or cuts. Replace if necessary. All vehicle safety belt assemblies, including
retractors, buckles, front safety belt buckle assemblies, buckle support
assemblies (slide bar-if equipped), shoulder belt height adjusters (if
equipped), shoulder belt guide on seatback (if equipped), child safety
seat LATCH and tether anchors, and attaching hardware, should be
inspected after a collision. Refer to the child restraint manufacturer’s
instructions for additional inspection and maintenance information
specific to the child restraint. Ford Motor Company recommends that all
safety belt assemblies in use in vehicles involved in a collision be
replaced. However, if the collision was minor and an authorized dealer
finds that the belts do not show damage and continue to operate
properly, they do not need to be replaced. Safety belt assemblies not in
use during a collision should also be inspected and replaced if either
damage or improper operation is noted.
For proper care of soiled safety belts, refer toInteriorin theCleaning
chapter.
WARNING:Failure to inspect and if necessary replace the
safety belt assembly or child restraint system under the above
conditions could result in severe personal injuries in the event of a
collision.
2009 Taurus X(219)
Owners Guide, 2nd Printing
USA(fus)
Seating and Safety Restraints
218
ProCarManuals.com
Page 282 of 358
Fuse/Relay
LocationFuse Amp
RatingProtected Circuits
36 5A PATS module
37 10A Climate control
38 20A Subwoofer (Audiophile radio)
39 20A Radio
40 20A Spare
41 15A Moon roof, Front lock switches,
Radio, EC Mirror with compass
(with and without microphone)
42 10A Not used (spare)
43 10A Not used (spare)
44 10A Not used (spare)
45 5A Relay coils: PDB, Auxiliary A/C,
Front and rear wipers, Front
blower motor
46 7.5A Occupant Classification Sensor
(OCS), Passenger Airbag
Deactivation Indicator (PADI)
47 30A Circuit
BreakerPower windows
48 — Delayed accessory relay
Power distribution box
The power distribution box is located in the engine compartment. The
power distribution box contains high-current fuses that protect your
vehicle’s main electrical systems from overloads.
WARNING:Always disconnect the battery before servicing high
current fuses.
WARNING:To reduce risk of electrical shock, always replace
the cover to the Power Distribution Box before reconnecting the
battery or refilling fluid reservoirs.
If the battery has been disconnected and reconnected, refer to the
Batterysection of theMaintenance and Specificationschapter.
2009 Taurus X(219)
Owners Guide, 2nd Printing
USA(fus)
Roadside Emergencies
282
ProCarManuals.com
Page 311 of 358
INSTRUMENT PANEL/INTERIOR TRIM AND CLUSTER LENS
Clean the instrument panel, interior trim areas and cluster lens with a
clean and damp white cotton cloth, then with a clean and dry white
cotton cloth; you may also use Motorcraft Dash & Vinyl Cleaner
(ZC-38-A) on the instrument panel and interior trim areas.
•Avoid cleaners or polishes that increase the gloss of the upper portion
of the instrument panel. The dull finish in this area helps protect the
driver from undesirable windshield reflection.
•Be certain to wash or wipe your hands clean if you have been in
contact with certain products such as insect repellent and suntan
lotion in order to avoid possible damage to the interior painted
surfaces.
•Do not use household or glass cleaners as these may damage the
finish of the instrument panel, interior trim and cluster lens.
WARNING:Do not use chemical solvents or strong detergents
when cleaning the steering wheel or instrument panel to avoid
contamination of the airbag system.
If a staining liquid like coffee/juice has been spilled on the instrument
panel or on interior trim surfaces, clean as follows:
1. Wipe up spilled liquid using a clean, white, cotton cloth.
2. Apply Motorcraft Deluxe Leather and Vinyl Cleaner (ZC-11-A) [In
Canada use Motorcraft Multi-Purpose Cleaner (CXC-101)] to the wiped
area and spread around evenly.
3. Apply more Motorcraft cleaner to a clean, white, cotton cloth and
press the cloth onto the soiled area–allow this to set at room
temperature for 30 minutes.
4. Remove the soaked cloth, and if it is not soiled badly, use this cloth to
clean the area by using a rubbing motion for 60 seconds.
5. Following this, wipe area dry with a clean, white, cotton cloth.
INTERIOR
For fabric, carpets, cloth seats, safety belts and seats equipped with side
airbags:
•Remove dust and loose dirt with a vacuum cleaner.
•Remove light stains and soil with Motorcraft Professional Strength
Carpet & Upholstery Cleaner (ZC-54).
2009 Taurus X(219)
Owners Guide, 2nd Printing
USA(fus)
Cleaning
311
ProCarManuals.com
Page 312 of 358
•If grease or tar is present on the material, spot-clean the area first
with Motorcraft Spot and Stain Remover (ZC-14). In Canada, use
Motorcraft Multi-Purpose Cleaner (CXC-101).
•If a ring forms on the fabric after spot cleaning, clean the entire area
immediately (but do not oversaturate) or the ring will set.
•Do not use household cleaning products or glass cleaners, which can
stain and discolor the fabric and affect the flame retardant abilities of
the seat materials.
WARNING:Do not use cleaning solvents, bleach or dye on the
vehicle’s safety belts, as these actions may weaken the belt
webbing.
WARNING:On vehicles equipped with seat-mounted airbags, do
not use chemical solvents or strong detergents. Such products
could contaminate the side-airbag system and affect performance of
the side airbag in a collision.
LEATHER SEATS (IF EQUIPPED)
Your leather seating surfaces have a clear, protective coating over the
leather.
•For routine cleaning, wipe the surface with a soft, damp cloth. For
more thorough cleaning, wipe the surface with a mild soap and water
solution. In Canada, use Motorcraft Vinyl Cleaner (CXC-93). Dry the
area with a soft cloth.
•If the leather cannot be completely cleaned using a mild soap and
water solution, the leather may be cleaned using a commercially
available cleaning product designed for automotive leather.
•Do not use household cleaning products, alcohol solutions, solvents or
cleaners intended for rubber, vinyl and plastics, or oil/petroleum-based
leather conditioners. These products may cause premature wearing of
the clear, protective coating.
Note:In some instances, color or dye transfer can occur when wet
clothing comes in contact with leather upholstery. If this occurs, the
leather should be cleaned immediately to avoid permanent staining.
UNDERBODY
Flush the complete underside of your vehicle frequently. Keep body and
door drain holes free from packed dirt.
2009 Taurus X(219)
Owners Guide, 2nd Printing
USA(fus)
Cleaning
312
ProCarManuals.com
Page 316 of 358
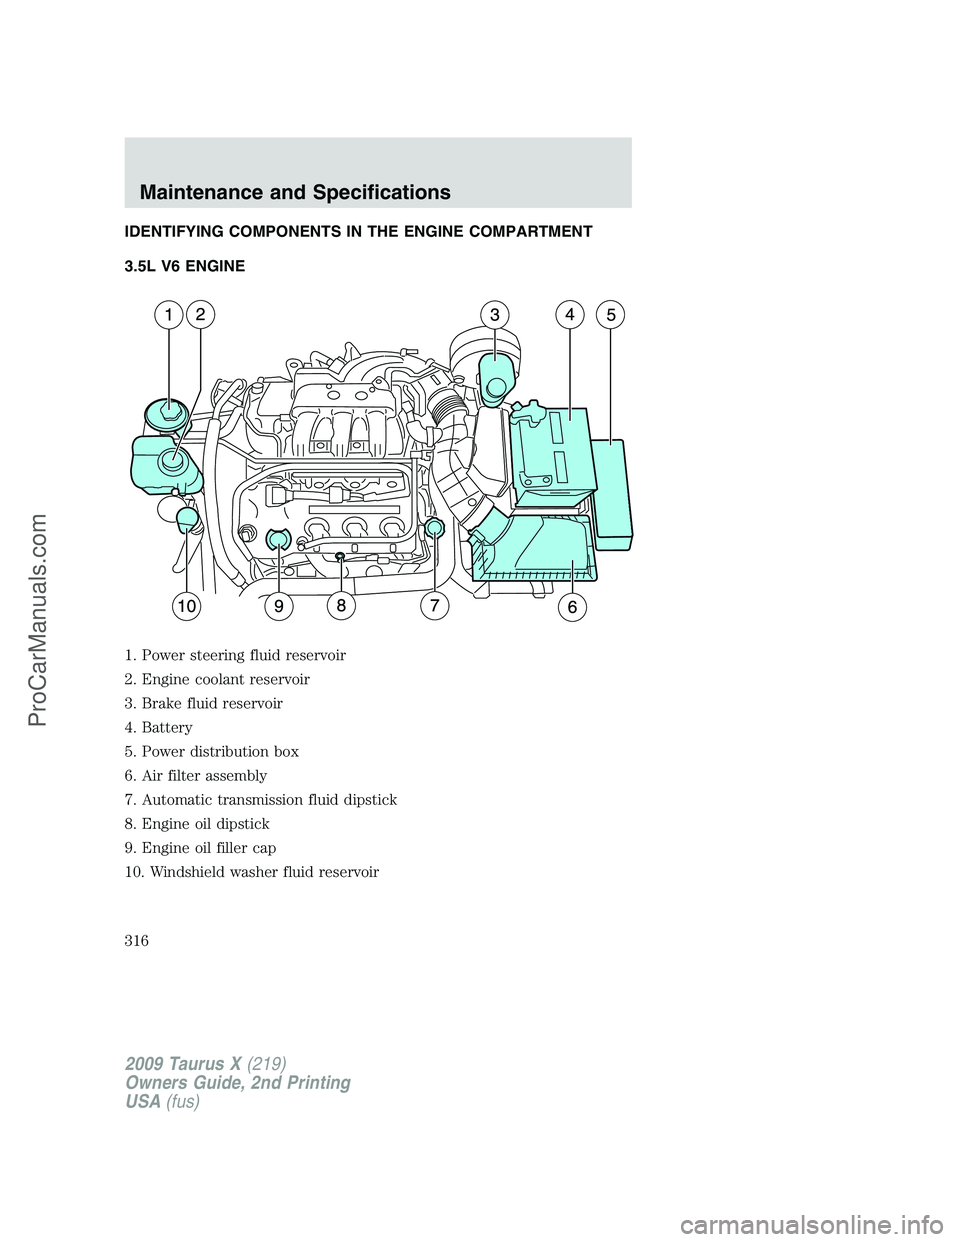
IDENTIFYING COMPONENTS IN THE ENGINE COMPARTMENT
3.5L V6 ENGINE
1. Power steering fluid reservoir
2. Engine coolant reservoir
3. Brake fluid reservoir
4. Battery
5. Power distribution box
6. Air filter assembly
7. Automatic transmission fluid dipstick
8. Engine oil dipstick
9. Engine oil filler cap
10. Windshield washer fluid reservoir
2009 Taurus X(219)
Owners Guide, 2nd Printing
USA(fus)
Maintenance and Specifications
316
ProCarManuals.com
Page 319 of 358
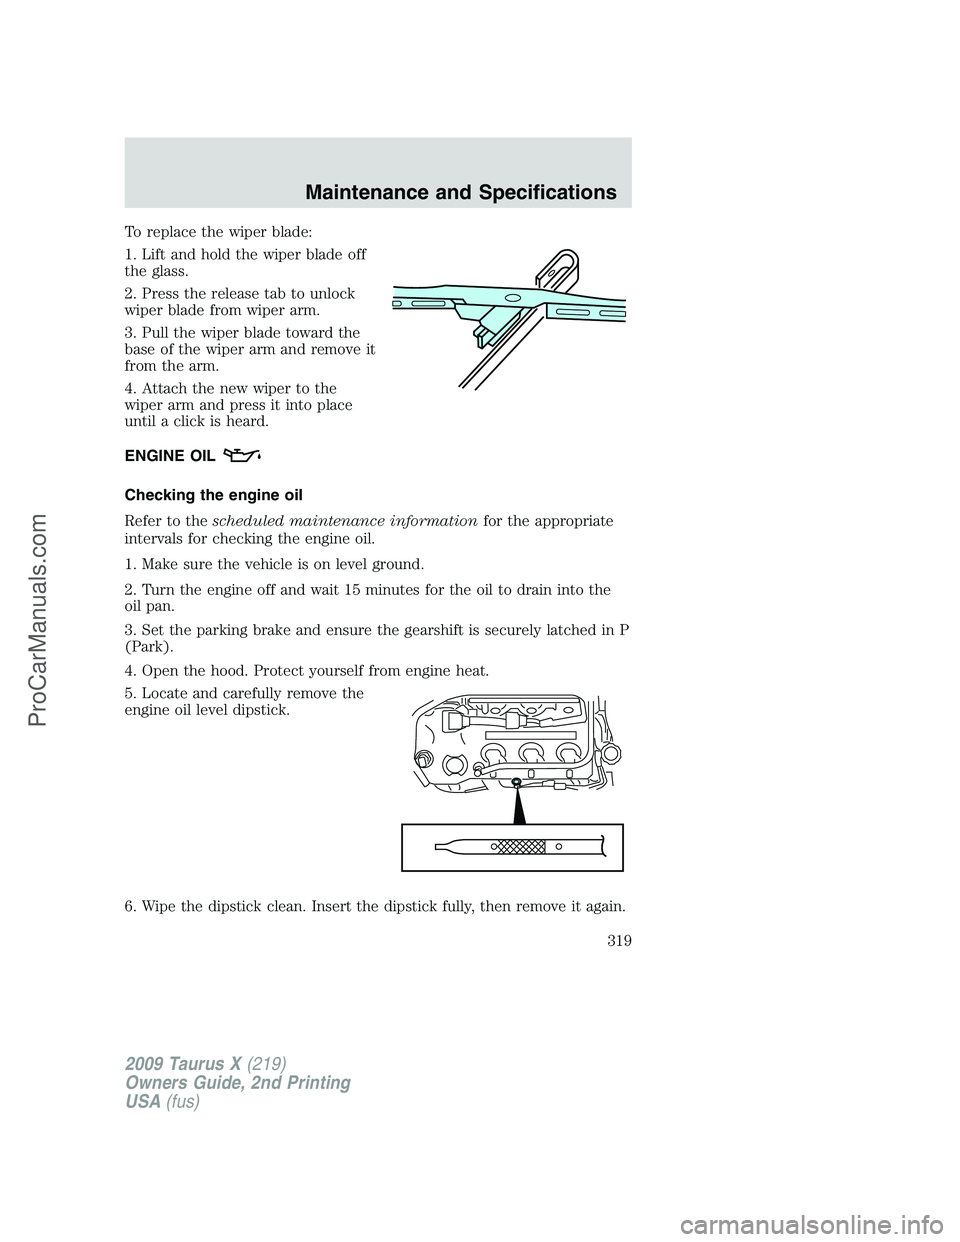
To replace the wiper blade:
1. Lift and hold the wiper blade off
the glass.
2. Press the release tab to unlock
wiper blade from wiper arm.
3. Pull the wiper blade toward the
base of the wiper arm and remove it
from the arm.
4. Attach the new wiper to the
wiper arm and press it into place
until a click is heard.
ENGINE OIL
Checking the engine oil
Refer to thescheduled maintenance informationfor the appropriate
intervals for checking the engine oil.
1. Make sure the vehicle is on level ground.
2. Turn the engine off and wait 15 minutes for the oil to drain into the
oil pan.
3. Set the parking brake and ensure the gearshift is securely latched in P
(Park).
4. Open the hood. Protect yourself from engine heat.
5. Locate and carefully remove the
engine oil level dipstick.
6. Wipe the dipstick clean. Insert the dipstick fully, then remove it again.
2009 Taurus X(219)
Owners Guide, 2nd Printing
USA(fus)
Maintenance and Specifications
319
ProCarManuals.com
Page 320 of 358
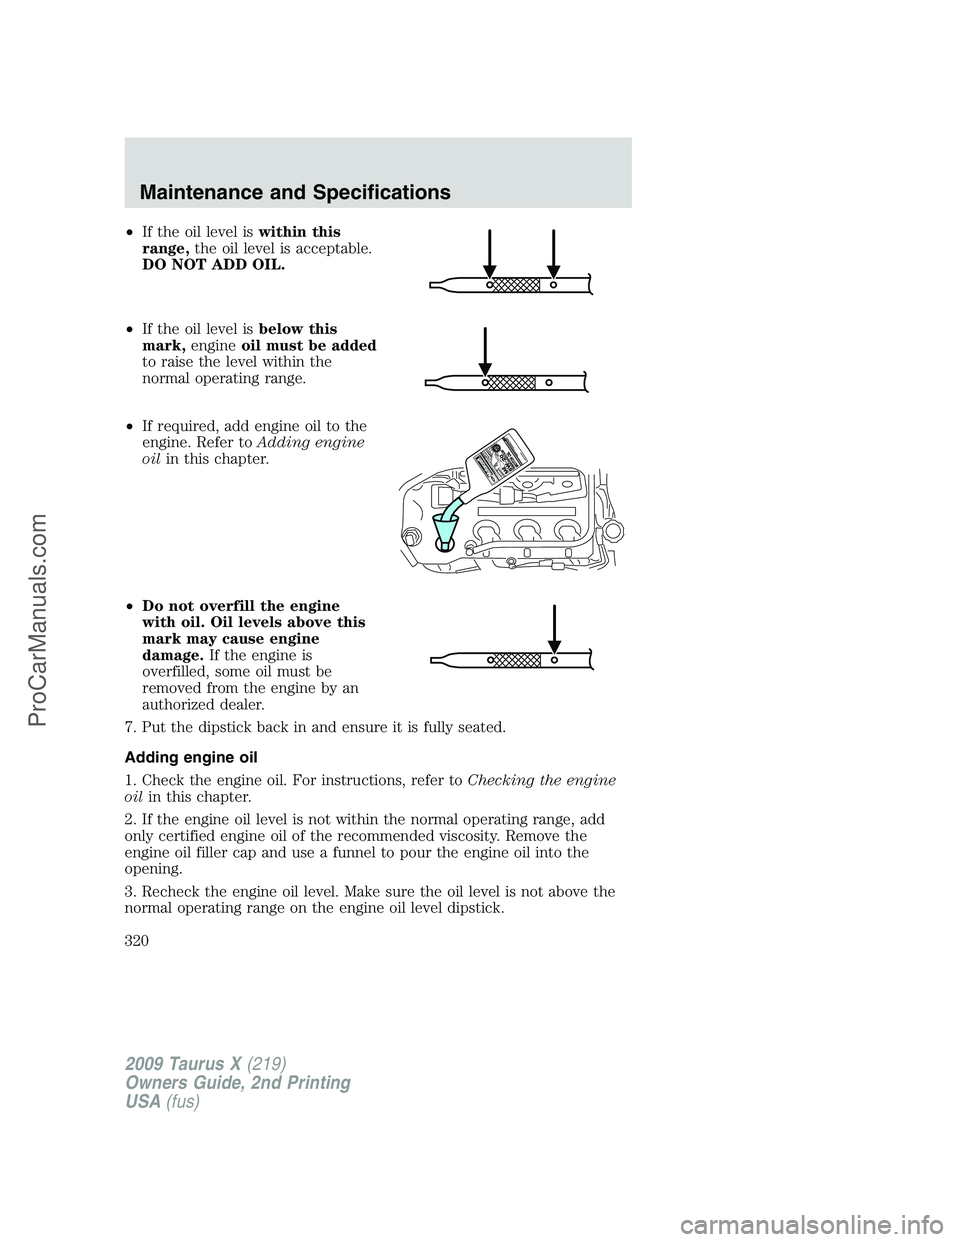
•If the oil level iswithin this
range,the oil level is acceptable.
DO NOT ADD OIL.
•If the oil level isbelow this
mark,engineoil must be added
to raise the level within the
normal operating range.
•If required, add engine oil to the
engine. Refer toAdding engine
oilin this chapter.
•Do not overfill the engine
with oil. Oil levels above this
mark may cause engine
damage.If the engine is
overfilled, some oil must be
removed from the engine by an
authorized dealer.
7. Put the dipstick back in and ensure it is fully seated.
Adding engine oil
1. Check the engine oil. For instructions, refer toChecking the engine
oilin this chapter.
2. If the engine oil level is not within the normal operating range, add
only certified engine oil of the recommended viscosity. Remove the
engine oil filler cap and use a funnel to pour the engine oil into the
opening.
3. Recheck the engine oil level. Make sure the oil level is not above the
normal operating range on the engine oil level dipstick.
2009 Taurus X(219)
Owners Guide, 2nd Printing
USA(fus)
Maintenance and Specifications
320
ProCarManuals.com