2009 FORD FREESTYLE change time
[x] Cancel search: change timePage 43 of 358
•Terrain: Hills, mountains, tall buildings, bridges, tunnels, freeway
overpasses, parking garages, dense tree foliage and thunderstorms can
interfere with your reception.
•Station overload: When you pass a ground based broadcast repeating
tower, a stronger signal may overtake a weaker one and result in an
audio mute.
Unlike AM/FM audible static, you will hear an audio mute when there is
a satellite radio signal interference. Your radio display may display NO
SIGNAL to indicate the interference.
SIRIUS satellite radio service:SIRIUS Satellite Radio is a subscription
based satellite radio service that broadcasts music, sports, news and
entertainment programming. A service fee is required in order to receive
SIRIUS service. Vehicles that are equipped with a factory installed
SIRIUS Satellite Radio system include:
•Hardware and limited subscription term, which begins on the date of
sale or lease of the vehicle.
•Use of online media player providing access to all SIRIUS music
channels over the internet using any computer connected to the
internet (U.S. customers only).
For information on extended subscription terms, contact SIRIUS at
1–888–539–7474.
Note:SIRIUS reserves the unrestricted right to change, rearrange, add
or delete programming including canceling, moving or adding particular
channels, and its prices, at any time, with or without notice to you. Ford
Motor Company shall not be responsible for any such programming
changes.
Satellite Radio Electronic Serial Number (ESN):This 12–digit
Satellite Serial Number is needed to activate, modify or track your
satellite radio account. You will need this number when communicating
with SIRIUS. While in Satellite Radio mode, you can view this number on
the radio display by pressing AUX and Preset 1 control simultaneously.
2009 Taurus X(219)
Owners Guide, 2nd Printing
USA(fus)
Entertainment Systems
43
ProCarManuals.com
Page 48 of 358
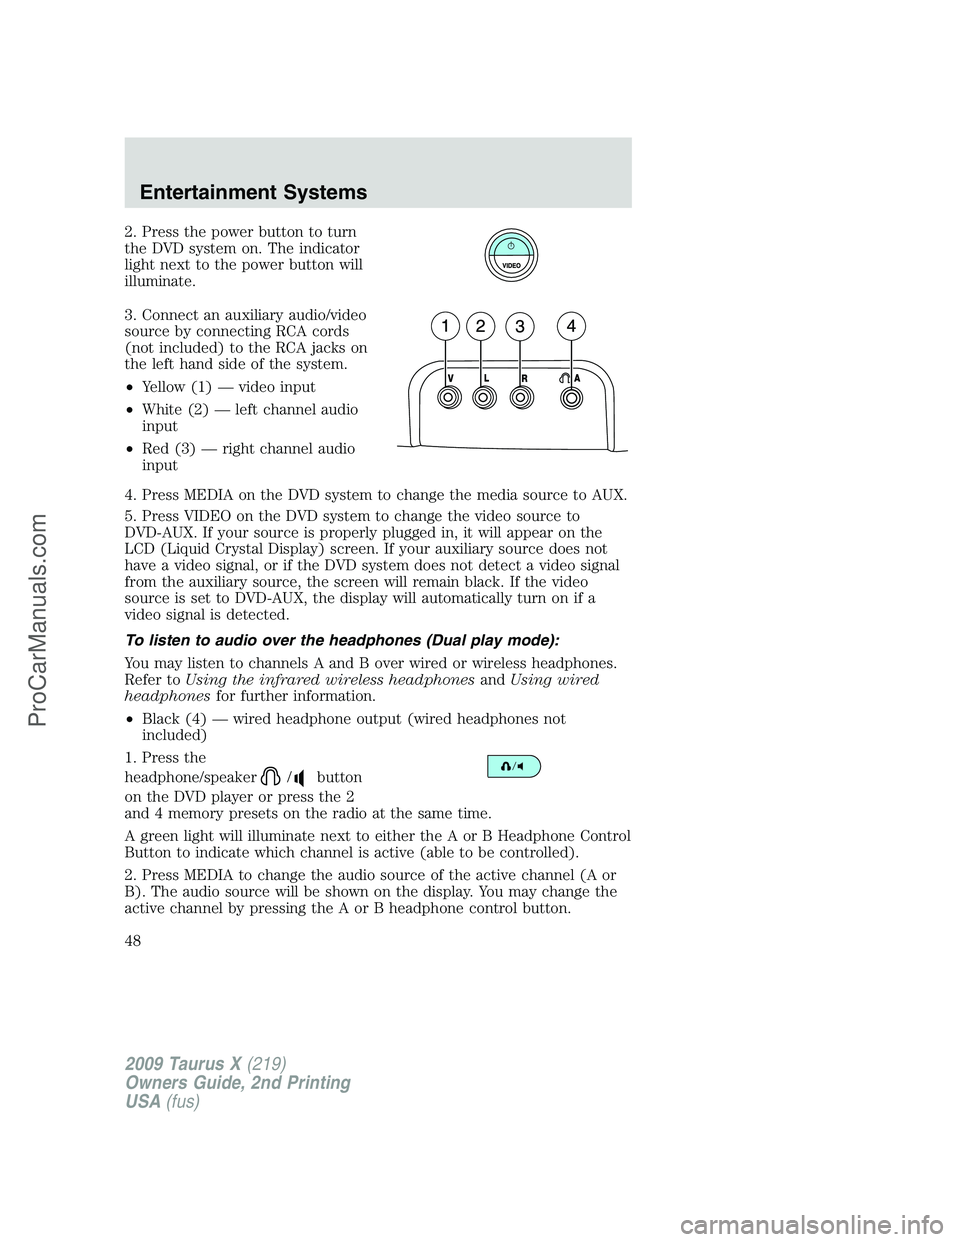
2. Press the power button to turn
the DVD system on. The indicator
light next to the power button will
illuminate.
3. Connect an auxiliary audio/video
source by connecting RCA cords
(not included) to the RCA jacks on
the left hand side of the system.
•Yellow (1) — video input
•White (2) — left channel audio
input
•Red (3) — right channel audio
input
4. Press MEDIA on the DVD system to change the media source to AUX.
5. Press VIDEO on the DVD system to change the video source to
DVD-AUX. If your source is properly plugged in, it will appear on the
LCD (Liquid Crystal Display) screen. If your auxiliary source does not
have a video signal, or if the DVD system does not detect a video signal
from the auxiliary source, the screen will remain black. If the video
source is set to DVD-AUX, the display will automatically turn on if a
video signal is detected.
To listen to audio over the headphones (Dual play mode):
You may listen to channels A and B over wired or wireless headphones.
Refer toUsing the infrared wireless headphonesandUsing wired
headphonesfor further information.
•Black (4) — wired headphone output (wired headphones not
included)
1. Press the
headphone/speaker
/button
on the DVD player or press the 2
and 4 memory presets on the radio at the same time.
A green light will illuminate next to either the A or B Headphone Control
Button to indicate which channel is active (able to be controlled).
2. Press MEDIA to change the audio source of the active channel (A or
B). The audio source will be shown on the display. You may change the
active channel by pressing the A or B headphone control button.
2009 Taurus X(219)
Owners Guide, 2nd Printing
USA(fus)
Entertainment Systems
48
ProCarManuals.com
Page 69 of 358
LOCKED (disabled). To change the level of control, press the memory
preset controls 3 and 5 simultaneously on the front audio controls. The
control level will cycle each time the buttons are pressed simultaneously.
The three states are described as:
FULL(enabled): The FES has control over the primary (speaker) and
secondary (headphone) audio sources.
LOCAL: The FES has control over the secondary source (headphones)
only. The radio will ignore button presses that affect the primary
(speaker) audio source.
LOCKED(disabled): The FES buttons are locked and all FES button
presses are ignored by the radio and the FES except for load and eject.
When the DVD system is ON, you
can then press the memory preset
controls 2 and 4 simultaneously to
toggle between Single Play and Dual Play. In Single Play mode, all
speakers listen to the same media. In Dual Play mode, rear seat
passengers can use the infrared wireless, or wired (not included)
headphones to listen to a different playing media than the front seat
passengers.
General information
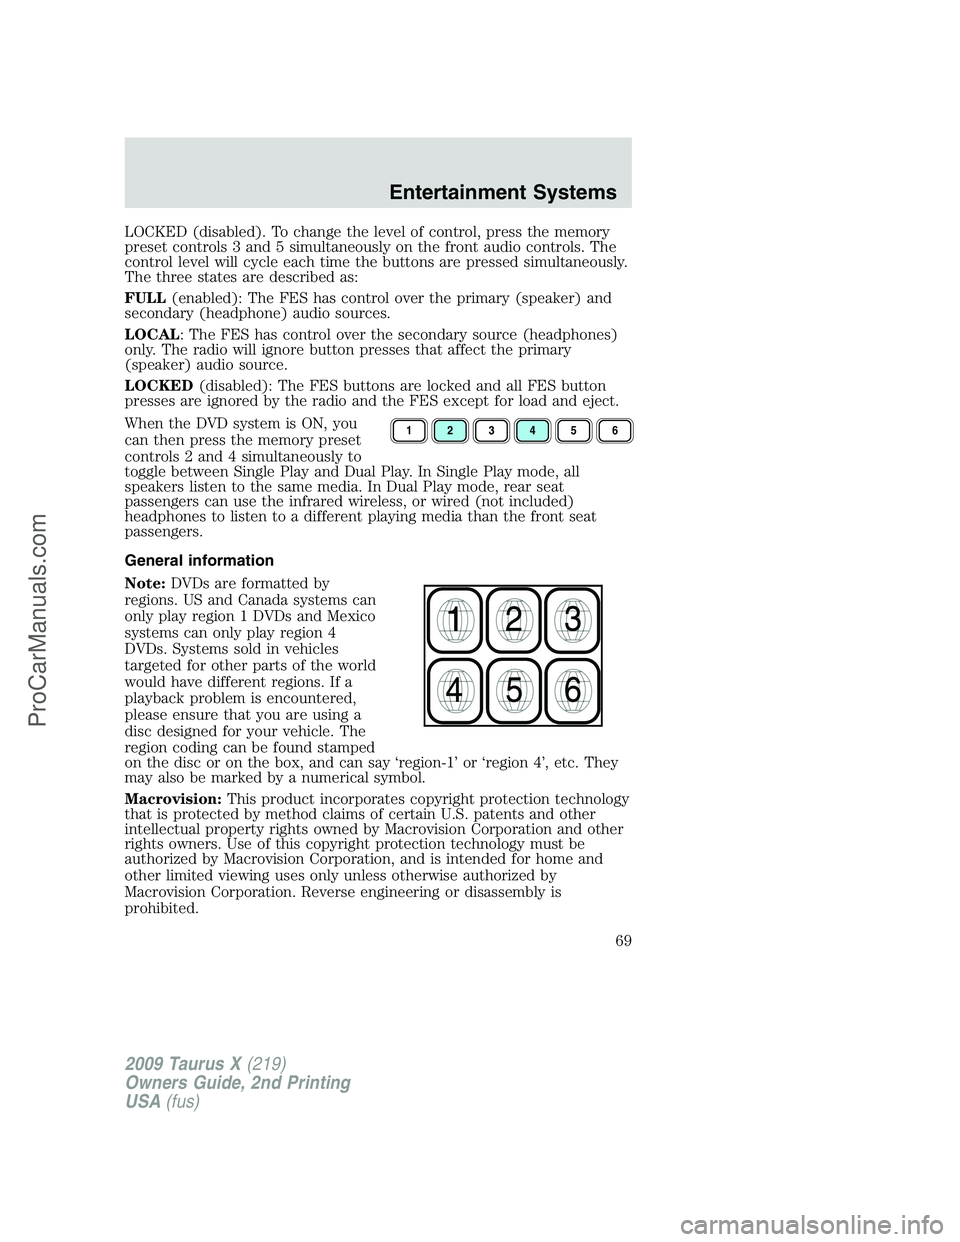
Note:DVDs are formatted by
regions. US and Canada systems can
only play region 1 DVDs and Mexico
systems can only play region 4
DVDs. Systems sold in vehicles
targeted for other parts of the world
would have different regions. If a
playback problem is encountered,
please ensure that you are using a
disc designed for your vehicle. The
region coding can be found stamped
on the disc or on the box, and can say ‘region-1’ or ‘region 4’, etc. They
may also be marked by a numerical symbol.
Macrovision:This product incorporates copyright protection technology
that is protected by method claims of certain U.S. patents and other
intellectual property rights owned by Macrovision Corporation and other
rights owners. Use of this copyright protection technology must be
authorized by Macrovision Corporation, and is intended for home and
other limited viewing uses only unless otherwise authorized by
Macrovision Corporation. Reverse engineering or disassembly is
prohibited.
123456
2009 Taurus X(219)
Owners Guide, 2nd Printing
USA(fus)
Entertainment Systems
69
ProCarManuals.com
Page 71 of 358
Do not expose the liquid crystal display (LCD) flip-down screen
to direct sunlight or intensive ultraviolet rays for extensive
periods of time. Ultraviolet rays deteriorate the liquid crystal.
Be sure to review User Manuals for video games and video game
equipment when used as auxiliary inputs for your Family Entertainment
System (FES).
Do not operate video games or video equipment if the power cords
and/or cables are broken, split or damaged. Carefully place cords and/or
cables where they will not be stepped on or interfere with the operation
of seats and/or compartments.
Disconnect video games and video equipment power cords and/or cables
when not in use.
Avoid touching auxiliary input jacks with your fingers. Do not blow on
them or allow them to get wet or dirty.
Do not clean any part of the DVD player with benzene, paint thinner, or
any other solvent.
Federal Communication Commission (FCC) Compliance
Changes or modifications not approved by Ford Lincoln-Mercury could
void user’s authority to operate the equipment. This equipment has been
tested and found to comply with the limits for a Class B digital device,
pursuant to Part 15 of the FCC Rules. These limits are designed to
provide reasonable protection against harmful interference in a
residential installation. This equipment generates, uses and can radiate
radio frequency energy and, if not installed and used in accordance with
the instructions, may cause harmful interference and radio
communications.
However, there is no guarantee that interference will not occur in a
particular installation. If this equipment does cause harmful interference
to radio or television reception, which can be determined by turning the
equipment off and on, the user is encouraged to consult the dealer or an
experienced radio/TV technician for help.
2009 Taurus X(219)
Owners Guide, 2nd Printing
USA(fus)
Entertainment Systems
71
ProCarManuals.com
Page 81 of 358
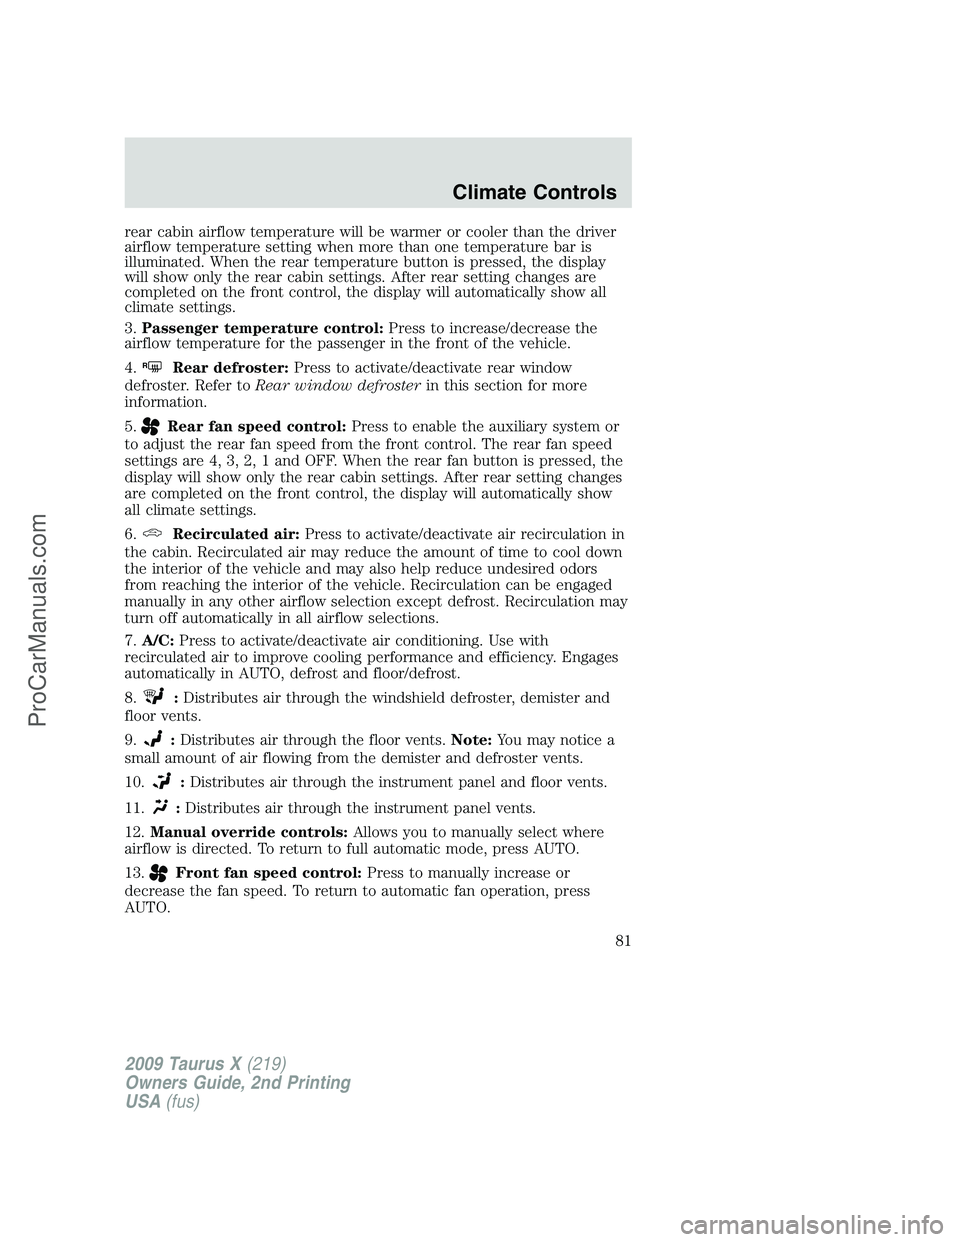
rear cabin airflow temperature will be warmer or cooler than the driver
airflow temperature setting when more than one temperature bar is
illuminated. When the rear temperature button is pressed, the display
will show only the rear cabin settings. After rear setting changes are
completed on the front control, the display will automatically show all
climate settings.
3.Passenger temperature control:Press to increase/decrease the
airflow temperature for the passenger in the front of the vehicle.
4.
RRear defroster:Press to activate/deactivate rear window
defroster. Refer toRear window defrosterin this section for more
information.
5.
Rear fan speed control:Press to enable the auxiliary system or
to adjust the rear fan speed from the front control. The rear fan speed
settings are 4, 3, 2, 1 and OFF. When the rear fan button is pressed, the
display will show only the rear cabin settings. After rear setting changes
are completed on the front control, the display will automatically show
all climate settings.
6.
Recirculated air:Press to activate/deactivate air recirculation in
the cabin. Recirculated air may reduce the amount of time to cool down
the interior of the vehicle and may also help reduce undesired odors
from reaching the interior of the vehicle. Recirculation can be engaged
manually in any other airflow selection except defrost. Recirculation may
turn off automatically in all airflow selections.
7.A/C:Press to activate/deactivate air conditioning. Use with
recirculated air to improve cooling performance and efficiency. Engages
automatically in AUTO, defrost and floor/defrost.
8.
:Distributes air through the windshield defroster, demister and
floor vents.
9.
:Distributes air through the floor vents.Note:You may notice a
small amount of air flowing from the demister and defroster vents.
10.
:Distributes air through the instrument panel and floor vents.
11.
:Distributes air through the instrument panel vents.
12.Manual override controls:Allows you to manually select where
airflow is directed. To return to full automatic mode, press AUTO.
13.
Front fan speed control:Press to manually increase or
decrease the fan speed. To return to automatic fan operation, press
AUTO.
2009 Taurus X(219)
Owners Guide, 2nd Printing
USA(fus)
Climate Controls
81
ProCarManuals.com
Page 83 of 358
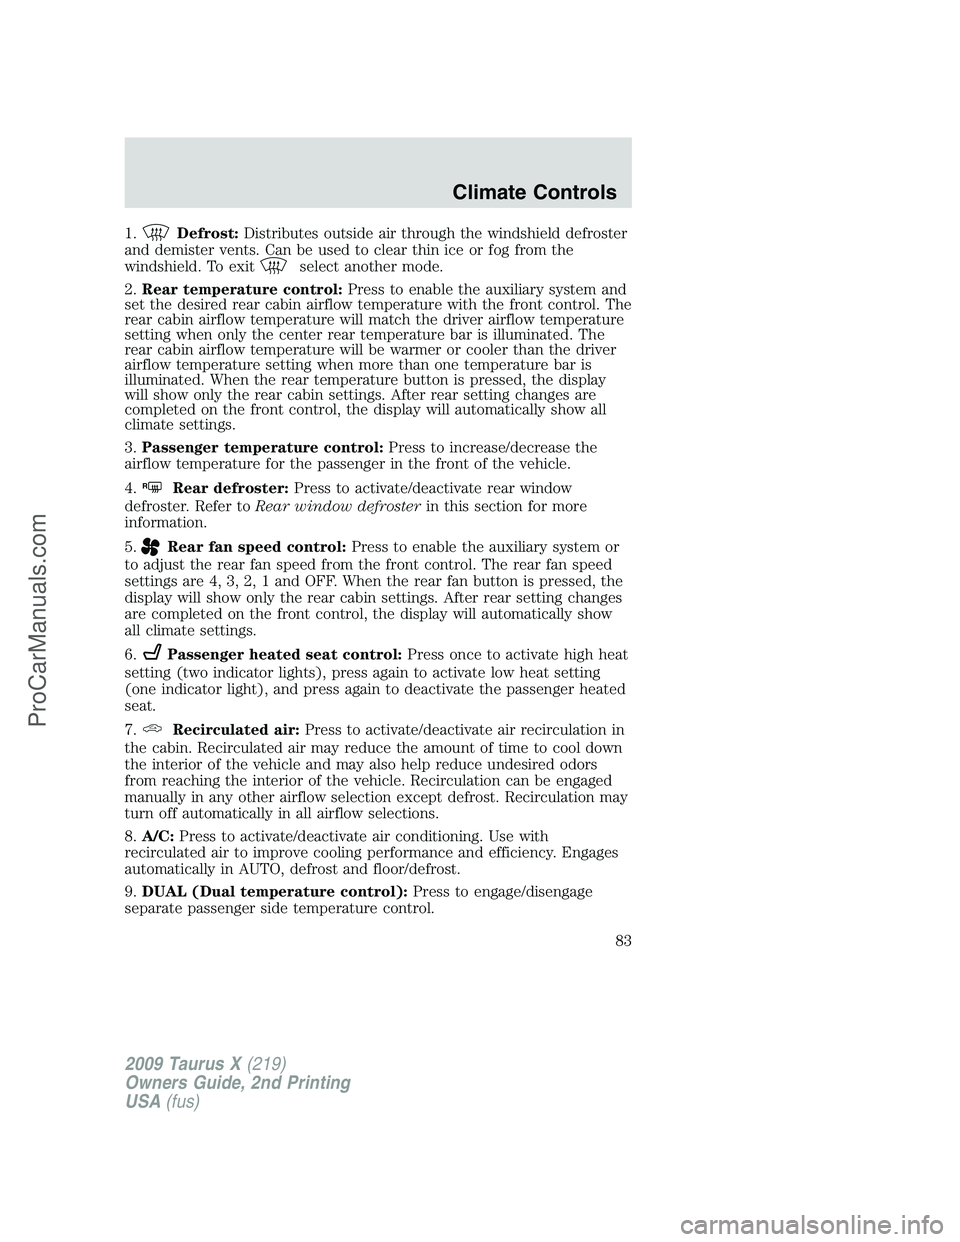
1.Defrost:Distributes outside air through the windshield defroster
and demister vents. Can be used to clear thin ice or fog from the
windshield. To exit
select another mode.
2.Rear temperature control:Press to enable the auxiliary system and
set the desired rear cabin airflow temperature with the front control. The
rear cabin airflow temperature will match the driver airflow temperature
setting when only the center rear temperature bar is illuminated. The
rear cabin airflow temperature will be warmer or cooler than the driver
airflow temperature setting when more than one temperature bar is
illuminated. When the rear temperature button is pressed, the display
will show only the rear cabin settings. After rear setting changes are
completed on the front control, the display will automatically show all
climate settings.
3.Passenger temperature control:Press to increase/decrease the
airflow temperature for the passenger in the front of the vehicle.
4.
RRear defroster:Press to activate/deactivate rear window
defroster. Refer toRear window defrosterin this section for more
information.
5.
Rear fan speed control:Press to enable the auxiliary system or
to adjust the rear fan speed from the front control. The rear fan speed
settings are 4, 3, 2, 1 and OFF. When the rear fan button is pressed, the
display will show only the rear cabin settings. After rear setting changes
are completed on the front control, the display will automatically show
all climate settings.
6.
Passenger heated seat control:Press once to activate high heat
setting (two indicator lights), press again to activate low heat setting
(one indicator light), and press again to deactivate the passenger heated
seat.
7.
Recirculated air:Press to activate/deactivate air recirculation in
the cabin. Recirculated air may reduce the amount of time to cool down
the interior of the vehicle and may also help reduce undesired odors
from reaching the interior of the vehicle. Recirculation can be engaged
manually in any other airflow selection except defrost. Recirculation may
turn off automatically in all airflow selections.
8.A/C:Press to activate/deactivate air conditioning. Use with
recirculated air to improve cooling performance and efficiency. Engages
automatically in AUTO, defrost and floor/defrost.
9.DUAL (Dual temperature control):Press to engage/disengage
separate passenger side temperature control.
2009 Taurus X(219)
Owners Guide, 2nd Printing
USA(fus)
Climate Controls
83
ProCarManuals.com
Page 85 of 358
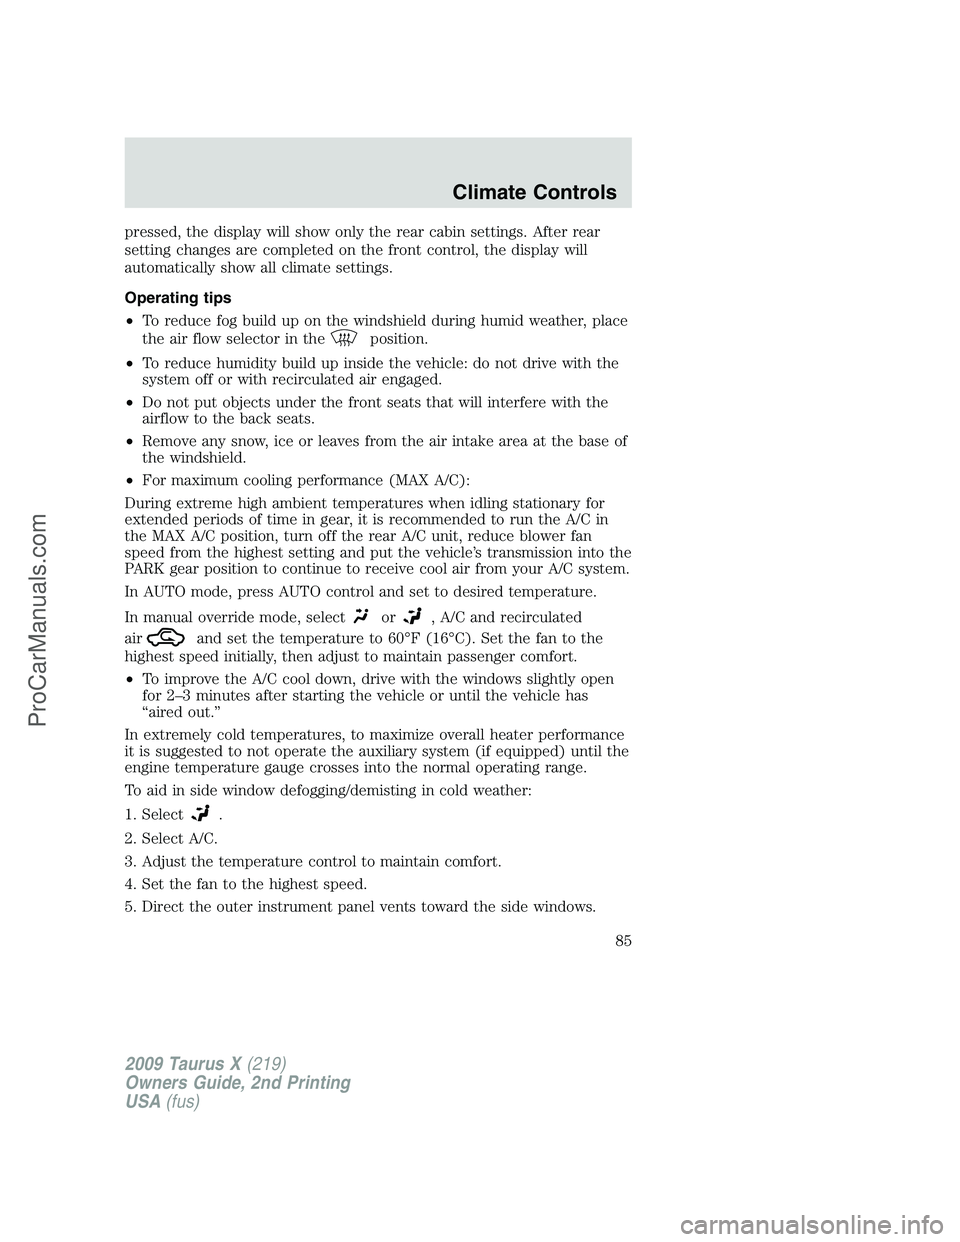
pressed, the display will show only the rear cabin settings. After rear
setting changes are completed on the front control, the display will
automatically show all climate settings.
Operating tips
•To reduce fog build up on the windshield during humid weather, place
the air flow selector in the
position.
•To reduce humidity build up inside the vehicle: do not drive with the
system off or with recirculated air engaged.
•Do not put objects under the front seats that will interfere with the
airflow to the back seats.
•Remove any snow, ice or leaves from the air intake area at the base of
the windshield.
•For maximum cooling performance (MAX A/C):
During extreme high ambient temperatures when idling stationary for
extended periods of time in gear, it is recommended to run the A/C in
the MAX A/C position, turn off the rear A/C unit, reduce blower fan
speed from the highest setting and put the vehicle’s transmission into the
PARK gear position to continue to receive cool air from your A/C system.
In AUTO mode, press AUTO control and set to desired temperature.
In manual override mode, select
or, A/C and recirculated
air
and set the temperature to 60°F (16°C). Set the fan to the
highest speed initially, then adjust to maintain passenger comfort.
•To improve the A/C cool down, drive with the windows slightly open
for 2–3 minutes after starting the vehicle or until the vehicle has
“aired out.”
In extremely cold temperatures, to maximize overall heater performance
it is suggested to not operate the auxiliary system (if equipped) until the
engine temperature gauge crosses into the normal operating range.
To aid in side window defogging/demisting in cold weather:
1. Select
.
2. Select A/C.
3. Adjust the temperature control to maintain comfort.
4. Set the fan to the highest speed.
5. Direct the outer instrument panel vents toward the side windows.
2009 Taurus X(219)
Owners Guide, 2nd Printing
USA(fus)
Climate Controls
85
ProCarManuals.com
Page 87 of 358

HEADLAMP CONTROL
Turns the lamps off.
Turns on the parking lamps,
instrument panel lamps, license
plate lamps and tail lamps.
Turns the low beam headlamps
on.
Autolamp control (if equipped)
The autolamp system provides light
sensitive automatic on-off control of
the exterior lights normally
controlled by the headlamp control.
•To turn autolamps on, rotate the
control to
.
•To turn autolamps off, rotate the
control from the autolamp
position.
The autolamp system also keeps the
lights on for a predetermined amount of time after the ignition switch is
turned to off. You can change the amount of time the lamps stay on by
using the programming procedure that follows:
Note:If the vehicle is equipped with autolamps, it will have the
headlamps on with windshield wipers feature.If the windshield
wipers are turned on (for a fixed period of time), the exterior lamps will
turn on with the headlamp control in the Autolamp position.
Autolamps - Programmable exit delay
Programmable exit delay allows the length of the autolamp exit delay to
be changed.
To program the auto lamp exit time delay:
1. Start with the ignition in the off position and the headlamp control in
the autolamp position.
2. Turn the headlamp control to off.
P
2009 Taurus X(219)
Owners Guide, 2nd Printing
USA(fus)
Lights
87
ProCarManuals.com