2009 FORD F350 clutch
[x] Cancel search: clutchPage 277 of 419
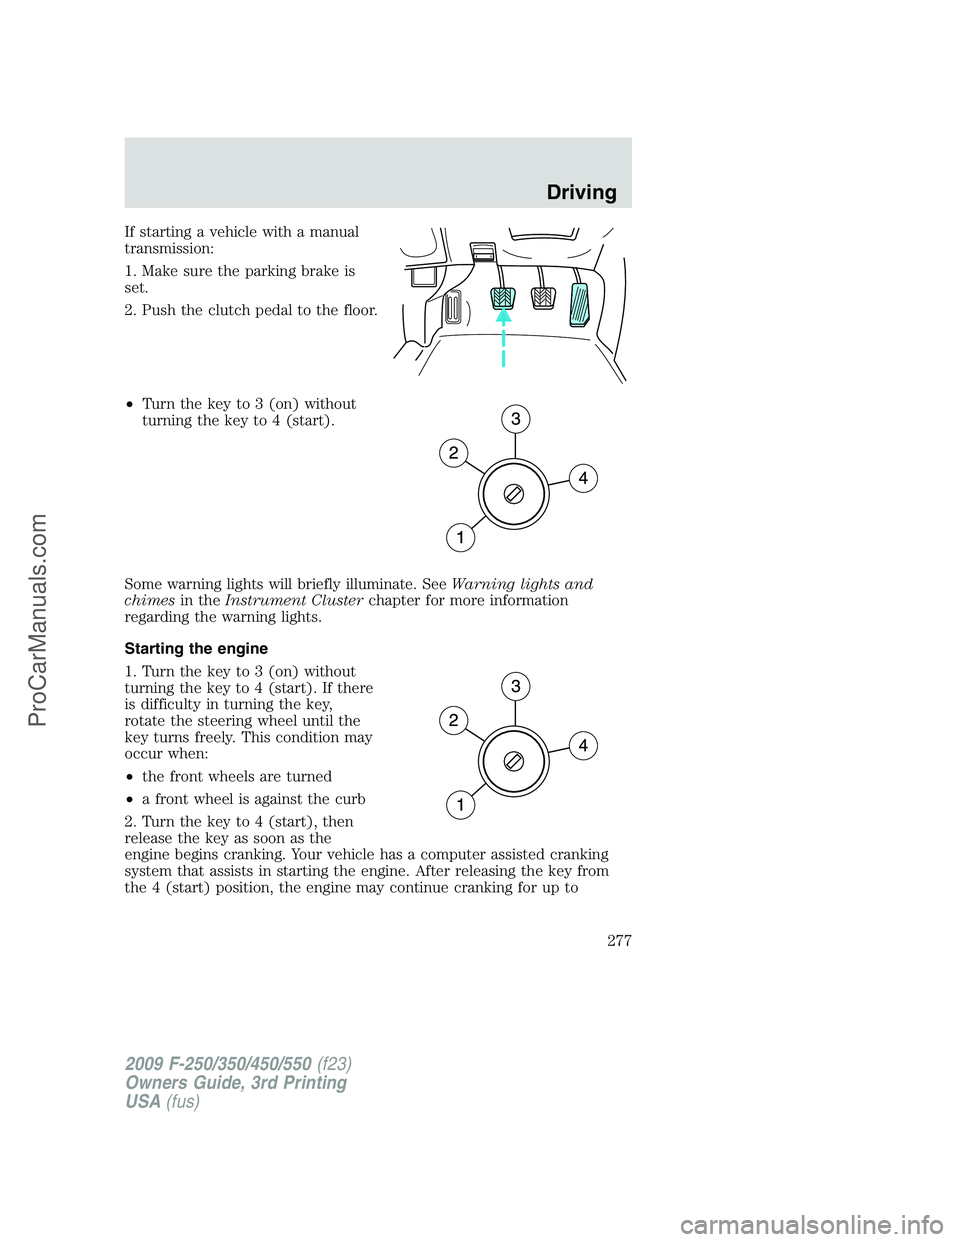
If starting a vehicle with a manual
transmission:
1. Make sure the parking brake is
set.
2. Push the clutch pedal to the floor.
•Turn the key to 3 (on) without
turning the key to 4 (start).
Some warning lights will briefly illuminate. SeeWarning lights and
chimesin theInstrument Clusterchapter for more information
regarding the warning lights.
Starting the engine
1. Turn the key to 3 (on) without
turning the key to 4 (start). If there
is difficulty in turning the key,
rotate the steering wheel until the
key turns freely. This condition may
occur when:
•the front wheels are turned
•a front wheel is against the curb
2. Turn the key to 4 (start), then
release the key as soon as the
engine begins cranking. Your vehicle has a computer assisted cranking
system that assists in starting the engine. After releasing the key from
the 4 (start) position, the engine may continue cranking for up to
2009 F-250/350/450/550(f23)
Owners Guide, 3rd Printing
USA(fus)
Driving
277
ProCarManuals.com
Page 290 of 419

Using the clutch
Manual transmission vehicles have a starter interlock that prevents
cranking the engine unless the clutch pedal is fully depressed.
To start the vehicle:
1. Make sure the parking brake is fully set.
2. Press the clutch pedal to the floor, then put the gearshift lever in the
neutral position.
3. Start the engine.
4. Press the brake pedal and move the gearshift lever to the desired
gear; 1 (First) or R (Reverse).
5. Release the parking brake, then slowly release the clutch pedal while
slowly pressing on the accelerator.
During each shift, the clutch pedal must be fully depressed to the floor.
Make sure the floor mat is properly positioned so it doesn’t interfere with
the full extension of the clutch pedal.
Failure to fully depress the clutch pedal to the floor may cause
increased shift efforts, prematurely wear transmission
components or damage the transmission.
Do not drive with your foot resting on the clutch pedal or use the
clutch pedal to hold your vehicle at a standstill while waiting on a
hill. These actions will severely reduce the life of the clutch and
could nullify a clutch warranty claim.
Recommended shift speeds
Do not overspeed the engine when going downhill or steep grades. If
equipped, use the tachometer and do not allow engine speed to exceed
the redline area. Operating the engine beyond the recommended speeds
can cause severe engine damage.
2009 F-250/350/450/550(f23)
Owners Guide, 3rd Printing
USA(fus)
Driving
290
ProCarManuals.com
Page 297 of 419

Manual Shift On Stop (MSOS) 4x4 system (if equipped)
The 4WD system is engaged or
disengaged by rotating the control
for both front wheel hub locks from
the FREE or LOCK position, then
manually engaging or disengaging
the transfer case with the
floor-mounted shifter. For increased
fuel economy in 2WD, rotate both
hub locks to the FREE position.
•For proper operation, make
sure that each hub is fully
engaged and that both hub locks are set to the same position
(both set to LOCK or both set to FREE). To engage LOCK,
turn the hub locks completely clockwise; to disengage the hubs
(FREE), turn the hub locks completely counterclockwise.
•Some vehicles may be equipped with wheel ornaments that cover the
4x4 manual hub lock. These ornaments must be removed to access
the manual hub locks.
Electronic Shift On the Fly (ESOF) 4x4 system (if equipped)
If equipped with the electronic shift 4WD System, and the
instrument panel control is moved to 4X4 LOW while the vehicle
is moving above 5 mph (8 km/h), the system will not engage and
no damage will occur to the 4WD system. Before 4X4 LOW can be
engaged, the vehicle speed must be below 5 mph (8 km/h) with
the transmission in N (Neutral). If your vehicle is equipped with
a manual transmission, the clutch pedal also must be depressed.
The 4x4 Low indicator will flash continuously until these actions
are performed by the user. This vehicle is equipped with a
non-synchronous low range gearset which will not allow the
transfer case to shift into 4X4 LOW if vehicle speed is above
5 mph (8 km/h). It is recommended that a shift to 4X4 LOW is
performed while the vehicle is rolling at a speed below 5 mph
(8 km/h).
2009 F-250/350/450/550(f23)
Owners Guide, 3rd Printing
USA(fus)
Driving
297
ProCarManuals.com
Page 300 of 419

Shifting from 4H (4x4 High) to 2H (2WD)
Move the transfer case lever to 2H
(2WD) at a stop or a vehicle speed
below 5 mph (8 km/h).
With the vehicle at complete stop,
disengage the locking hubs
(optional) by rotating the hub lock
control from LOCK to FREE.
•For proper operation, make
sure that both indicator arrows on the hub are aligned, and
that both hubs are set to FREE
Shifting from 4H (4x4 High) to 4L (4x4 Low)
1. Bring the vehicle to a stop or a speed below 5 mph (8 km/h).
2. Place the gearshift lever in N (Neutral). If the vehicle is equipped with
a manual transmission, also depress the clutch pedal.
3. Move the transfer case shift lever
through N (Neutral) directly to 4L
(4x4 Low).
4. If the shift lever does not, or only
partially moves to the 4L (4x4 Low)
position, perform a shift with the
transmission in N (Neutral) (or
clutch pedal depressed) and the
vehicle rolling at a speed below 5 mph (8 km/h). This will ensure the
transfer case is fully engaged into 4L (4x4 Low).
Shifting from 4L (4x4 Low) to 4H (4x4 High) or 2H (2WD)
1. Bring the vehicle to a stop or a speed below 5 mph (8 km/h).
2. Place the gearshift lever in N (Neutral). If the vehicle is equipped with
a manual transmission, also depress the clutch pedal.
3. Move the transfer case shift lever
through N (Neutral) directly to 4H
(4x4 High) or 2H (2WD).
4. If the transfer casewill not
engage into 4H (4x4 High) or 2H
(2WD), perform a shift with the
transmission in N (Neutral) (or
clutch pedal depressed) and the
vehicle rolling at a speed below 5 mph (8 km/h).
2H
4H
4LN
2H
4H
4LN
2H
4H
4LN
2009 F-250/350/450/550(f23)
Owners Guide, 3rd Printing
USA(fus)
Driving
300
ProCarManuals.com
Page 302 of 419
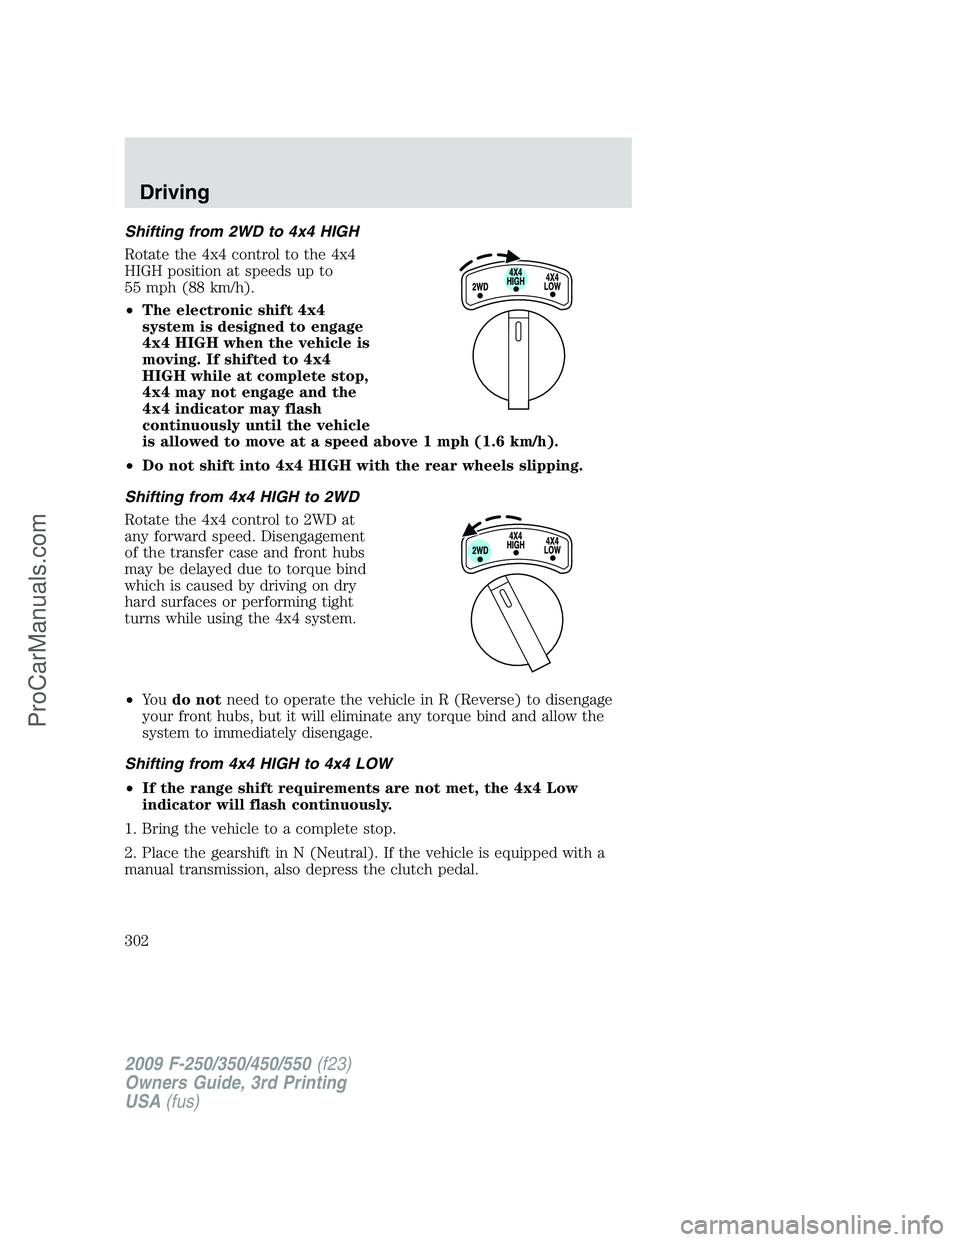
Shifting from 2WD to 4x4 HIGH
Rotate the 4x4 control to the 4x4
HIGH position at speeds up to
55 mph (88 km/h).
•The electronic shift 4x4
system is designed to engage
4x4 HIGH when the vehicle is
moving. If shifted to 4x4
HIGH while at complete stop,
4x4 may not engage and the
4x4 indicator may flash
continuously until the vehicle
is allowed to move at a speed above 1 mph (1.6 km/h).
•Do not shift into 4x4 HIGH with the rear wheels slipping.
Shifting from 4x4 HIGH to 2WD
Rotate the 4x4 control to 2WD at
any forward speed. Disengagement
of the transfer case and front hubs
may be delayed due to torque bind
which is caused by driving on dry
hard surfaces or performing tight
turns while using the 4x4 system.
•Yo udo notneed to operate the vehicle in R (Reverse) to disengage
your front hubs, but it will eliminate any torque bind and allow the
system to immediately disengage.
Shifting from 4x4 HIGH to 4x4 LOW
•If the range shift requirements are not met, the 4x4 Low
indicator will flash continuously.
1. Bring the vehicle to a complete stop.
2. Place the gearshift in N (Neutral). If the vehicle is equipped with a
manual transmission, also depress the clutch pedal.
2009 F-250/350/450/550(f23)
Owners Guide, 3rd Printing
USA(fus)
Driving
302
ProCarManuals.com
Page 324 of 419
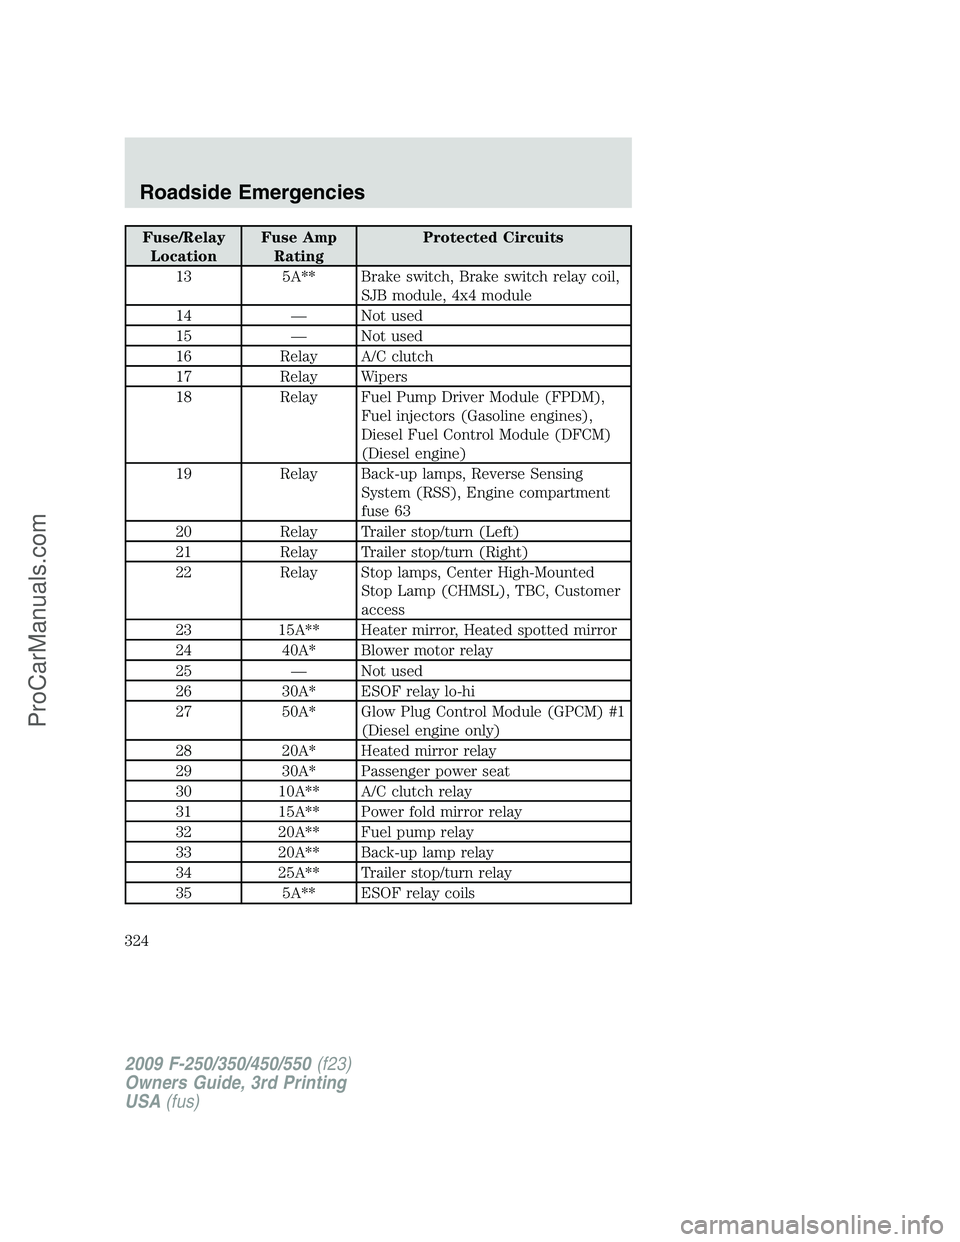
Fuse/Relay
LocationFuse Amp
RatingProtected Circuits
13 5A** Brake switch, Brake switch relay coil,
SJB module, 4x4 module
14 — Not used
15 — Not used
16 Relay A/C clutch
17 Relay Wipers
18 Relay Fuel Pump Driver Module (FPDM),
Fuel injectors (Gasoline engines),
Diesel Fuel Control Module (DFCM)
(Diesel engine)
19 Relay Back-up lamps, Reverse Sensing
System (RSS), Engine compartment
fuse 63
20 Relay Trailer stop/turn (Left)
21 Relay Trailer stop/turn (Right)
22 Relay Stop lamps, Center High-Mounted
Stop Lamp (CHMSL), TBC, Customer
access
23 15A** Heater mirror, Heated spotted mirror
24 40A* Blower motor relay
25 — Not used
26 30A* ESOF relay lo-hi
27 50A* Glow Plug Control Module (GPCM) #1
(Diesel engine only)
28 20A* Heated mirror relay
29 30A* Passenger power seat
30 10A** A/C clutch relay
31 15A** Power fold mirror relay
32 20A** Fuel pump relay
33 20A** Back-up lamp relay
34 25A** Trailer stop/turn relay
35 5A** ESOF relay coils
2009 F-250/350/450/550(f23)
Owners Guide, 3rd Printing
USA(fus)
Roadside Emergencies
324
ProCarManuals.com
Page 326 of 419
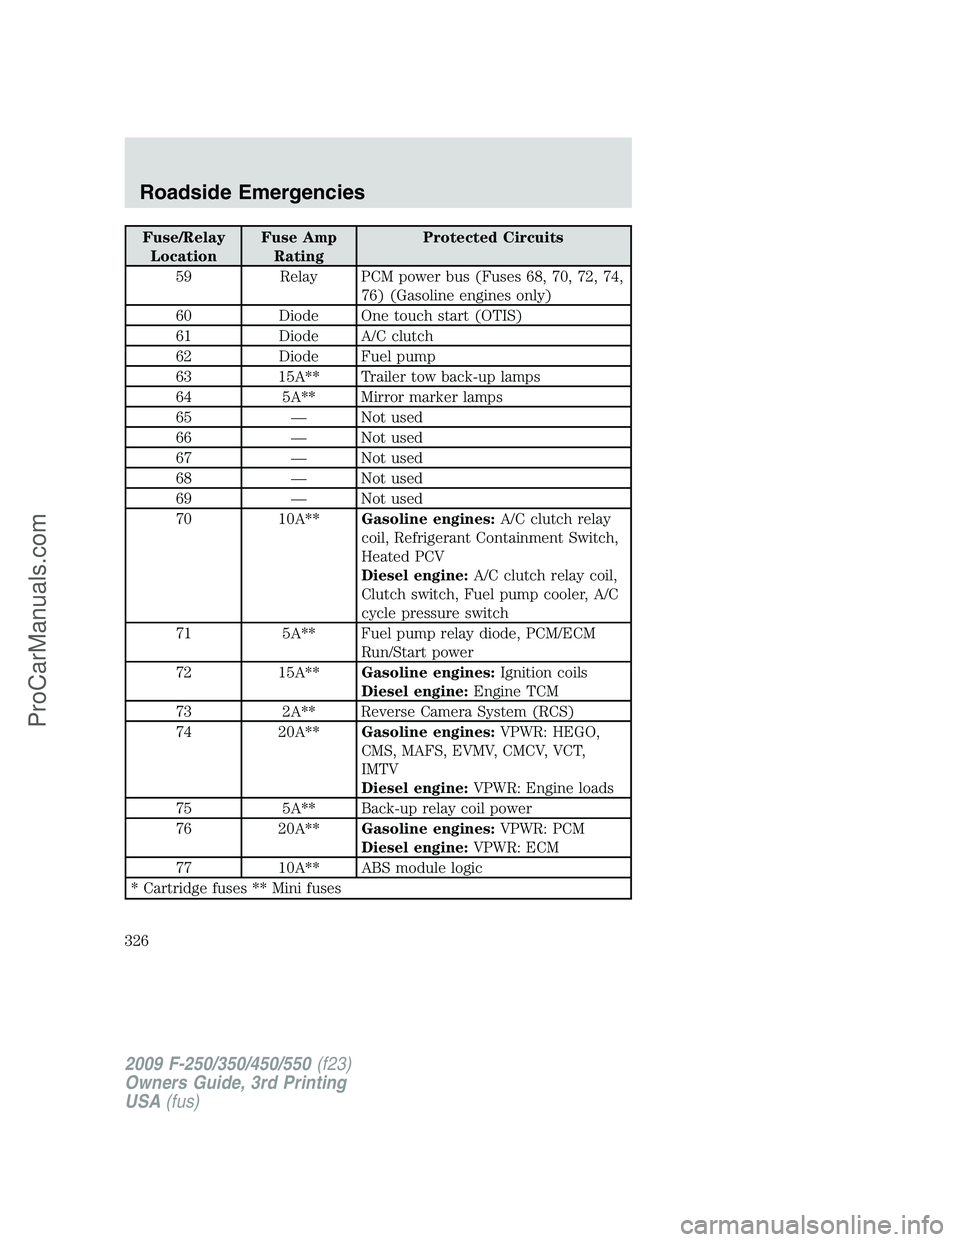
Fuse/Relay
LocationFuse Amp
RatingProtected Circuits
59 Relay PCM power bus (Fuses 68, 70, 72, 74,
76) (Gasoline engines only)
60 Diode One touch start (OTIS)
61 Diode A/C clutch
62 Diode Fuel pump
63 15A** Trailer tow back-up lamps
64 5A** Mirror marker lamps
65 — Not used
66 — Not used
67 — Not used
68 — Not used
69 — Not used
70 10A**Gasoline engines:A/C clutch relay
coil, Refrigerant Containment Switch,
Heated PCV
Diesel engine:A/C clutch relay coil,
Clutch switch, Fuel pump cooler, A/C
cycle pressure switch
71 5A** Fuel pump relay diode, PCM/ECM
Run/Start power
72 15A**Gasoline engines:Ignition coils
Diesel engine:Engine TCM
73 2A** Reverse Camera System (RCS)
74 20A**Gasoline engines:VPWR: HEGO,
CMS, MAFS, EVMV, CMCV, VCT,
IMTV
Diesel engine:VPWR: Engine loads
75 5A** Back-up relay coil power
76 20A**Gasoline engines:VPWR: PCM
Diesel engine:VPWR: ECM
77 10A** ABS module logic
* Cartridge fuses ** Mini fuses
2009 F-250/350/450/550(f23)
Owners Guide, 3rd Printing
USA(fus)
Roadside Emergencies
326
ProCarManuals.com
Page 367 of 419
SERVICE RECOMMENDATIONS
To help you service your vehicle, we providescheduled maintenance
informationwhich makes tracking routine service easy.
If your vehicle requires professional service, your authorized dealer can
provide the necessary parts and service. Check yourWarranty
Guide/Customer Information Guideto find out which parts and
services are covered.
Use only recommended fuels, lubricants, fluids and service parts
conforming to specifications. Motorcraft parts are designed and built to
provide the best performance in your vehicle.
PRECAUTIONS WHEN SERVICING YOUR VEHICLE
•Do not work on a hot engine.
•Make sure that nothing gets caught in moving parts.
•Do not work on a vehicle with the engine running in an enclosed
space, unless you are sure you have enough ventilation.
•Keep all open flames and other burning (cigarettes) material away
from the battery and all fuel related parts.
Working with the engine off
•Automatic transmission:
1. Set the parking brake and shift to P (Park).
2. Turn off the engine and remove the key.
3. Block the wheels.
•Manual transmission:
1. Set the parking brake, depress the clutch pedal, place the gearshift in
1 (First), and release the clutch pedal.
2. Turn off the engine and remove the key.
3. Block the wheels.
Working with the engine on
•Automatic transmission:
1. Set the parking brake and shift to P (Park).
2. Block the wheels.
•Manual transmission:
1. Set the parking brake, depress the clutch pedal, place the gearshift in
N (Neutral), and release the clutch pedal.
2009 F-250/350/450/550(f23)
Owners Guide, 3rd Printing
USA(fus)
Maintenance and Specifications
367
ProCarManuals.com