2009 FORD F250 ECU
[x] Cancel search: ECUPage 330 of 419
•Tow a trailer
•Use snow chains on the end of the vehicle with the temporary spare
tire
•Use more than one temporary spare tire at a time
Use of a temporary spare tire at any one wheel location can lead to
impairment of the following:
•Handling, stability and braking performance
•Comfort and noise
•Ground clearance and parking at curbs
•Winter weather driving capability
•Wet weather driving capability
Stopping and securing the vehicle
WARNING:To help prevent the vehicle from moving when you
change a tire, be sure the parking brake is set, then block (in
both directions) the wheel that is diagonally opposite to the tire being
changed.
Refer to the instruction sheet (located in the glove box) for detailed tire
change instructions.
Park on a level surface, activate
hazard flashers and set the parking
brake.
•Automatic transmission: Place
gearshift lever in P (Park).
•Manual transmission: Place
gearshift lever in R (Reverse).
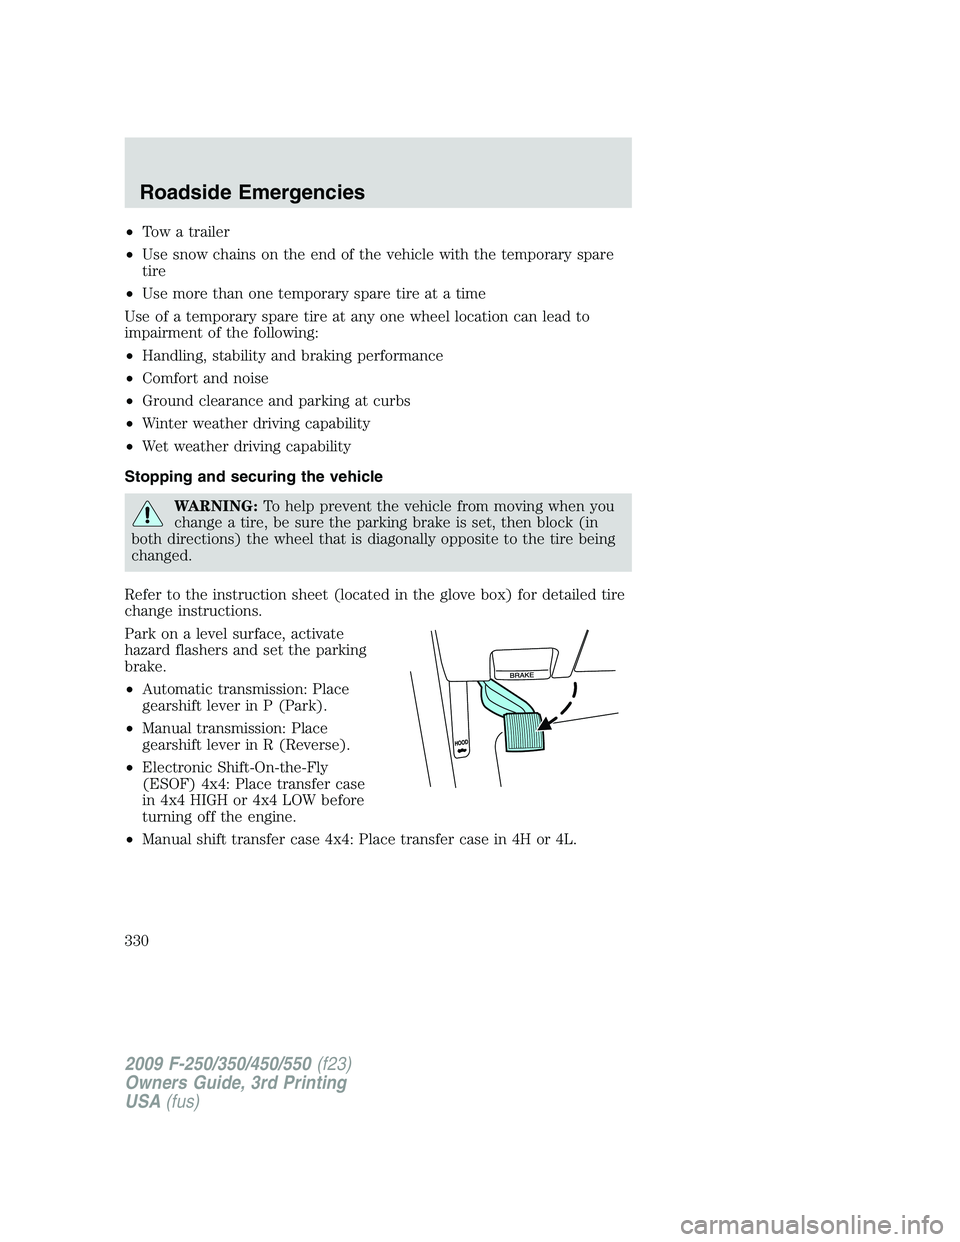
•Electronic Shift-On-the-Fly
(ESOF) 4x4: Place transfer case
in 4x4 HIGH or 4x4 LOW before
turning off the engine.
•Manual shift transfer case 4x4: Place transfer case in 4H or 4L.
2009 F-250/350/450/550(f23)
Owners Guide, 3rd Printing
USA(fus)
Roadside Emergencies
330
Page 339 of 419
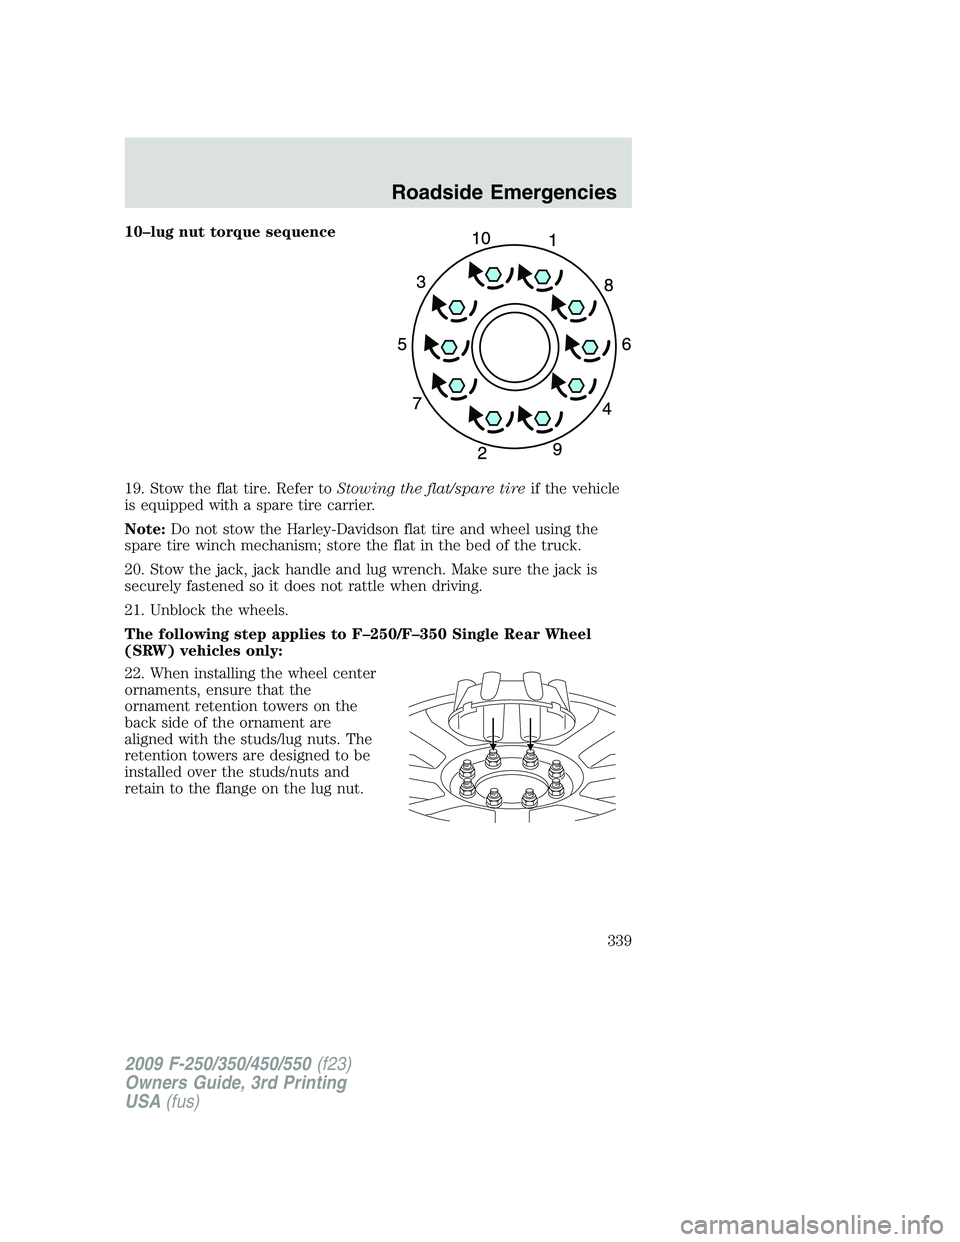
10–lug nut torque sequence
19. Stow the flat tire. Refer toStowing the flat/spare tireif the vehicle
is equipped with a spare tire carrier.
Note:Do not stow the Harley-Davidson flat tire and wheel using the
spare tire winch mechanism; store the flat in the bed of the truck.
20. Stow the jack, jack handle and lug wrench. Make sure the jack is
securely fastened so it does not rattle when driving.
21. Unblock the wheels.
The following step applies to F–250/F–350 Single Rear Wheel
(SRW) vehicles only:
22. When installing the wheel center
ornaments, ensure that the
ornament retention towers on the
back side of the ornament are
aligned with the studs/lug nuts. The
retention towers are designed to be
installed over the studs/nuts and
retain to the flange on the lug nut.
2009 F-250/350/450/550(f23)
Owners Guide, 3rd Printing
USA(fus)
Roadside Emergencies
339
Page 342 of 419
5. Repeat this tightness check procedure when servicing the spare tire
pressure (every six months, perscheduled maintenance information),
or at any time that the spare tire is disturbed through service of other
components.
6. If removed, install the spare tire lock (if equipped) into the bumper
drive tube with the spare tire lock key (if equipped) and jack handle.
WHEEL LUG NUT TORQUE SPECIFICATIONS
On vehicles equipped with single rear wheels, retighten the lug nuts to
the specified torque at 500 miles (800 km) after any wheel disturbance
(tire rotation, changing a flat tire, wheel removal, etc.).
On vehicles equipped with dual rear wheels, retighten the wheel lug nuts
to the specified torque at 100 miles (160 km), and again at 500 miles
(800 km) of new vehicle operation and after any wheel disturbance (tire
rotation, changing a flat tire, wheel removal, etc.).
Bolt size Wheel lug nut torque*
lb.ft. N•m
M14 x 1.5 165 224
* Torque specifications are for nut and bolt threads free of dirt and
rust. Use only Ford recommended replacement fasteners.
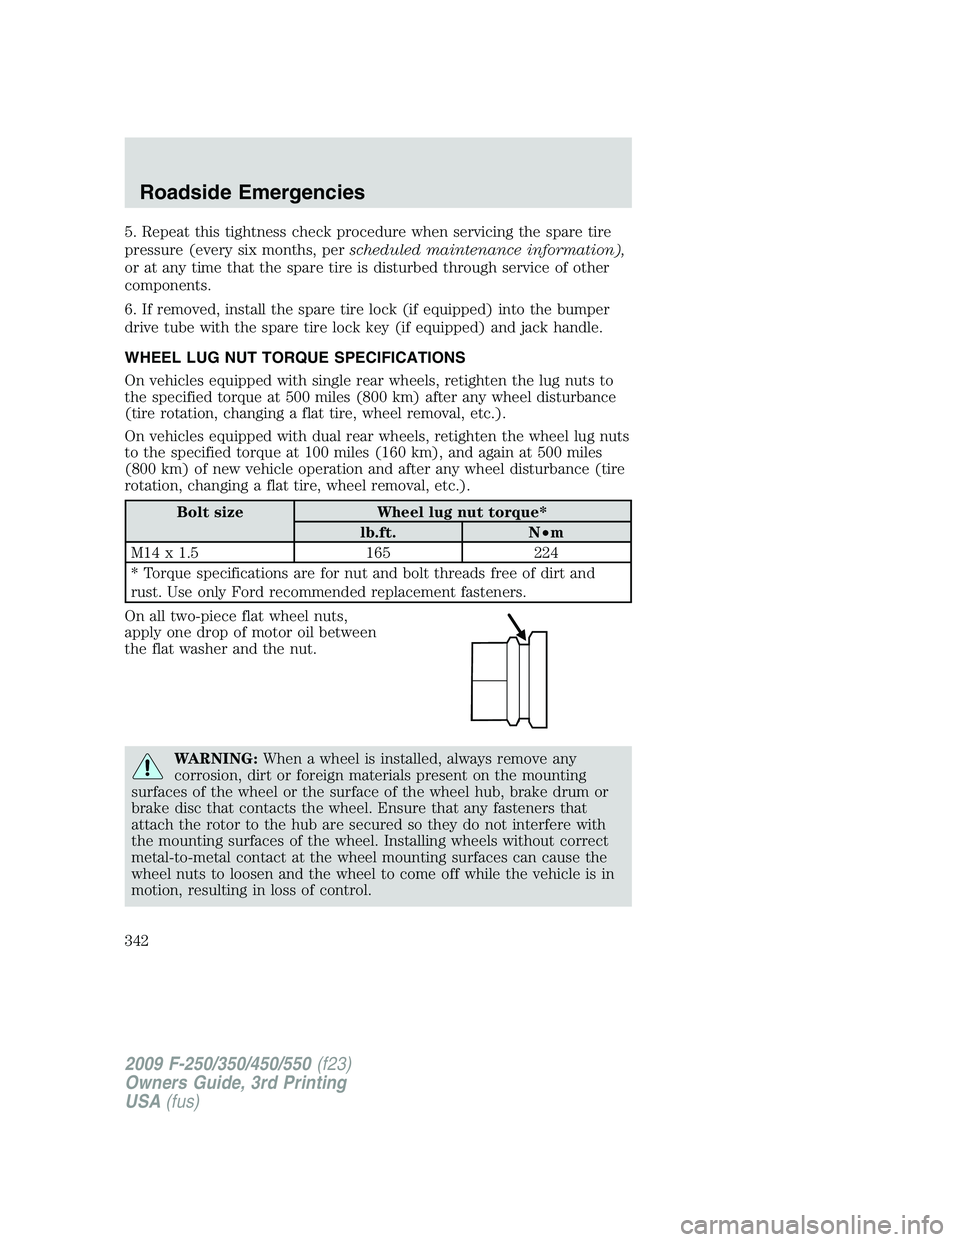
On all two-piece flat wheel nuts,
apply one drop of motor oil between
the flat washer and the nut.
WARNING:When a wheel is installed, always remove any
corrosion, dirt or foreign materials present on the mounting
surfaces of the wheel or the surface of the wheel hub, brake drum or
brake disc that contacts the wheel. Ensure that any fasteners that
attach the rotor to the hub are secured so they do not interfere with
the mounting surfaces of the wheel. Installing wheels without correct
metal-to-metal contact at the wheel mounting surfaces can cause the
wheel nuts to loosen and the wheel to come off while the vehicle is in
motion, resulting in loss of control.
2009 F-250/350/450/550(f23)
Owners Guide, 3rd Printing
USA(fus)
Roadside Emergencies
342
Page 352 of 419
In the United States, a warranty dispute must be submitted to the BBB
AUTO LINE before taking action under the Magnuson-Moss Warranty
Act, or to the extent allowed by state law, before pursuing replacement
or repurchase remedies provided by certain state laws. This dispute
handling procedure is not required prior to enforcing state created rights
or other rights which are independent of the Magnuson-Moss Warranty
Act or state replacement or repurchase laws.
IN CALIFORNIA (U.S. ONLY)
California Civil Code Section 1793.2(d) requires that, if a manufacturer
or its representative is unable to repair a motor vehicle to conform to the
vehicle’s applicable express warranty after a reasonable number of
attempts, the manufacturer shall be required to either replace the
vehicle with one substantially identical or repurchase the vehicle and
reimburse the buyer in an amount equal to the actual price paid or
payable by the consumer (less a reasonable allowance for consumer
use). The consumer has the right to choose whether to receive a refund
or replacement vehicle.
California Civil Code Section 1793.22(b) presumes that the manufacturer
has had a reasonable number of attempts to conform the vehicle to its
applicable express warranties if, within the first 18 months of ownership
of a new vehicle or the first 18,000 miles (29,000 km), whichever occurs
first:
1. Two or more repair attempts are made on the same non-conformity
likely to cause death or serious bodily injury OR
2. Four or more repair attempts are made on the same nonconformity (a
defect or condition that substantially impairs the use, value or safety of
the vehicle) OR
3. The vehicle is out of service for repair of nonconformities for a total of
more than 30 calendar days (not necessarily all at one time)
In the case of 1 or 2 above, the consumer must also notify the
manufacturer of the need for the repair of the nonconformity at the
following address:
Ford Motor Company
16800 Executive Plaza Drive
Mail Drop 3NE-B
Dearborn, MI 48126
THE BETTER BUSINESS BUREAU (BBB) AUTO LINE PROGRAM
(U.S. ONLY)
Your satisfaction is important to Ford Motor Company and to your dealer.
If a warranty concern has not been resolved using the three-step
2009 F-250/350/450/550(f23)
Owners Guide, 3rd Printing
USA(fus)
Customer Assistance
352
Page 353 of 419
procedure outlined on the first page of theCustomer Assistancesection,
you may be eligible to participate in the BBB AUTO LINE program.
The BBB AUTO LINE program consists of two parts – mediation and
arbitration. During mediation, a representative of the BBB will contact
both you and Ford Motor Company to explore options for settlement of
the claim. If an agreement is not reached during mediation and your
claim is eligible, you may participate in the arbitration process. An
arbitration hearing will be scheduled so that you can present your case
in an informal setting before an impartial person. The arbitrator will
consider the testimony provided and make a decision after the hearing.
You are not bound by the decision, but should you choose to accept the
BBB AUTO LINE decision, Ford must abide by the accepted decision as
well. Disputes submitted to the BBB AUTO LINE program are usually
decided within forty days after you file your claim with the BBB.
BBB AUTO LINE Application: Using the information provided below,
please call or write to request a program application. You will be asked
for your name and address, general information about your new vehicle,
information about your warranty concerns, and any steps you have
already taken to try to resolve them. A Customer Claim Form will be
mailed that will need to be completed, signed and returned to the BBB
along with proof of ownership. Upon receipt, the BBB will review the
claim for eligibility under the Program Summary Guidelines.
You can get more information by calling BBB AUTO LINE at
1-800-955-5100, or writing to:
BBB AUTO LINE
4200 Wilson Boulevard, Suite 800
Arlington, Virginia 22203–1833
BBB AUTO LINE applications can also be requested by calling the Ford
Motor Company Customer Relationship Center at 1-800-392-3673.
Note:Ford Motor Company reserves the right to change eligibility
limitations, modify procedures, or to discontinue this process at any time
without notice and without obligation.
UTILIZING THE MEDIATION/ARBITRATION PROGRAM
(CANADA ONLY)
For vehicles delivered to authorized Canadian dealers. In those cases
where you continue to feel that the efforts by Ford of Canada and the
authorized dealer to resolve a factory-related vehicle service concern
have been unsatisfactory, Ford of Canada participates in an impartial
third party mediation/arbitration program administered by the Canadian
Motor Vehicle Arbitration Plan (CAMVAP).
2009 F-250/350/450/550(f23)
Owners Guide, 3rd Printing
USA(fus)
Customer Assistance
353
Page 372 of 419
CHANGING THE WIPER BLADES
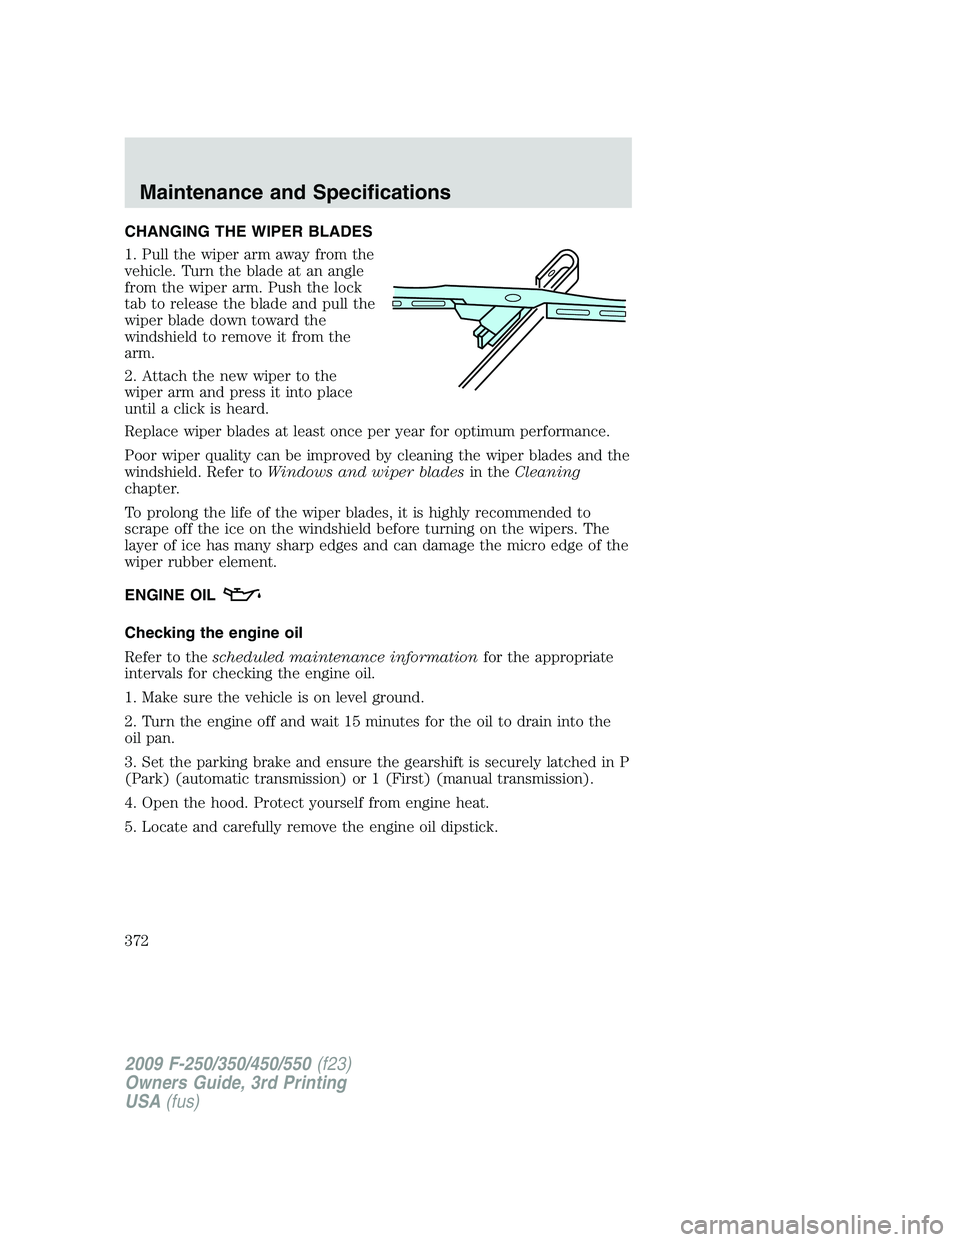
1. Pull the wiper arm away from the
vehicle. Turn the blade at an angle
from the wiper arm. Push the lock
tab to release the blade and pull the
wiper blade down toward the
windshield to remove it from the
arm.
2. Attach the new wiper to the
wiper arm and press it into place
until a click is heard.
Replace wiper blades at least once per year for optimum performance.
Poor wiper quality can be improved by cleaning the wiper blades and the
windshield. Refer toWindows and wiper bladesin theCleaning
chapter.
To prolong the life of the wiper blades, it is highly recommended to
scrape off the ice on the windshield before turning on the wipers. The
layer of ice has many sharp edges and can damage the micro edge of the
wiper rubber element.
ENGINE OIL
Checking the engine oil
Refer to thescheduled maintenance informationfor the appropriate
intervals for checking the engine oil.
1. Make sure the vehicle is on level ground.
2. Turn the engine off and wait 15 minutes for the oil to drain into the
oil pan.
3. Set the parking brake and ensure the gearshift is securely latched in P
(Park) (automatic transmission) or 1 (First) (manual transmission).
4. Open the hood. Protect yourself from engine heat.
5. Locate and carefully remove the engine oil dipstick.
2009 F-250/350/450/550(f23)
Owners Guide, 3rd Printing
USA(fus)
Maintenance and Specifications
372
Page 393 of 419

Do not make any unauthorized changes to your vehicle or engine. By
law, vehicle owners and anyone who manufactures, repairs, services,
sells, leases, trades vehicles, or supervises a fleet of vehicles are not
permitted to intentionally remove an emission control device or prevent
it from working. Information about your vehicle’s emission system is on
the Vehicle Emission Control Information Decal located on or near the
engine. This decal also lists engine displacement.
Please consult yourWarranty Guide/Customer Information Guidefor
complete emission warranty information.
On board diagnostics (OBD-II)
Your vehicle is equipped with a computer that monitors the engine’s
emission control system. This system is commonly known as the On
Board Diagnostics System (OBD-II). The OBD-II system protects the
environment by ensuring that your vehicle continues to meet
government emission standards. The OBD-II system also assists your
authorized dealer in properly servicing your vehicle. When the service
engine soon
indicator illuminates, the OBD-II system has detected
a malfunction. Temporary malfunctions may cause the service engine
soon
indicator to illuminate. Examples are:
1. The vehicle has run out of fuel—the engine may misfire or run poorly.
2. Poor fuel quality or water in the fuel—the engine may misfire or run
poorly.
3. The fuel cap may not have been securely tightened. SeeFuel filler
capin this chapter.
4. Driving through deep water—the electrical system may be wet.
These temporary malfunctions can be corrected by filling the fuel tank
with good quality fuel, properly tightening the fuel cap or letting the
electrical system dry out. After three driving cycles without these or any
other temporary malfunctions present, the service engine soon
indicator should stay off the next time the engine is started. A driving
cycle consists of a cold engine startup followed by mixed city/highway
driving. No additional vehicle service is required.
If the service engine soon
indicator remains on, have your vehicle
serviced at the first available opportunity. Although some malfunctions
detected by the OBD-II may not have symptoms that are apparent,
continued driving with the service engine soon
indicator on can
result in increased emissions, lower fuel economy, reduced engine and
transmission smoothness, and lead to more costly repairs.
2009 F-250/350/450/550(f23)
Owners Guide, 3rd Printing
USA(fus)
Maintenance and Specifications
393
Page 400 of 419
Checking and adding manual transmission fluid (if equipped)
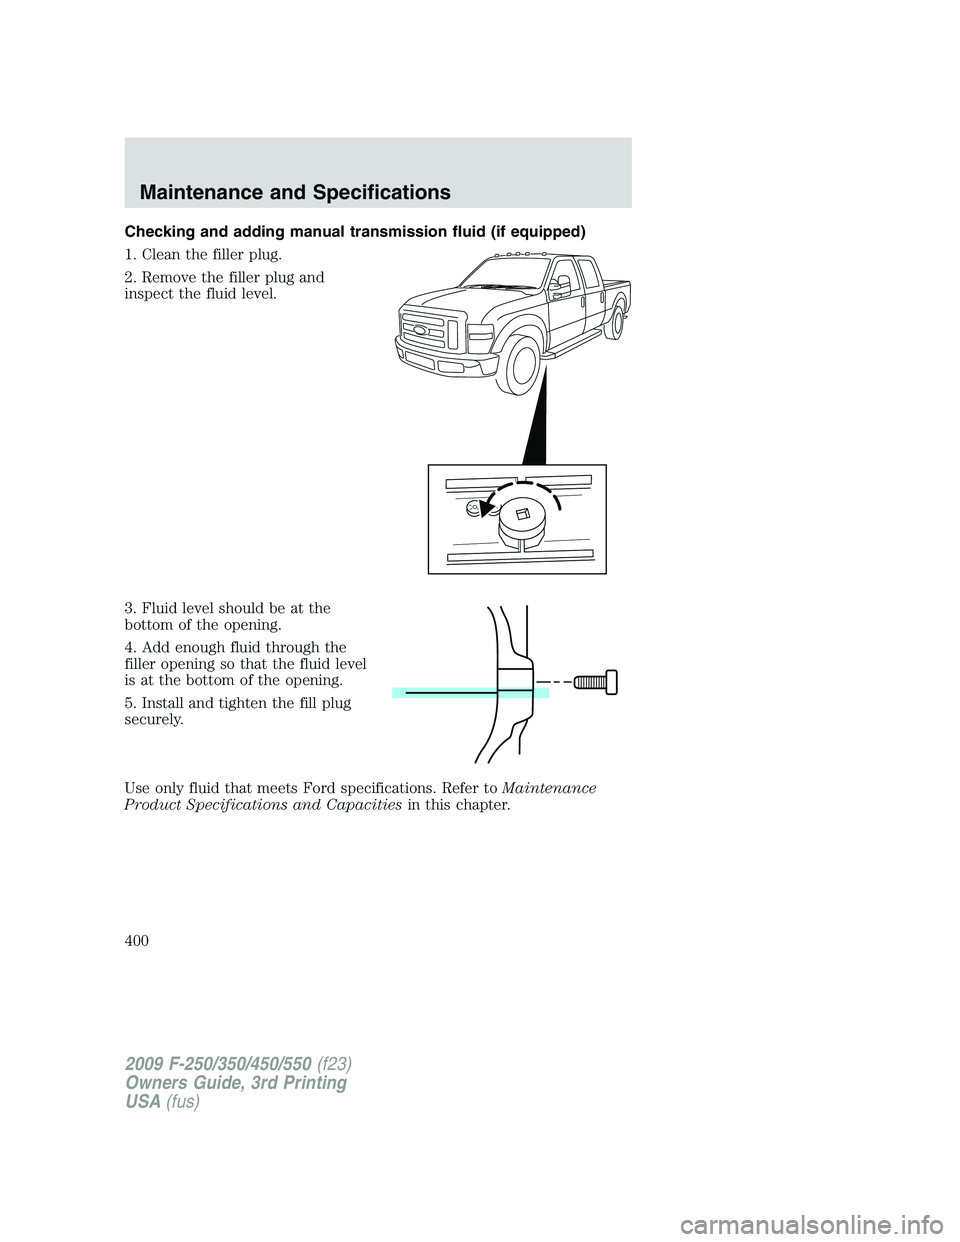
1. Clean the filler plug.
2. Remove the filler plug and
inspect the fluid level.
3. Fluid level should be at the
bottom of the opening.
4. Add enough fluid through the
filler opening so that the fluid level
is at the bottom of the opening.
5. Install and tighten the fill plug
securely.
Use only fluid that meets Ford specifications. Refer toMaintenance
Product Specifications and Capacitiesin this chapter.
2009 F-250/350/450/550(f23)
Owners Guide, 3rd Printing
USA(fus)
Maintenance and Specifications
400