2009 FORD EXPLORER service schedule
[x] Cancel search: service schedulePage 267 of 407
2. Weigh your vehicle without cargo. To obtain correct weights, take your
vehicle to a shipping company or an inspection station for trucks.
3. Subtract your loaded weight from the maximum GCWR in the chart.
This is the maximum trailer weight your vehicle can tow. It must be
below the maximum trailer weight shown in the chart.
TRAILER TOWING
Trailer towing with your vehicle may require the use of a trailer tow
option package.
Trailer towing puts additional loads on your vehicle’s engine,
transmission, axle, brakes, tires, and suspension. For your safety and to
maximize vehicle performance, be sure to use the proper equipment
while towing.
Follow these guidelines to ensure safe towing procedure:
•Do not tow a trailer until your vehicle has been driven at least
1,000 miles (1600 km).
•Stay within your vehicle’s load limits.
•Thoroughly prepare your vehicle for towing. Refer toPreparing to
towin this chapter.
•Use extra caution when driving while trailer towing. Refer toDriving
while you towin this chapter.
•Service your vehicle more frequently if you tow a trailer. Refer to the
severe duty schedule in thescheduled maintenance information.
•Refer to the instructions included with towing accessories for the
proper installation and adjustment specifications.
Do not exceed the maximum loads listed on the Safety Compliance
Certification label. For load specification terms found on the label, refer
toVehicle loadingin this chapter when figuring the total weight of your
vehicle.
Your vehicle is equipped with a standard Class II integrated hitch and
requires only a draw bar and ball with a 19 mm (3/4 inch) shank
diameter. An optional Class III/Class IV hitch is also available.
Note:Do not exceed the GVWR or the GAWR specified on the
certification label.
WARNING:Towing trailers beyond the maximum recommended
gross trailer weight exceeds the limit of the vehicle and could
result in engine damage, transmission damage, structural damage, loss
of vehicle control, vehicle rollover and personal injury.
2009 Explorer(exp)
Owners Guide, 1st Printing
USA(fus)
Tires, Wheels and Loading
267
Page 271 of 407

Driving while you tow
When towing a trailer:
•To ensure proper “break-in” of powertrain components, do not trailer
tow during the first 1,000 miles (1,600 km) of a new vehicle.
•To ensure proper “break-in” of powertrain components during the first
500 miles (800 km) of trailer towing, drive no faster than 70 mph
(113 km/h) with no full throttle starts.
•Turn off the speed control. The speed control may shut off
automatically when you are towing on long, steep grades.
•Consult your local motor vehicle speed regulations for towing a trailer.
•To eliminate excessive shifting, use a lower gear. This will also assist
in transmission cooling. For additional information, refer toAutomatic
transmission operationin theDrivingchapter.
•Under extreme conditions with large frontal trailers, high outside
temperatures and highway speeds, the coolant gauge may indicate
higher than normal coolant temperatures. If this occurs, reduce speed
until the coolant temperature returns to the normal range. Refer to
Engine coolant temperature gaugein theInstrument Cluster
chapter.
•Anticipate stops and brake gradually.
•Do not exceed the GCWR rating or transmission damage may occur.
Servicing after towing
If you tow a trailer for long distances, your vehicle will require more
frequent service intervals. Refer to yourscheduled maintenance
informationfor more information.
Trailer towing tips
•Practice turning, stopping and backing up before starting on a trip to
get the feel of the vehicle trailer combination. When turning, make
wider turns so the trailer wheels will clear curbs and other obstacles.
•Allow more distance for stopping with a trailer attached.
•If you are driving down a long or steep hill, shift to a lower gear. Do
not apply the brakes continuously, as they may overheat and become
less effective.
•The trailer tongue weight should be 10–15% of the loaded trailer
weight.
2009 Explorer(exp)
Owners Guide, 1st Printing
USA(fus)
Tires, Wheels and Loading
271
Page 329 of 407
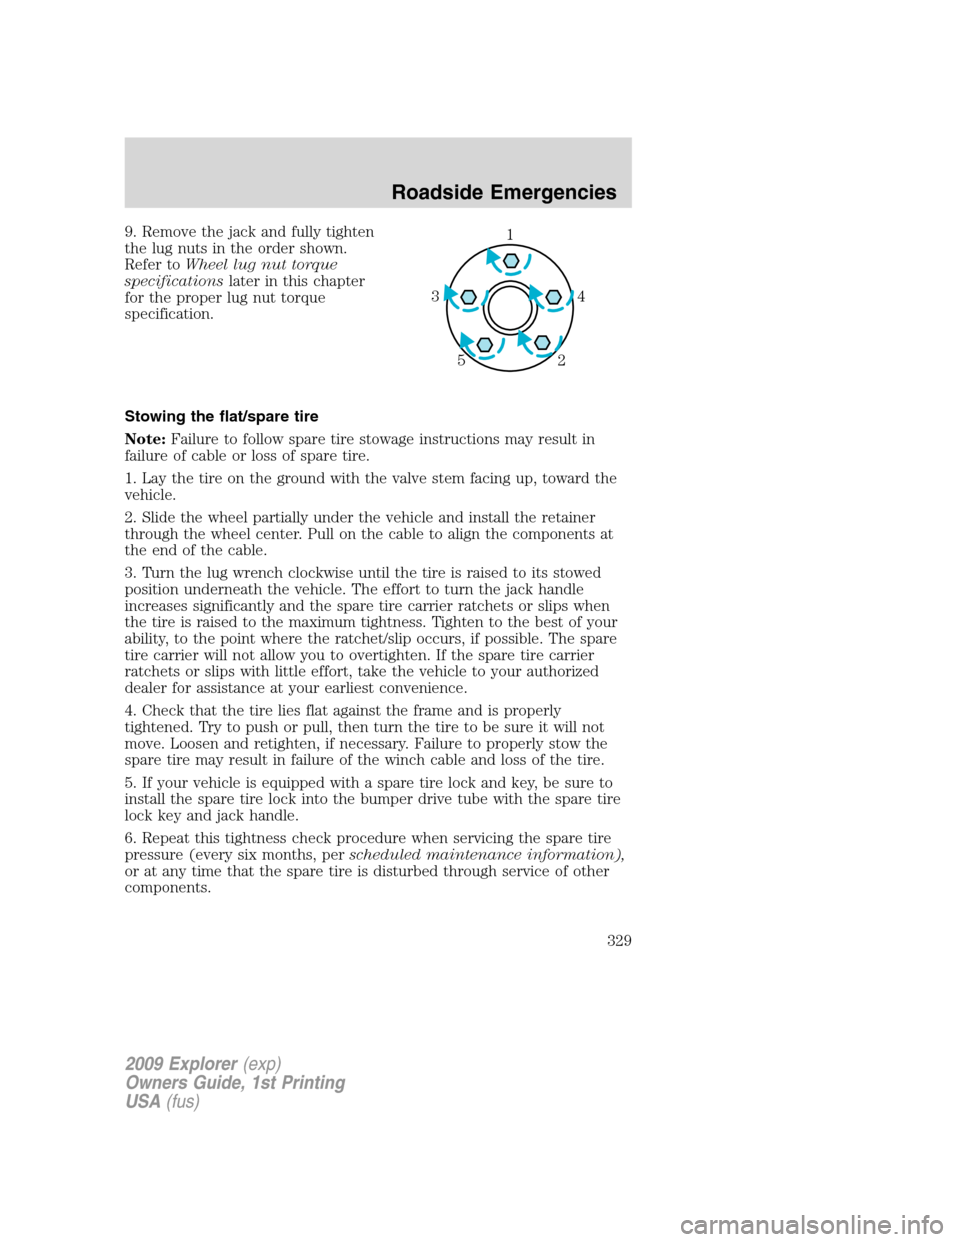
9. Remove the jack and fully tighten
the lug nuts in the order shown.
Refer toWheel lug nut torque
specificationslater in this chapter
for the proper lug nut torque
specification.
Stowing the flat/spare tire
Note:Failure to follow spare tire stowage instructions may result in
failure of cable or loss of spare tire.
1. Lay the tire on the ground with the valve stem facing up, toward the
vehicle.
2. Slide the wheel partially under the vehicle and install the retainer
through the wheel center. Pull on the cable to align the components at
the end of the cable.
3. Turn the lug wrench clockwise until the tire is raised to its stowed
position underneath the vehicle. The effort to turn the jack handle
increases significantly and the spare tire carrier ratchets or slips when
the tire is raised to the maximum tightness. Tighten to the best of your
ability, to the point where the ratchet/slip occurs, if possible. The spare
tire carrier will not allow you to overtighten. If the spare tire carrier
ratchets or slips with little effort, take the vehicle to your authorized
dealer for assistance at your earliest convenience.
4. Check that the tire lies flat against the frame and is properly
tightened. Try to push or pull, then turn the tire to be sure it will not
move. Loosen and retighten, if necessary. Failure to properly stow the
spare tire may result in failure of the winch cable and loss of the tire.
5. If your vehicle is equipped with a spare tire lock and key, be sure to
install the spare tire lock into the bumper drive tube with the spare tire
lock key and jack handle.
6. Repeat this tightness check procedure when servicing the spare tire
pressure (every six months, perscheduled maintenance information),
or at any time that the spare tire is disturbed through service of other
components.1
4 3
2 5
2009 Explorer(exp)
Owners Guide, 1st Printing
USA(fus)
Roadside Emergencies
329
Page 339 of 407

GETTING THE SERVICES YOU NEED
Warranty repairs to your vehicle must be performed by an authorized
Ford, Lincoln, or Mercury dealer. While any authorized dealer handling
your vehicle line will provide warranty service, we recommend you
return to your selling authorized dealer who wants to ensure your
continued satisfaction.
Please note that certain warranty repairs require special training and/or
equipment, so not all authorized dealers are authorized to perform all
warranty repairs. This means that, depending on the warranty repair
needed, you may have to take your vehicle to another authorized dealer.
A reasonable time must be allowed to perform a repair after taking your
vehicle to the authorized dealer. Repairs will be made using Ford or
Motorcraft parts, or remanufactured or other parts that are authorized by
Ford.
Away from home
If you are away from home when your vehicle needs service, contact the
Ford Customer Relationship Center or use the online resources listed
below to find the nearest authorized dealer.
In the United States:
Mailing Address
Ford Motor Company
Customer Relationship Center
P.O. Box 6248
Dearborn, MI 48121
Telephone
1-800-392-3673 (FORD)
(TDD for the hearing impaired: 1-800-232-5952)
Online
Additional information and resources are available online at
www.genuineservice.com.
•U.S. dealer locator by Dealer Name, City/State, or Zip Code
•Owner Guides
•Maintenance Schedules
•Recalls
•Ford Extended Service Plans
•Ford Genuine Accessories
•Service specials and promotions.
2009 Explorer(exp)
Owners Guide, 1st Printing
USA(fus)
Customer Assistance
339
Page 355 of 407

SERVICE RECOMMENDATIONS
•Use thescheduled maintenance informationto track routine
service.
•Use only recommended fuels, lubricants, fluids and service parts
conforming to specifications.
•Your authorized dealer can provide parts and service.
PRECAUTIONS WHEN SERVICING YOUR VEHICLE
•Do not work on a hot engine.
•Make sure that nothing gets caught in moving parts.
•Do not work on a vehicle with the engine running in an enclosed
space, unless you are sure you have enough ventilation.
•Keep all open flames and other lit material away from the battery and
all fuel related parts.
WARNING:Turn off the power running boards, if equipped,
before working under the vehicle, jacking or placing any object
under the vehicle. Never place your hand between the extended
running board and the vehicle. A moving running board may cause
injury.
Working with the engine off
1. Set the parking brake and ensure the gearshift is securely latched in P
(Park).
2. Turn off the engine and remove the key.
3. Block the wheels to prevent the vehicle from moving unexpectedly.
Working with the engine on
1. Set the parking brake and shift to P (Park).
2. Block the wheels.
WARNING:To reduce the risk of vehicle damage and/or
personal burn injuries, do not start your engine with the air
cleaner removed and do not remove it while the engine is running.
2009 Explorer(exp)
Owners Guide, 1st Printing
USA(fus)
Maintenance and Specifications
355
Page 369 of 407
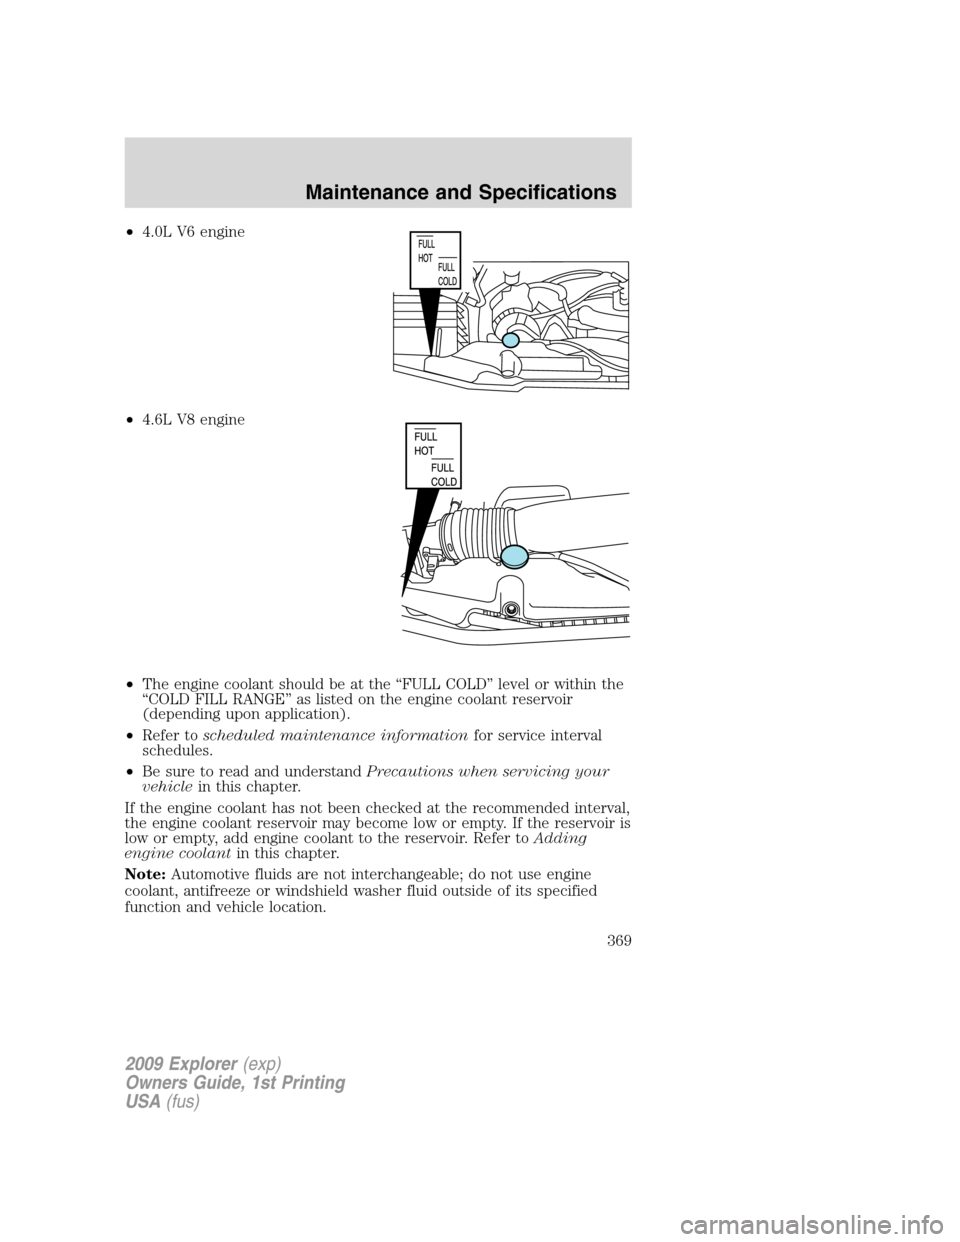
•4.0L V6 engine
•4.6L V8 engine
•The engine coolant should be at the “FULL COLD” level or within the
“COLD FILL RANGE” as listed on the engine coolant reservoir
(depending upon application).
•Refer toscheduled maintenance informationfor service interval
schedules.
•Be sure to read and understandPrecautions when servicing your
vehiclein this chapter.
If the engine coolant has not been checked at the recommended interval,
the engine coolant reservoir may become low or empty. If the reservoir is
low or empty, add engine coolant to the reservoir. Refer toAdding
engine coolantin this chapter.
Note:Automotive fluids are not interchangeable; do not use engine
coolant, antifreeze or windshield washer fluid outside of its specified
function and vehicle location.
2009 Explorer(exp)
Owners Guide, 1st Printing
USA(fus)
Maintenance and Specifications
369
Page 384 of 407
EPA fuel economy estimates
Every new vehicle should have a window sticker containing EPA fuel
economy estimates. Contact your authorized dealer if the window sticker
is not supplied with your vehicle. The EPA fuel economy estimates
should be your guide for the fuel economy comparisons with other
vehicles. Your fuel economy may vary depending upon the method of
operation and conditions.
EMISSION CONTROL SYSTEM
Your vehicle is equipped with various emission control components and a
catalytic converter which will enable your vehicle to comply with
applicable exhaust emission standards. To make sure that the catalytic
converter and other emission control components continue to work
properly:
•Use only the specified fuel listed.
•Avoid running out of fuel.
•Do not turn off the ignition while your vehicle is moving, especially at
high speeds.
•Have the items listed inscheduled maintenance information
performed according to the specified schedule.
The scheduled maintenance items listed inscheduled maintenance
informationare essential to the life and performance of your vehicle
and to its emissions system.
If other than Ford, Motorcraft or Ford-authorized parts are used for
maintenance replacements or for service of components affecting
emission control, such non-Ford parts should be equivalent to genuine
Ford Motor Company parts in performance and durability.
WARNING:Do not park, idle, or drive your vehicle in dry grass
or other dry ground cover. The emission system heats up the
engine compartment and exhaust system, which can start a fire.
Illumination of theService engine soon
indicator, charging system
warning light or the temperature warning light, fluid leaks, strange odors,
smoke or loss of engine power could indicate that the emission control
system is not working properly.
An improperly operating or damaged exhaust system may allow exhaust
to enter the vehicle. Have a damaged or improperly operating exhaust
system inspected and repaired immediately.
2009 Explorer(exp)
Owners Guide, 1st Printing
USA(fus)
Maintenance and Specifications
384
Page 387 of 407
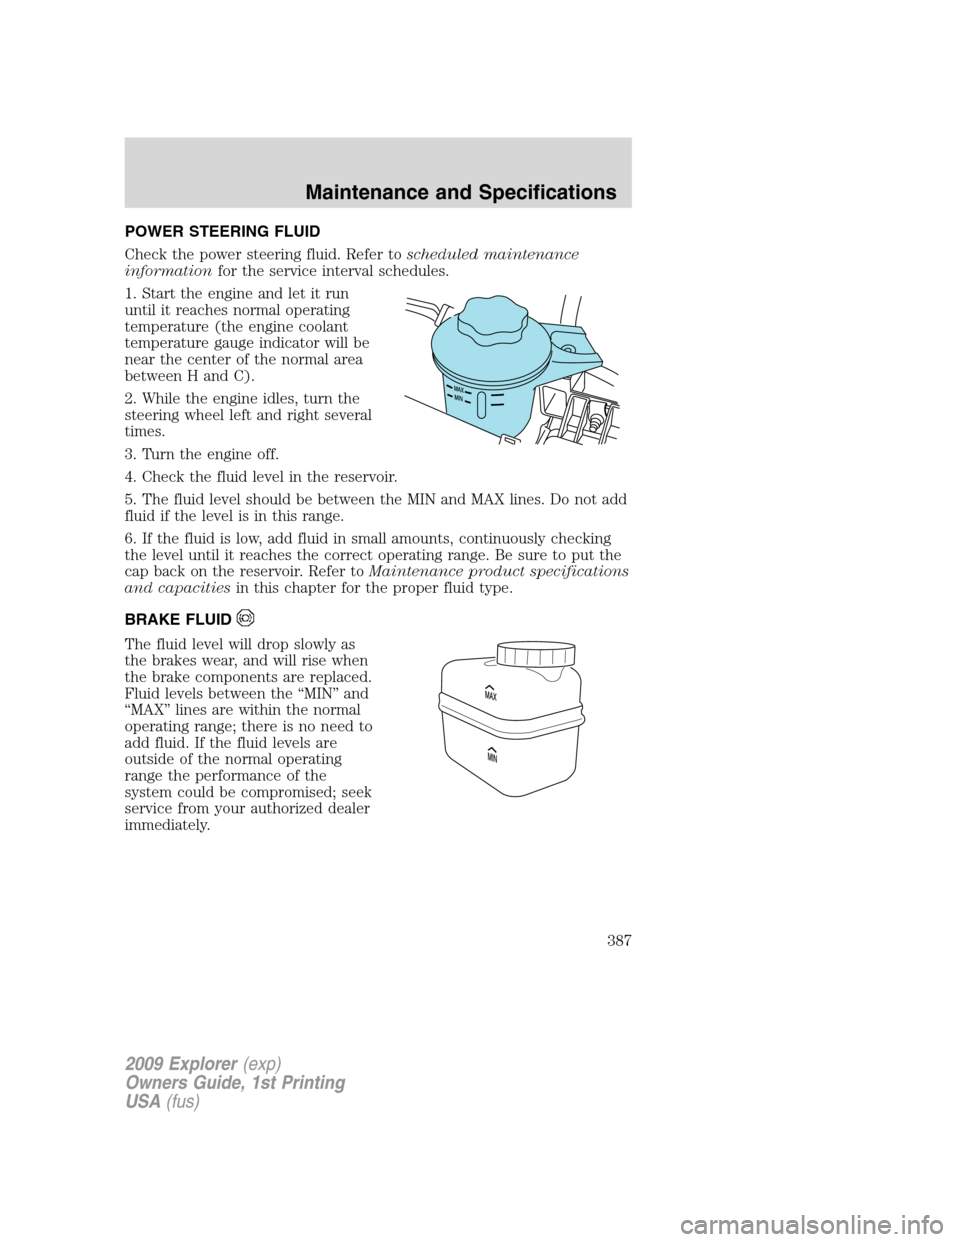
POWER STEERING FLUID
Check the power steering fluid. Refer toscheduled maintenance
informationfor the service interval schedules.
1. Start the engine and let it run
until it reaches normal operating
temperature (the engine coolant
temperature gauge indicator will be
near the center of the normal area
between H and C).
2. While the engine idles, turn the
steering wheel left and right several
times.
3. Turn the engine off.
4. Check the fluid level in the reservoir.
5. The fluid level should be between the MIN and MAX lines. Do not add
fluid if the level is in this range.
6. If the fluid is low, add fluid in small amounts, continuously checking
the level until it reaches the correct operating range. Be sure to put the
cap back on the reservoir. Refer toMaintenance product specifications
and capacitiesin this chapter for the proper fluid type.
BRAKE FLUID
The fluid level will drop slowly as
the brakes wear, and will rise when
the brake components are replaced.
Fluid levels between the “MIN” and
“MAX” lines are within the normal
operating range; there is no need to
add fluid. If the fluid levels are
outside of the normal operating
range the performance of the
system could be compromised; seek
service from your authorized dealer
immediately.
2009 Explorer(exp)
Owners Guide, 1st Printing
USA(fus)
Maintenance and Specifications
387