Page 147 of 407

Warning display Status
Door ajar Warning cannot be reset
Fuel level low Warning returns after 10 minutes
Park brake engaged
Service RSC now
Check brake system
Check park aid (if equipped) Warning returns only after the ignition
key is turned from off to on.
Brake fluid level low
Washer fluid level low
Oil change required
Oil life change soon
Liftgate/glass ajar Warning returns after the condition
has cleared then reoccurs within the
same ignition on-off cycle. Remove objects near pass seat
Check fuel fill inlet (if
equipped)
Check charging system
Low tire pressure
Tire pressure monitor fault
Tire pressure sensor fault
Trailer sway, reduce speed Temporary alert
For 4x4 low stop vehicle (if
equipped)
For 4x4 low shift to N (if
equipped)
To exit 4x4 low stop vehicle (if
equipped)
To exit 4x4 low shift to N (if
equipped)
DOOR AJAR— Displayed when a door is not completely closed.
REMOVE OBJECTS NEAR PASS SEAT— Displayed when objects
are by the passenger seat. After the objects are moved away from the
seat, if the warning stays on or continues to come on, contact your
authorized dealer as soon as possible.
CHECK FUEL FILL INLET (if equipped)— Displayed when the fuel
fill inlet may not be properly closed. Refer toEasy Fuel™ “no cap” fuel
systemin theMaintenance and Specificationschapter.
2009 Explorer(exp)
Owners Guide, 1st Printing
USA(fus)
Driver Controls
147
Page 148 of 407

CHECK CHARGING SYSTEM— Displayed when the electrical system
is not maintaining proper voltage when the engine is running. If you are
operating electrical accessories when the engine is idling at a low speed,
turn off as many of the electrical loads as soon as possible. If the
warning stays on or comes on when the engine is operating at normal
speeds, contact your authorized dealer as soon as possible.
FUEL LEVEL LOW— Displayed as an early reminder of a low fuel
condition.
PARK BRAKE ENGAGED— Displayed when the manual park brake is
set, the engine is running and the vehicle is driven more than 3 mph
(5 km/h). If the warning stays on after the park brake is released,
contact your authorized dealer as soon as possible.
CHECK BRAKE SYSTEM— Displayed when the braking system is not
operating properly. If the warning stays on or continues to come on,
contact your authorized dealer as soon as possible.
CHECK PARK AID (if equipped)— Displayed when the transmission
is in R (Reverse) and the Reverse Sensing System (Park Aid) is disabled.
Refer toReverse Sensing System (Park Aid)in this section to enable.
LOW TIRE PRESSURE— Displayed when one or more tires on your
vehicle have low tire pressure. Refer toInflating your tiresin theTires,
Wheels and Loadingchapter.
TIRE PRESSURE MONITOR FAULT— Displayed when the Tire
Pressure Monitoring System is malfunctioning. If the warning stays on or
continues to come on, contact your authorized dealer as soon as
possible.
TIRE PRESSURE SENSOR FAULT— Displayed when a tire pressure
sensor is malfunctioning, or your spare tire is in use. For more
information on how the system operates under these conditions, refer to
Understanding your Tire Pressure Monitoring System (TPMS)in the
Tires, Wheels and Loadingchapter. If the warning stays on or
continues to come on, contact your authorized dealer as soon as
possible.
BRAKE FLUID LEVEL LOW— Indicates the brake fluid level is low
and the brake system should be inspected immediately. Refer toBrake
fluidin theMaintenance and Specificationschapter.
2009 Explorer(exp)
Owners Guide, 1st Printing
USA(fus)
Driver Controls
148
Page 150 of 407

POSITIVE RETENTION FLOOR MAT
WARNING:Do not install additional floor mats on top of the
factory installed floor mats as they may interfere with the
accelerator or the brake pedals.
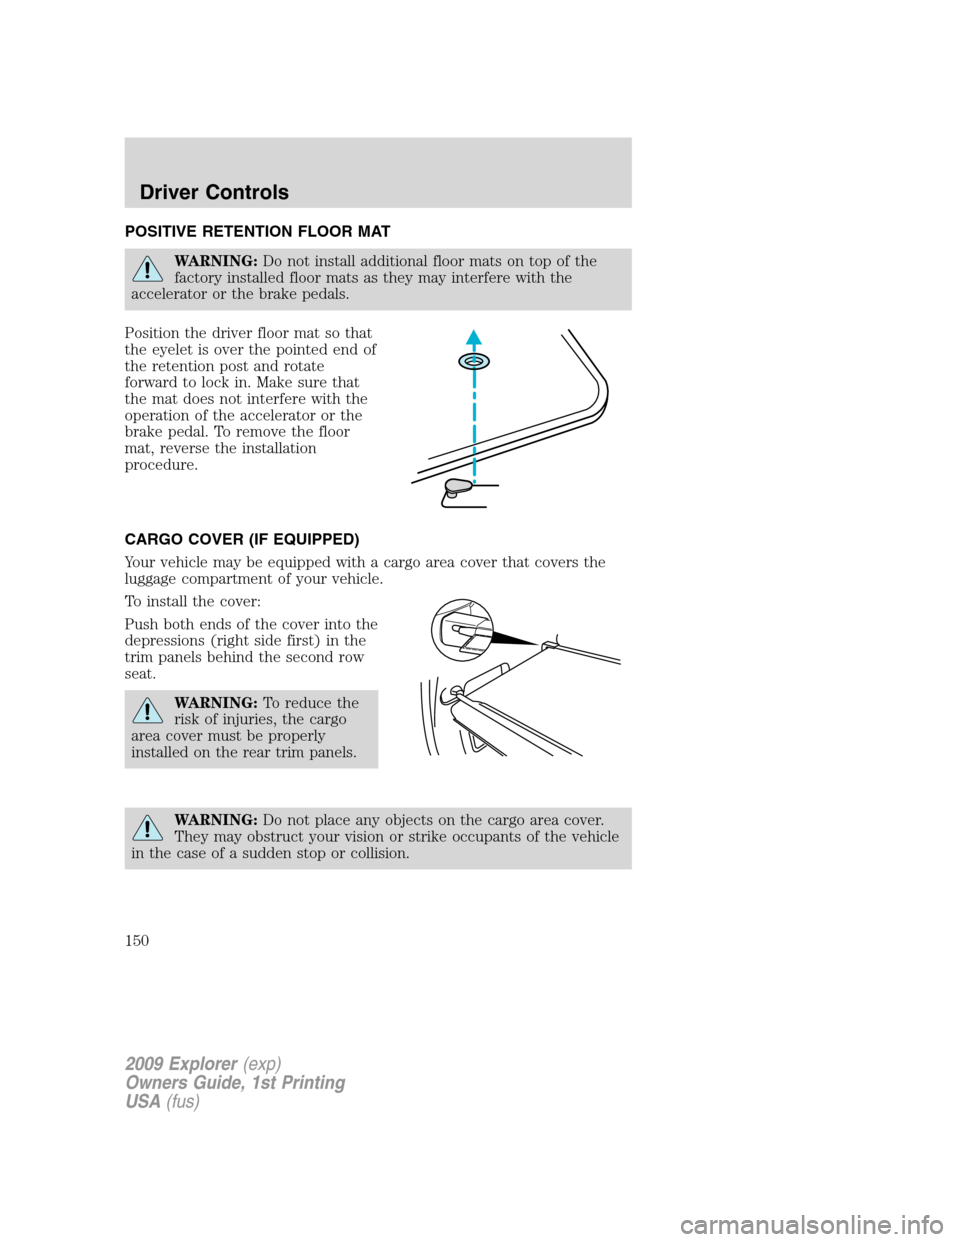
Position the driver floor mat so that
the eyelet is over the pointed end of
the retention post and rotate
forward to lock in. Make sure that
the mat does not interfere with the
operation of the accelerator or the
brake pedal. To remove the floor
mat, reverse the installation
procedure.
CARGO COVER (IF EQUIPPED)
Your vehicle may be equipped with a cargo area cover that covers the
luggage compartment of your vehicle.
To install the cover:
Push both ends of the cover into the
depressions (right side first) in the
trim panels behind the second row
seat.
WARNING:To reduce the
risk of injuries, the cargo
area cover must be properly
installed on the rear trim panels.
WARNING:Do not place any objects on the cargo area cover.
They may obstruct your vision or strike occupants of the vehicle
in the case of a sudden stop or collision.
2009 Explorer(exp)
Owners Guide, 1st Printing
USA(fus)
Driver Controls
150
Page 152 of 407

•To open the liftgate window, press
the control on the remote entry
transmitter or, with the liftgate
unlocked, push the control button
on theright sideunder the
license plate lamp shield.
•To open the liftgate, unlock the
liftgate (with the power door
locks, the remote entry or the
keyless entry pad) and pull the
middlelever under the license
plate lamp shield.
To lock the liftgate and the liftgate window, use the power door locks.
The liftgate door and window should be closed before driving. If not,
possible damage may occur to your vehicle.
WARNING:Always close liftgate window before opening liftgate.
Liftgate glass and liftgate should never be open at the same
time. Failure to observe this warning may result in personal injury or
damage to your vehicle.
WARNING:Make sure the liftgate door and/or window are closed
to prevent exhaust fumes from being drawn into the vehicle. This
will also reduce the risk of passengers and cargo falling out.
LUGGAGE RACK
Your vehicle is equipped with a roof rack for transporting items on the
exterior of the vehicle.
The maximum recommended load to
be carried on the roof rack is 100 lb
(45 kg), evenly distributed. The
cross-bars (if equipped) can be
adjusted by using the thumbwheels
at each end. Use the tie-down loops
on the thumbwheels to secure load.
2009 Explorer(exp)
Owners Guide, 1st Printing
USA(fus)
Driver Controls
152
Page 153 of 407

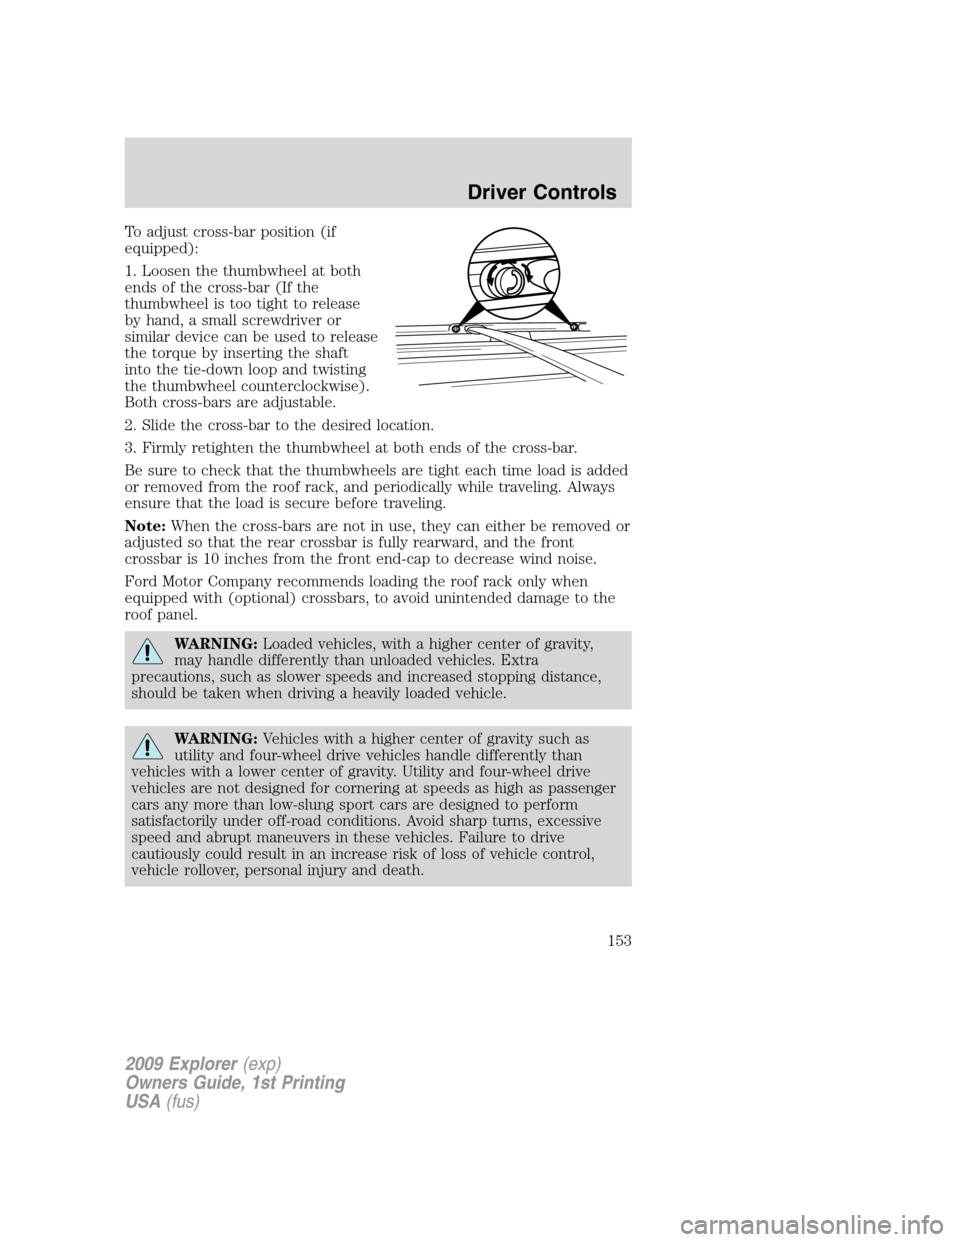
To adjust cross-bar position (if
equipped):
1. Loosen the thumbwheel at both
ends of the cross-bar (If the
thumbwheel is too tight to release
by hand, a small screwdriver or
similar device can be used to release
the torque by inserting the shaft
into the tie-down loop and twisting
the thumbwheel counterclockwise).
Both cross-bars are adjustable.
2. Slide the cross-bar to the desired location.
3. Firmly retighten the thumbwheel at both ends of the cross-bar.
Be sure to check that the thumbwheels are tight each time load is added
or removed from the roof rack, and periodically while traveling. Always
ensure that the load is secure before traveling.
Note:When the cross-bars are not in use, they can either be removed or
adjusted so that the rear crossbar is fully rearward, and the front
crossbar is 10 inches from the front end-cap to decrease wind noise.
Ford Motor Company recommends loading the roof rack only when
equipped with (optional) crossbars, to avoid unintended damage to the
roof panel.
WARNING:Loaded vehicles, with a higher center of gravity,
may handle differently than unloaded vehicles. Extra
precautions, such as slower speeds and increased stopping distance,
should be taken when driving a heavily loaded vehicle.
WARNING:Vehicles with a higher center of gravity such as
utility and four-wheel drive vehicles handle differently than
vehicles with a lower center of gravity. Utility and four-wheel drive
vehicles are not designed for cornering at speeds as high as passenger
cars any more than low-slung sport cars are designed to perform
satisfactorily under off-road conditions. Avoid sharp turns, excessive
speed and abrupt maneuvers in these vehicles. Failure to drive
cautiously could result in an increase risk of loss of vehicle control,
vehicle rollover, personal injury and death.
2009 Explorer(exp)
Owners Guide, 1st Printing
USA(fus)
Driver Controls
153
Page 170 of 407

SEATING
WARNING:Reclining the seatback can cause an occupant to
slide under the seat’s safety belt, resulting in severe personal
injuries in the event of a collision.
WARNING:Do not pile cargo higher than the seatbacks to
reduce the risk of injury in a collision or sudden stop.
WARNING:Before returning the seatback to its original
position, make sure that cargo or any objects are not trapped
behind the seatback. After returning the seatback to its original
position, pull on the seatback to ensure that it has fully latched. An
unlatched seat may become dangerous in the event of a sudden stop or
collision.
Adjustable head restraints
Your vehicle is equipped with front row outboard head restraints that are
vertically adjustable.
WARNING:To minimize the risk of neck injury in the event of a
crash, the driver and passenger occupants should not sit in
and/or operate the vehicle, until the head restraint is placed in its
proper position. The driver should never adjust the head restraint
while the vehicle is in motion.
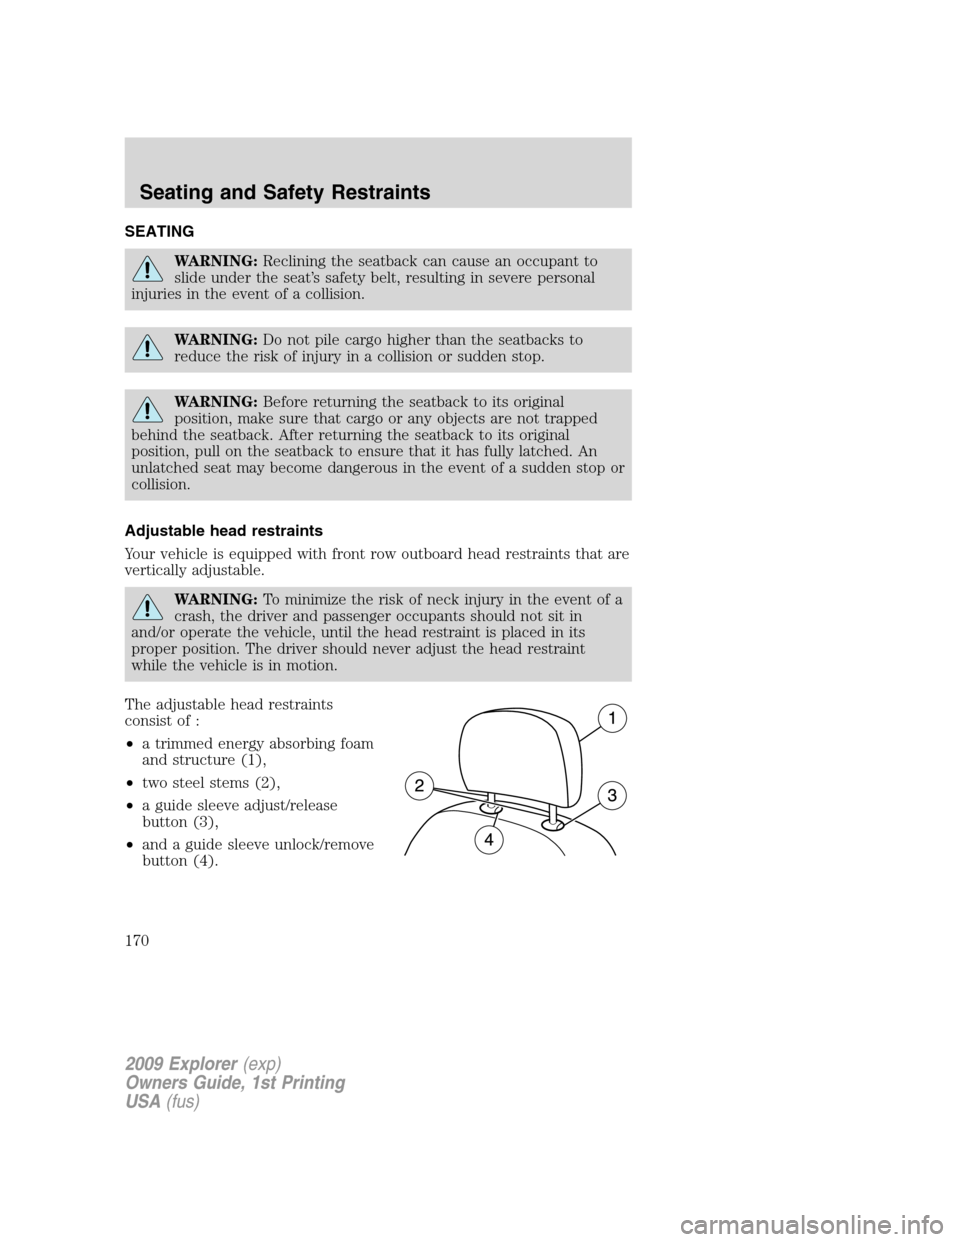
The adjustable head restraints
consist of :
•a trimmed energy absorbing foam
and structure (1),
•two steel stems (2),
•a guide sleeve adjust/release
button (3),
•and a guide sleeve unlock/remove
button (4).
2009 Explorer(exp)
Owners Guide, 1st Printing
USA(fus)
Seating and Safety Restraints
170
Page 171 of 407
To adjust the head restraint, do the following:
1. Adjust the seatback to an upright driving/riding position.
2. Raise the head restraint by
pulling up on the head restraint.
3. Lower the head restraint by
pressing and holding the guide
sleeve adjust/release button and
pushing down on the head restraint.
Properly adjust the head restraint so that the top of the head restraint is
even with the top of your head and positioned as close as possible to the
back of your head. For occupants of extremely tall stature, adjust the
head restraint to its full up position.
WARNING:The adjustable head restraint is a safety device.
Whenever possible it should be installed and properly adjusted
when the seat is occupied.
2009 Explorer(exp)
Owners Guide, 1st Printing
USA(fus)
Seating and Safety Restraints
171
Page 173 of 407
WARNING:To minimize the risk of neck injury in the event of a
crash, head restraints must be installed properly.
Adjusting the front manual seat (if equipped)
WARNING:Never adjust the driver’s seat or seatback when the
vehicle is moving.
WARNING:Always drive and ride with your seatback upright
and the lap belt snug and low across the hips.
Lift handle to move seat forward or
backward.
Pull lever up to adjust seatback.
WARNING:Before
returning the seatback to its
original position, make sure that
cargo or any objects are not
trapped behind the seatback. After
returning the seatback to its
original position, pull on the
seatback to ensure that it has fully
latched. An unlatched seat may
become dangerous in the event of
a sudden stop or collision.
2009 Explorer(exp)
Owners Guide, 1st Printing
USA(fus)
Seating and Safety Restraints
173