Page 109 of 407
To adjust your mirrors:
1. Rotate the control clockwise to
adjust the right mirror and rotate
the control counterclockwise to
adjust the left mirror.
2. Move the control in the direction
you wish to tilt the mirror.
3. Return to the center position to lock mirrors in place.
Fold-away mirrors
Fold the side mirrors in carefully
when driving through a narrow
space, like an automatic car wash.
Heated outside mirrors
(if equipped)
Both mirrors are heated
automatically to remove ice, mist
and fog when the rear window
defrost is activated.
Do not remove ice from the
mirrors with a scraper or
attempt to readjust the mirror
glass if it is frozen in place.
These actions could cause damage to the glass and mirrors.
Do not clean the housing or glass of any mirror with harsh
abrasives, fuel or other petroleum-based cleaning products.
2009 Explorer(exp)
Owners Guide, 1st Printing
USA(fus)
Driver Controls
109
Page 111 of 407
, the running boards will
immediately move to the correct position based on the position of the
doors.
Bounce-back:
•If an object is in the way of the movi")
•When this feature is enabled (AUTOMATIC), the running boards will
immediately move to the correct position based on the position of the
doors.
Bounce-back:
•If an object is in the way of the moving running board, the running
board will automatically bounce back in the reverse direction and
move to the end of travel.
Note:The running boards may operate more slowly in cooler
temperatures. In adverse conditions, mud, slush, salt, and other road
debris may become trapped in the running board mechanism possibly
causing unwanted noise. If this occurs manually set the running boards
in the deployed position and flush the debris from the front and rear
hinges using a high-pressure car wash wand.
Note:Do not use the running boards, front and rear hinge assemblies,
running board motors, or the running board under body mounts to lift
the vehicle with the jack, refer toChanging tiresin theRoadside
Emergencieschapter.
WARNING:In extreme climates, excessive ice buildup may
occur, causing the running boards not to deploy. Be sure that the
running boards have deployed, and have finished moving before
attempting to step on them. Note: The running boards will resume
normal function once the blockage is cleared.
WARNING:Turn off the running boards before working under
the vehicle, jacking, or placing any object under the vehicle.
Never place your hand in the hinge assemblies. A moving running
board may cause injury
SPEED CONTROL (IF EQUIPPED)
With speed control set, you can maintain a set speed without keeping
your foot on the accelerator pedal.
WARNING:Do not use the speed control in heavy traffic or on
roads that are winding, slippery or unpaved.
2009 Explorer(exp)
Owners Guide, 1st Printing
USA(fus)
Driver Controls
111
Page 117 of 407

To open the moon roof:Press and
release the SLIDE control, the moon
roof will open automatically. Press
the switch again to stop the moon
roof.
To close the moon roof:Pull and
release the SLIDE control, the moon
roof will close automatically. Press
the switch again to stop the moon
roof.
Bounce-back:When an obstacle has been detected in the moon roof
opening as the moon roof is closing, the moon roof will automatically
open and stop at a prescribed position.
Bounce-back override:To override bounce-back function, pull and hold
the SLIDE switch within two seconds of a bounce-back event. The
closing force will begin to increase each time the moon roof is closed for
the first three closing cycles, with bounce-back active. For example:
Bounce-back can be used to overcome the resistance of ice on the moon
roof or seals
To vent the moon roof:Press and release the TILT control, the moon
roof will move to the vent position automatically from any moon roof
position. Press the switch again to stop the moon roof. Pull and hold the
TILT control to close the moon roof.
The moon roof has a built-in sliding shade that can be manually opened
or closed when the glass panel is shut. To close the shade, pull it toward
the front of the vehicle.
Accessory delay:
With accessory delay, the window switches, audio system, and moon roof
may be used for up to 10 minutes after the ignition switch is turned to
the off position or until either front door is opened.
HOMELINK�WIRELESS CONTROL SYSTEM (IF EQUIPPED)
The HomeLink�Wireless Control System, located on the overhead
console or on the driver’s visor, provides a convenient way to replace up
to three hand-held transmitters with a single built-in device. This feature
will learn the radio frequency codes of most transmitters to operate
garage doors, entry gate operators, security systems, entry door locks,
and home or office lighting.
2009 Explorer(exp)
Owners Guide, 1st Printing
USA(fus)
Driver Controls
117
Page 121 of 407
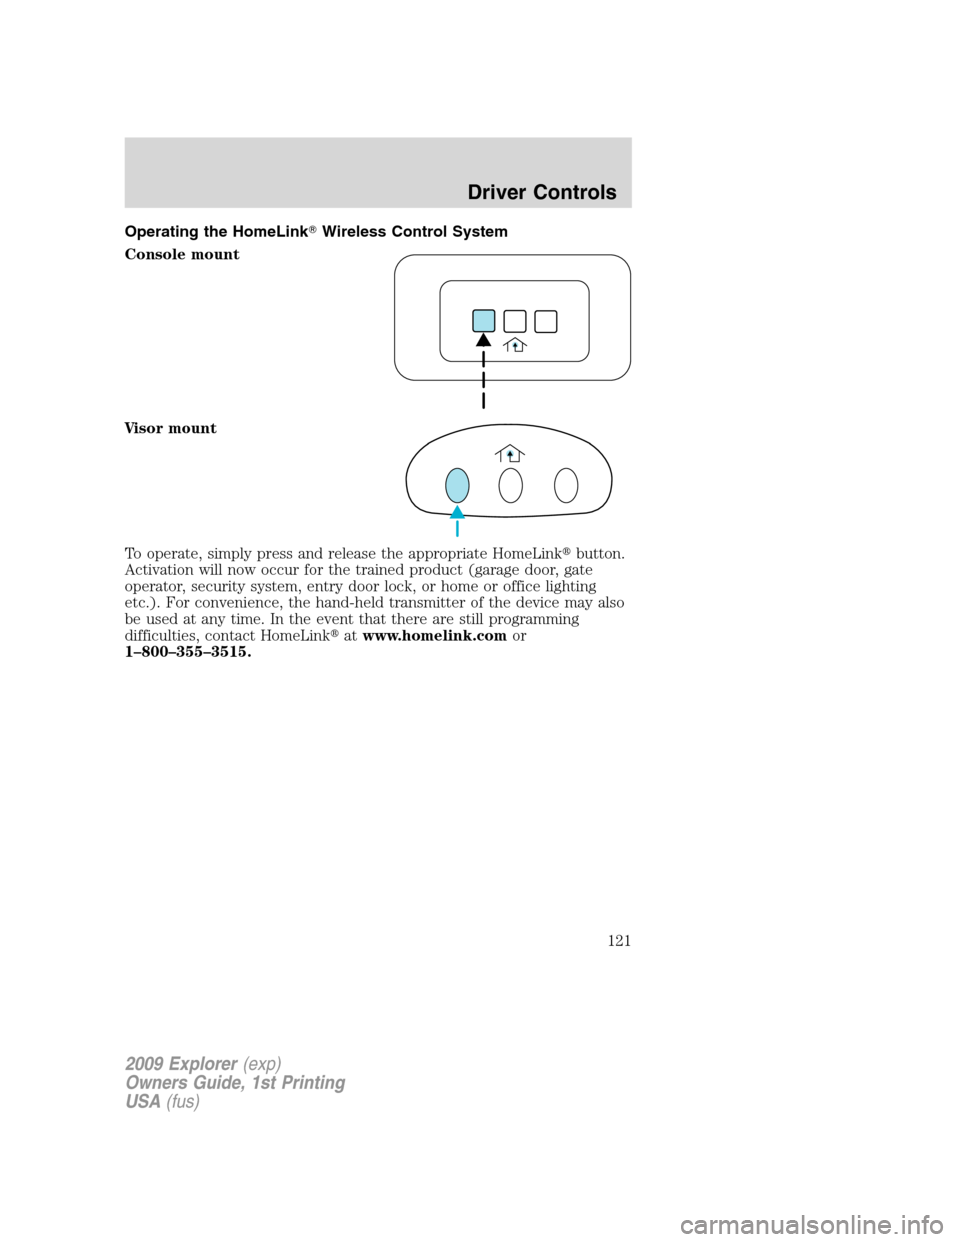
Operating the HomeLink�Wireless Control System
Console mount
Visor mount
To operate, simply press and release the appropriate HomeLink�button.
Activation will now occur for the trained product (garage door, gate
operator, security system, entry door lock, or home or office lighting
etc.). For convenience, the hand-held transmitter of the device may also
be used at any time. In the event that there are still programming
difficulties, contact HomeLink�atwww.homelink.comor
1–800–355–3515.
2009 Explorer(exp)
Owners Guide, 1st Printing
USA(fus)
Driver Controls
121
Page 124 of 407
. This value is not
the same as the average fuel economy display. The running")
DTE is calculated using a running average fuel economy, which is based
on your recent driving history of 500 miles (800 km). This value is not
the same as the average fuel economy display. The running average fuel
economy is reinitialized to a factory default value if the battery is
disconnected.
Average fuel economy (AFE)
Select this function to display your
average fuel economy in miles/gallon
or liters/km.
If you calculate your average fuel
economy by dividing miles traveled
by gallons of fuel used (liters of fuel
used by 100 kilometers traveled), your figure may be different than
displayed for the following reasons:
•Your vehicle was not perfectly level during fill-up
•Differences in the automatic shut-off points on the fuel pumps at
service stations
•Variations in top-off procedure from one fill-up to another
•Rounding of the displayed values to the nearest 0.1 gallon (liter)
1. Drive the vehicle at least 5 miles (8 km) with the speed control
system engaged to display a stabilized average.
2. Record the highway fuel economy for future reference.
It is important to press the SELECT/RESET control switch (press and
hold for two seconds in order to reset the function) after setting the
speed control to get accurate highway fuel economy readings.
Setup menu
Press and hold the SELECT/RESET
control switch to get to the SETUP
MENU sequence from the INFO
MENU for the following displays:
•System Check
•AWD Lock (4.6L engine vehicles only)
•Units (English/Metric)
•Language
•Autolamp
•Autolock
2009 Explorer(exp)
Owners Guide, 1st Printing
USA(fus)
Driver Controls
124
Page 125 of 407

•Trailer sway control
•Oil Life Reset and Start Value
•Compass display
•Compass zone adjustment
•Compass calibration adjustment
Briefly press the SELE")
•Autounlock
•Park Aid (if equipped)
•Trailer sway control
•Oil Life Reset and Start Value
•Compass display
•Compass zone adjustment
•Compass calibration adjustment
Briefly press the SELECT/RESET control switch to scroll through the
SETUP MENU display sequence. If the SELECT/RESET control switch is
not pressed within four seconds, the message center returns to the Info
Menu.
AWD lock (4.6L engine vehicles only)
Select this function from the SETUP MENU to display the AWD locked
function.
1. Press the SELECT/RESET control
for the current display mode.
2. Press and hold the
SELECT/RESET control within four
seconds to turn the AWD system to
the LOCKED mode.
3. Press the SELECT/RESET control switch for the next SETUP MENU
item or wait for more than four seconds to return to the INFO MENU.
Note:When the AWD system is in the LOCKED mode, the 4X4 indicator
will be illuminated.
System check
Press and hold the SELECT/RESET
control switch to select SYSTEM
CHECK when “SYSTEM CHECK
HOLD RESET” is displayed in the
message center. Selecting this
function from the SETUP MENU
causes the message center to cycle through each of the systems being
monitored. For each of the monitored systems, the message center will
indicate either an OK message or a warning message for two seconds.
Pressing the SELECT/RESET control switch cycles the message center
through each of the systems being monitored.
2009 Explorer(exp)
Owners Guide, 1st Printing
USA(fus)
Driver Controls
125
Page 127 of 407

Autolamp
This feature keeps your headlights on for up to three minutes after the
ignition is switched off.
1. To change the time delay of the
autolamp feature, select this
function from the SETUP MENU.
2. Press and hold the
SELECT/RESET control switch to
select the new autolamp delay time
(in seconds) values of 0, 10, 20, 30, 60, 90, 120 or 180 and wraps back to
0. Selecting 0 will result in no delay feature.
Note:“>” in front of a number indicates current selection.
3. Press the SELECT/RESET control switch for the next SETUP MENU
item or wait for more than four seconds to return to the INFO MENU.
Autolock
This feature automatically locks all vehicle doors when the vehicle is
shifted into any gear and when the vehicle is in motion over 13 mph
(20 km/h) or higher.
1. To disable/enable the autolock
feature, select this function from the
SETUP MENU.
2. Press and hold the
SELECT/RESET control switch to
turn the autolock feature ON or OFF.
3. Press the SELECT/RESET control switch for the next SETUP MENU
item or wait for more than four seconds to return to the INFO MENU.
Autounlock
This feature automatically unlocks all vehicle doors when the driver’s
door is opened within 10 minutes of the ignition being turned off.
1. To disable/enable the autounlock
feature, select this function from the
SETUP MENU.
2. Press and hold the
SELECT/RESET control switch to
turn the autounlock ON or OFF.
3. Press the SELECT/RESET control switch for the next SETUP MENU
item or wait for more than four seconds to return to the INFO MENU.
2009 Explorer(exp)
Owners Guide, 1st Printing
USA(fus)
Driver Controls
127
Page 138 of 407
Fuel Used
Selecting this function from the
INFO menu. “FUEL USED XXX.X
GAL” will display the fuel used since
last reset. The information displayed
will be in gallons or liters,
depending on English/Metric mode
state.
Trip elapsed drive time
Select this function from the INFO
menu to display a timer.
To operate the Trip Elapsed Drive
Time perform the following:
1. Press and release RESET in order
to start the timer.
2. Press and release RESET to
pause the timer.
3. Press and hold RESET for two seconds in order to reset the timer to
zero.
Blank display
Select this function from the INFO menu to turn the upper two lines of
the message center display off.
Setup menu
Press the SETUP control twice for
the following displays:
•System Check
•AWD Lock (4.6L engine vehicles
only)
•Units (English/Metric)
•Language
•Autolamp
•Autolock
•Autounlock
•Power Running Boards (if equipped)
INFOSETUP
RESET
2009 Explorer(exp)
Owners Guide, 1st Printing
USA(fus)
Driver Controls
138