2009 FORD E450 ignition
[x] Cancel search: ignitionPage 227 of 320

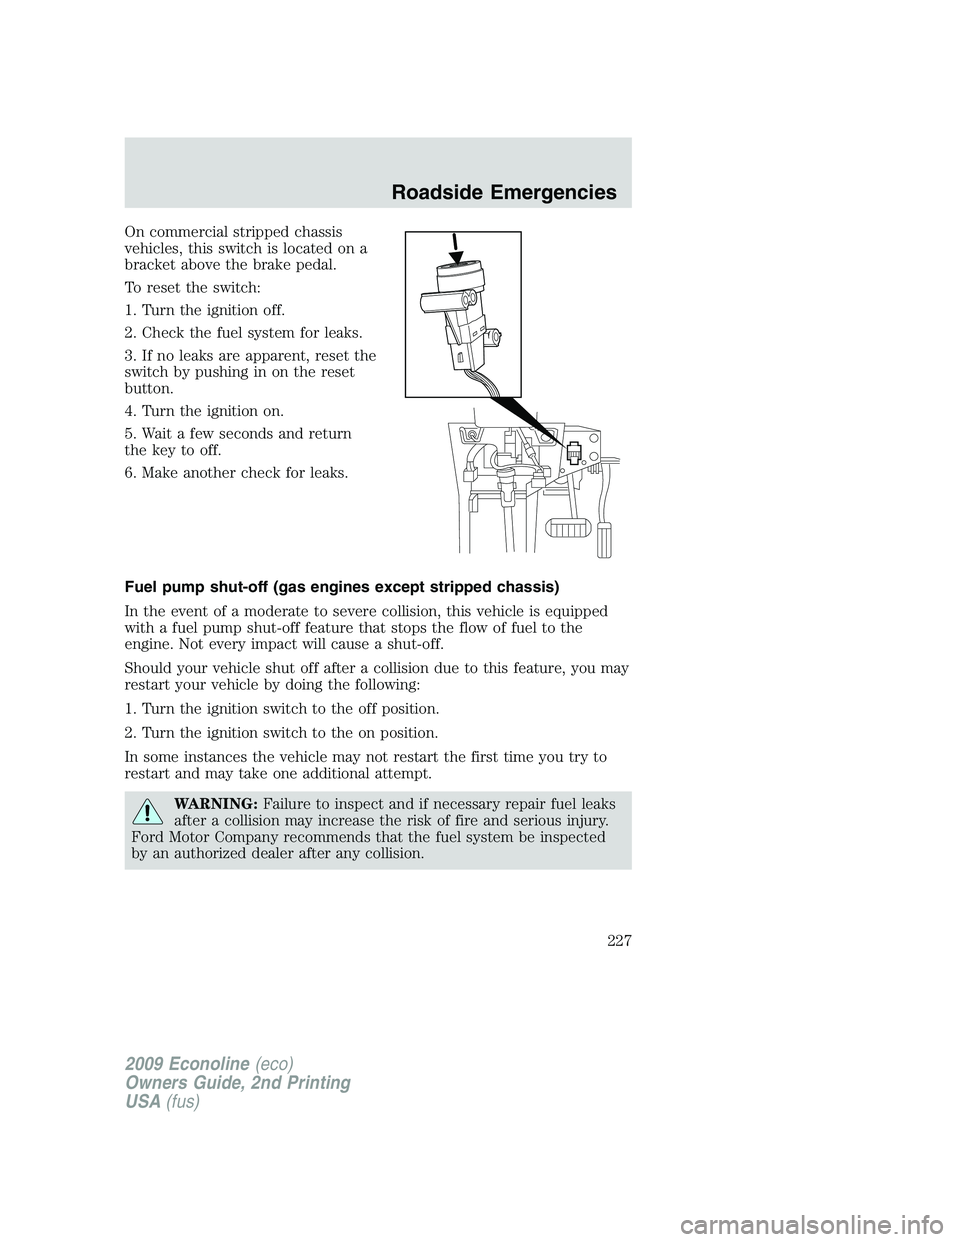
On commercial stripped chassis
vehicles, this switch is located on a
bracket above the brake pedal.
To reset the switch:
1. Turn the ignition off.
2. Check the fuel system for leaks.
3. If no leaks are apparent, reset the
switch by pushing in on the reset
button.
4. Turn the ignition on.
5. Wait a few seconds and return
the key to off.
6. Make another check for leaks.
Fuel pump shut-off (gas engines except stripped chassis)
In the event of a moderate to severe collision, this vehicle is equipped
with a fuel pump shut-off feature that stops the flow of fuel to the
engine. Not every impact will cause a shut-off.
Should your vehicle shut off after a collision due to this feature, you may
restart your vehicle by doing the following:
1. Turn the ignition switch to the off position.
2. Turn the ignition switch to the on position.
In some instances the vehicle may not restart the first time you try to
restart and may take one additional attempt.
WARNING:Failure to inspect and if necessary repair fuel leaks
after a collision may increase the risk of fire and serious injury.
Ford Motor Company recommends that the fuel system be inspected
by an authorized dealer after any collision.
2009 Econoline(eco)
Owners Guide, 2nd Printing
USA(fus)
Roadside Emergencies
227
Page 230 of 320

Fuse/Relay
LocationFuse Amp
RatingProtected Circuits
6 20A Turn signal, Hazard, Stop lamps
7 10A Left low beam
8 10A Right low beam
9 15A Courtesy lamps
10 15A Switch illumination
11 10A Not used (spare)
12 7.5A Not used (spare)
13 5A Mirrors
14 10A Not used (spare)
15 10A Not used (spare)
16 15A Not used (spare)
17 20A Door locks
18 20A Not used (spare)
19 25A Not used (spare)
20 15A Diagnostic connector (except
stripped chassis)
21 15A Not used (spare)
22 15A Park lamps, License plate lamps
23 15A High beams
24 20A Horn (except stripped chassis)
25 10A Demand lighting
26 10A Cluster (except stripped chassis)
27 20A Ignition switch feed
28 5A Audio mute (start)
29 5A Cluster (except stripped chassis)
30 5A Not used (spare)
31 10A Not used (spare)
32 10A Restraints module
33 10A Trailer Brake Controller
34 5A Not used (spare)
2009 Econoline(eco)
Owners Guide, 2nd Printing
USA(fus)
Roadside Emergencies
230
Page 233 of 320

Fuse/Relay
LocationFuse Amp
RatingProtected Circuits
13 30A** Starter solenoid relay
14 40A** Run start relay
15 40A** Modified vehicle and stripped
chassis battery
16 50A** Auxiliary A/C blower
17 50A** Auxiliary battery feed, Trailer tow
battery charge, trailer tow park
feed
18 30A** Electric trailer brake, Trailer
brake controller
19 30A** Upfitter #1
20 30A** Upfitter #2
21 50A** IDM relay (diesel engine only)
22 — Not used
23 G8VA relay A/C clutch
24 G8VA relay Horn relay (Stripped chassis)
25 HC Micro relay Run/start
26 — Not used
27 — Not used
28 20A* Back up lamp
29 10A* A/C clutch
30 10A* BOO switch
31 10A* Cluster battery (stripped chassis
only), IDM coil (diesel engine
only)
32 50A** Blower motor
33 40A** ABS pump
34 20A** Stripped chassis horn
35 40A** PCM relay
36 20A** Ignition switch (Stripped chassis
only)
37 G8VA relay Trailer tow stop/LH turn signal
2009 Econoline(eco)
Owners Guide, 2nd Printing
USA(fus)
Roadside Emergencies
233
Page 235 of 320

Fuse/Relay
LocationFuse Amp
RatingProtected Circuits
65 20A** Power point 2 (glove box)
66 20A** Power point 3 (left-hand B-pillar)
67 20A** Power point 1 (instrument panel)
68 50A** Modified vehicle
69 — Not used
70 30A** Stripped chassis
71 — Not used
72 20A** Cigar lighter
73 — Not used
74 30A** Power seat
75 20A* VPWR 1, PCM power
76 20A* VPWR 2, PCM mil
77 10A* VPWR 3, PCM non mil
78 15A* VPWR 4 (gas engine only),
Ignition coil (diesel engine only),
Fuel pump relay coil
79 10A* VPWR 5, Transmission
80 10A* Cluster run/start (stripped chassis
only)
81 15A* IDM logic (diesel engine only)
82 — Not used
83 — Fuel pump (diode)
84 — Not used
85 HC Micro relay Upfitter #1
* Mini fuses ** A1S fuses
CHANGING THE TIRES
If you get a flat tire while driving, do not apply the brake heavily.
Instead, gradually decrease your speed. Hold the steering wheel firmly
and slowly move to a safe place on the side of the road.
Note:The tire pressure monitoring system (TPMS) indicator light will
illuminate when the spare tire is in use. To restore the full functionality
of the monitoring system, all road wheels equipped with tire pressure
monitoring sensors must be mounted on the vehicle.
2009 Econoline(eco)
Owners Guide, 2nd Printing
USA(fus)
Roadside Emergencies
235
Page 290 of 320

If you have run out of fuel:
•You may need to cycle the ignition from off to on several times after
refueling to allow the fuel system to pump the fuel from the tank to
the engine. On restarting, cranking time will take a few seconds longer
than normal.
•Normally, adding 1 gallon (3.8L) of fuel is enough to restart the
engine. If the vehicle is out of fuel and on a steep grade, more than
1 gallon (3.8L) may be required.
•TheService engine soon
indicator may come on. For more
information on theService engine soon
indicator, refer to
Warning lights and chimesin theInstrument Clusterchapter.
ESSENTIALS OF GOOD FUEL ECONOMY
Measuring techniques
Your best source of information about actual fuel economy is you, the
driver. You must gather information as accurately and consistently as
possible. Fuel expense, frequency of fill-ups or fuel gauge readings are
NOT accurate as a measure of fuel economy. We do not recommend taking
fuel economy measurements during the first 1,000 miles (1,600 km) of
driving (engine break-in period). You will get a more accurate
measurement after 2,000 miles–3,000 miles (3,000 km–5,000 km).
Filling the tank
The advertised fuel capacity of the fuel tank on your vehicle is equal to
the rated refill capacity of the fuel tank as listed in theMaintenance
product specifications and capacitiessection of this chapter.
The advertised capacity is the amount of the indicated capacity and the
empty reserve combined. Indicated capacity is the difference in the
amount of fuel in a full tank and a tank when the fuel gauge indicates
empty. Empty reserve is the small amount of fuel remaining in the fuel
tank after the fuel gauge indicates empty.
The amount of usable fuel in the empty reserve varies and should
not be relied upon to increase driving range. When refueling your
vehicle after the fuel gauge indicates empty, you might not be
able to refuel the full amount of the advertised capacity of the
fuel tank due to the empty reserve still present in the tank.
For consistent results when filling the fuel tank:
•Turn the engine/ignition switch to the off position prior to refueling,
an error in the reading will result if the engine is left running.
2009 Econoline(eco)
Owners Guide, 2nd Printing
USA(fus)
Maintenance and Specifications
290
Page 293 of 320

•Driving on flat terrain offers improved fuel economy as compared to
driving on hilly terrain.
•Transmissions give their best fuel economy when operated in the top
cruise gear and with steady pressure on the gas pedal.
•Close windows for high speed driving.
EPA fuel economy estimates
Every new vehicle should have a window sticker containing EPA fuel
economy estimates. Contact your authorized dealer if the window sticker
is not supplied with your vehicle. The EPA fuel economy estimates
should be your guide for the fuel economy comparisons with other
vehicles. Your fuel economy may vary depending upon the method of
operation and conditions.
Note:Vehicles over 8,500 GVW (Gross Vehicle Weight) will not have fuel
economy information printed on the window sticker.
EMISSION CONTROL SYSTEM
Your vehicle is equipped with various emission control components and a
catalytic converter which will enable your vehicle to comply with
applicable exhaust emission standards. To make sure that the catalytic
converter and other emission control components continue to work
properly:
•Use only the specified fuel listed.
•Avoid running out of fuel.
•Do not turn off the ignition while your vehicle is moving, especially at
high speeds.
•Have the items listed inscheduled maintenance information
performed according to the specified schedule.
The scheduled maintenance items listed inscheduled maintenance
informationare essential to the life and performance of your vehicle
and to its emissions system.
If other than Ford, Motorcraft or Ford-authorized parts are used for
maintenance replacements or for service of components affecting
emission control, such non-Ford parts should be equivalent to genuine
Ford Motor Company parts in performance and durability.
WARNING:Do not park, idle, or drive your vehicle in dry grass
or other dry ground cover. The emission system heats up the
engine compartment and exhaust system, which can start a fire.
2009 Econoline(eco)
Owners Guide, 2nd Printing
USA(fus)
Maintenance and Specifications
293
Page 295 of 320

electrical system dry out. After three driving cycles without these or any
other temporary malfunctions present, theService engine soon
indicator should stay off the next time the engine is started. A driving
cycle consists of a cold engine startup followed by mixed city/highway
driving. No additional vehicle service is required.
If theService engine soon
indicator remains on, have your vehicle
serviced at the first available opportunity. Although some malfunctions
detected by the OBD-II may not have symptoms that are apparent,
continued driving with theService engine soon
indicator on can
result in increased emissions, lower fuel economy, reduced engine and
transmission smoothness, and lead to more costly repairs.
Readiness for Inspection/Maintenance (I/M) testing
Some state/provincial and local governments may have
Inspection/Maintenance (I/M) programs to inspect the emission control
equipment on your vehicle. Failure to pass this inspection could prevent
you from getting a vehicle registration. Your vehicle may not pass the I/M
test if theService engine soon
indicator is on or not working
properly (bulb is burned out), or if the OBD-II system has determined
that some of the emission control systems have not been properly
checked. In this case, the vehicle is considered not ready for I/M testing.
If theService engine soon
indicator is on or the bulb does not
work, the vehicle may need to be serviced. Refer to the On board
diagnostics (OBD-II) description in this chapter.
If the vehicle’s engine or transmission has just been serviced, or the
battery has recently run down or been replaced, the OBD-II system may
indicate that the vehicle is not ready for I/M testing. To determine if the
vehicle is ready for I/M testing, turn the ignition key to the on position
for 15 seconds without cranking the engine. If theService engine
soon
indicator blinks eight times, it means that the vehicle is not
ready for I/M testing; if theService engine soon
indicator stays on
solid, it means that the vehicle is ready for I/M testing.
The OBD-II system is designed to check the emission control system
during normal driving. A complete check may take several days. If the
vehicle is not ready for I/M testing, the following driving cycle consisting
of mixed city and highway driving may be performed:
15 minutes of steady driving on an expressway/highway followed by
20 minutes of stop-and-go driving with at least four 30-second idle
periods.
2009 Econoline(eco)
Owners Guide, 2nd Printing
USA(fus)
Maintenance and Specifications
295
Page 309 of 320

ENGINE DATA
Engine14.6L V8 engine 5.4L V8 engine 6.8L V10 engine
Cubic inches 281 330 415
Required fuel87 octane or
(E-85)
287 octane 87 octane
Firing order 1-3-7-2-6-5-4-8 1-3-7-2-6-5-4-8 1-6-5-10-2-7-3-8-4-9
Ignition system Coil on plug Coil on plug Coil on plug
Spark plug gap0.052–0.056 inch
(1.32–1.42mm)0.051–0.057 inch
(1.29–1.45mm)0.052–0.056 inch
(1.32–1.42mm)
Compression
ratio9.4:1 9.0:1 9.0:1
1Refer to the6.0 and 6.4 Liter Power Stroke Direct Injection Turbo
Diesel Owner’s Guide Supplementfor diesel engine information.
24.6L V8 FFV engines only.
Engine drivebelt routing
•4.6L V8, 5.4L V8 and 6.8L V10 engines without A/C
2009 Econoline(eco)
Owners Guide, 2nd Printing
USA(fus)
Maintenance and Specifications
309