2009 FORD E150 low beam
[x] Cancel search: low beamPage 18 of 320

Anti-theft system:Flashes when
the SecuriLock™ Passive Anti-theft
System has been activated.
Overdrive off (if equipped):
Illuminates when the overdrive
function of the transmission has
been turned off; refer to the
Drivingchapter. If the light does not illuminate, have the transmission
serviced soon, or damage may occur.
Charging system (RTT):
Illuminates when the battery is not
charging properly. If it stays on
while the engine is running, there
may be a malfunction with the
charging system. Contact your
authorized dealer as soon as possible. This indicates a problem with the
electrical system or a related component.
Speed control:Illuminates when
the speed control is activated. Turns
off when the speed control system
is deactivated.
Low fuel (RTT):Displays when
the fuel level in the fuel tank is at
or near empty (refer toFuel gauge
in this chapter).
Turn signal:Illuminates when the
left or right turn signal or the
hazard lights are turned on. If the
indicators stay on or flash faster, check for a burned out bulb.
High beams:Illuminates when the
high beam headlamps are turned on.
Key-in-ignition warning chime:Sounds when the key is left in the
ignition in the off or accessory position and the driver’s door is opened.
O/D
OFF
2009 Econoline(eco)
Owners Guide, 2nd Printing
USA(fus)
Instrument Cluster
18
Page 48 of 320

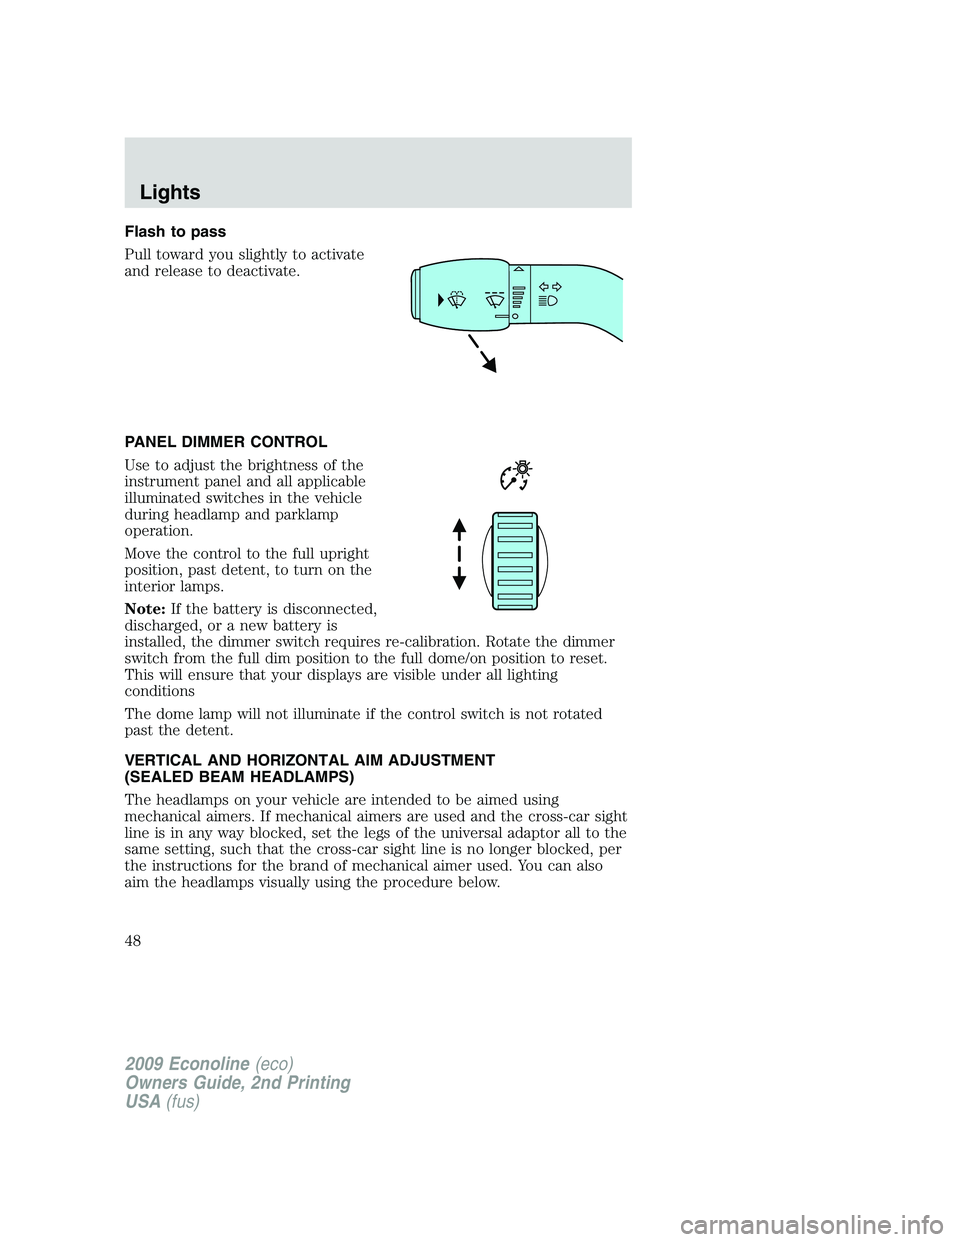
Flash to pass
Pull toward you slightly to activate
and release to deactivate.
PANEL DIMMER CONTROL
Use to adjust the brightness of the
instrument panel and all applicable
illuminated switches in the vehicle
during headlamp and parklamp
operation.
Move the control to the full upright
position, past detent, to turn on the
interior lamps.
Note:If the battery is disconnected,
discharged, or a new battery is
installed, the dimmer switch requires re-calibration. Rotate the dimmer
switch from the full dim position to the full dome/on position to reset.
This will ensure that your displays are visible under all lighting
conditions
The dome lamp will not illuminate if the control switch is not rotated
past the detent.
VERTICAL AND HORIZONTAL AIM ADJUSTMENT
(SEALED BEAM HEADLAMPS)
The headlamps on your vehicle are intended to be aimed using
mechanical aimers. If mechanical aimers are used and the cross-car sight
line is in any way blocked, set the legs of the universal adaptor all to the
same setting, such that the cross-car sight line is no longer blocked, per
the instructions for the brand of mechanical aimer used. You can also
aim the headlamps visually using the procedure below.
2009 Econoline(eco)
Owners Guide, 2nd Printing
USA(fus)
Lights
48
Page 49 of 320

To adjust the headlamps:
1. Park your vehicle on a level surface about 25 feet (7.6 meters) away
from a vertical plain surface (3). Check your headlamp alignment at
night or in a dark area so that you can see the headlamp beam pattern.
•(1) 8 feet (2.4 meters)
•(2) Center height of lamp to
ground
•(3) 25 feet (7.6 meters)
•(4) Horizontal reference line
•(5) Center of headlamps
•(6) Center line of the vehicle
2. The center of the headlamp is
marked either on the lens (a circle
or cross marker) or on the bulb shield, internal to the lamp (mark or
feature). Measure the height from the center of your headlamp to the
ground (2) and mark an 8 foot (2.4 meter) long horizontal line on the
wall or screen (1) at this height (masking tape works well).
3. Turn on the low beam headlamps
and open the hood.
4. Locate the high intensity area of
the beam pattern and place the top
edge of the intensity zone even with
the horizontal reference line (4). If
the top edge of the high intensity
area is not even with the horizontal
line, follow the next step to adjust
it.
5. Locate the vertical adjuster (1)
for each headlamp. Adjust the aim
by turning the adjuster control
either clockwise (to adjust up) or
counterclockwise (to adjust down).
6. In addition to the horizontal line
marked in step 2, a pair of vertical
lines (5) must be marked at the
center line of the headlamps on the
wall or screen.
2009 Econoline(eco)
Owners Guide, 2nd Printing
USA(fus)
Lights
49
Page 50 of 320

7. On the wall or screen, locate the high intensity area of the beam
pattern. The left edge of the high intensity area should be even with the
vertical line corresponding to the headlamp under adjustment. If the left
edge of the high intensity area is not even with the vertical line, follow
the next step to adjust it.
8. Locate the horizontal adjuster (2) for each headlamp. Turn it
clockwise or counterclockwise, to place the left edge of the high
intensity area even with the vertical line corresponding to the headlamp
under adjustment.
VERTICAL AIM ADJUSTMENT (AERODYNAMIC HEADLAMPS)
The headlamps on your vehicle can only be vertically adjusted. Your
vehicle does not require horizontal aim adjustments.
To adjust the headlamps:
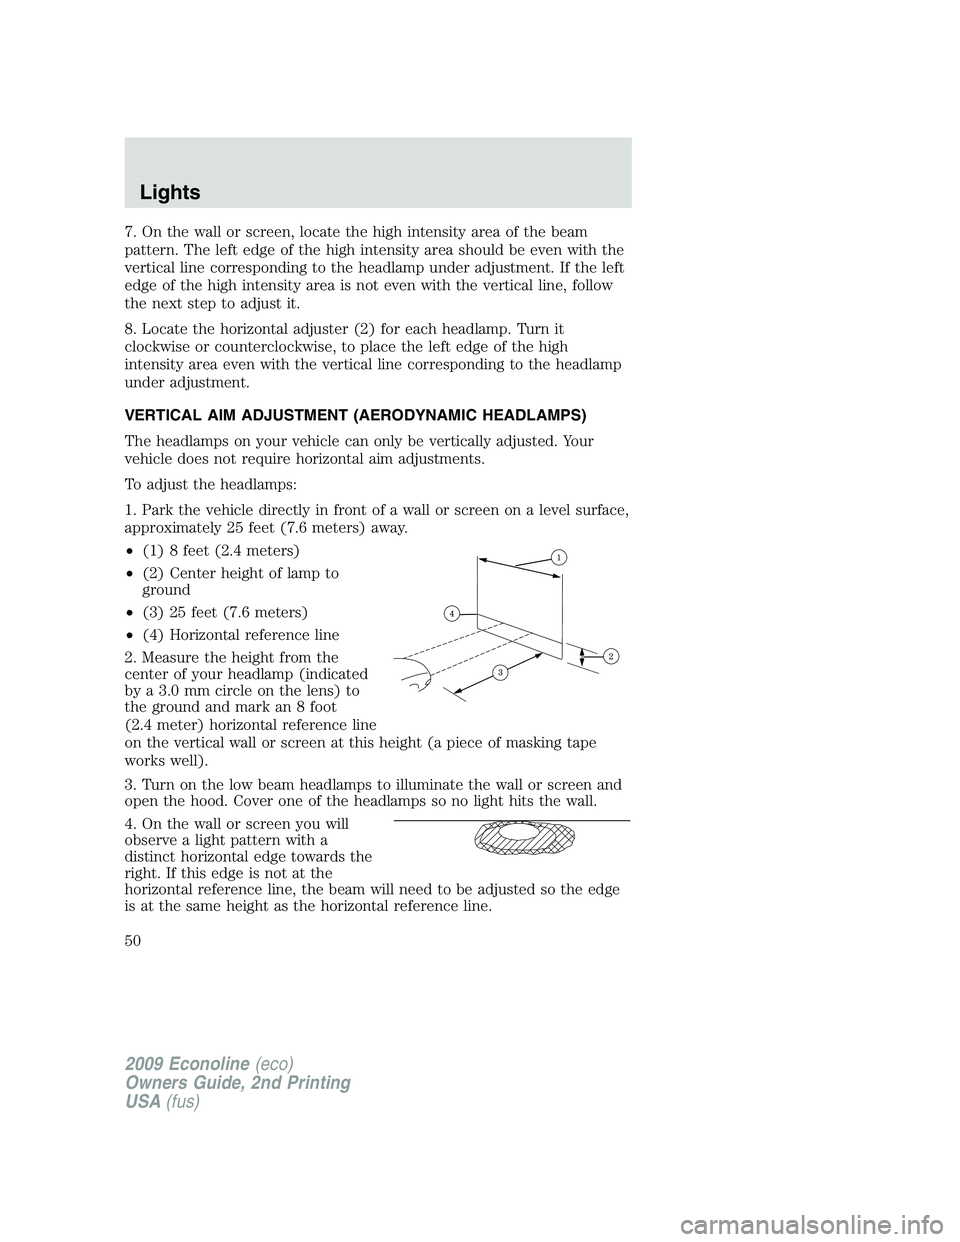
1. Park the vehicle directly in front of a wall or screen on a level surface,
approximately 25 feet (7.6 meters) away.
•(1) 8 feet (2.4 meters)
•(2) Center height of lamp to
ground
•(3) 25 feet (7.6 meters)
•(4) Horizontal reference line
2. Measure the height from the
center of your headlamp (indicated
by a 3.0 mm circle on the lens) to
the ground and mark an 8 foot
(2.4 meter) horizontal reference line
on the vertical wall or screen at this height (a piece of masking tape
works well).
3. Turn on the low beam headlamps to illuminate the wall or screen and
open the hood. Cover one of the headlamps so no light hits the wall.
4. On the wall or screen you will
observe a light pattern with a
distinct horizontal edge towards the
right. If this edge is not at the
horizontal reference line, the beam will need to be adjusted so the edge
is at the same height as the horizontal reference line.
2009 Econoline(eco)
Owners Guide, 2nd Printing
USA(fus)
Lights
50
Page 53 of 320

Examples of unacceptable moisture (usually caused by a lamp water
leak) are:
•Water puddle inside the lamp
•Large water droplets, drip marks or streaks present on the interior of
the lens
Take your vehicle to dealer for service if any of the above conditions of
unacceptable moisture are present.
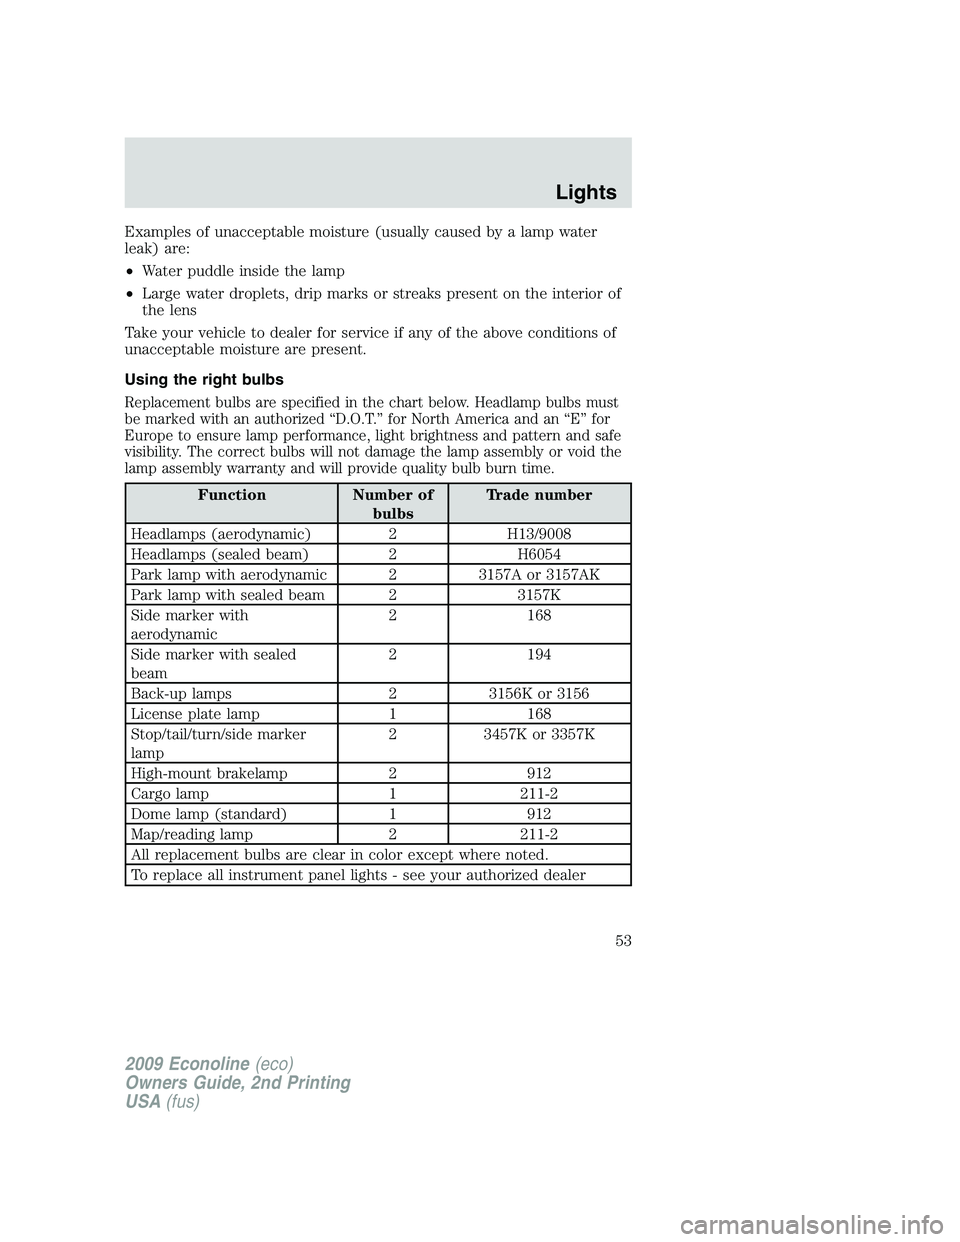
Using the right bulbs
Replacement bulbs are specified in the chart below. Headlamp bulbs must
be marked with an authorized “D.O.T.” for North America and an “E” for
Europe to ensure lamp performance, light brightness and pattern and safe
visibility. The correct bulbs will not damage the lamp assembly or void the
lamp assembly warranty and will provide quality bulb burn time.
Function Number of
bulbsTrade number
Headlamps (aerodynamic) 2 H13/9008
Headlamps (sealed beam) 2 H6054
Park lamp with aerodynamic 2 3157A or 3157AK
Park lamp with sealed beam 2 3157K
Side marker with
aerodynamic2 168
Side marker with sealed
beam2 194
Back-up lamps 2 3156K or 3156
License plate lamp 1 168
Stop/tail/turn/side marker
lamp2 3457K or 3357K
High-mount brakelamp 2 912
Cargo lamp 1 211-2
Dome lamp (standard) 1 912
Map/reading lamp 2 211-2
All replacement bulbs are clear in color except where noted.
To replace all instrument panel lights - see your authorized dealer
2009 Econoline(eco)
Owners Guide, 2nd Printing
USA(fus)
Lights
53
Page 55 of 320

Replacing headlamps (sealed beam)
1. Make sure the headlamp switch is in the off position and open the
hood.
2. Remove the four screws from the
top and bottom front of the
headlamp assembly and carefully
remove the lamp/bezel.
3. Remove the four screws and the
retaining ring.
4. Disconnect the electrical
connector from the lamp and
remove the lamp.
To install the new lamp, follow the
removal procedures in reverse order.
Replacing front parking lamp/turn signal bulbs
1. Make sure the headlamp control is in the off position.
2. Remove the headlamp assembly, refer toReplacing headlamp bulbs
in this section.
Aerodynamic
Sealed beam
2009 Econoline(eco)
Owners Guide, 2nd Printing
USA(fus)
Lights
55
Page 56 of 320

3. Rotate the bulb socket counterclockwise and remove.
4. Carefully pull the bulb straight out of the socket.
To complete installation, follow the removal procedures in reverse order.
Replacing side marker bulbs
1. Make sure the headlamp control is in the off position.
2. Remove the headlamp assembly. Refer toReplacing headlamp bulbs
in this section.
Aerodynamic
Sealed beam
3. Rotate the bulb socket counterclockwise and remove.
4. Carefully pull the bulb straight out of the socket.
To complete installation, follow the removal procedures in reverse order.
2009 Econoline(eco)
Owners Guide, 2nd Printing
USA(fus)
Lights
56
Page 230 of 320

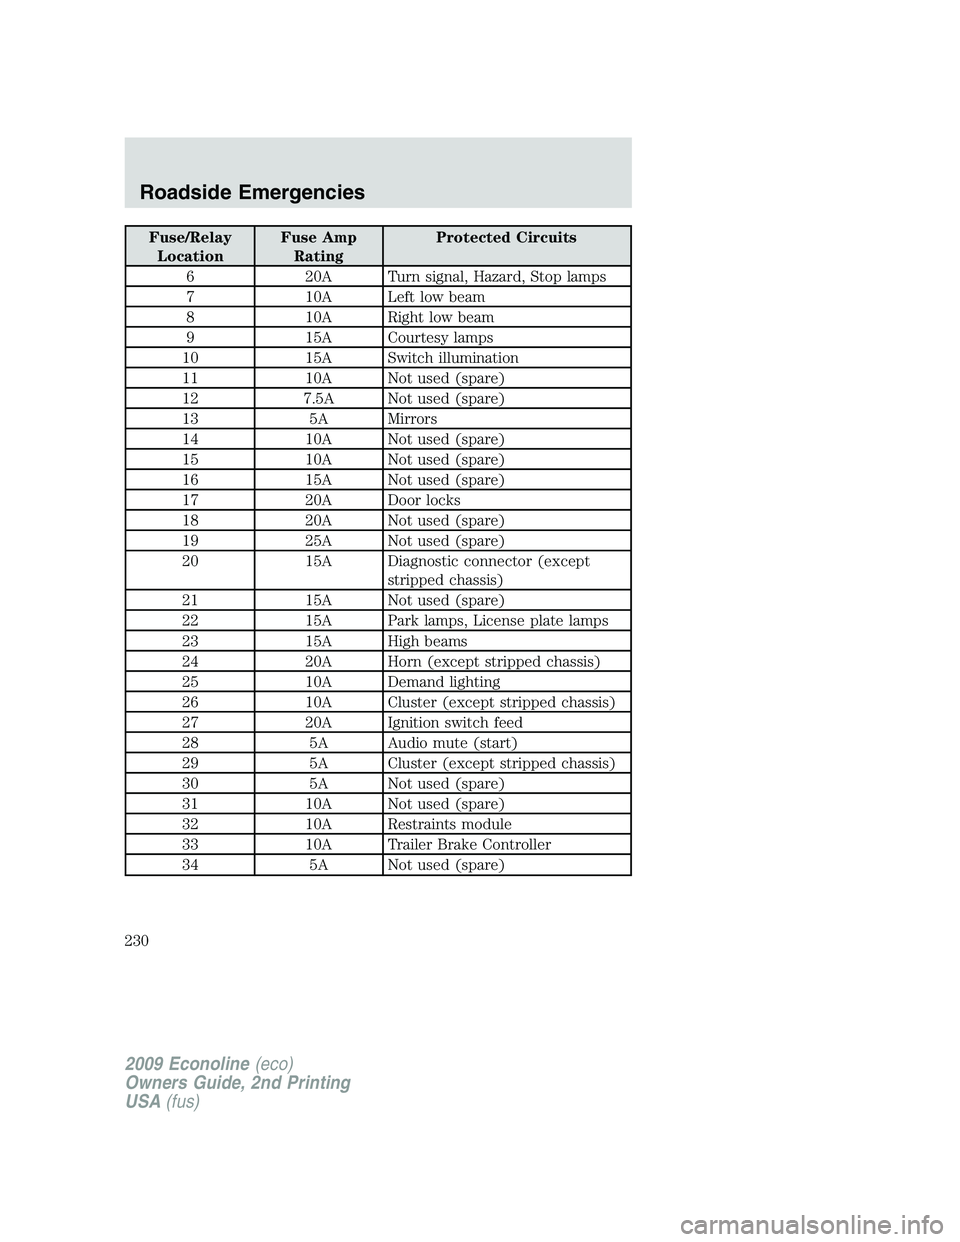
Fuse/Relay
LocationFuse Amp
RatingProtected Circuits
6 20A Turn signal, Hazard, Stop lamps
7 10A Left low beam
8 10A Right low beam
9 15A Courtesy lamps
10 15A Switch illumination
11 10A Not used (spare)
12 7.5A Not used (spare)
13 5A Mirrors
14 10A Not used (spare)
15 10A Not used (spare)
16 15A Not used (spare)
17 20A Door locks
18 20A Not used (spare)
19 25A Not used (spare)
20 15A Diagnostic connector (except
stripped chassis)
21 15A Not used (spare)
22 15A Park lamps, License plate lamps
23 15A High beams
24 20A Horn (except stripped chassis)
25 10A Demand lighting
26 10A Cluster (except stripped chassis)
27 20A Ignition switch feed
28 5A Audio mute (start)
29 5A Cluster (except stripped chassis)
30 5A Not used (spare)
31 10A Not used (spare)
32 10A Restraints module
33 10A Trailer Brake Controller
34 5A Not used (spare)
2009 Econoline(eco)
Owners Guide, 2nd Printing
USA(fus)
Roadside Emergencies
230