Page 176 of 271
Parking brake
Apply the parking brake whenever
the vehicle is parked.
To set the parking brake:
1. Move the gearshift to P (Park).
2. Push pedal downward.
The BRAKE warning lamp in the
instrument cluster illuminates and
remains illuminated (when the
ignition is turned on) until the
parking brake is fully released.
WARNING:Always set the parking brake fully and make sure
the gearshift is latched in P (Park). Turn the ignition to the off
position and remove the key whenever you leave your vehicle.
The parking brake is not recommended to stop a moving vehicle.
However, if the normal brakes fail, the parking brake can be used to stop
your vehicle in an emergency. Since the parking brake applies only the
rear brakes, the vehicle’s stopping distance will increase greatly and the
handling of your vehicle will be adversely affected.
Pull the lever to release the parking
brake.
HOOD
P!
BRAKE
2009 Crown Victoria(cro)
Owners Guide, 2nd Printing
USA(fus)
Driving
176
Page 179 of 271
If you exceed the load limit, the rear air suspension may not operate.
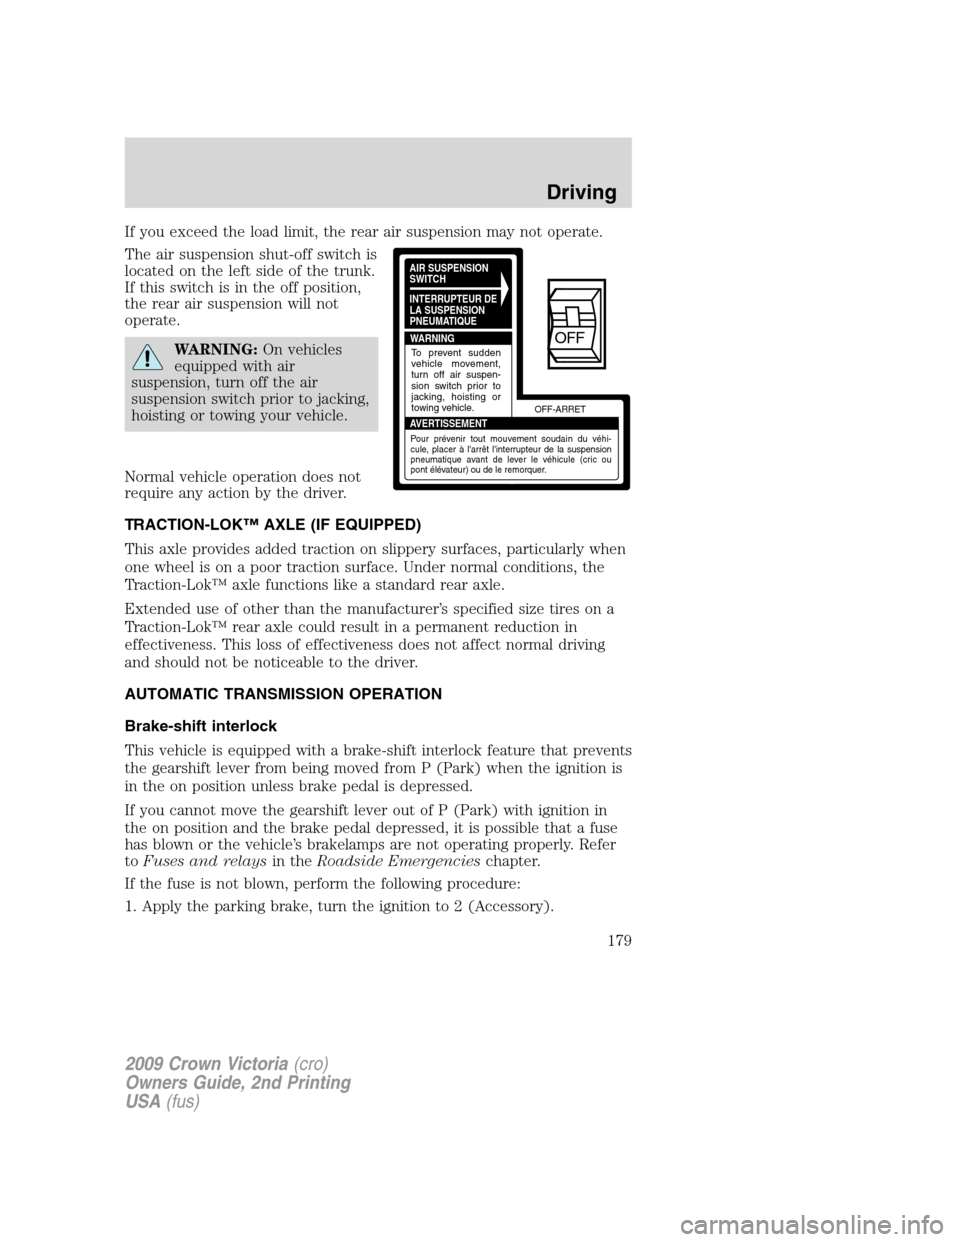
The air suspension shut-off switch is
located on the left side of the trunk.
If this switch is in the off position,
the rear air suspension will not
operate.
WARNING:On vehicles
equipped with air
suspension, turn off the air
suspension switch prior to jacking,
hoisting or towing your vehicle.
Normal vehicle operation does not
require any action by the driver.
TRACTION-LOK™ AXLE (IF EQUIPPED)
This axle provides added traction on slippery surfaces, particularly when
one wheel is on a poor traction surface. Under normal conditions, the
Traction-Lok™ axle functions like a standard rear axle.
Extended use of other than the manufacturer’s specified size tires on a
Traction-Lok™ rear axle could result in a permanent reduction in
effectiveness. This loss of effectiveness does not affect normal driving
and should not be noticeable to the driver.
AUTOMATIC TRANSMISSION OPERATION
Brake-shift interlock
This vehicle is equipped with a brake-shift interlock feature that prevents
the gearshift lever from being moved from P (Park) when the ignition is
in the on position unless brake pedal is depressed.
If you cannot move the gearshift lever out of P (Park) with ignition in
the on position and the brake pedal depressed, it is possible that a fuse
has blown or the vehicle’s brakelamps are not operating properly. Refer
toFuses and relaysin theRoadside Emergencieschapter.
If the fuse is not blown, perform the following procedure:
1. Apply the parking brake, turn the ignition to 2 (Accessory).
AIR SUSPENSION
SWITCH
INTERRUPTEUR DE
LA SUSPENSION
PNEUMATIQUE
WARNING
AVERTISSEMENTOFF-ARRET
To prevent sudden
vehicle movement,
turn off air suspen-
sion switch prior to
jacking, hoisting or
towing vehicle.
Pour prévenir tout mouvement soudain du véhi-
cule, placer à l'arrêt l'interrupteur de la suspension
pneumatique avant de lever le véhicule (cric ou
pont élévateur) ou de le remorquer.
OFF
2009 Crown Victoria(cro)
Owners Guide, 2nd Printing
USA(fus)
Driving
179
Page 180 of 271
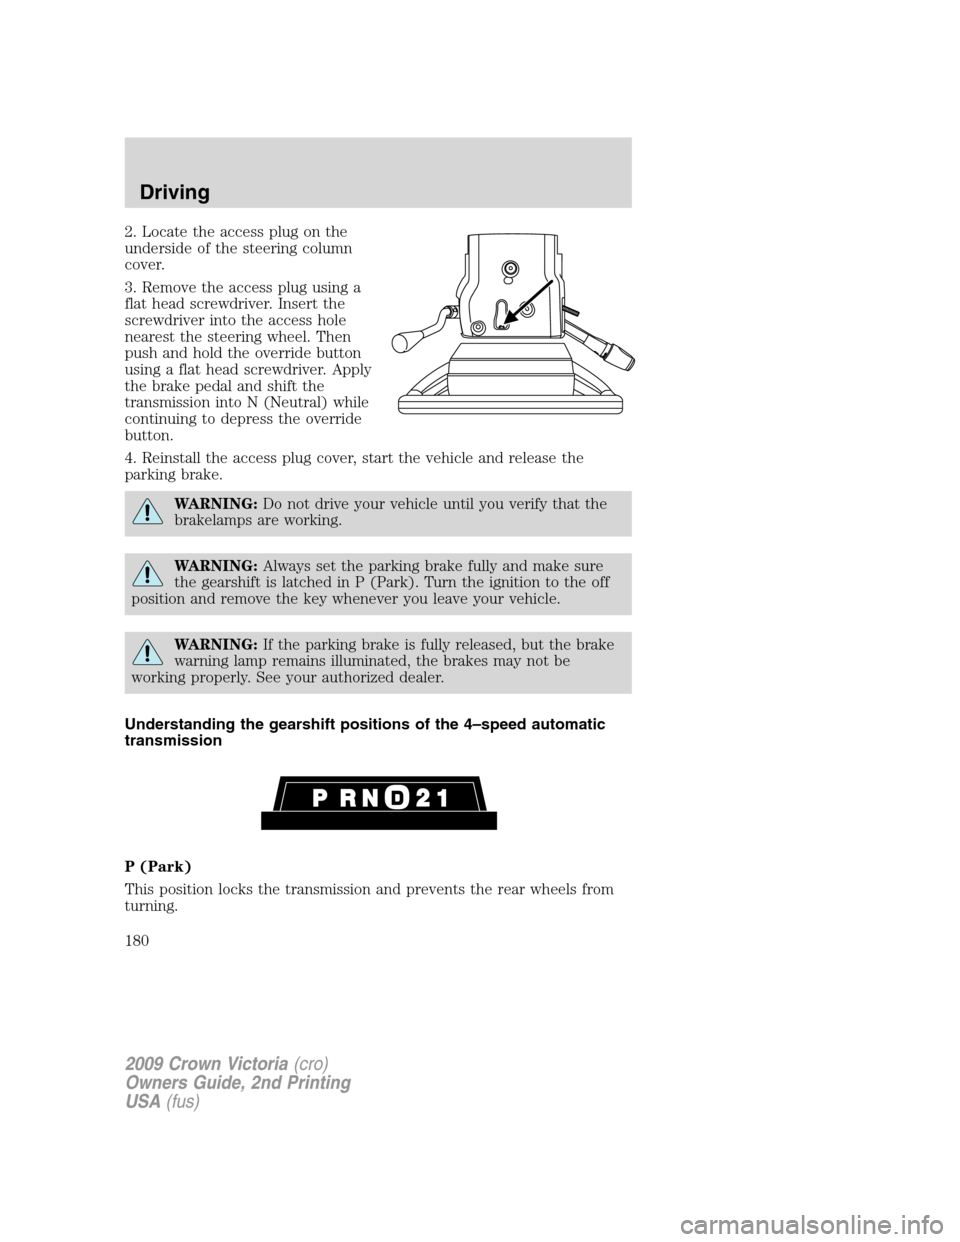
2. Locate the access plug on the
underside of the steering column
cover.
3. Remove the access plug using a
flat head screwdriver. Insert the
screwdriver into the access hole
nearest the steering wheel. Then
push and hold the override button
using a flat head screwdriver. Apply
the brake pedal and shift the
transmission into N (Neutral) while
continuing to depress the override
button.
4. Reinstall the access plug cover, start the vehicle and release the
parking brake.
WARNING:Do not drive your vehicle until you verify that the
brakelamps are working.
WARNING:Always set the parking brake fully and make sure
the gearshift is latched in P (Park). Turn the ignition to the off
position and remove the key whenever you leave your vehicle.
WARNING:If the parking brake is fully released, but the brake
warning lamp remains illuminated, the brakes may not be
working properly. See your authorized dealer.
Understanding the gearshift positions of the 4–speed automatic
transmission
P (Park)
This position locks the transmission and prevents the rear wheels from
turning.
2009 Crown Victoria(cro)
Owners Guide, 2nd Printing
USA(fus)
Driving
180
Page 181 of 271
To put your vehicle in gear:
•Start the engine
•Depress the brake pedal
•Move the gearshift lever into the desired gear
To put your vehicle in P (Park):
•Come to a complete stop
•Move the gearshift lever and securely latch it in P (Park)
WARNING:Always set the parking brake fully and make sure
the gearshift is latched in P (Park). Turn the ignition to the off
position and remove the key whenever you leave your vehicle.
R (Reverse)
With the gearshift lever in R (Reverse), the vehicle will move backward.
Always come to a complete stop before shifting into and out of R
(Reverse).
N (Neutral)
With the gearshift lever in N (Neutral), the vehicle can be started and is
free to roll. Hold the brake pedal down while in this position.
(Overdrive)
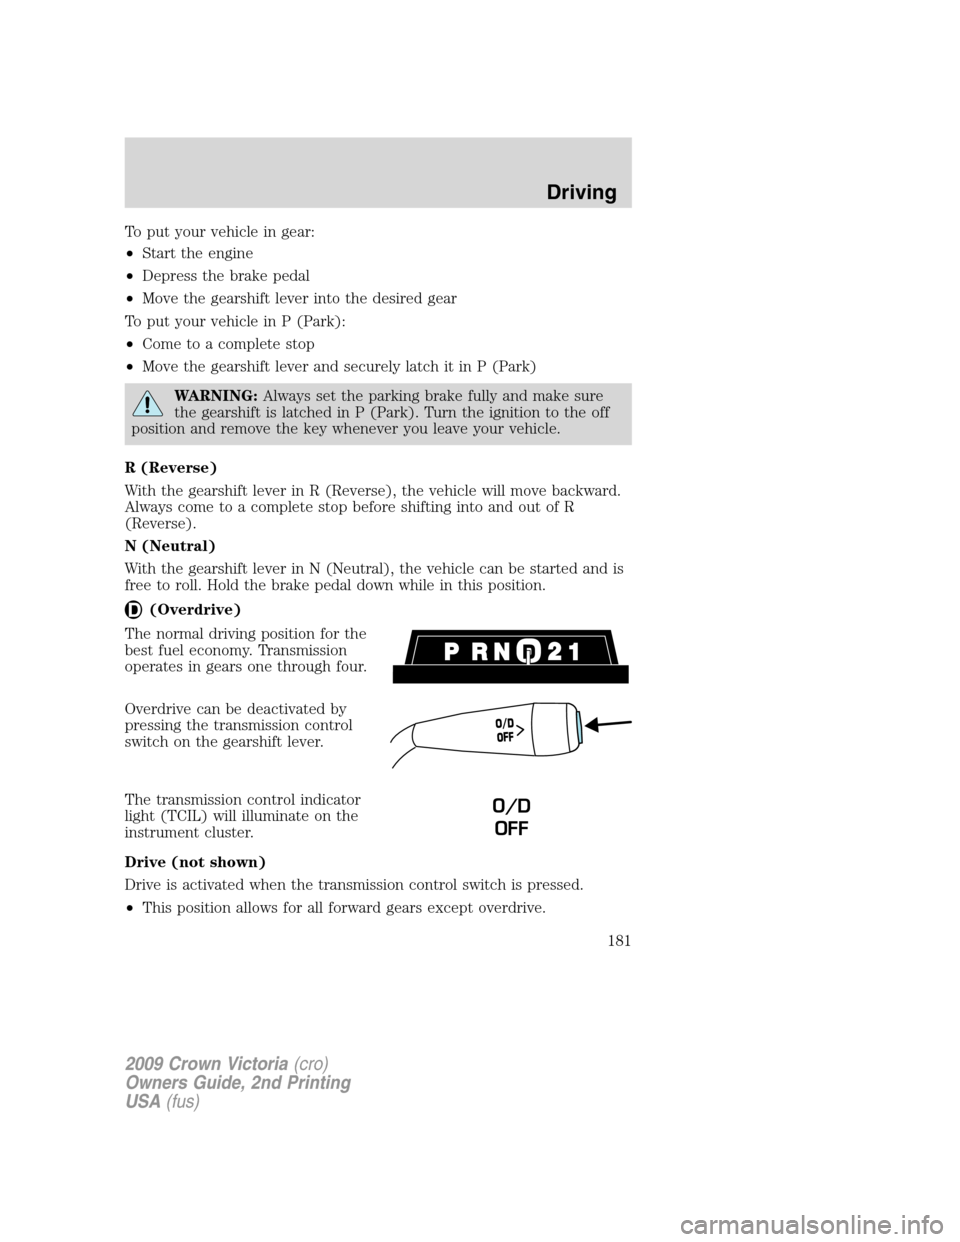
The normal driving position for the
best fuel economy. Transmission
operates in gears one through four.
Overdrive can be deactivated by
pressing the transmission control
switch on the gearshift lever.
The transmission control indicator
light (TCIL) will illuminate on the
instrument cluster.
Drive (not shown)
Drive is activated when the transmission control switch is pressed.
•This position allows for all forward gears except overdrive.
O
/
D
O
F
F
O/D
OFF
2009 Crown Victoria(cro)
Owners Guide, 2nd Printing
USA(fus)
Driving
181
Page 183 of 271
DRIVING THROUGH WATER
If driving through deep or standing
water is unavoidable, proceed very
slowly especially when the depth is
not known. Never drive through
water that is higher than the bottom
of the wheel rims (for cars) or the
bottom of the hubs (for trucks).
When driving through water, traction or brake capability may be limited.
Also, water may enter your engine’s air intake and severely damage your
engine or your vehicle may stall.Driving through deep water where
the transmission vent tube is submerged may allow water into the
transmission and cause internal transmission damage.
Once through the water, always dry the brakes by moving your
vehicle slowly while applying light pressure on the brake pedal.
Wet brakes do not stop the vehicle as quickly as dry brakes.
2009 Crown Victoria(cro)
Owners Guide, 2nd Printing
USA(fus)
Driving
183
Page 188 of 271
COLOR
Fuse
ratingMini
fusesStandard
fusesMaxi
fusesCartridge
maxi
fusesFuse link
cartridge
50A — — Red Red Red
60A — — Blue Yellow Yellow
70A — — Tan — Brown
80A — — Natural Black Black
Passenger compartment fuse panel
The fuse panel is located below and to the left of the steering wheel by
the brake pedal. Remove the panel cover to access the fuses.
To remove a fuse use the fuse puller tool provided on the fuse panel
cover.
The fuses are coded as follows.
27 25
26 2423 21
2219
20
18 16
17 1514 12
1310
33
31
2932
30
28 11
97
8653
41
2Relay
1
2009 Crown Victoria(cro)
Owners Guide, 2nd Printing
USA(fus)
Roadside Emergencies
188
Page 190 of 271
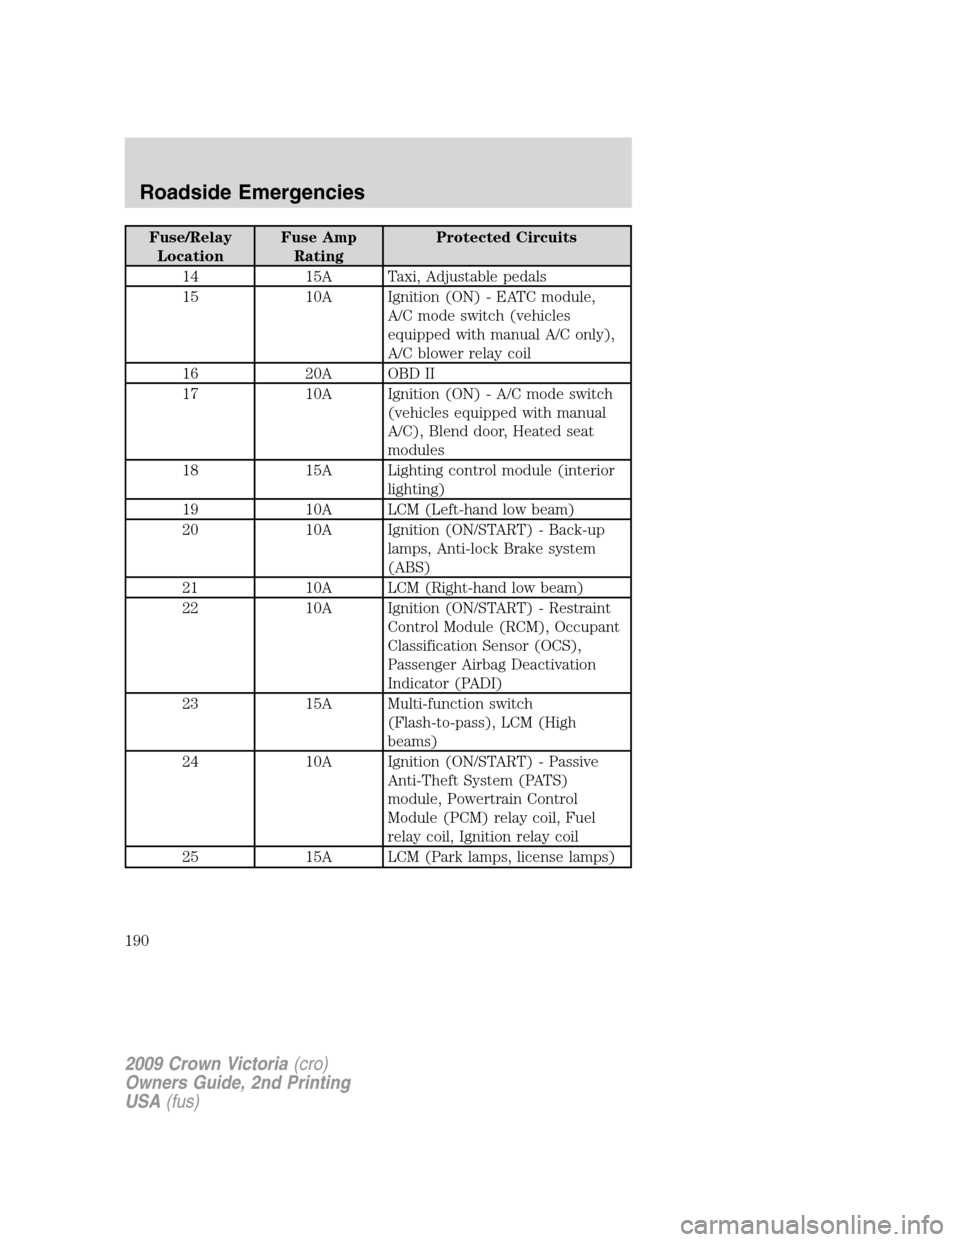
Fuse/Relay
LocationFuse Amp
RatingProtected Circuits
14 15A Taxi, Adjustable pedals
15 10A Ignition (ON) - EATC module,
A/C mode switch (vehicles
equipped with manual A/C only),
A/C blower relay coil
16 20A OBD II
17 10A Ignition (ON) - A/C mode switch
(vehicles equipped with manual
A/C), Blend door, Heated seat
modules
18 15A Lighting control module (interior
lighting)
19 10A LCM (Left-hand low beam)
20 10A Ignition (ON/START) - Back-up
lamps, Anti-lock Brake system
(ABS)
21 10A LCM (Right-hand low beam)
22 10A Ignition (ON/START) - Restraint
Control Module (RCM), Occupant
Classification Sensor (OCS),
Passenger Airbag Deactivation
Indicator (PADI)
23 15A Multi-function switch
(Flash-to-pass), LCM (High
beams)
24 10A Ignition (ON/START) - Passive
Anti-Theft System (PATS)
module, Powertrain Control
Module (PCM) relay coil, Fuel
relay coil, Ignition relay coil
25 15A LCM (Park lamps, license lamps)
2009 Crown Victoria(cro)
Owners Guide, 2nd Printing
USA(fus)
Roadside Emergencies
190
Page 191 of 271
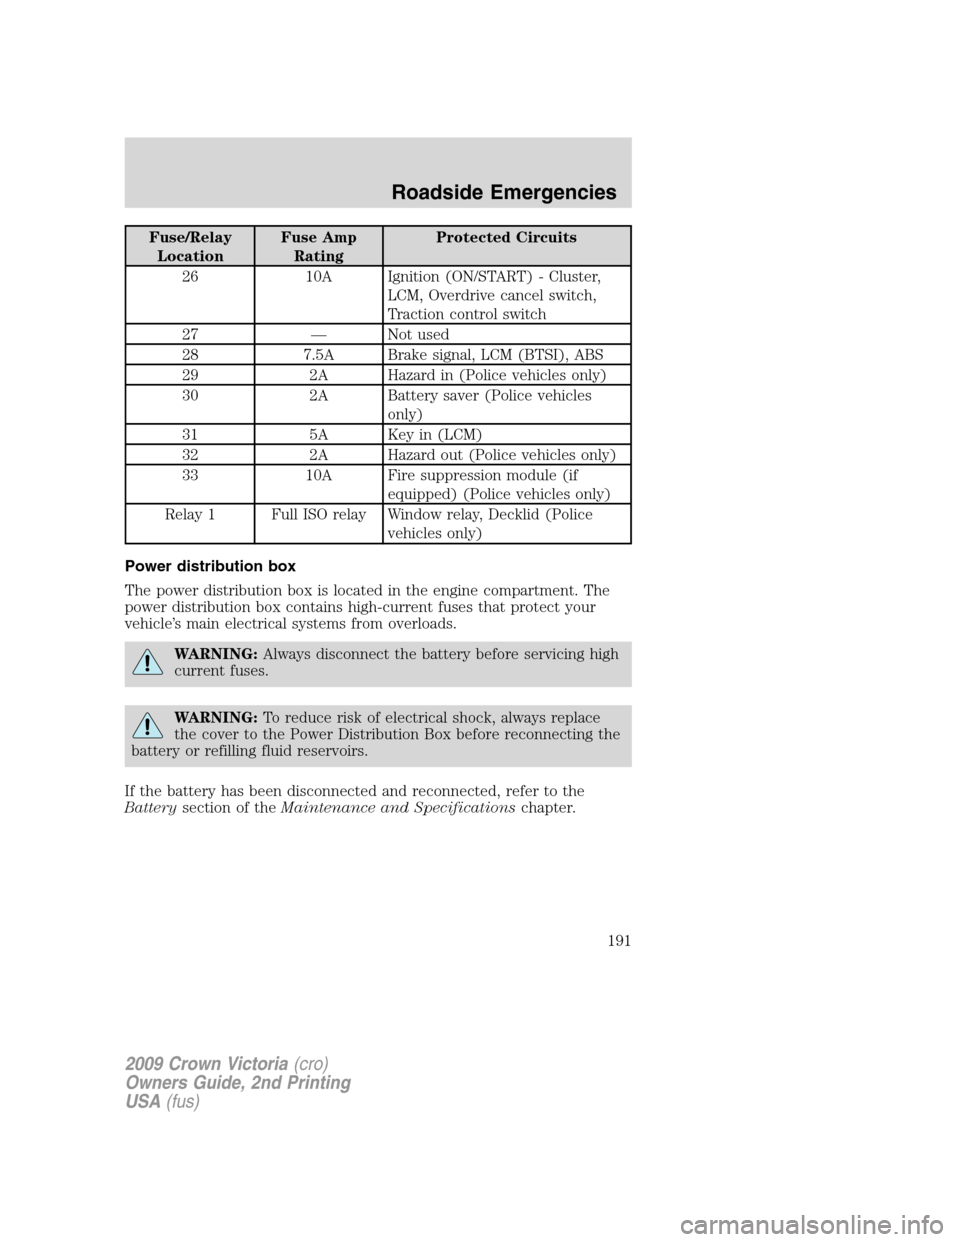
Fuse/Relay
LocationFuse Amp
RatingProtected Circuits
26 10A Ignition (ON/START) - Cluster,
LCM, Overdrive cancel switch,
Traction control switch
27 — Not used
28 7.5A Brake signal, LCM (BTSI), ABS
29 2A Hazard in (Police vehicles only)
30 2A Battery saver (Police vehicles
only)
31 5A Key in (LCM)
32 2A Hazard out (Police vehicles only)
33 10A Fire suppression module (if
equipped) (Police vehicles only)
Relay 1 Full ISO relay Window relay, Decklid (Police
vehicles only)
Power distribution box
The power distribution box is located in the engine compartment. The
power distribution box contains high-current fuses that protect your
vehicle’s main electrical systems from overloads.
WARNING:Always disconnect the battery before servicing high
current fuses.
WARNING:To reduce risk of electrical shock, always replace
the cover to the Power Distribution Box before reconnecting the
battery or refilling fluid reservoirs.
If the battery has been disconnected and reconnected, refer to the
Batterysection of theMaintenance and Specificationschapter.
2009 Crown Victoria(cro)
Owners Guide, 2nd Printing
USA(fus)
Roadside Emergencies
191