2009 FIAT DUCATO height
[x] Cancel search: heightPage 38 of 282
37
SAFETY
DEVICES
CORRECT USE
OF THE
VEHICLE
WARNING
LIGHTS AND
MESSAGES
IN AN
EMERGENCY
VEHICLE
MAINTENANCE
TECHNICAL
SPECIFICATIONS
INDEX
DASHBOARD
AND CONTROLS
Fabric upholstery of your Fiat
Ducato is purpose-made to
withstand common wear re-
sulting from normal use of the
vehicle. It is however absolutely neces-
sary to prevent hard and/or prolonged
scratching/scraping caused by clothing
accessories like metallic buckles, studs,
“Velcro” fixings, etc. that stressing lo-
cally the fabric could break yarns and
damage the upholstery as a conse-
quence.
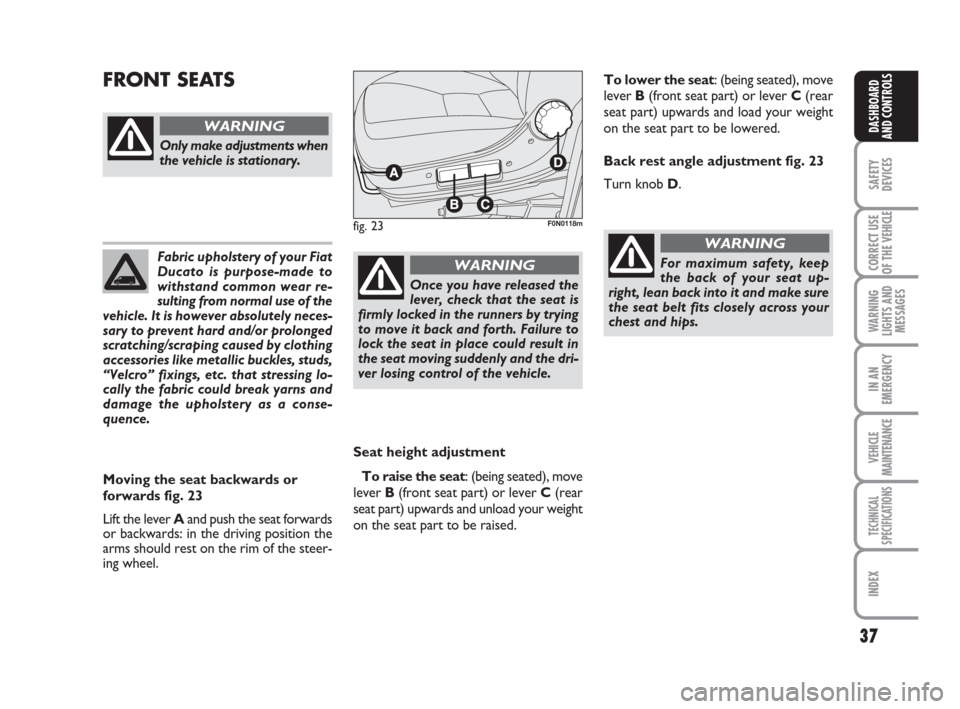
Seat height adjustment
To raise the seat: (being seated), move
lever B (front seat part) or lever C (rear
seat part) upwards and unload your weight
on the seat part to be raised.
FRONT SEATS
fig. 23F0N0118m
Only make adjustments when
the vehicle is stationary.
WARNING
Moving the seat backwards or
forwards fig. 23
Lift the lever Aand push the seat forwards
or backwards: in the driving position the
arms should rest on the rim of the steer-
ing wheel.
Once you have released the
lever, check that the seat is
firmly locked in the runners by trying
to move it back and forth. Failure to
lock the seat in place could result in
the seat moving suddenly and the dri-
ver losing control of the vehicle.
WARNINGFor maximum safety, keep
the back of your seat up-
right, lean back into it and make sure
the seat belt fits closely across your
chest and hips.
WARNING
To lower the seat: (being seated), move
lever B(front seat part) or lever C(rear
seat part) upwards and load your weight
on the seat part to be lowered.
Back rest angle adjustment fig. 23
Turn knob D.
Page 39 of 282
38
SAFETY
DEVICES
CORRECT USE
OF THE
VEHICLE
WARNING
LIGHTS AND
MESSAGES
IN AN
EMERGENCY
VEHICLE
MAINTENANCE
TECHNICAL
SPECIFICATIONS
INDEX
DASHBOARD
AND CONTROLS
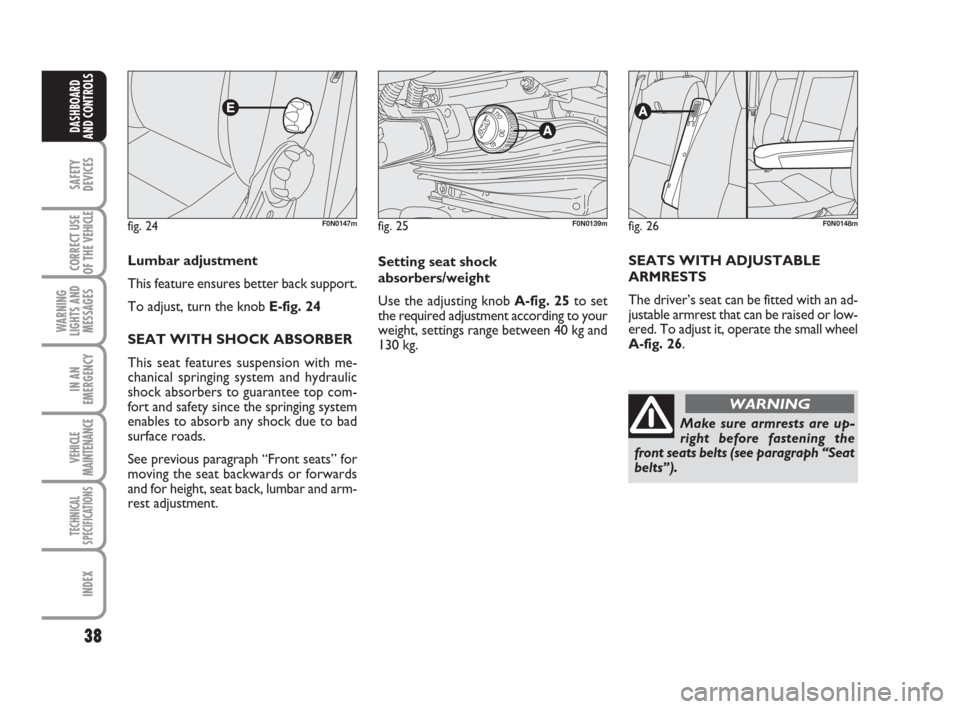
fig. 24F0N0147m
Lumbar adjustment
This feature ensures better back support.
To adjust, turn the knob E-fig. 24
SEAT WITH SHOCK ABSORBER
This seat features suspension with me-
chanical springing system and hydraulic
shock absorbers to guarantee top com-
fort and safety since the springing system
enables to absorb any shock due to bad
surface roads.
See previous paragraph “Front seats” for
moving the seat backwards or forwards
and for height, seat back, lumbar and arm-
rest adjustment.
fig. 25F0N0139m
Setting seat shock
absorbers/weight
Use the adjusting knob A-fig. 25to set
the required adjustment according to your
weight, settings range between 40 kg and
130 kg.
Make sure armrests are up-
right before fastening the
front seats belts (see paragraph “Seat
belts”). SEATS WITH ADJUSTABLE
ARMRESTS
The driver’s seat can be fitted with an ad-
justable armrest that can be raised or low-
ered. To adjust it, operate the small wheel
A-fig. 26.
fig. 26F0N0148m
WARNING
Page 40 of 282
39
SAFETY
DEVICES
CORRECT USE
OF THE
VEHICLE
WARNING
LIGHTS AND
MESSAGES
IN AN
EMERGENCY
VEHICLE
MAINTENANCE
TECHNICAL
SPECIFICATIONS
INDEX
DASHBOARD
AND CONTROLS
Only make adjustments
when the vehicle is station-
ary. Specially when revolving the seat,
make sure it is not interfering with the
handbrake lever.
Make sure the outer armrest
(door side) is completely up-
right before unfastening the seat belts
and getting out of the vehicle.
WARNING
Should it be absolutely nec-
essary to carry a child seat
on the front passenger’s seat, make
sure to deactivate the front passen-
ger’s air bag, to fasten the passenger’s
seat belt and to lower completely the
armrests to prevent their accidental
moving.
WARNING
REVOLVING SEAT WITH
INTEGRAL SEAT
BELT (where provided)
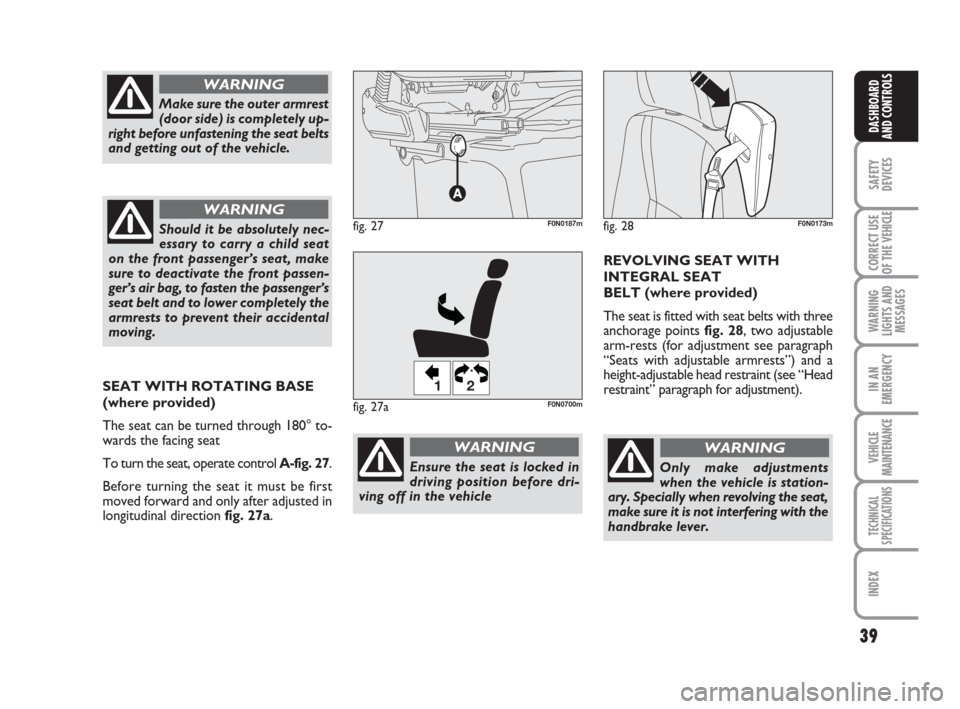
The seat is fitted with seat belts with three
anchorage points fig. 28, two adjustable
arm-rests (for adjustment see paragraph
“Seats with adjustable armrests”) and a
height-adjustable head restraint (see “Head
restraint” paragraph for adjustment).
WARNING
fig. 28F0N0173mfig. 27F0N0187m
Ensure the seat is locked in
driving position before dri-
ving off in the vehicle
WARNING
SEAT WITH ROTATING BASE
(where provided)
The seat can be turned through 180° to-
wards the facing seat
To turn the seat, operate control A-fig. 27.
Before turning the seat it must be first
moved forward and only after adjusted in
longitudinal direction fig. 27a.
fig. 27a
12
F0N0700m
Page 41 of 282
40
SAFETY
DEVICES
CORRECT USE
OF THE
VEHICLE
WARNING
LIGHTS AND
MESSAGES
IN AN
EMERGENCY
VEHICLE
MAINTENANCE
TECHNICAL
SPECIFICATIONS
INDEX
DASHBOARD
AND CONTROLS
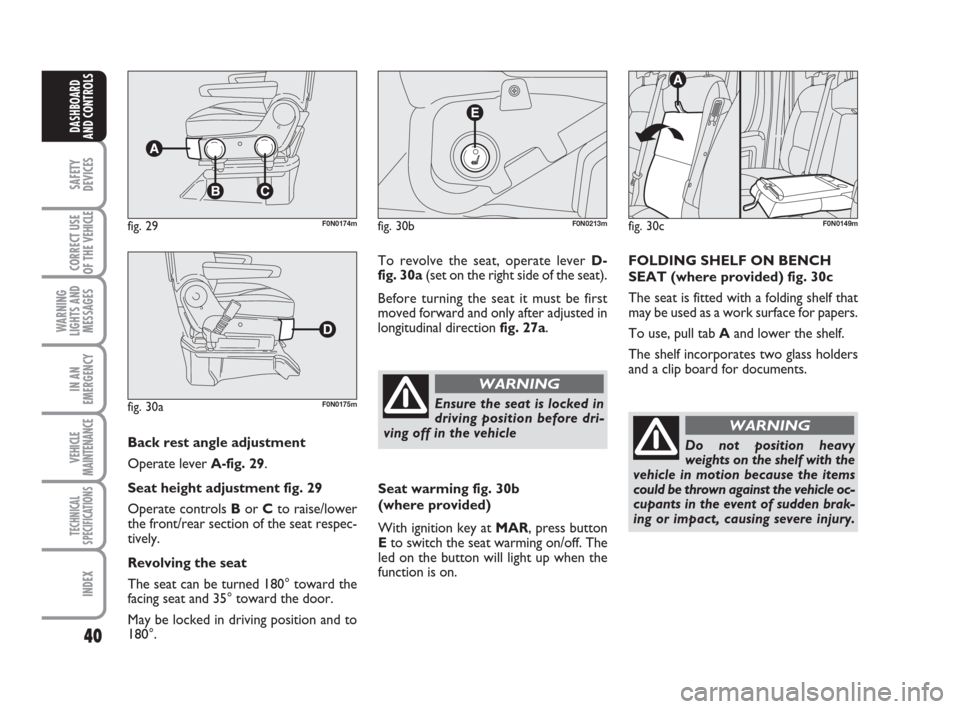
Back rest angle adjustment
Operate lever A-fig. 29.
Seat height adjustment fig. 29
Operate controls Bor Cto raise/lower
the front/rear section of the seat respec-
tively.
Revolving the seat
The seat can be turned 180° toward the
facing seat and 35° toward the door.
May be locked in driving position and to
180°.
fig. 29F0N0174m
fig. 30aF0N0175m
To revolve the seat, operate lever D-
fig. 30a(set on the right side of the seat).
Before turning the seat it must be first
moved forward and only after adjusted in
longitudinal direction fig. 27a.
fig. 30bF0N0213m
Ensure the seat is locked in
driving position before dri-
ving off in the vehicle
WARNING
Seat warming fig. 30b
(where provided)
With ignition key at MAR, press button
Eto switch the seat warming on/off. The
led on the button will light up when the
function is on.
fig. 30cF0N0149m
FOLDING SHELF ON BENCH
SEAT (where provided) fig. 30c
The seat is fitted with a folding shelf that
may be used as a work surface for papers.
To use, pull tab Aand lower the shelf.
The shelf incorporates two glass holders
and a clip board for documents.
Do not position heavy
weights on the shelf with the
vehicle in motion because the items
could be thrown against the vehicle oc-
cupants in the event of sudden brak-
ing or impact, causing severe injury.
WARNING
Page 44 of 282
43
SAFETY
DEVICES
CORRECT USE
OF THE
VEHICLE
WARNING
LIGHTS AND
MESSAGES
IN AN
EMERGENCY
VEHICLE
MAINTENANCE
TECHNICAL
SPECIFICATIONS
INDEX
DASHBOARD
AND CONTROLS
HEAD RESTRAINTS
FRONT fig. 36
On certain versions head restraints are ad-
justable in height and they lock automati-
cally in the required position.
To adjust head restraints
❒to raise: raise the head restraint until
hearing the locking click.fig. 33F0N0229mfig. 34F0N0230m
fig. 35F0N0231m
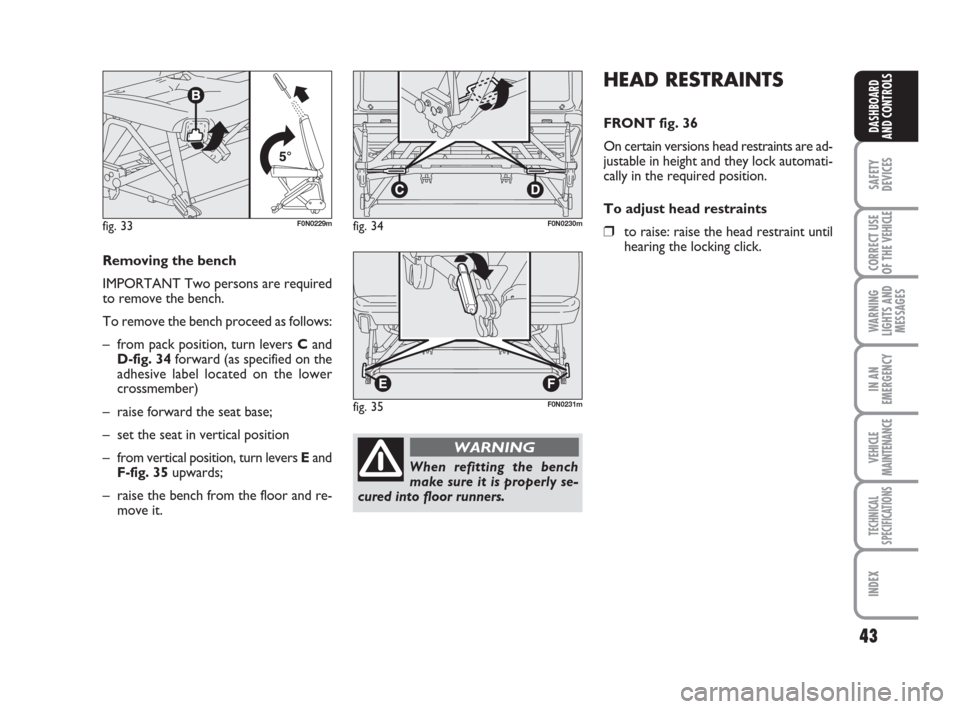
Removing the bench
IMPORTANT Two persons are required
to remove the bench.
To remove the bench proceed as follows:
– from pack position, turn levers Cand
D-fig. 34forward (as specified on the
adhesive label located on the lower
crossmember)
– raise forward the seat base;
– set the seat in vertical position
– from vertical position, turn levers Eand
F-fig. 35upwards;
– raise the bench from the floor and re-
move it.
When refitting the bench
make sure it is properly se-
cured into floor runners.
WARNING
Page 115 of 282
114
CORRECT USE
OF THE
VEHICLE
WARNING
LIGHTS AND
MESSAGES
IN AN
EMERGENCY
VEHICLE
MAINTENANCE
TECHNICAL
SPECIFICATIONS
IINDEX
DASHBOARD
AND CONTROLS
SAFETY
DEVICES
When the vehicle is parked on a steep
slope the reel mechanism may block; this
is normal. The reel mechanism also pre-
vents the webbing coming out when it is
jerked or if the vehicle brakes sharply, is
in a collision or when cornering at high
speed.ADJUSTING THE SEAT BELT
HEIGHT fig. 2
SEAT BELTS
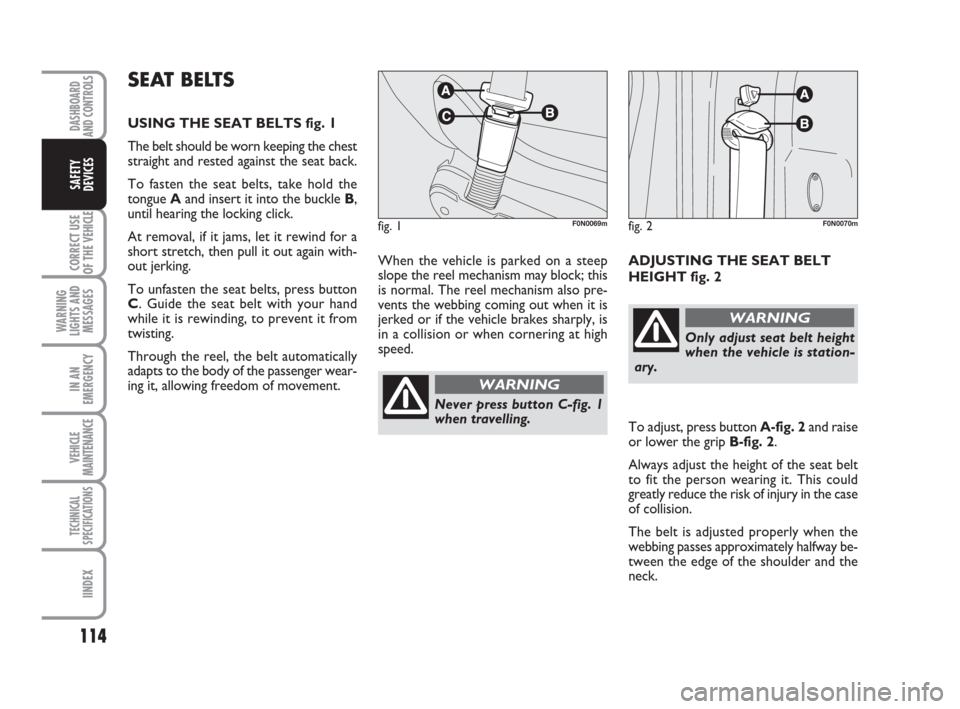
USING THE SEAT BELTS fig. 1
The belt should be worn keeping the chest
straight and rested against the seat back.
To fasten the seat belts, take hold the
tongue Aand insert it into the buckle B,
until hearing the locking click.
At removal, if it jams, let it rewind for a
short stretch, then pull it out again with-
out jerking.
To unfasten the seat belts, press button
C. Guide the seat belt with your hand
while it is rewinding, to prevent it from
twisting.
Through the reel, the belt automatically
adapts to the body of the passenger wear-
ing it, allowing freedom of movement.
fig. 1F0N0069mfig. 2F0N0070m
Never press button C-fig. 1
when travelling.
WARNING
Only adjust seat belt height
when the vehicle is station-
ary.
WARNING
To adjust, press button A-fig. 2and raise
or lower the grip B-fig. 2.
Always adjust the height of the seat belt
to fit the person wearing it. This could
greatly reduce the risk of injury in the case
of collision.
The belt is adjusted properly when the
webbing passes approximately halfway be-
tween the edge of the shoulder and the
neck.
Page 120 of 282

HOW TO KEEP THE SEAT
BELTS ALWAYS IN EFFICIENT
CONDITIONS
Observe the following:
❒always use the belt with the tap taut
and never twisted; make sure that it
is free to run without impediments;
❒after a serious accident, replace the
belt being worn at that time, even if it
does not appear damaged. Always re-
place the seat belts if pretensioners
have been activated;
❒to clean the belts, wash by hand with
neutral soap, rinse and leave to dry in
the shade. Never use strong deter-
gents, bleach or dyes or other chem-
ical substance that might weaken the
fibres;
❒prevent the reels from getting wet:
their correct operation is only guar-
anteed if water does not get inside;
❒replace the seat belt when showing
significant wear or cut signs.For optimal protection in the event of a
crash, all passengers must be seated and
wearing adequate restraint systems.
This is even more important for children.
This prescription is compulsory in all EC
countries according to EC Directive
2003/20/EC.
Compared with adults, their head is pro-
portionally larger and heavier than the rest
of the body, while the muscles and bone
structure are not completely developed.
Therefore, correct restraint systems are
necessary, other than adult seat belts. The
results of research on the best child re-
straint systems are contained in the Euro-
pean Standard EEC-R44. This Standard en-
forces the use of restraint systems classi-
fied in five groups:Group 0 0-10 kg in weight
Group 0+ 0-13 kg in weight
Group 1 9-18 kg in weight
Group 2 15-25 kg in weight
Group 3 22-36 kg in weight
As it may be noted, the groups overlap
partly and in fact, in commerce it is pos-
sible to find devices that cover more than
one weight group.
All restraint devices must bear the certi-
fication data, together with the control
brand, on a solidly fixed label which must
absolutely never be removed.
Over 1.50 m in height, from the point of
view of restraint systems, children are
considered as adults and wear the seat
belts normally.
119
CORRECT USE
OF THE
VEHICLE
WARNING
LIGHTS AND
MESSAGES
IN AN
EMERGENCY
VEHICLE
MAINTENANCE
TECHNICAL
SPECIFICATIONS
INDEX
DASHBOARD
AND CONTROLS
SAFETY
DEVICES
CARRYING CHILDREN SAFELY
Page 169 of 282

168
WARNING
LIGHTS AND
MESSAGES
VEHICLE
MAINTENANCE
TECHNICAL
SPECIFICATIONS
IINDEX
DASHBOARD
AND CONTROLS
SAFETY
DEVICES
CORRECT USE
OF THE
VEHICLE
IN AN
EMERGENCY
WHEN NEEDING TO
CHANGE A BULB
GENERAL INSTRUCTIONS
❒When a light is not working, check
that the corresponding fuse is intact
before changing a bulb. For the loca-
tion of fuses, refer to the paragraph “If
a fuse blows” in this section;
❒Before changing a bulb check the con-
tacts for oxidation;
❒Burnt bulbs must be replaced by oth-
ers of the same type and power;
❒Always check the height of the head-
light beam after changing a bulb.
IMPORTANT The headlight inner surface
may be lightly misted over: this is not a
fault but a natural fact due to low tem-
perature and the level of air humidity. It
will disappear as soon the headlights are
turned on. The presence of drops inside
the headlights means water infiltration,
therefore contact Fiat Dealership.
TYPES OF BULBS
Various types of bulbs are fitted to your
vehicle:
AGlass bulbs: clipped into position. Pull
to remove.BBayonet type bulbs: to remove this
type of bulb from its holder, press the
bulb and turn it counter-clockwise.
CTubular bulbs: release them from
their contacts to remove.
D-EHalogen bulbs: to remove the bulb,
release the clip holding the bulb in
place. Halogen bulbs must be han-
dled touching only the metal-
lic part. If the transparent bulb
is touched with the fingers, its
lighting intensity is reduced and life of
the bulb may be compromised. If
touched accidentally, rub the bulb with
a cloth moistened with alcohol and al-
low to dry.
Modifications or repairs to
the electrical system (elec-
tronic control units) carried out in-
correctly and without bearing the fea-
tures of the system in mind can cause
malfunctions with the risk of fire.
WARNING
Halogen bulbs contain pres-
surised gas which, if broken,
may cause small fragments of glass to
be projected outwards.
WARNING
fig. 18F0N0078m