Page 78 of 532

DefrosterCheck operation by selecting the defrost mode and place
the blower control on high speed. You should be able to
feel the air directed against the windshield. See your
authorized dealer for service if your defroster is
inoperable.Periodic Safety Checks You Should Make Outside
the Vehicle
TiresExamine tires for excessive tread wear and uneven wear
patterns. Check for stones, nails, glass, or other objects
lodged in the tread. Inspect the tread and sidewall for
cuts and cracks. Check the wheel nuts for tightness.
Check the tires (including spare) for proper pressure.
LightsHave someone observe the operation of exterior lights
while you work the controls. Check turn signal and high
beam indicator lights on the instrument panel.Door LatchesCheck for positive closing, latching, and locking.Fluid LeaksCheck area under vehicle after overnight parking for fuel,
engine coolant, oil, or other fluid leaks. Also, if gasoline
fumes are detected or if fuel, power steering fluid, or
brake fluid leaks are suspected, the cause should be
located and corrected immediately.
76 THINGS TO KNOW BEFORE STARTING YOUR VEHICLE
Page 367 of 532
Dual Rear WheelsThe tires used on dual wheel assemblies should be
matched for wear to prevent overloading one tire in a set.
To check if tires are even, lay a straight edge across all
four tires. The straight edge should touch all the tires.
CAUTION!
3500 Dual Rear Tires have only one approved direc-
tion of rotation. This is to accommodate the asym-
metrical design (tread pattern) of the ON/OFF road
tire and the use of Outline White Letter (OWL) tires.•
When replacing a flat, the spare tire may have to
be remounted on the rim, or installed at a different
location, to maintain the correct placement of the
tire on the wheel relative to the tire/wheel position
on the truck. For example, if the spare is used to
replace an outer rear tire it will have to be re-
mounted on the rim so that the wheel is dished
inward. That way the tread design of asymmetrical
tires and the white writing of the OWL tires will
maintain proper position.
STARTING AND OPERATING 365
5
Page 375 of 532

Tire Pressure Monitoring Low Pressure Warnings
The “Tire Pressure Monitoring Telltale Light” will
illuminate in the instrument cluster, and an au-
dible chime will be activated when one or more of
the four active road tire pressures are low. Should this
occur, you should stop as soon as possible, check the
inflation pressure of each tire on your vehicle and inflate
each tire to the vehicle’s recommended cold placard
pressure value. The system will automatically update
and the “Tire Pressure Monitoring Telltale Light” will
extinguish once the updated tire pressures have been
received. The vehicle may need to be driven for up to
20 minutes above 15 mph (25 km/h) to receive this
information.
Check TPMS WarningsThe “Tire Pressure Monitoring Telltale Light” (located in
the instrument cluster) will flash on and off for 75 sec-
onds and will remain on solid when a system fault is
detected. The system fault will also sound a chime. If the ignition key is cycled, this sequence will repeat, provid-
ing the system fault still exists. A system fault can occur
by any of the following scenarios:
1. Signal interference due to electronic devices or driving
next to facilities emitting the same Radio Frequencies as
the TPM sensors.
2. Installing aftermarket window tinting that affects ra-
dio wave signals.
3. Accumulation of snow or ice around the wheels or
wheel housings.
4. Using tire chains on the vehicle.
5. Using wheels/tires not equipped with TPM sensors.
6. Loss of communication with the trigger modules or
tire pressure monitoring sensors.
NOTE: Your vehicle is equipped with a non-matching
full size spare wheel and tire assembly.
STARTING AND OPERATING 373
5
Page 407 of 532
WHAT TO DO IN EMERGENCIES
CONTENTS�Hazard Warning Flasher ............... 406
� Jacking Instructions ................... 407
▫ Jack Location ...................... 407
▫ Removing The Spare Tire ............. 408
▫ Tire Changing Procedure .............. 409
▫ Preparations ....................... 409
▫ Instructions ....................... 410
▫ Hub Caps/Wheel Covers ............. 414�
Hoisting ........................... 418
� Jump-Starting Procedures ............... 419
� Freeing A Stuck Vehicle ................ 421
� Emergency Tow Hooks — If Equipped ..... 422
� Towing A Disabled Vehicle .............. 422
▫ 4-Wheel Drive Vehicles ............... 423
▫ 2–Wheel Drive Vehicles ............... 423
6
Page 410 of 532
Removing The Spare TireRemove the spare tire before attempting to jack the truck.
Attach the wheel wrench to the jack extension tube. Insert
the tube through the access hole between the lower
tailgate and the top of the bumper and into the winch
mechanism tube. Rotate the wheel wrench handle coun-
terclockwise until the spare tire is on the ground with
enough cable slack to allow you to pull it out from under
the vehicle. When the spare is clear, tilt the retainer at the
end of the cable and pull it through the center of the
wheel.
NOTE:Always stow the spare tire with the valve stem
facing the ground.
It is recommended that you stow the flat or spare to
avoid tangling the loose cable.
Removing the Spare Tire
1 — Lower
2 — Raise
408 WHAT TO DO IN EMERGENCIES
Page 413 of 532
WARNING! (Continued)
•
Do not get under the vehicle when it is on a jack.
•
Only use the jack in the positions indicated and
for lifting this vehicle during a tire change.
•
If working on or near a roadway, be extremely
careful of motor traffic.
•
To assure that spare tires, flat or inflated, are
securely stowed, spares must be stowed with the
valve stem facing the ground.
•
Turn on the Hazard Warning flasher.
1. Remove the spare wheel, jack, and tools from storage. 2. Using the wheel wrench, loosen, but do not remove,
the wheel nuts by turning them counterclockwise one
turn while the wheel is still on the ground.
3. Placement of the Jack:
•
For 2500/3500 4x2 series trucks, when changing a
front wheel, place the bottle jack under the frame
rail behind the wheel. Locate the jack as far forward
as possible on the straight part of the frame.
Jack Warning Label
4x2 Jacking Location
WHAT TO DO IN EMERGENCIES 411
6
Page 415 of 532

•
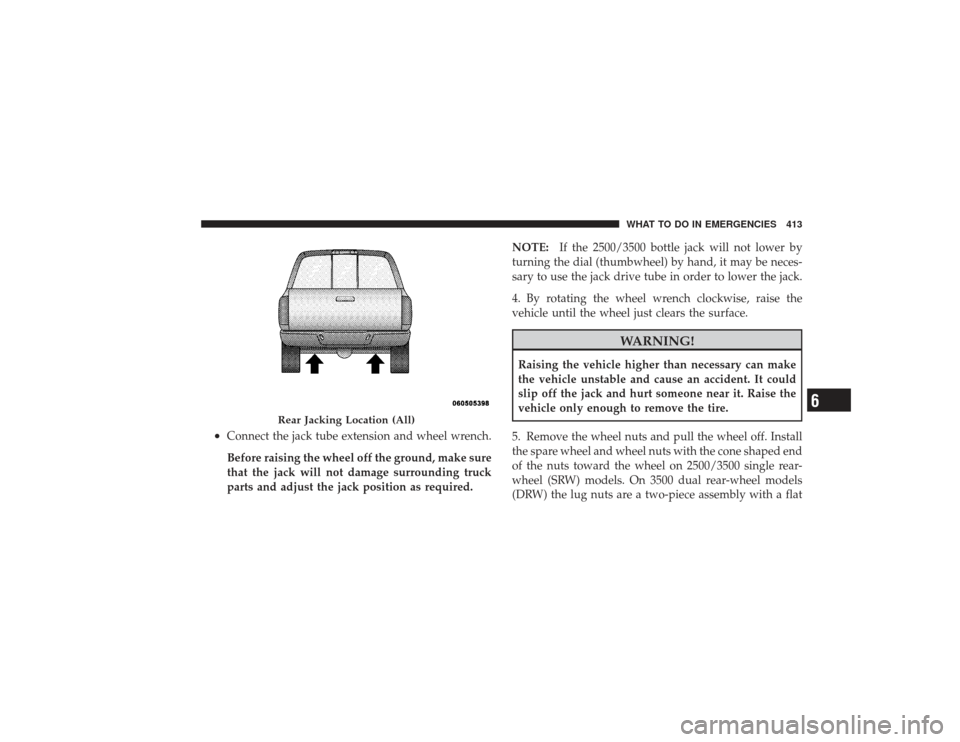
Connect the jack tube extension and wheel wrench.
Before raising the wheel off the ground, make sure
that the jack will not damage surrounding truck
parts and adjust the jack position as required.NOTE:
If the 2500/3500 bottle jack will not lower by
turning the dial (thumbwheel) by hand, it may be neces-
sary to use the jack drive tube in order to lower the jack.
4. By rotating the wheel wrench clockwise, raise the
vehicle until the wheel just clears the surface.
WARNING!
Raising the vehicle higher than necessary can make
the vehicle unstable and cause an accident. It could
slip off the jack and hurt someone near it. Raise the
vehicle only enough to remove the tire.
5. Remove the wheel nuts and pull the wheel off. Install
the spare wheel and wheel nuts with the cone shaped end
of the nuts toward the wheel on 2500/3500 single rear-
wheel (SRW) models. On 3500 dual rear-wheel models
(DRW) the lug nuts are a two-piece assembly with a flat
Rear Jacking Location (All)
WHAT TO DO IN EMERGENCIES 413
6
Page 416 of 532

face. Lightly tighten the nuts. To avoid risk of forcing the
vehicle off the jack, do not fully tighten the nuts until the
vehicle has been lowered.
6. Using the wheel wrench, finish tightening the nuts
using a crisscross pattern. The correct nut tightness is
135 ft lbs (183 N·m) torque for 2500/3500 single-rear
wheel (SRW) models, and 145 ft lbs (197 N·m) for 3500
dual rear-wheel models. If in doubt about the correct
tightness, have them checked with a torque wrench by
your authorized dealer or at a service station.
WARNING!
A loose tire or jack thrown forward in a collision or
hard stop could injure someone in the vehicle. Al-
ways stow the jack parts and the extra tire and wheel
in the places provided.7. Install wheel center cap and remove wheel blocks. Do
not install chrome or aluminum wheel center caps on the
spare wheel. This may result in cap damage.
8. Lower the jack to its fully closed position. If the bottle
jack will not lower by turning the dial (thumbwheel) by
hand, it may be necessary to use the jack drive tube in
order to lower the jack. Stow the replaced tire, jack, and
tools as previously described.
9. Adjust the tire pressure when possible.
NOTE:
Do not oil wheel studs. For chrome wheels, do
not substitute with chrome plated wheel nuts.
Hub Caps/Wheel CoversThe hub caps must be removed before raising the vehicle
off the ground.
For 2500/3500 single rear-wheel (SRW) models, use the
blade on the end of the lug wrench to pry the hub cap off.
414 WHAT TO DO IN EMERGENCIES