Page 79 of 532
UNDERSTANDING THE FEATURES OF YOUR VEHICLE
CONTENTS�Mirrors ............................. 82
▫ Inside Day/Night Mirror .............. 82
▫ Automatic Dimming Mirror — If Equipped . 82
▫ Outside Mirrors ..................... 83
▫ Outside Mirrors Folding Feature ......... 84
▫ Power Mirrors — If Equipped ........... 84
▫ Heated Mirrors — If Equipped .......... 85
▫ Trailer Towing Mirrors — If Equipped ..... 85�
uconnect� phone — If Equipped ........... 86
▫ Operation ......................... 88
▫ Phone Call Features .................. 96
▫ uconnect� phone Features .............. 99
▫ Advanced Phone Connectivity .......... 104
▫ Things You Should Know About Your
uconnect� phone..................... 106
▫ General Information ................. 114
3
Page 87 of 532
Heated Mirrors — If Equipped
These mirrors are heated to melt frost or ice. This
feature is activated whenever you turn on the rear
window defroster. Refer to “Rear Window Features” in
this section, for further information.
Trailer Towing Mirrors — If EquippedThese mirrors are designed with an adjustable mirror
head to provide a greater vision range when towing
extra-wide loads. To change position inboard or out-
board, the mirror head should be rotated (flipped in or
out).
Power Mirror Movement
Trailer Towing Position
UNDERSTANDING THE FEATURES OF YOUR VEHICLE 85
3
Page 88 of 532

NOTE:Fold the trailer towing mirrors rearward prior to
entering an automated car wash.
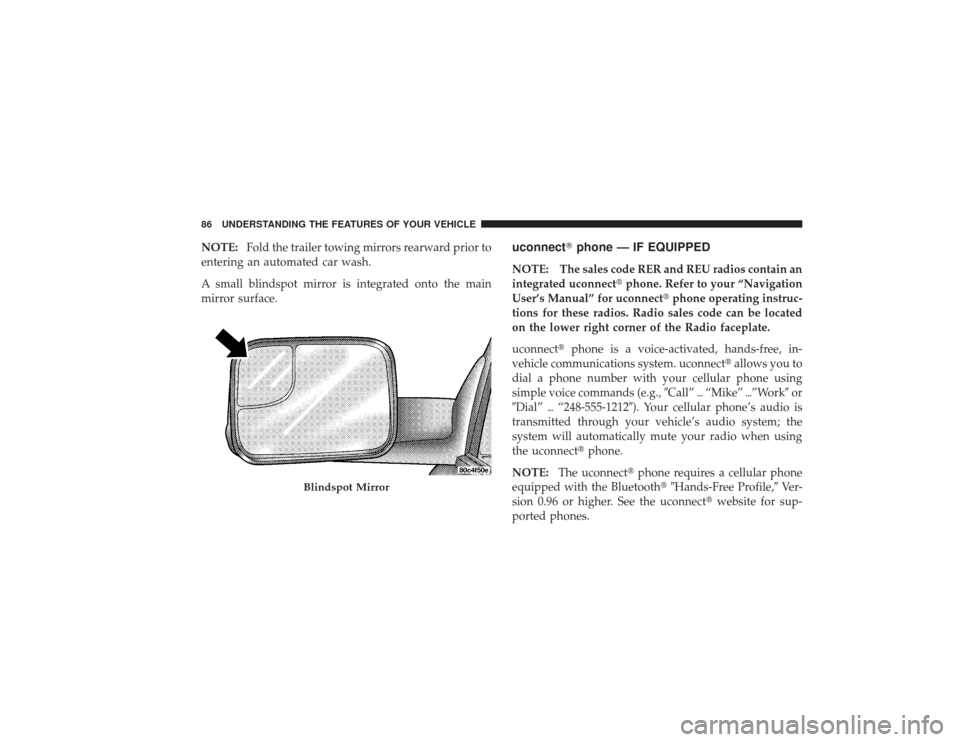
A small blindspot mirror is integrated onto the main
mirror surface.
uconnect� phone — IF EQUIPPEDNOTE: The sales code RER and REU radios contain an
integrated uconnect� phone. Refer to your “Navigation
User’s Manual” for uconnect� phone operating instruc-
tions for these radios. Radio sales code can be located
on the lower right corner of the Radio faceplate.
uconnect� phone is a voice-activated, hands-free, in-
vehicle communications system. uconnect� allows you to
dial a phone number with your cellular phone using
simple voice commands (e.g., �Call”�“Mike” �”Work� or
�Dial” �“248-555-1212�). Your cellular phone’s audio is
transmitted through your vehicle’s audio system; the
system will automatically mute your radio when using
the uconnect� phone.
NOTE: The uconnect� phone requires a cellular phone
equipped with the Bluetooth�� Hands-Free Profile,�Ve r -
sion 0.96 or higher. See the uconnect �website for sup-
ported phones.
Blindspot Mirror
86 UNDERSTANDING THE FEATURES OF YOUR VEHICLE
Page 103 of 532

Towing AssistanceIf you need towing assistance:•
Press the PHONE button to begin.
•
After the�Ready�prompt and the following beep, say
�Towing Assistance.�
NOTE:
•
The towing assistance number dialed is based on the
country where the vehicle is purchased (1-800-528-
2069 for the U.S., 1-877-213-4525 for Canada, 55-14-
3454 for Mexico City and 1-800-712-3040 for outside
Mexico City in Mexico).
•
If supported, this number may be programmable on
some systems. To do this, press the PHONE button
and say “Setup”, followed by “Towing Assistance”.
PagingTo learn how to page, refer to �Working with Automated
Systems.� Paging works properly except for pagers of
certain companies, which time out a little too soon to
work properly with the uconnect� phone.Voice Mail CallingTo learn how to access your voice mail, refer to �Working
with Automated Systems.�Working with Automated SystemsThis method is used in instances where one generally has
to press numbers on the cellular phone keypad while
navigating through an automated telephone system.
You can use your uconnect� phone to access a voice mail
system or an automated service, such as a paging service
or automated customer service line. Some services re-
quire immediate response selection. In some instances,
that may be too quick for use of the uconnect� phone.UNDERSTANDING THE FEATURES OF YOUR VEHICLE 101
3
Page 115 of 532
Voice Commands
Primary Alternate(s)
language
list names
list phones
mobile
mute
mute off
new entry
no
pager
pair a phone
phone pairing pairing
phonebook phone book
previous
record again
redial
Voice Commands
Primary Alternate(s)
return to main menu return or main menu
select phone select
send
set up phone settings or phone set up
towing assistance
transfer call
uconnect� Tutorial
try again
voice training
work
yes
UNDERSTANDING THE FEATURES OF YOUR VEHICLE 113
3
Page 146 of 532

is tapped, speed increases so that tapping the button
three times will increase speed by 3 mph (4.8 km/h).
Tapping the SET DECEL button once will result in a
1 mph (2 km/h) speed decrease. Each time the button is
tapped, speed decreases. For example, tapping the button
three times will decrease the speed by 3 mph (4.8 km/h)
To decrease speed while speed control is ON, push down
and hold SET DECEL. Release the lever when the desired
speed is reached, and the new speed will be set.To Accelerate for PassingDepress the accelerator as you would normally. When the
pedal is released, the vehicle will return to the set speed.
NOTE:When driving uphill, at elevations above 2,000 ft
(610 m), or when the vehicle is heavily loaded (especially
when towing) the vehicle may slow below the SET speed.
If the vehicle speed drops below 25 mph (40 km/h), the
speed control will automatically disengage. If this hap- pens, you can push down on the accelerator pedal to
maintain the desired speed.
Vehicles may exhibit several downshifts under the above
conditions. To reduce the frequency of the downshifts
and to improve vehicle performance, it is advisable to use
either TOW HAUL or O/D OFF modes, which can be
selected by pressing the TOW HAUL O/D OFF button
located at the end of the shift lever.
WARNING!
Electronic Speed Control can be dangerous where the
system cannot maintain a constant speed. Your ve-
hicle could go too fast for the conditions, and you
could lose control. An accident could be the result.
Do not use Electronic Speed Control in heavy traffic
or on roads that are winding, icy, snow-covered or
slippery.
144 UNDERSTANDING THE FEATURES OF YOUR VEHICLE
Page 192 of 532

9. Oil Pressure Gauge — Premium Cluster OnlyThe pointer should always indicate some oil pres-
sure when the engine is running. A continuous
high or low reading, under normal driving conditions,
may indicate a lubrication system malfunction. Immedi-
ate service should be obtained from an authorized dealer.
NOTE: If the gauge pointer moves to either extreme of
the gauge, the “Check Gauges” indicator will illuminate
and a single chime will sound.
10. Transfer Case Position
This display indicator shows the transfer case position
selection.
For additional information refer to “4-Wheel Drive Op-
eration” in section 5 of this manual. 11. TOW HAUL
The TOW HAUL button is located at the end of
the gear shift lever. This light will illuminate
when the TOW HAUL OD/OFF button is
pushed once.
12. OD/OFF
The OD/OFF button is located at the end of the gear shift
lever. This light will illuminate when the TOW HAUL
OD/OFF button is pushed twice.
13. Temperature Gauge The temperature gauge shows engine coolant tem-
perature. Any reading within the normal range
indicates that the engine cooling system is operat-
ing satisfactorily.
The gauge pointer will likely indicate a higher tempera-
ture when driving in hot weather, up mountain grades,
or when towing a trailer. It should not be allowed to
exceed the upper limits of the normal operating range.190 UNDERSTANDING YOUR INSTRUMENT PANEL
Page 196 of 532

18. Malfunction Indicator Light (MIL)The Malfunction Indicator Light (MIL) is part of
an onboard diagnostic system, called OBD II, that
monitors engine and automatic transmission con-
trol systems. The light will illuminate when the key is in
the ON position, before engine start. If the bulb does not
come on when turning the key from OFF to ON, have the
condition checked promptly.
Certain conditions such as a loose or missing gas cap,
poor fuel quality, etc., may illuminate the MIL after
engine start. The vehicle should be serviced if the light
stays on through several of your typical driving cycles. In
most situations, the vehicle will drive normally and will
not require towing.
If the MIL flashes when the engine is running, serious
conditions may exist that could lead to immediate loss of
power or severe catalytic converter damage. The vehicle
should be serviced as soon as possible if this occurs. 19. Brake Warning Light
This light monitors various brake functions,
including brake fluid level and parking brake
application. If the brake light turns on, it may
indicate that the parking brake is applied, that
the brake fluid level is low, or that there is a problem with
the anti-lock brake system reservoir.
If the light remains on when the parking brake has been
disengaged, and the fluid level is at the full mark on the
master cylinder reservoir, it indicates a possible brake
hydraulic system malfunction or that a problem with the
Brake Booster has been detected by the Anti-Lock Brake
System (ABS) / Electronic Stability Program (ESP) sys-
tem. In this case, the light will remain on until the
condition has been corrected. If the problem is related to
the brake booster, the ABS pump will run when applying
the brake and a brake pedal pulsation may be felt during
each stop.194 UNDERSTANDING YOUR INSTRUMENT PANEL