Page 92 of 469

Three-Way Calling
To initiate three-way calling, press the VOICE RECOG-
NITION button while a call is in progress, and make a
second phone call, as described under�Making a Second
Call While Current Call is in Progress.�After the second
call has established, press and hold the PHONE button
until you hear a double beep, indicating that the two calls
have been joined into one conference call.
Call Termination
To end a call in progress, momentarily press the PHONE
button. Only the active call(s) will be terminated and if
there is a call on hold, it will become the new active call.
If the active call is terminated by the far end, a call on
hold may not become active automatically. This is cell
phone-dependent. To bring the call back from hold, press
and hold the PHONE button until you hear a single beep.
Redial
•
Press the PHONE button to begin.
•After the�Ready�prompt and the following beep, say
�Redial.�
•The uconnect�phone will call the last number that
was dialed from your cellular phone.
NOTE:This may not be the last number dialed from the
uconnect�phone.
Call Continuation
Call continuation is the progression of a phone call on the
uconnect�phone after the vehicle ignition key has been
switched to OFF. Call continuation functionality avail-
able on the vehicle can be any one of three types:
•After the ignition key is switched to OFF, a call can
continue on the uconnect�phone either until the call
ends, or until the vehicle battery condition dictates
cessation of the call on the uconnect�phone and
transfer of the call to the cellular phone.
90 UNDERSTANDING THE FEATURES OF YOUR VEHICLE
Page 97 of 469
.
•")
Turning Confirmation Prompts ON/OFF
Turning confirmation prompts off will stop the system
from confirming your choices (e.g., the uconnect�phone
will not repeat a phone number before you dial it).
•Press the PHONE button to begin.
•After the�Ready�prompt and the following beep, say
�Setup Confirmations.�The uconnect�phone will play
the current confirmation prompt status and you will
be given the choice to change it.
Phone and Network Status Indicators
If available on the radio and/or on a premium display
such as the instrument panel cluster, and supported by
your cellular phone, the uconnect�phone will provide
notification to inform you of your phone and network
status when you are attempting to make a phone call
using uconnect�phone. The status is given for roaming,
network signal strength, phone battery strength, etc.
Dialing Using the Cellular Phone Keypad
You can dial a phone number with your cellular phone
keypad and still use the uconnect�phone (while dialing
via the cellular phone keypad, the user must exercise
caution and take precautionary safety measures). By
dialing a number with your paired Bluetooth�cellular
phone, the audio will be played through your vehicle’s
audio system. The uconnect�phone will work the same
as if you dial the number using voice recognition.
NOTE:Certain brands of cellular phones do not send
the dial ring to the uconnect�phone to play it on the
vehicle audio system, so you will not hear it. Under this
situation, after successfully dialing a number the user
may feel that the call did not go through even though the
call is in progress. Once your call is answered, you will
hear the audio.
3
UNDERSTANDING THE FEATURES OF YOUR VEHICLE 95
Page 125 of 469

High Beam/Low Beam Select Switch
Push the multifunction lever away from you to switch
the headlights to high beam. Pull the multifunction lever
toward you to switch the headlights back to low beam.
Flash-to-Pass
You can signal another vehicle with your headlights by
lightly pulling the multifunction lever toward you. This
will turn on the high beam headlights until the lever is
released.
Overhead Console Map/Reading Lights
These lights are mounted between the sun visors on the
overhead console. Each light is turned on by pressing the
lens. Press the lens a second time to turn off the light.
These lights also turn on when a door is opened, or when
the UNLOCK button on the Remote Keyless Entry (RKE)
transmitter is pressed, or when the dimmer control is
turned fully upward, past the second detent.
Interior Lights
The interior lights come on when a door is opened.
To protect the battery, the interior lights will turn off
automatically 10 minutes after the ignition switch is
moved to the LOCK position. This will occur if the
interior lights were switched on manually or are on
Overhead Console
3
UNDERSTANDING THE FEATURES OF YOUR VEHICLE 123
Page 135 of 469
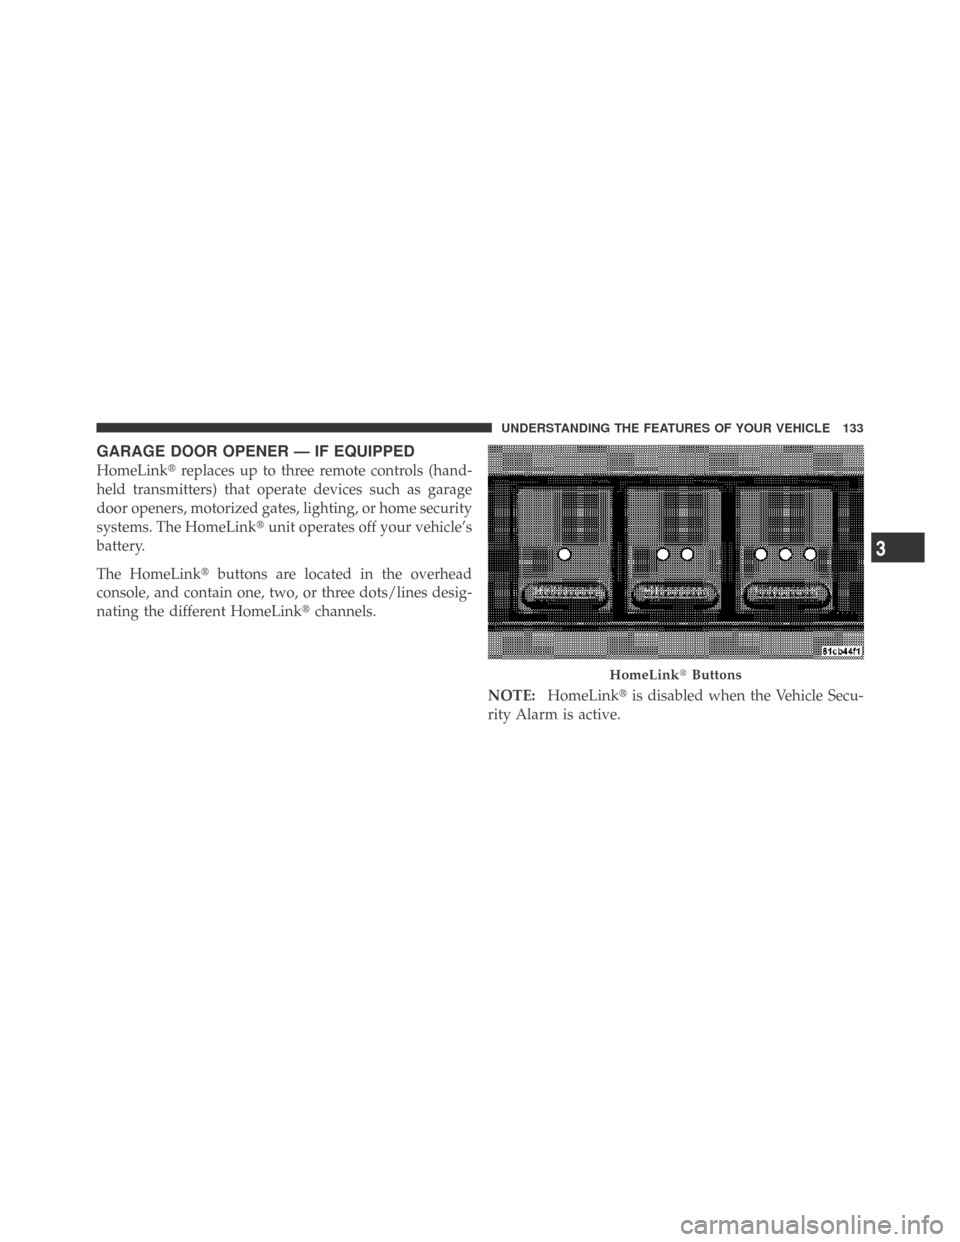
GARAGE DOOR OPENER — IF EQUIPPED
HomeLink�replaces up to three remote controls (hand-
held transmitters) that operate devices such as garage
door openers, motorized gates, lighting, or home security
systems. The HomeLink�unit operates off your vehicle’s
battery.
The HomeLink�buttons are located in the overhead
console, and contain one, two, or three dots/lines desig-
nating the different HomeLink�channels.
NOTE:HomeLink�is disabled when the Vehicle Secu-
rity Alarm is active.
HomeLink�Buttons
3
UNDERSTANDING THE FEATURES OF YOUR VEHICLE 133
Page 136 of 469

WARNING!
•Your motorized door or gate will open and close
while you are training the Universal Transceiver.
Do not train the transceiver if people or pets are in
the path of the door or gate. Only use this trans-
ceiver with a garage door opener that has a “stop
and reverse” feature as required by federal safety
standards. This includes most garage door opener
models manufactured after 1982. Do not use a
garage door opener without these safety features.
Call toll-free 1–800–355–3515 or, on the Internet at
www.HomeLink.com for safety information or as-
sistance.
•Vehicle exhaust contains carbon monoxide, a dan-
gerous gas. Do not run your vehicle in the garage
while training the transceiver. Exhaust gas can
cause serious injury or death.
Programming HomeLink�
Before You Begin
If you have not trained any of the HomeLink�buttons,
erase all channels before you begin training.
To do this, press and hold the two outside buttons for up
to 20 seconds. The EVIC will display “CLEARING
CHANNELS.” Release the buttons when the EVIC mes-
sage states “CHANNELS CLEARED.”
It is recommended that a new battery be placed in the
hand-held transmitter of the device being programmed
to HomeLink�for more efficient training and accurate
transmission of the radio-frequency signal.
Your vehicle should be parked outside of the garage
while training.
1. Turn the ignition switch to the ON/RUN position.
134 UNDERSTANDING THE FEATURES OF YOUR VEHICLE
Page 137 of 469

from the HomeLink�buttons while keeping the EVIC
display in view.
For optimal training, point the battery end of the hand-
held transmitter awa")
2. Place the hand-held transmitter 1 to 3 in (3 to 8 cm)
from the HomeLink�buttons while keeping the EVIC
display in view.
For optimal training, point the battery end of the hand-
held transmitter away from the HomeLink�.
3. Simultaneously, press and hold both the chosen
HomeLink�button and the hand-held transmitter button
until the EVIC display changes from “CHANNEL #
TRAINING” to “CHANNEL # TRAINED.”
Then release both the HomeLink�and hand-held trans-
mitter buttons.
If the EVIC display states “DID NOT TRAIN” repeat
Step 3. If the signal is too weak, replace the battery in the
original hand-held transmitter.
It may take up to 30 seconds, or longer, in rare cases. The
garage door may open and close while you train.NOTE:Some gate operators and garage door openers
may require you to replace Step 3 with procedures noted
in the “Gate Operator/Canadian Programming” section.
4. Press and hold the just-trained HomeLink�button. If
the channel has been trained, the EVIC display will now
state “CHANNEL # TRANSMIT.”
If the EVIC display still states “CHANNEL # TRAIN-
ING” repeat Step 3.
NOTE:After training a HomeLink�channel, if the
garage door does not operate with HomeLink�and the
garage door opener was manufactured after 1995, the
garage door opener may have rolling code. If so, proceed
to the heading “Programming A Rolling Code System.”
5. PROGRAMMING A ROLLING CODE SYSTEM
At the garage door opener motor (in the garage), locate
the “learn” or “training” button.
3
UNDERSTANDING THE FEATURES OF YOUR VEHICLE 135
Page 140 of 469

Reprogramming A Single HomeLink�Button
To reprogram a channel that has been previously trained,
follow these steps:
1. Turn the ignition switch to the ON/RUN position.
2. Press and hold the desired HomeLink�button for
20 seconds until the EVIC display states “CHANNEL #
TRAINING.”Do not release the button.
3.Without releasing the button,proceed with Program-
ming HomeLink�Step 2 and follow all remaining steps.
Security
It is advised to erase all channels before you sell or turn
in your vehicle.
To do this, press and hold the two outside buttons for
20 seconds until the EVIC message states “CHANNELS
CLEARED.” Note that all channels will be erased. Indi-
vidual channels cannot be erased.The HomeLink�Universal Transceiver is disabled when
the Vehicle Security Alarm is active.
Troubleshooting Tips
If you are having trouble programming HomeLink�, here
are some of the most common solutions:
•Replace the battery in the original transmitter.
•Press the learn button on the garage door opener to
complete the training for rolling code.
•Did you unplug the device for training, and remember
to plug it back in?
If you are having any problems or require assistance,
please call toll-free 1–800–355–3515 or, on the Internet at
www.HomeLink.com for information or assistance.
138 UNDERSTANDING THE FEATURES OF YOUR VEHICLE
Page 145 of 469
The center console power outlet is powered directly from
the battery (power available at all times). Items plugged
into this power outlet may discharge the battery and/or
prevent the engine from starting.
WARNING!
To avoid serious injury or death:
•Do not use a three-prong adapter.
•Do not insert any objects into the receptacles.
•Do not touch with wet hands.
•Close the lid when not in use and while driving
the vehicle.
•If this outlet is mishandled, it may cause an
electric shock and failure.
Front Power Outlet
3
UNDERSTANDING THE FEATURES OF YOUR VEHICLE 143
. Items plugged
into this power outlet may discharge the battery and/or
prevent the engine from start")