2009 DODGE CARAVAN spare wheel
[x] Cancel search: spare wheelPage 419 of 534
WARNING!
Getting under a jacked-up vehicle is dangerous. The
vehicle could slip off the jack and fall on you. You
could be crushed. Never get any part of your body
under a vehicle that is on a jack. If you need to get
under a raised vehicle, take it to a service center
where it can be raised on a lift.
NOTE:If either front tire is flat, it may be necessary to
jack up the vehicle to remove the compact spare tire/
cover assembly from under the vehicle. Refer to jack
engagement locations in the following steps for proper
jack placement.
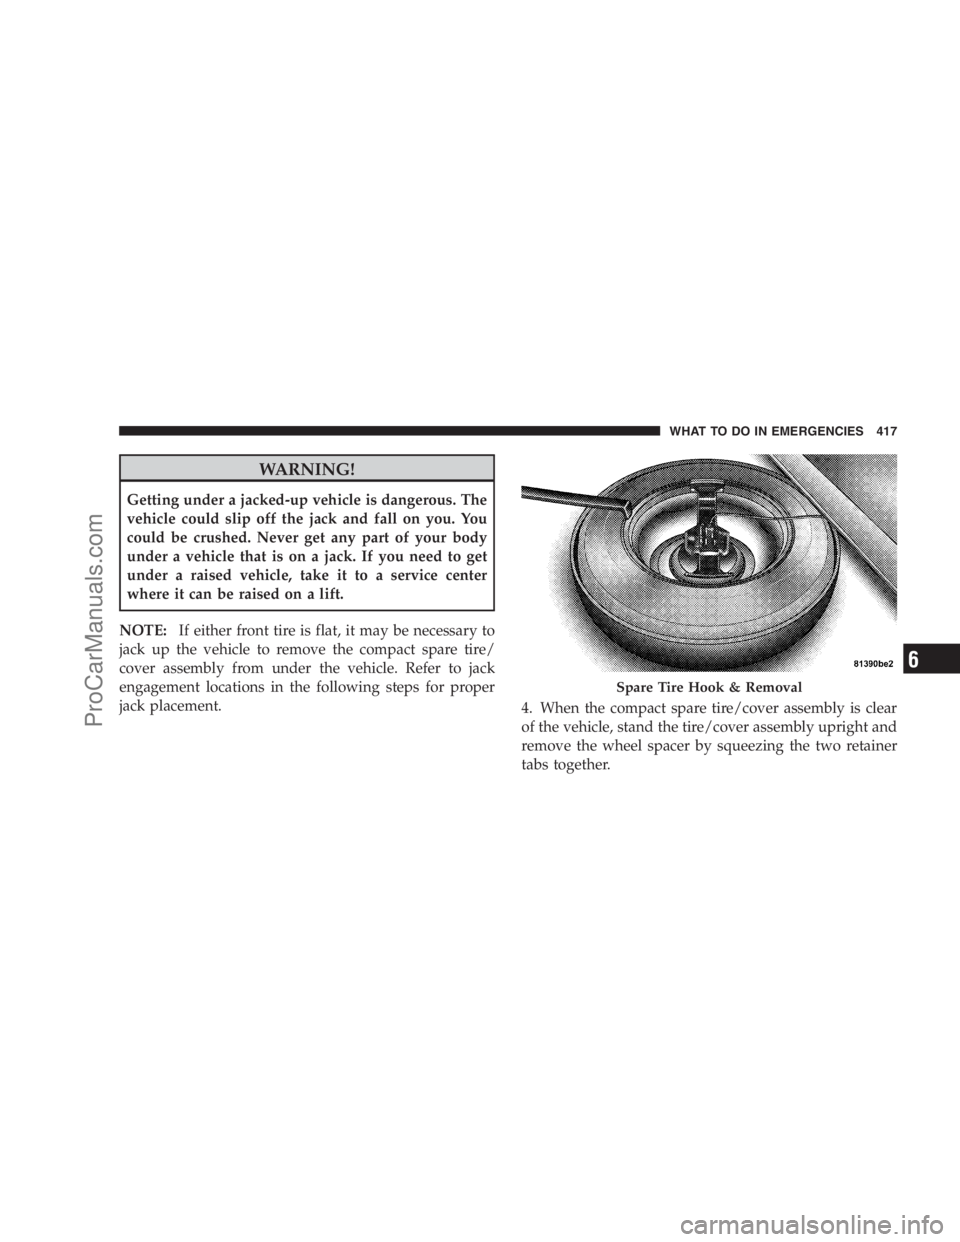
4. When the compact spare tire/cover assembly is clear
of the vehicle, stand the tire/cover assembly upright and
remove the wheel spacer by squeezing the two retainer
tabs together.
Spare Tire Hook & Removal
WHAT TO DO IN EMERGENCIES 417
6
ProCarManuals.com
Page 422 of 534
CAUTION!
Do not attempt to raise the vehicle by jacking on
locations other than those indicated in Step 5.
6. Place the wrench on the jack screw and turn to the
right until the jack head is properly engaged in the
described location.Do not raise the vehicle until you are
sure the jack is securely engaged.
7. Raise the vehicle by turning the jack screw to the right,
using the swivel wrench. Raise the vehicle only until the
tire just clears the surface and enough clearance is
obtained to install the spare tire. Minimum tire lift
provides maximum stability.
WARNING!
Raising the vehicle higher than necessary can make
the vehicle less stable. It could slip off the jack and
hurt someone near it. Raise the vehicle only enough
to remove the tire.
8. Remove the wheel lug nuts, for vehicles with wheel
covers, remove the cover from the wheel by hand. Do not
pry the wheel cover off. Then pull the wheel off the hub.
9. Install the compact spare tire. Lightly tighten the lug
nuts. To avoid the risk of forcing the vehicle off the jack,
do not tighten the lug nuts fully until the vehicle has been
lowered.
NOTE:
•Do not install the wheel cover on the compact spare.
•Do not use a hammer or force to install the wheel
covers.
420 WHAT TO DO IN EMERGENCIES
ProCarManuals.com
Page 423 of 534
10. Lower the vehicle by turning the jack screw to the
left.
11. Finish tightening the lug nuts. Push down on the
wrench while tightening for increased leverage. Alternate
lug nuts until each nut has been tightened twice. Correct
wheel nut tightness is 95 ft lbs (130 N·m). If in doubt
about the correct tightness, have them checked with a
torque wrench by your authorized dealer or at a service
station.
12. Lower the jack to its fully-closed position.
WARNING!
A loose tire or jack thrown forward in a collision or
hard stop could endanger the occupants of the ve-
hicle. Always stow the jack parts and the spare tire in
the places provided. Have the deflated (flat) tire
repaired or replaced immediately.13. Place the deflated (flat) tire and compact spare tire
cover assembly. in the rear cargo area.Do not stow the
deflated tire in the spare tire location.Have the full-
sized tire repaired or replaced, as soon as possible.
14. Stow the cable and wheel spacer before driving the
vehicle. Reassemble the winch handle extensions to form
a “T” and fit the winch “T” handle over the drive nut.
Rotate the nut to the right until the winch mechanism
clicks at least three times.
15. Stow the jack, jack handle and winch handle tools.
16. Check the compact spare tire pressure as soon as
possible. Correct the pressure, as required.Wheel Nuts
All wheel nuts should be tightened occasionally, to
eliminate the possibility of wheel studs being sheared or
the bolt holes in the wheels becoming elongated. This is
especially important during the first few hundred miles
WHAT TO DO IN EMERGENCIES 421
6
ProCarManuals.com
Page 424 of 534
of operation, and after each time a tire is changed, to
allow the wheel nuts to become properly set. All nuts
should first be firmly seated against the wheel. The nuts
should then be tightened to recommended torque.
Tighten the nuts to final torque in increments. Progress
around the bolt circle, tightening the nut opposite to the
nut just previously tightened until final torque is
achieved. Recommended torque is 95 ft lbs (130 N·m).
Secure The Spare Tire As Follows:
1. To stow the compact spare tire/cover assembly on
vehicles equipped with Stow ’n Go seating, assemble the
winch handle extensions to form a “T” and fit the winch
“T” handle over the drive nut. Rotate the nut to the left
until the winch mechanism stops turning freely. This will
allow enough slack in the cable to allow you to pull the
wheel spacer out from under the vehicle.
WARNING!
A loose compact spare tire/cover assembly, thrown
forward in a collision or hard stop could endanger
the occupants of the vehicle. Always stow the com-
pact spare tire with the cover assembly in the place
provided.
CAUTION!
The winch mechanism is designed for use with the
winch “T” handle only. Use of an air wrench or other
power tools is not recommended and can damage the
winch.
2. Assemble the winch handle extensions to form the
spare tire hook, and pull the wheel spacer from under the
vehicle.
422 WHAT TO DO IN EMERGENCIES
ProCarManuals.com
Page 425 of 534
3. Turn the compact spare tire so that the valve stem is
down, and place the tire into the spare tire/cover assem-
bly. Slide the wheel spacer through the center of the
wheel and spare tire/cover assembly, so that the two
retainer tabs snap out and engage the spare tire cover on
the opposite side.
CAUTION!
The compact spare tire/cover assembly must be used
when the compact spare tire is stored. Failure to use
this cover could drastically reduce the life of the
compact spare tire.
WARNING!
Verify that both retainer tabs of the wheel spacer
have been properly extended through the center of
the wheel and spare tire/cover assembly. Failure to
properly engage both retainer tabs could result in
loss of the spare tire and cover assembly, which will
cause vehicle damage and may cause loss of vehicle
control.
4. Using the winch “T” handle, rotate the drive nut to the
right until the compact spare tire/cover assembly is
drawn into place against the underside of the vehicle.
5. Continue to rotate the nut to the right until you hear
the winch mechanism click three times. It cannot be
overtightened. Check under the vehicle to ensure the
compact spare tire/cover assembly is positioned cor-
rectly against the underside of the vehicle.
WHAT TO DO IN EMERGENCIES 423
6
ProCarManuals.com
Page 516 of 534

Camera, Rear........................... 192
Capacities, Fluid........................ 479
Caps, Filler
Fuel................................ 387
Oil (Engine).......................... 440
Power Steering........................ 338
Radiator (Coolant Pressure)............... 453
Car Washes............................ 461
Carbon Monoxide Warning................. 382
Cargo Compartment
Luggage Carrier....................... 225
Cargo (Vehicle Loading)................... 216
Caution, Exhaust Gas.................53,95,382
Cellular Phone....................... 115,301
Center High Mounted Stop Light............ 478
Chains, Tire............................ 367
Changing A Flat Tire..................... 412
Chart, Tire Sizing........................ 350Check Engine Light
(Malfunction Indicator Light).............242,436
Child Restraint........................81,83
Child Restraint Tether Anchors............... 86
Child Safety Locks........................ 47
Child Seat.............................. 89
Clean Air Gasoline....................... 379
Cleaning
Wheels............................. 462
Climate Control......................... 301
Clock...........................263,267,276
Coat Hook............................ 216
Coin Holder........................... 217
Cold Weather Operation................... 325
Compact Disc (CD) Maintenance............. 300
Compact Spare Tire...................... 361
Compass........................248,251,257
Compass Calibration..................251,257
Compass Variance....................250,258
514 INDEX
ProCarManuals.com
Page 529 of 534

Remote.............................. 28
Starting and Operating.................... 324
Starting Procedures...................... 324
Steering
Power.............................. 338
Shaft Seal............................ 448
Tilt Column.......................... 181
Steering Wheel Mounted Sound
System Controls......................... 299
Storage............................ 211,474
Storage Bin............................ 211
Storage, Vehicle......................319,474
Storing Your Vehicle...................... 474
Stow n Go (Fold in Floor) Seats............. 149
Sun Roof.............................. 204
Sunglasses Storage....................... 195
Sunroof Maintenance..................... 206
Supplemental Restraint System - Airbag........ 65
Synthetic Engine Oil...................... 441System, Remote Starting.................... 28
Tachometer............................ 239
Temperature Control, Automatic (ATC)........ 310
Temperature Gauge, Engine Coolant........236,411
Tether Anchor, Child Restraint............... 86
Tilt Steering Column..................... 181
Tip Start............................... 14
Tire and Loading Information Placard......... 354
Tire Identification Number (TIN)............. 353
Tire Markings.......................... 349
Tire Safety Information.................... 349
Tires ............................95,358,509
Aging (Life of Tires).................... 364
Air Pressure.......................... 358
Alignment........................... 366
Chains.............................. 367
Changing............................ 412
Compact Spare........................ 361
INDEX 527
10
ProCarManuals.com