Page 76 of 411
 —
If Equipped........................... 109
▫Voice Recognition System (VR) Operation . . . 109
▫Commands..........................111
▫Voice Training...........")
�Voice Recognition System (VR) —
If Equipped........................... 109
▫Voice Recognition System (VR) Operation . . . 109
▫Commands..........................111
▫Voice Training....................... 114
�Seats............................... 114
▫Front Seat Adjustment................. 114
▫Manual Seat Height Adjustment.......... 115
▫Manual Lumbar..................... 116
▫Driver’s Seatback Recline............... 116
▫Heated Seats — If Equipped............. 117
▫Adjustable Head Restraints.............. 118
▫Folding Rear Seat.................... 119▫Reclining Rear Seat — If Equipped........ 120
�To Open And Close The Hood............. 121
�Lights.............................. 122
▫Multifunction Lever................... 122
▫Headlights, Parking Lights And Instrument
Panel Lights........................ 123
▫Lights-On Reminder.................. 124
▫Fog Lights — If Equipped.............. 124
▫Turn Signals........................ 124
▫High Beam/Low Beam Select Switch....... 125
▫Flash-To-Pass....................... 126
▫Map/Reading Lights.................. 126
▫Daytime Running Lights (DRL) — If
Equipped.......................... 127
74 UNDERSTANDING THE FEATURES OF YOUR VEHICLE
Page 116 of 411
Voice Training
For users experiencing difficulty with the system recog-
nizing their voice commands or numbers, the UConnect�
system Voice Training feature may be used.
1. Press the VR hard-key, say “System Setup” and once
you are in that menu then say “Voice Training.” This will
train your own voice to the system and will improve
recognition.
2. Repeat the words and phrases when prompted by the
UConnect�System. For best results, the Voice Training
session should be completed when the vehicle is parked,
engine running, all windows closed, and the blower fan
switched off. This procedure may be repeated with a new
user. The system will adapt to the last trained voice only.
SEATS
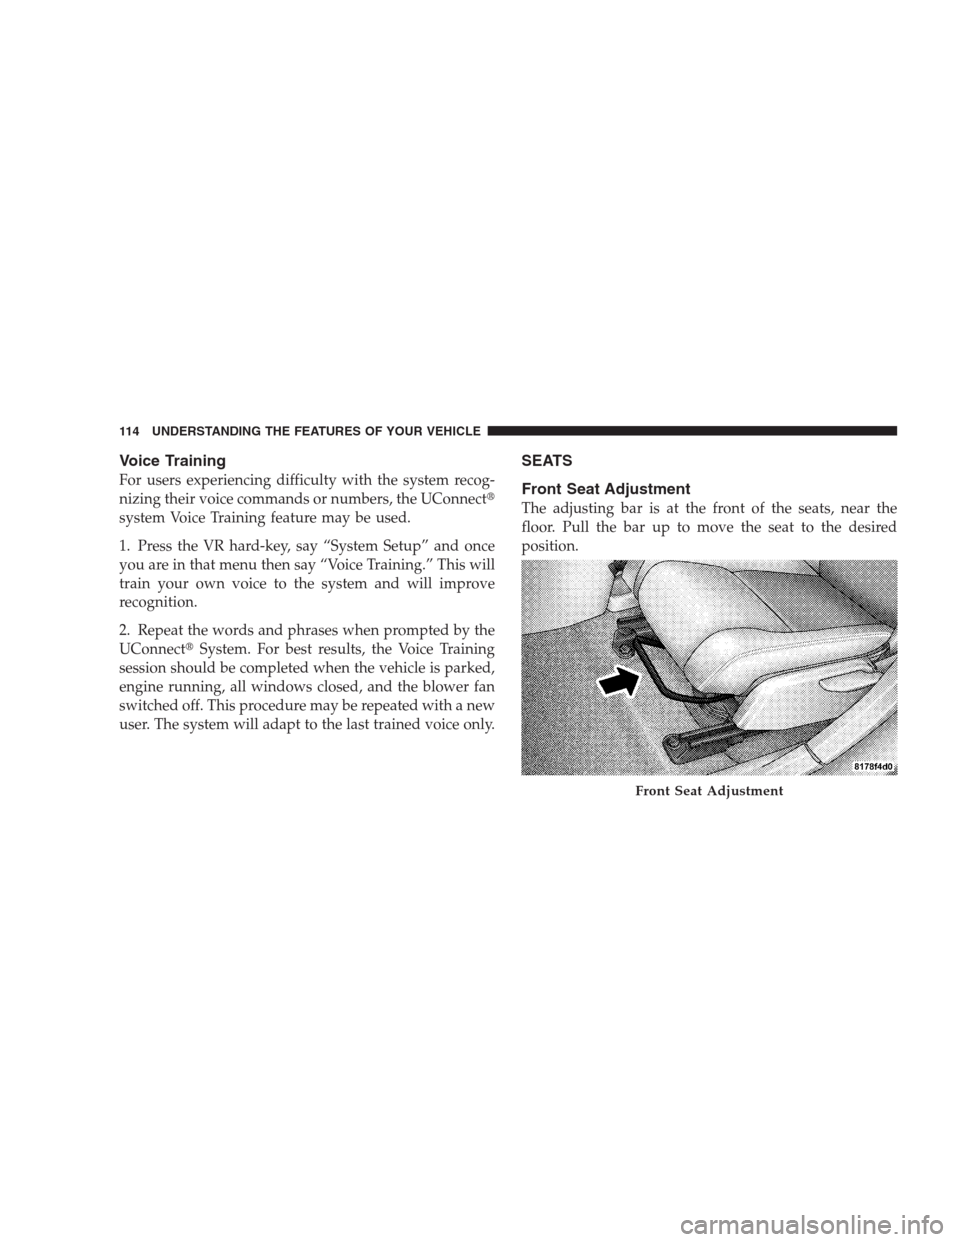
Front Seat Adjustment
The adjusting bar is at the front of the seats, near the
floor. Pull the bar up to move the seat to the desired
position.
Front Seat Adjustment
114 UNDERSTANDING THE FEATURES OF YOUR VEHICLE
Page 119 of 411

Heated Seats — If Equipped
This feature heats the front driver and passenger seats.
The controls for front heated seats are located on the
center instrument panel area. The switch indicator lights
will show when the High or Low heat is on.
Press the switch once to choose High (two
lights), press it a second time to choose Low
(one light), press it a third time to turn the
heater Off (no lights).
When High is selected, the heaters provide a boosted
heat level during the first four minutes of operation after
heating is activated. The heat output then drops to the
normal High-level. If High is selected, the system will
automatically switch to Low after about 30 minutes of
continuous operation. At that time, the number of illu-
minated LEDs changes from two to one, indicating the
change. Operation on Low heating also turns off auto-
matically after about 30 minutes.NOTE:If High is selected, heat will be felt within two to
three minutes.
WARNING!
Persons who are unable to feel pain to the skin
because of advanced age, chronic illness, diabetes,
spinal cord injury, medication, alcohol use, exhaus-
tion or other physical condition must exercise care
when using the seat heater. It may cause burns even
at low temperatures, especially if used for long
periods of time. Do not place anything on the seat
that insulates against heat, such as a blanket or
cushion. This may cause the seat heater to overheat.
UNDERSTANDING THE FEATURES OF YOUR VEHICLE 117
3
Page 122 of 411
Reclining Rear Seat — If Equipped
For additional comfort, pull the strap forward just
enough to release the seatback latch. Then push the
seatback to a reclined position, approximately 35 degrees
maximum, and release the strap.WARNING!
•It is extremely dangerous to ride in a cargo area,
inside or outside of a vehicle. In a collision, people
riding in these areas are more likely to be seri-
ously injured or killed.
•Do not allow people to ride in any area of your
vehicle that is not equipped with seats and seat
belts.
•Be sure that everyone in your vehicle is in a seat
and using a seat belt properly.
Reclining The Rear Seat
120 UNDERSTANDING THE FEATURES OF YOUR VEHICLE
Page 152 of 411

Cargo Tie-Down Loops
There are two D-rings installed on the D-pillars for
securing a net across the liftgate opening.
WARNING!
•Cargo tie-down loops are not safe anchors for a
child seat tether strap. In a sudden stop or collision
a loop could pull loose and allow the child seat to
come loose. A child could be badly injured. Use
only the anchors provided for child seat tethers.
•The weight and position of cargo and passengers
can change the vehicle center of gravity and ve-
hicle handling. To avoid loss of control resulting
in personal injury, follow these guidelines for
loading your vehicle:
(Continued)
WARNING! (Continued)
•Always place cargo evenly on the cargo floor. Put
heavier objects as low and as far forward as
possible.
•Place as much cargo as possible in front of the rear
axle. Too much weight or improperly placed
weight over or behind the rear axle can cause the
rear of the vehicle to sway.
•Do not pile luggage or cargo higher than the top of
the seatback. This could impair visibility or be-
come a dangerous projectile in a sudden stop or
collision.
•To help protect against personal injury, passengers
should not be seated in the rear cargo area. The
rear cargo space is intended for load carrying
purposes only, not for passengers, who should sit
in seats and use seat belts.
150 UNDERSTANDING THE FEATURES OF YOUR VEHICLE
Page 354 of 411
Replace the seat belts if they appear frayed or worn or if
the buckles do not work properly.
Dry with a soft cloth.
FUSES
Integrated Power Module
The Integrated Power Module (IPM) is located in the
engine compartment near the air cleaner assembly. This
center contains cartridge fuses and mini-fuses. A label
that identifies each component may be printed on the
inside of the cover. Refer to “Engine Compartment” in
this section of the Owner’s Manual for the underhood
location of the Integrated Power Module (IPM).
Cavity Cartridge
FuseMini-
FuseDescription
1 Empty Empty
2 15 Amp
Lt. BlueAWD/4WD ECU
Feed
Cavity Cartridge
FuseMini-
FuseDescription
3 10 Amp
RedCHMSL Brake Switch
Feed
4 10 Amp
RedIgnition Switch Feed
5 20 Amp
YellowTrailer Tow
6 10 Amp
RedIOD Sw/Pwr Mir/
Ocm Steering Cntrl
Sdar/Hands-Free
Phone
7 30 Amp
GreenIOD Sense1
8 30 Amp
GreenIOD Sense2
9 40 Amp
GreenPower Seats
352 MAINTAINING YOUR VEHICLE
Page 356 of 411
Cavity Cartridge
FuseMini-
FuseDescription
26 15 Amp
Lt. BlueENG ASD Relay Feed
2
27 10 Amp
RedIGN RUN Only ORC
Feed
28 10 Amp
RedIGN RUN ORC/OCM
Feed
29 Hot Car (No Fuse Re-
quired)
30 20 Amp
YellowHeated Seats
31 10 Amp
RedHeadlight Washer
Relay Control
32 30 Amp
PinkENG ASD Control
Feed 1
33 10 Amp
RedABS MOD/J1962
Conn/PCMCavity Cartridge
FuseMini-
FuseDescription
34 30 Amp
PinkABS Valve Feed
35 40 Amp
GreenABS Pump Feed
36 30 Amp
PinkHeadlight/Washer
Control/Smart Glass/
Cool Down Pump
37 25 Amp
Natural110 Inverter
354 MAINTAINING YOUR VEHICLE
Page 400 of 411

High Beam/Low Beam Select Switch........ 125
Passing............................. 126
Replacing............................ 356
Switch.............................. 123
Heated Seats........................... 117
HomeLink�(Garage Door Opener) Transmitter . . . 134
Hood Release.......................... 121
Ignition............................... 12
Key ................................. 12
Ignition Key Removal..................... 12
Immobilizer (Sentry Key).................16,20
Infant Restraint.......................... 61
Information Center, Vehicle................. 174
Inside Rearview Mirror.................... 77
Instrument Cluster....................163,164
Instrument Panel and Controls.............. 161
Instrument Panel Cover................... 351
Instrument Panel Lens Cleaning............. 351Integrated Power Module (Fuses)............ 352
Interior Appearance Care.................. 349
Intermittent Wipers (Delay Wipers)........... 128
Introduction............................. 4
Jump Starting.......................... 317
Key, Programming........................ 18
Key, Replacement........................ 17
Key, Sentry (Immobilizer)................... 16
Key-In Reminder......................... 15
Keyless Entry System (Sedan)................ 20
Keys................................. 12
Kicker Sound System..................... 233
Lane Change and Turn Signals.............. 357
Lap/Shoulder Belts....................... 36
Latches
Hood............................... 121
398 INDEX

 is located in the
en")

30 20 Amp
YellowH")