Page 123 of 473

Commands
The Voice Recognition system understands two types of
commands. Universal commands are available at all
times. Local commands are available if the supported
radio mode is active.
Changing the Volume
1. Start a dialogue by pressing the VR hard-key.
2. Say a command (e.g., “Help”).
3. Use the ON/OFF VOLUME rotary knob to adjust the
volume to a comfortable level while the Voice Recogni-
tion system is speaking. Please note the volume setting
for VR is different then the audio system.
Main Menu
Start a dialogue by pressing the VR hard-key. You may
say “Main Menu” to switch to the main menu.In this mode, you can say the following commands:
•“Radio” (to switch to the radio mode)
•“Disc” (to switch to the disc mode)
•“Memo” (to switch to the memo recorder)
•“System Setup” (to switch to system setup)
Radio AM (or Radio Long Wave or Radio Medium
Wave — If Equipped)
To switch to the AM band say “AM” or “Radio AM”. In
this mode, you may say the following commands:
•“Frequency” (to change the frequency)
•“Next Station” (to select the next station)
•“Previous Station” (to select the previous station)
•“Radio Menu” (to switch to the radio menu)
•“Main Menu” (to switch to the main menu)
UNDERSTANDING THE FEATURES OF YOUR VEHICLE 121
3
Page 125 of 473
 — During the
recording you may press the VR hard-")
Memo
To switch to the voice recorder mode say “Memo”. In this
mode, you may say the following commands:
•“New Memo” (to record a new memo) — During the
recording you may press the VR hard-key to stop
recording. You proceed by saying one of the following
commands:
�“Save” (to save the memo)
�“Continue” (to continue recording)
�“Delete” (to delete the recording)
•“Play Memos” (to play previously recorded memos)
— During the playback you may press the VR hard-
key to stop playing memos. You proceed by saying one
of the following commands:
�“Repeat” (to repeat a memo)
�“Next” (to play the next memo)
�“Previous” (to play the previous memo)
�“Delete” (to delete a memo)
•“Delete All” (to delete all memos)
System Setup
To switch to system setup say “Setup”. In this mode, you
may say the following commands:
•“Language English”
•“Language French”
•“Language Spanish”
•“Tutorial”
•“Voice Training”
NOTE:Keep in mind that you have to press the VR
hard-key first and wait for the beep before speaking the
“Barge In” commands.
UNDERSTANDING THE FEATURES OF YOUR VEHICLE 123
3
Page 126 of 473
Voice Training
For users experiencing difficulty with the system recog-
nizing their voice commands or numbers, the UConnect�
system Voice Training feature may be used.
1. Press the VR hard-key, say “System Setup” and once
you are in that menu then say “Voice Training.” This will
train your own voice to the system and will improve
recognition.
2. Repeat the words and phrases when prompted by the
UConnect�System. For best results, the Voice Training
session should be completed when the vehicle is parked,
engine running, all windows closed, and the blower fan
switched off. This procedure may be repeated with a new
user. The system will adapt to the last trained voice only.
SEATS
Manual Front Seat Adjustments
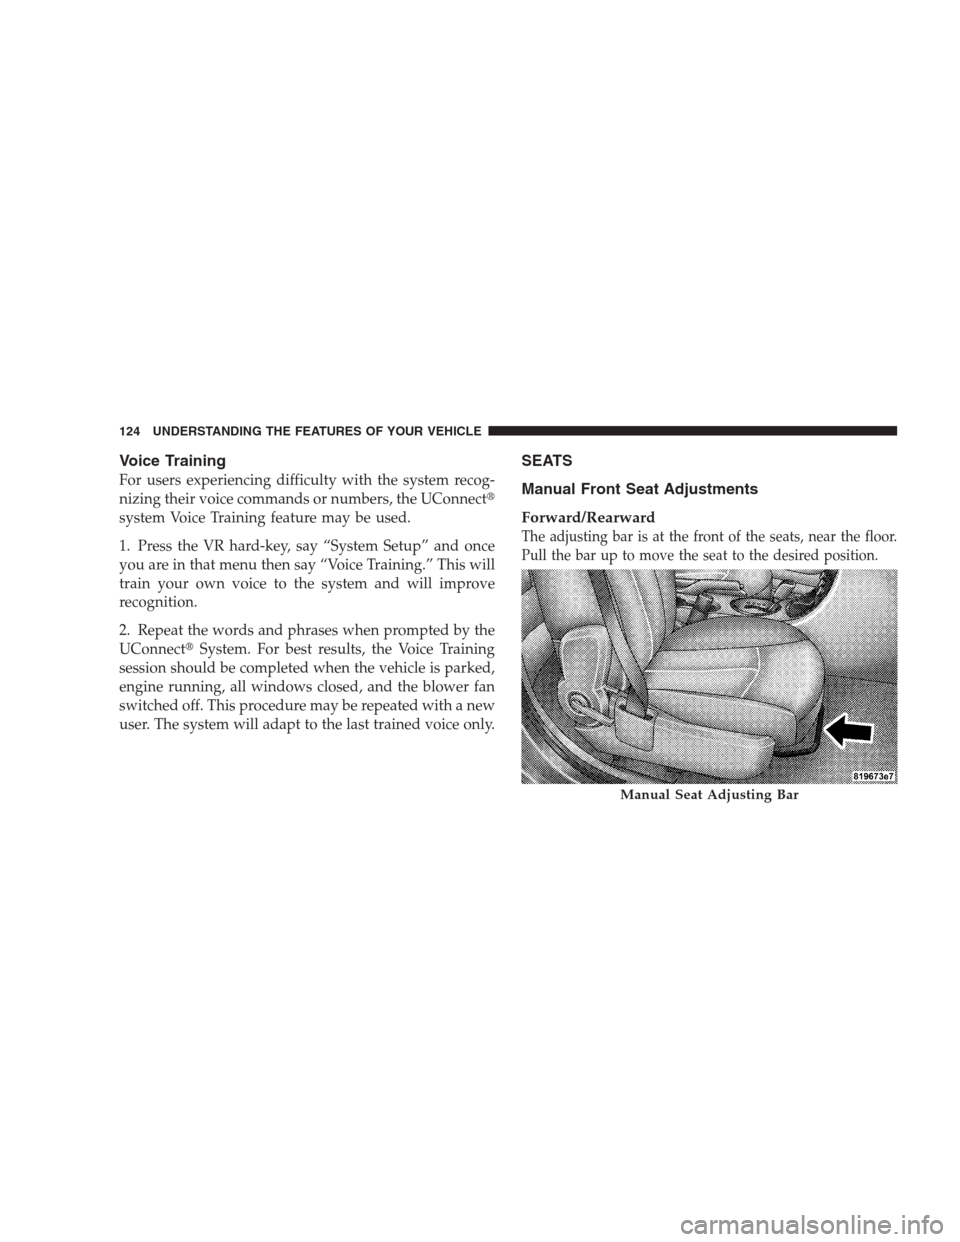
Forward/Rearward
The adjusting bar is at the front of the seats, near the floor.
Pull the bar up to move the seat to the desired position.
Manual Seat Adjusting Bar
124 UNDERSTANDING THE FEATURES OF YOUR VEHICLE
Page 156 of 473

WARNING!
•Never leave children in a vehicle, with the keys in
the ignition switch. Occupants, particularly unat-
tended children, can become entrapped by the
power sunroof while operating the power sunroof
switch. Such entrapment may result in serious
injury or death.
•In an accident, there is greater risk of being
thrown from a vehicle with an open sunroof. You
could also be seriously injured or killed. Always
fasten your seat belt properly and make sure all
passengers are properly secured too.
•Do not allow small children to operate the sun-
roof. Never allow fingers or other body parts, or
any object to project through the sunroof opening.
Injury may result.
Sunroof Operation
Opening Sunroof Manually
Press the switch rearward and hold, and the sunroof will
open automatically from any position. The sunroof will
open fully, then stop automatically. During this opera-
tion, any release of the sunroof switch will stop the
sunroof.
Opening Sunroof - Express
Press the switch rearward and release, and the sunroof
will open automatically from any position. The sunroof
will open fully, then stop automatically. This is called
Express Open. During Express Open operation, any
movement of the sunroof switch will stop the sunroof.
Closing Sunroof Manually
To close the sunroof from an open or vent position, press
andholdthe switch forward. The sunroof will close fully
and stop automatically. Release the switch to stop sun-
roof travel at any point.
154 UNDERSTANDING THE FEATURES OF YOUR VEHICLE
Page 158 of 473
, the power sunroof switch
will remain active for 45 seconds after the ignition switch
is turned O")
Ignition Off Operation
For vehicles not equipped with the Electronic Vehicle
Information Center (EVIC), the power sunroof switch
will remain active for 45 seconds after the ignition switch
is turned OFF. Opening either front door will cancel this
feature.
For vehicles equipped with the EVIC, the power sunroof
switch will remain active for up to 10 minutes after the
ignition switch is turned OFF. Opening either front door
will cancel this feature. The time is programmable. For
details, refer to “Key-Off Power Delay,” under “Personal
Settings (Customer-Programmable Features)” under
“Electronic Vehicle Information Center (EVIC)” in Sec-
tion 4 of this manual.
ELECTRICAL POWER OUTLETS
There are two 12-Volt electrical outlets on this vehicle.
Both of the outlets are protected by a fuse.
The instrument panel power outlet, located below the
climate control knobs, has power available only when the
ignition is ON. This outlet will also operate a conven-
tional cigar lighter unit.
156 UNDERSTANDING THE FEATURES OF YOUR VEHICLE
Page 188 of 473

The Malfunction Indicator Light (MIL) is part of
an onboard diagnostic system called OBD that
monitors emissions, engine, and automatic trans-
axle control system")
23. Malfunction Indicator Light (MIL)
The Malfunction Indicator Light (MIL) is part of
an onboard diagnostic system called OBD that
monitors emissions, engine, and automatic trans-
axle control systems. The light will illuminate when the
key is in the ON position before engine start. If the bulb
does not come on when turning the key from LOCK to
ON, have the condition checked promptly.
Certain conditions such as a loose or missing gas cap,
poor fuel quality, etc. may illuminate the light after
engine start. The vehicle should be serviced if the light
stays on through several of your typical driving cycles. In
most situations the vehicle will drive normally and will
not require towing.
If the MIL flashes when the engine is running, serious
conditions may exist that could lead to immediate loss of
power or severe catalytic converter damage. The vehicle
should be serviced as soon as possible if this occurs.24. Anti-Lock Brake (ABS) Light — If Equipped
This light monitors the ABS. This light will
come on when the ignition key is turned to the
ON position and may stay on for approxi-
mately three seconds.
If the ABS light remains on or comes on during driving,
it indicates that the Anti-Lock portion of the brake system
is not functioning and that service is required, however,
the conventional brake system will continue to operate
normally provided that the BRAKE warning light is not
on.
If the ABS light is on, the brake system should be serviced
as soon as possible to restore the benefit of Anti-Lock
Brakes.
The ABS warning light should be checked frequently to
assure that it is operating properly. Turn the ignition key
to the on position, but do not start the vehicle. The light
186 UNDERSTANDING YOUR INSTRUMENT PANEL
Page 193 of 473

•Left Rear Turn Signal Light Out (with a single chime)
•Right Front Turn Signal Light Out (with a single chime)
•Right Rear Turn Signal")
•Left Front Turn Signal Light Out (with a single chime)
•Left Rear Turn Signal Light Out (with a single chime)
•Right Front Turn Signal Light Out (with a single chime)
•Right Rear Turn Signal Light Out (with a single chime)
•RKE (Remote Keyless Entry) Battery Low (with a
single chime)
•Personal Settings Not Available – Vehicle Not In PARK
•Personal Settings Not Available – Vehicle in Motion
•Left/Right Door Ajar (one or more, with a single
chime if speed is above 1 mph / 1 km h)
•Door(s) Ajar (with a single chime if vehicle is in
motion)
•Trunk Ajar (with a single chime)
•Headlights On
•Key In Ignition
•Oil Change Required (with a single chime)
Oil Change Required
Your vehicle is equipped with an engine oil change
indicator system. The Oil Change Required message will
flash in the EVIC display for approximately five seconds
after a single chime has sounded to indicate the next
scheduled oil change interval. The engine oil change
indicator system is duty cycle based, which means the
engine oil change interval may fluctuate dependent upon
your personal driving style.
Unless reset, this message will continue to display each
time you turn the ignition switch to the ON/RUN
position. To turn off the message temporarily, press and
release the MENU button. To reset the oil change indica-
tor system (after performing the scheduled maintenance)
perform the following procedure:
UNDERSTANDING YOUR INSTRUMENT PANEL 191
4
Page 198 of 473

Personal settings allows the driver to set and recall
features when the automatic transaxle is in PARK.
Press and release the MENU button until “Pe")
Personal Settings (Customer-Programmable
Features)
Personal settings allows the driver to set and recall
features when the automatic transaxle is in PARK.
Press and release the MENU button until “Personal
Settings” displays in the EVIC.
Press and release the STEP button to display the follow-
ing programmable features:
Language
When in this display you may select different languages
for all display nomenclature, including the trip functions.
Pressing the RESET button while in this display selects
English, Espanol, or Francais depending on availability.
As you continue, the displayed information will be
shown in the selected language.
Auto Unlock on Exit
When ON is selected and the transaxle is in the PARK or
NEUTRAL position, all doors will unlock when the
driver’s door is opened. To make your selection, press
and hold the RESET button until ON or OFF appears.
Remote Key Unlock
When “Driver Door 1st Press” is selected, only the
driver’s door will unlock on the first press of the Remote
Keyless Entry (RKE) transmitter UNLOCK button. When
Driver Door 1st Press is selected, you must press of the
RKE transmitter UNLOCK button twice to unlock the
passenger’s doors. When “All Doors 1st Press” is se-
lected, all of the doors will unlock on the first press of the
RKE transmitter UNLOCK button. To make your selec-
tion, press and release the RESET button until “Driver
Door 1st Press” or “All Doors 1st Press” appears.
196 UNDERSTANDING YOUR INSTRUMENT PANEL