Page 288 of 543

to seek up and the left switch to seek down. The radio
will remain tuned to the new station until you make
another selection. Holding either button will bypass
stations without stopping until you release it.
Voice Recognition System (Radio) — If Equipped
Refer to “Voice Recognition System (VR)” in Section 3.
Voice Recognition Button uconnect™ phone — If
Equipped
Press this button to operate the uconnect™ phone feature
(if equipped). Refer to “uconnect™ phone” in Section 3.
If your vehicle is not equipped with or this feature is not
available on your vehicle, a “Not Equipped With
UConnect” message will display on the radio screen.
Phone Button uconnect™ phone — If Equipped
Press this button to operate the uconnect™ phone feature
(if equipped). Refer to “uconnect™ phone” in Section 3.If your vehicle is not equipped with or this feature is not
available on your vehicle, a “Not Equipped With
UConnect” message will display on the radio screen.
TIME Button
Press the TIME button to alternate display of the time
and radio frequency.
Clock Setting Procedure
1. Press and hold the TIME button until the hours blink.
2. Adjust the hours by turning the right side TUNE/
SCROLL control knob.
3. After adjusting the hours, press the right side TUNE/
SCROLL control knob to set the minutes. The minutes
will begin to blink.
4. Adjust the minutes using the right side TUNE/
SCROLL control knob. Press the TUNE/SCROLL control
knob to save time change.
286 UNDERSTANDING YOUR INSTRUMENT PANEL
Page 298 of 543
Press and hold the INFO button again for three seconds
to return to�elapsed time� display.
Operation Instructions - Auxiliary Mode
The auxiliary (AUX) jack is an audio input jack which
allows the user to plug in a portable device such as an
MP3 player or cassette player and utilize the vehicle’s
audio system to amplify the source and play through the
vehicle speakers.
Pressing the AUX button will change the mode to auxil-
iary device if the AUX jack is connected.
NOTE:The AUX device must be turned on and the
device’s volume set to the proper level. If the AUX audio
is not loud enough, turn the device’s volume up. If the
AUX audio sounds distorted, turn the device’s volume
down.
TIME Button (Auxiliary Mode)
Press this button to change the display to time of day. The
time of day will display for five seconds (when the
ignition is OFF).
Operating Instructions - uconnect™ phone (If
Equipped)
Refer to “uconnect™ phone” in Section 3.
Operating Instructions - uconnect™ studios
(Satellite Radio) (If Equipped)
Refer to “uconnect™ studios (Satellite Radio)” in this
section.
UNIVERSAL CONSUMER INTERFACE (UCI) — IF
EQUIPPED
NOTE: This section is for sales code RES and REQ/
REL/RET radios only with uconnect™. For sales code
RER, REN, REP, REW or REZ touch-screen radio UCI
296 UNDERSTANDING YOUR INSTRUMENT PANEL
Page 299 of 543
feature, refer to the separate RER, REN or REZ User’s
Manual. UCI is available only if equipped as an option
with these radios.
This feature allows you to plug an iPod�into the
vehicle’s sound system through a 16–pin connector, using
the provided interface cable.
UCI supports Mini, 4G, Photo, Nano, 5G iPod �and
iPhone� devices. Some iPod� software versions may not
fully support the UCI features. Please visit Apple’s
website for software updates.
NOTE:
•If the radio has a USB port, connecting an iPod� to this
port does not play the media. For playing an iPod�,
use the separate 16–pin connector port (in the glove
compartment on some vehicles).
•Connecting an iPod� to the AUX port located in the
radio faceplate, plays media, but does not use the UCI
feature to control the connected device.
Connecting The iPod�
Use the provided connection cable to connect an iPod �to
the vehicle’s 16–pin connector port (which is located in
the glove compartment on some vehicles). Once the
iPod� is connected and synchronized to the vehicle’s UCI
system (iPod� may take a few seconds to connect), the
iPod� starts charging and is ready for use by pressing
radio switches, as described below.
NOTE:
•You may have to remove the connector pin protection
cap from the 16–pin connector port, prior to connect-
ing the cable.
4
UNDERSTANDING YOUR INSTRUMENT PANEL 297
Page 308 of 543
•Display Sirius ID number — Press the AUDIO/
SELECT button to display the Sirius ID number. This
number is used to activate, deactivate, or change the
Sirius subscription.
SET Button – To Set the Pushbutton Memory
When you are receiving a channel that you wish to
commit to pushbutton memory, press the SET button.
The symbol SET 1 will now show in the display window.
Select the button (1-6) you wish to lock onto this channel
and press and release that button. If a button is not
selected within five seconds after pressing the SET but-
ton, the channel will continue to play but will not be
stored into pushbutton memory.
You may add a second channel to each pushbutton by
repeating the above procedure with this exception: Press
the SET button twice and SET 2 will show in the display
window. Each button can be set for SET 1 and SET 2. This
allows a total of 12 Satellite channels to be stored intopushbutton memory. The channels stored in SET 2
memory can be selected by pressing the pushbutton
twice.
Every time a preset button is used, a corresponding
button number will display.Buttons1-6
These buttons tune the radio to the channels that you
commit to pushbutton memory (12 Satellite stations).
Operating Instructions — uconnect
�phone (If
Equipped)
Refer to “uconnect� phone” in Section 3.
Operating Instructions — Video Entertainment
System (VES)™ (If Equipped)
Refer to separate “Video Entertainment System (VES)™
Guide.”
306 UNDERSTANDING YOUR INSTRUMENT PANEL
Page 309 of 543
uconnect�studios (SIRIUS BACKSEAT TV™) —
IF EQUIPPED
Satellite video uses direct satellite receiver broadcasting
technology to provide streaming video. The subscription
service provider is SIRIUS Satellite Radio. SIRIUS Back-
seat TV™ offers three video channels for family enter-
tainment, directly from its satellites and broadcasting
studios.
NOTE: SIRIUS service is not available in Hawaii and
has limited coverage in Alaska.
Refer to your Video Entertainment System (VES)™, RER
Navigation or REN Multimedia User Manuals for de-
tailed operating instructions.
VIDEO ENTERTAINMENT SYSTEM (VES)™ — IF
EQUIPPED
The optional Video Entertainment System (VES)™ is
available with:
•One or two video screens
•Third row swivel screen — If Equipped
•Additional single-disc DVD player with two-screen
system
•Battery-powered two-channel remote control
•Two remote headphones
•Integrated remote storage in either screen location
•Three different medias can be played simultaneously
(Cabin speakers and Headphone Channels 1 and 2)
•Easy menu-driven functions on touch-screen radios
•Video and audio input jacks available in rear seating
area
4
UNDERSTANDING YOUR INSTRUMENT PANEL 307
Page 313 of 543
oversized, or have protection encoding. Try a known
good disc before considering disc player service.
RADIO OPERATION AND CELLULAR PHONES
Under certain conditions, the cellular phone being on in
your vehicle can cause erratic or noisy performance from
your radio. This condition may be lessened or eliminated
by relocating the cellular phone antenna. This condition
is not harmful to the radio. If your radio performance
does not satisfactorily “clear” by the repositioning of the
antenna, it is recommended that the radio volume be
turned down or off during cellular phone operation.
CLIMATE CONTROLS
The Climate Control System allows you to regulate the
temperature, amount, and direction of air circulating
throughout the vehicle. The controls are located on the
instrument panel, below the radio.
Manual Heating and Air Conditioning System
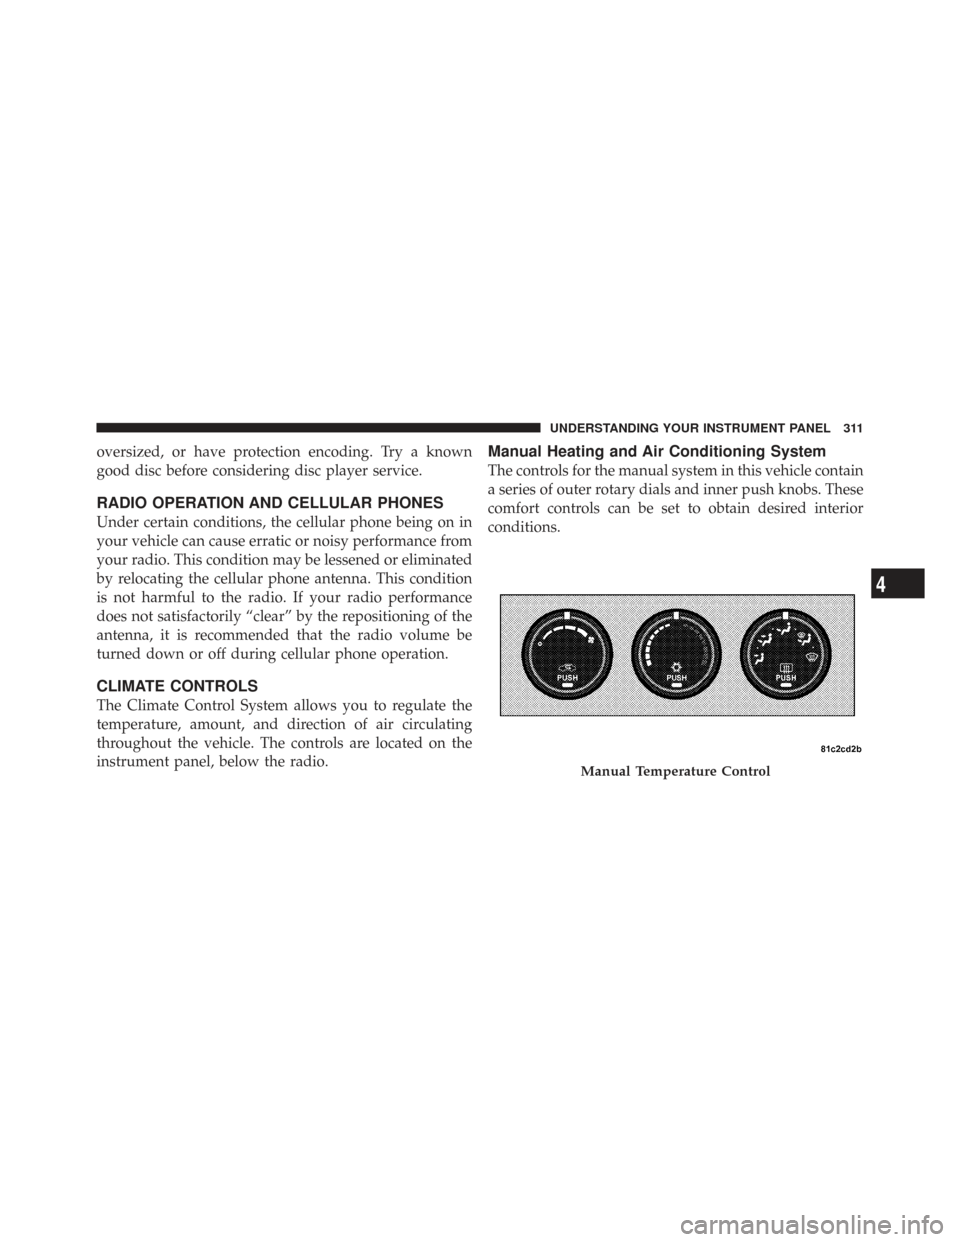
The controls for the manual system in this vehicle contain
a series of outer rotary dials and inner push knobs. These
comfort controls can be set to obtain desired interior
conditions.
Manual Temperature Control
4
UNDERSTANDING YOUR INSTRUMENT PANEL 311
Page 514 of 543
This is why you should always talk to an authorized
dealer’s service manager first. Most matters can be re-
solved with this process.
•If for some reason you are still not satisfied, talk to the
general manager or owner of the authorized dealer-
ship. They want to know if you need assistance.
•If an authorized dealership is unable to resolve the
concern, you may contact the manufacturer’s customer
center.
Any communication to the manufacturer’s customer cen-
ter should include the following information:
•Owner’s name and address
•Owner’s telephone number (home and office)
•Authorized dealership name
•Vehicle Identification Number (VIN)
•Vehicle delivery date and mileage
Chrysler LLC Customer Center
P.O. Box 21–8004
Auburn Hills, MI 48321–8004
Phone: (800) 992-1997
Chrysler Canada Inc. Customer Center
P.O. Box 1621
Windsor, Ontario N9A 4H6
Phone: (800) 465–2001
In Mexico contact:
Av. Prolongacion Paseo de la Reforma, 1240
Sante Fe C.P. 05109
Mexico, D. F.
In Mexico City: 5081-7568
Outside Mexico City: 1-800-505-1300
512 IF YOU NEED CONSUMER ASSISTANCE
Page 517 of 543
If NHTSA receives similar complaints, it may open an
investigation, and if it finds that a safety defect exists in
a group of vehicles, it may order a recall and remedy
campaign. However, NHTSA cannot become involved in
individual problems between you, your authorized
dealer, and the manufacturer.
To contact NHTSA, you may either call the Auto Safety
Hotline toll free at 1–888–327–4236 (TTY: 1–800–424–
9153), or go to http://www.safercar.gov; or write to:
Administrator, NHTSA, 1200 New Jersey Avenue, SE.,
West Building, Washington, D.C. 20590. You can also
obtain other information about motor vehicle safety from
http://www.safercar.gov.
In Canada
If you believe that your vehicle has a safety defect, you
should contact the Customer Service Department imme-
diately. Canadian customers who wish to report a safety
defect to the Canadian government should write to:Transport Canada, Motor Vehicle Defect Investigations
and Recalls, 2780 Sheffield Road, Ottawa, Ontario K1B
3V9.
PUBLICATION ORDER FORMS
To order the following manuals, you may use either the
website or the phone numbers listed below. Visa, Mas-
tercard, American Express, and Discover orders are ac-
cepted. If you prefer mailing your payment, please call
for an order form.
NOTE:
A street address is required when ordering
manuals (no P.O. Boxes).
•Service Manuals
These comprehensive Service Manuals provide the
information that students and professional technicians
need in diagnosing/troubleshooting, problem solving,
maintaining, servicing, and repairing Chrysler LLC
9
IF YOU NEED CONSUMER ASSISTANCE 515