Page 49 of 543
•When the Child Protection Door Lock system is en-
gaged, (even if the inside door lock is in the unlocked
position) the door can be opened only by using the
outside door handle, the RKE transmitter, the switches
on the overhead console or the switches located on the
trim panel just in front of the power sliding door.
•The power sliding side door will operate from the
switches located on the trim panel just in front of the
power sliding door, regardless of the Child Protection
Door Lock lever position.To avoid unintentional
operation of the power sliding door from the rear
seats, press the ”ON” Master Lock Out Switch lo-
cated in the front overhead console, next to the
driver.
WARNING!
Avoid trapping anyone in the vehicle in a collision.
Remember that the sliding doors can only be opened
from the outside door handle or the switches located
on the trim panel just in front of the power sliding
door when the Child Protection Door Locks are
engaged.
To Disengage the Child Protection Door Lock
1. Open the sliding side door.
2. Slide the Child Protection Door Lock control outward
(away from the vehicle) to disengage the Child Protection
Door Lock.
3. Repeat Steps 1 and 2 on the opposite sliding door (if
equipped).
2
THINGS TO KNOW BEFORE STARTING YOUR VEHICLE 47
Page 50 of 543
NOTE:
•After setting the Child Protection Door Lock system,
always test the door from the inside to make certain it
is in the desired position.
•The power sliding side door switches will not open the
power sliding doors if the vehicle is in gear or the
vehicle speed is above 0 mph (0 km/h).
•The power sliding door will operate from the outside
door handle, the RKE transmitter, the switches on the
overhead console, or the switches located on the trim
panel just in front of the power sliding door when the
shift lever is in PARK, regardless of the child lock lever
position.
LIFTGATE
On vehicles equipped with power locks, the liftgate can
be unlocked using the Remote Keyless Entry (RKE)
transmitter button, or by activating the power door lock
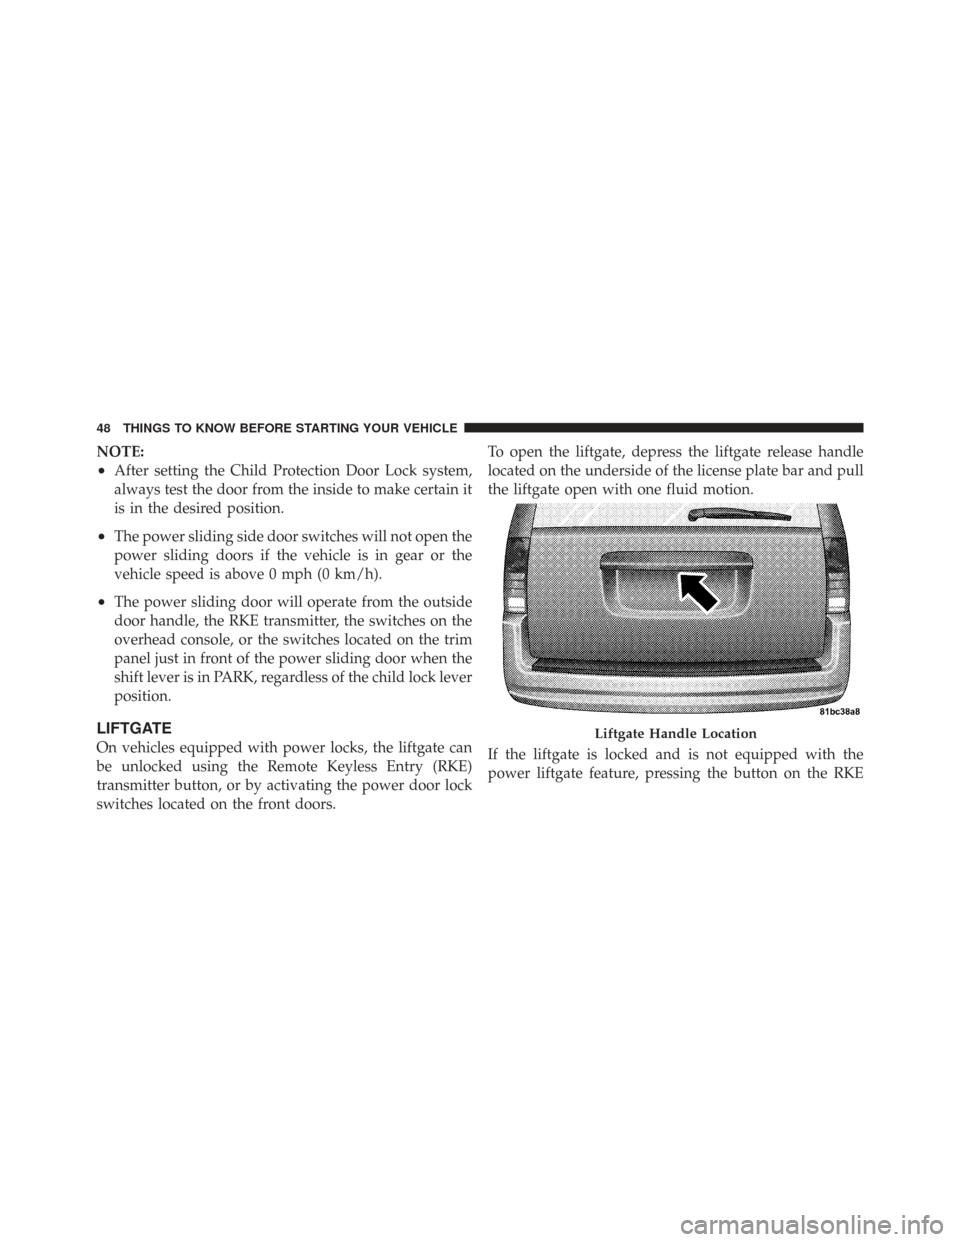
switches located on the front doors.To open the liftgate, depress the liftgate release handle
located on the underside of the license plate bar and pull
the liftgate open with one fluid motion.
If the liftgate is locked and is not equipped with the
power liftgate feature, pressing the button on the RKELiftgate Handle Location
48 THINGS TO KNOW BEFORE STARTING YOUR VEHICLE
Page 51 of 543
transmitter will result in the liftgate becoming unlocked
for 30 seconds allowing you to manually access the
liftgate area.
Power Liftgate — If Equipped
The power liftgate may be opened manually or by using
the button on the Remote Keyless Entry (RKE) transmit-
ter. Press the button on the transmitter twice within five
seconds, to open the power liftgate. When the liftgate is
fully open, pressing the button twice within five seconds,
a second time, will close the liftgate.
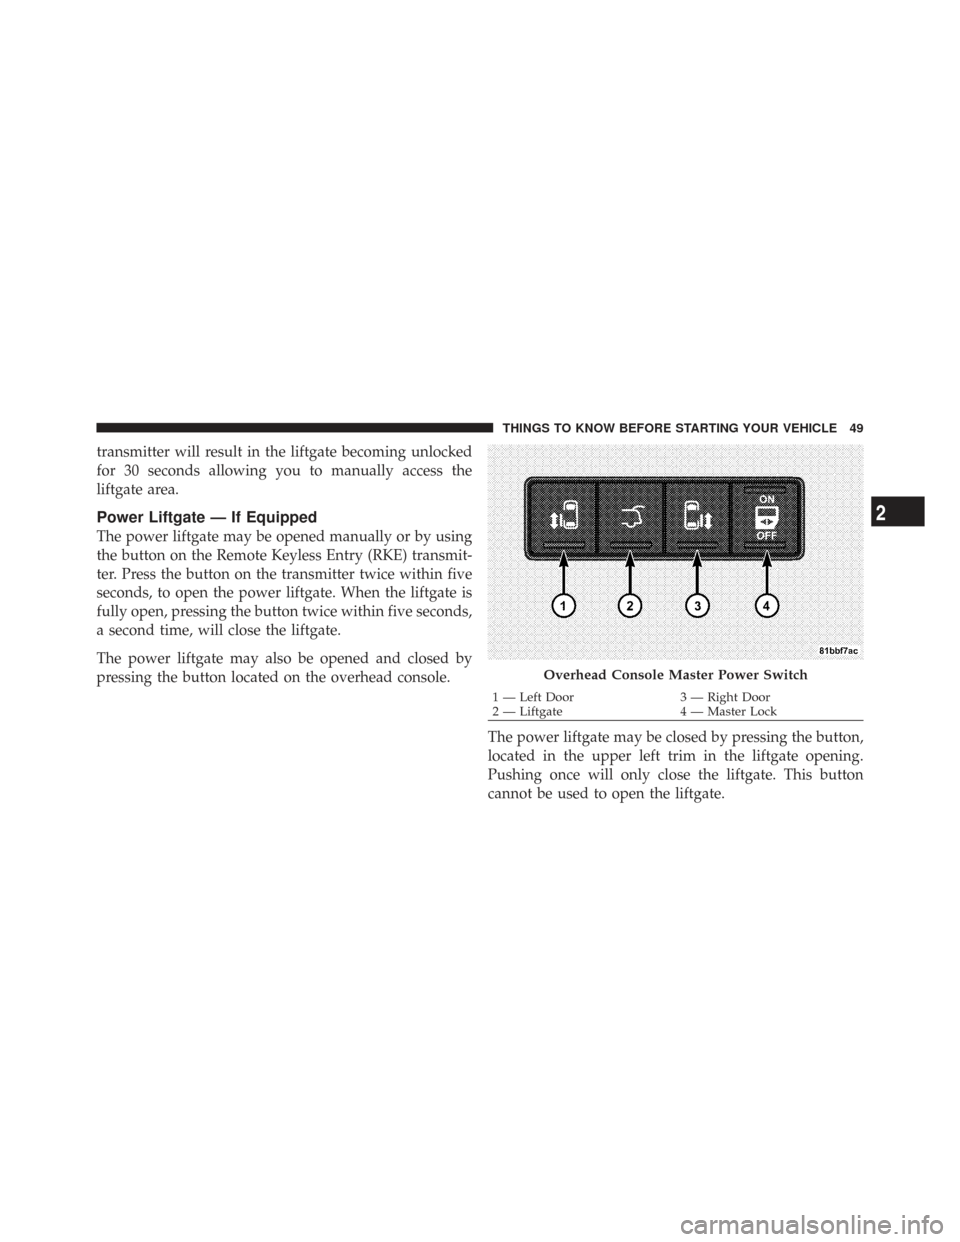
The power liftgate may also be opened and closed by
pressing the button located on the overhead console.The power liftgate may be closed by pressing the button,
located in the upper left trim in the liftgate opening.
Pushing once will only close the liftgate. This button
cannot be used to open the liftgate.
Overhead Console Master Power Switch
1 — Left Door3 — Right Door
2 — Liftgate 4 — Master Lock
2
THINGS TO KNOW BEFORE STARTING YOUR VEHICLE 49
Page 54 of 543
STORAGE BIN SAFETY WARNING
Safety Warning
Carefully follow these warnings to help prevent personal
injury or damage to your vehicle:
WARNING!
•Always close the storage bin covers when your
vehicle is unattended.
•Do not allow children to have access to the second
row seat storage bins. Once in the storage bin,
young children may not be able to escape. If
trapped in the storage bin, children can die from
suffocation or heat stroke.
•In an accident, serious injury could result if the
seat storage bin covers are not properly latched.
•Do not drive the vehicle with the storage bin
covers open.(Continued)
WARNING! (Continued)
•Keep the storage bin covers closed and latched
while the vehicle is in motion.
•Do not operate the storage bin covers while the
vehicle is in motion.
•Do not use a storage bin latch as a tie down.
CAUTION!
The storage bin cover must be flat and locked to
avoid damage from contact with the front seat tracks,
which have minimal clearance to the cover.
Seat Storage Bin Cover Emergency Release Lever
As a security measure, your vehicle may be built with a
Storage Bin Cover Emergency Release is built into the
storage bin cover latching mechanism.
52 THINGS TO KNOW BEFORE STARTING YOUR VEHICLE
Page 55 of 543
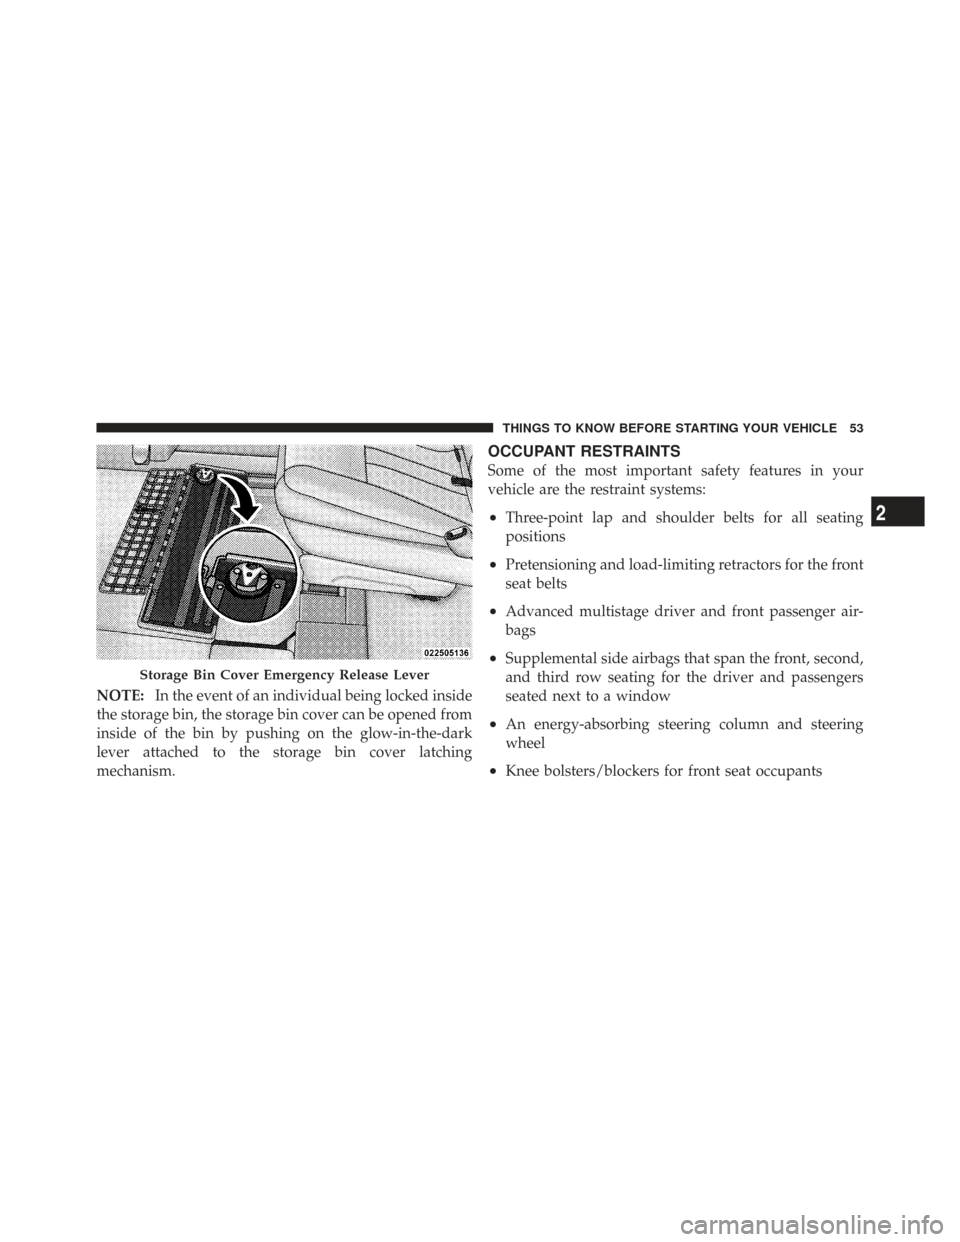
NOTE:In the event of an individual being locked inside
the storage bin, the storage bin cover can be opened from
inside of the bin by pushing on the glow-in-the-dark
lever attached to the storage bin cover latching
mechanism.
OCCUPANT RESTRAINTS
Some of the most important safety features in your
vehicle are the restraint systems:
•Three-point lap and shoulder belts for all seating
positions
•Pretensioning and load-limiting retractors for the front
seat belts
•Advanced multistage driver and front passenger air-
bags
•Supplemental side airbags that span the front, second,
and third row seating for the driver and passengers
seated next to a window
•An energy-absorbing steering column and steering
wheel
•Knee bolsters/blockers for front seat occupants
Storage Bin Cover Emergency Release Lever
2
THINGS TO KNOW BEFORE STARTING YOUR VEHICLE 53
Page 57 of 543
ejection and the risk of injury caused by striking the
inside of the vehicle.Everyone in a motor vehicle should
be belted at all times.
Lap/Shoulder Belts
All seats in your vehicle are equipped with lap/shoulder
belts.
The belt webbing in the retractor is designed to lock
during very sudden stops or collisions. This feature
allows the shoulder part of the belt to move freely with
you under normal conditions. But in a collision, the belt
will lock and reduce the risk of you striking the inside of
the vehicle or being thrown out.
WARNING!
•It is extremely dangerous to ride in a cargo area,
inside or outside of a vehicle. In a collision, people
riding in these areas are more likely to be seri-
ously injured or killed.
•Do not allow people to ride in any area of your
vehicle that is not equipped with seats and seat
belts.
•Be sure everyone in your vehicle is in a seat and
using a seat belt properly.
•Wearing a seat belt incorrectly is dangerous. Seat
belts are designed to go around the large bones of
your body. These are the strongest parts of your
body and can take the forces of a collision the best.
(Continued)
2
THINGS TO KNOW BEFORE STARTING YOUR VEHICLE 55
Page 62 of 543
is long enough to fit, insert the large latch plate into the
buckle until you hear a “click.” The retractor should
withdraw any slack in the belt.
To release the small latch plate, position the end of the
large latch plate against the red button on the small latch
plate and push upward. Reinstall the latch plates into the
headliner.
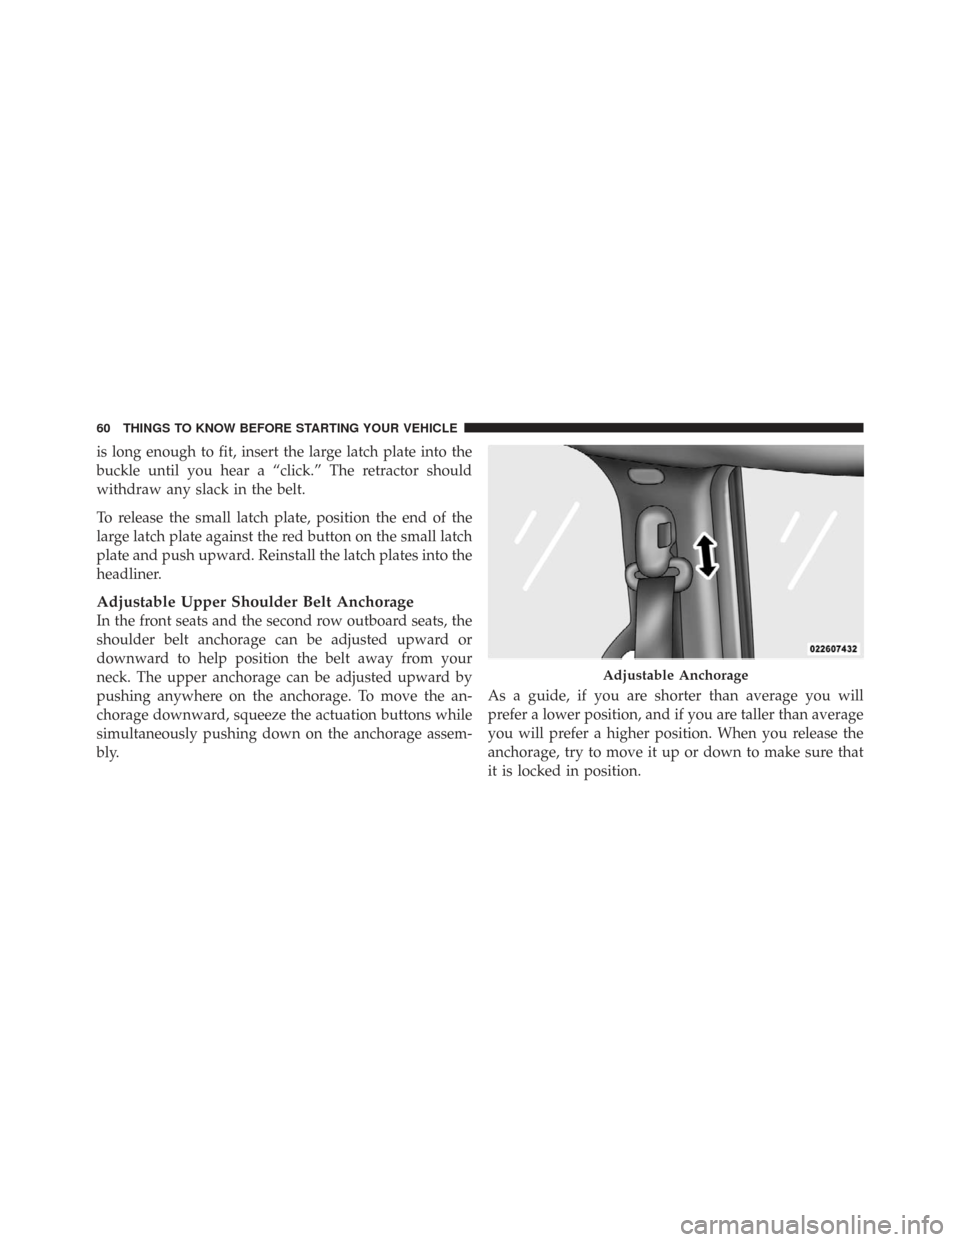
Adjustable Upper Shoulder Belt Anchorage
In the front seats and the second row outboard seats, the
shoulder belt anchorage can be adjusted upward or
downward to help position the belt away from your
neck. The upper anchorage can be adjusted upward by
pushing anywhere on the anchorage. To move the an-
chorage downward, squeeze the actuation buttons while
simultaneously pushing down on the anchorage assem-
bly.As a guide, if you are shorter than average you will
prefer a lower position, and if you are taller than average
you will prefer a higher position. When you release the
anchorage, try to move it up or down to make sure that
it is locked in position.
Adjustable Anchorage
60 THINGS TO KNOW BEFORE STARTING YOUR VEHICLE
Page 63 of 543
Automatic Locking Retractors (ALR) Mode — If
Equipped
In this mode, the shoulder belt is automatically pre-
locked. The belt will still retract to remove any slack in
the shoulder belt. The Automatic Locking Mode is avail-
able on all passenger-seating positions with a combina-
tion lap/shoulder belt.
When to Use the Automatic Locking Mode
Use the Automatic Locking Mode anytime a child safety
seat is installed in a passenger seating position. Children
12 years old and younger should be properly restrained
in the rear seat whenever possible.
How to Use the Automatic Locking Mode
1. Buckle the combination lap/shoulder belt.
2. Grasp the shoulder portion and pull downward until
the entire belt is extracted.3. Allow the belt to retract. As the belt retracts, you will
hear a clicking sound. This indicates the safety belt is
now in the Automatic Locking Mode.
How to Disengage the Automatic Locking Mode
Disconnect the combination lap/shoulder belt and allow
it to retract completely to disengage the Automatic
Locking Mode and activate the Vehicle Sensitive (Emer-
gency) Locking mode.
Seat Belt Pretensioners
The seat belts for both front seating positions are
equipped with pretensioning devices that are designed to
remove slack from the seat belt in the event of a collision.
These devices improve the performance of the seat belt
by assuring that the belt is tight about the occupant early
in a collision. Pretensioners work for all size occupants,
including those in child restraints.
2
THINGS TO KNOW BEFORE STARTING YOUR VEHICLE 61