Page 431 of 543
3. Turn the compact spare tire so that the valve stem is
down, and place the tire into the spare tire/cover assem-
bly. Slide the wheel spacer through the center of the
wheel and spare tire/cover assembly, so that the two
retainer tabs snap out and engage the spare tire cover on
the opposite side.
CAUTION!
The compact spare tire/cover assembly must be used
when the compact spare tire is stored. Failure to use
this cover could drastically reduce the life of the
compact spare tire.
WARNING!
Verify that both retainer tabs of the wheel spacer
have been properly extended through the center of
the wheel and spare tire/cover assembly. Failure to
properly engage both retainer tabs could result in
loss of the spare tire and cover assembly, which will
cause vehicle damage and may cause loss of vehicle
control.
4. Using the winch “T” handle, rotate the drive nut to the
right until the compact spare tire/cover assembly is
drawn into place against the underside of the vehicle.
5. Continue to rotate the nut to the right until you hear
the winch mechanism click three times. It cannot be
overtightened. Check under the vehicle to ensure the
compact spare tire/cover assembly is positioned cor-
rectly against the underside of the vehicle.
6
WHAT TO DO IN EMERGENCIES 429
Page 456 of 543
The A/C air filter is located in the fresh air inlet behind
the glove box. Perform the following procedure to re-
place the filter:
1. Open the glove compartment and remove all contents.
2. Push in on the sides of the glove compartment and
lower the door.
3. Pivot the glove compartment downward.
4. Disengage the two retaining tabs that secure the filter
cover to the HVAC housing, and remove the cover.5. Remove the A/C air filter by pulling it straight out of
the housing.
6. Install the A/C air filter with the arrow on the filter
pointing toward the floor. When installing the filter
cover, make sure the retaining tabs fully engage the
cover.
A/C Air Filter Replacement
454 MAINTAINING YOUR VEHICLE
Page 466 of 543
WARNING!
•Use of a brake fluid that may have a lower initial
boiling point, or is unidentified as to specification,
or which may occur by leaving the top of your
master cylinder reservoir uncovered or the top off
of the brake fluid bottle off, allowing it to absorb
moisture may result in sudden brake failure dur-
ing hard prolonged braking. You could have an
accident.
•Overfilling the brake fluid reservoir can result in
spilling brake fluid on hot engine parts and the
brake fluid catching fire.(Continued)
WARNING! (Continued)
•Use only brake fluid that has been in a tightly
closed container (both as to bottles and the master
cylinder remaining covered) to avoid contamina-
tion from foreign matter or moisture. Brake fluid,
unlike many other fluids, actually absorbs mois-
ture from the air. This lowers the boiling point of
the fluid and may cause it to boil during hard
braking and create a soft pedal pressure resistance
as the gas compresses. This condition does not
apply adequate pressure to the brakes to function
properly.
•Do not allow petroleum based fluid to contami-
nate the brake fluid, all brake seal components
could be damaged, causing partial or complete
brake failure leading to a crash.
464 MAINTAINING YOUR VEHICLE
Page 473 of 543
Interior Care
Instrument Panel Surfaces
The instrument panel cover has a low glare surface,
which minimizes reflections in the windshield. Do not
use protectants or other products which may cause
undesirable reflections. Use soap and warm water to
restore the low glare surface.
Cleaning Interior Trim
Interior trim should be cleaned starting with a damp
cloth, a damp cloth with MOPAR�Total Clean, then
MOPAR� Spot & Stain Remover if absolutely necessary.
Do not use harsh cleaners or Armorall. Use MOPAR �
Total Clean to clean vinyl upholstery
Cleaning Leather Upholstery
MOPAR� Total Clean is specifically recommended for
leather upholstery. Your leather upholstery can be best preserved by regular
cleaning with a damp soft cloth. Small particles of dirt
can act as an abrasive and damage the leather upholstery
and should be removed promptly with a damp cloth.
Stubborn soils can be removed easily with a soft cloth
and MOPAR�
Total Clean. Care should be taken to avoid
soaking your leather upholstery with any liquid. Please
do not use polishes, oils, cleaning fluids, solvents, deter-
gents, or ammonia-based cleaners to clean your leather
upholstery. Application of a leather conditioner is not
required to maintain the original condition.
WARNING!
Do not use volatile solvents for cleaning purposes.
Many are potentially flammable, and if used in
closed areas they may cause respiratory harm.7
MAINTAINING YOUR VEHICLE 471
Page 475 of 543
Seat Belt Maintenance
Do not bleach, dye or clean the seat belts with chemical
solvents or abrasive cleaners. This will weaken the fabric.
Sun damage can also weaken the fabric.
If the seat belts need cleaning, use a mild soap solution or
lukewarm water. Do not remove the belts from the car to
wash them.
Replace the seat belts if they appear frayed or worn, or if
the buckles do not work properly.
Cleaning the Instrument Panel Cupholders
Removal
Pull the flexible liner from the cupholder drawer starting
at one edge to ease removal.
Cleaning
The liner is top shelf dishwasher safe, or you may follow
the cleaning procedure below.Soak the liner in a mixture of medium hot tap water and
one teaspoon of mild liquid dish soap. Let soak for
approximately 30 minutes. After 30 minutes, pull the
liner from the water and dip it back into the water about
six times. This will loosen any remaining debris. Rinse
the liner thoroughly under warm running water. Shake
the excess water from the liner and dry the outer surfaces
with a clean soft cloth.
Installation
Place the liner into the cupholder drawer and press the
liner into place so that the retention tabs seat into the
corresponding openings in the drawer.
FUSES
Totally Integrated Power Module (TIPM)
The Totally Integrated Power Module (TIPM) is located
in the engine compartment near the battery. Refer to the
applicable “Engine Compartment” illustration in this
7
MAINTAINING YOUR VEHICLE 473
Page 476 of 543
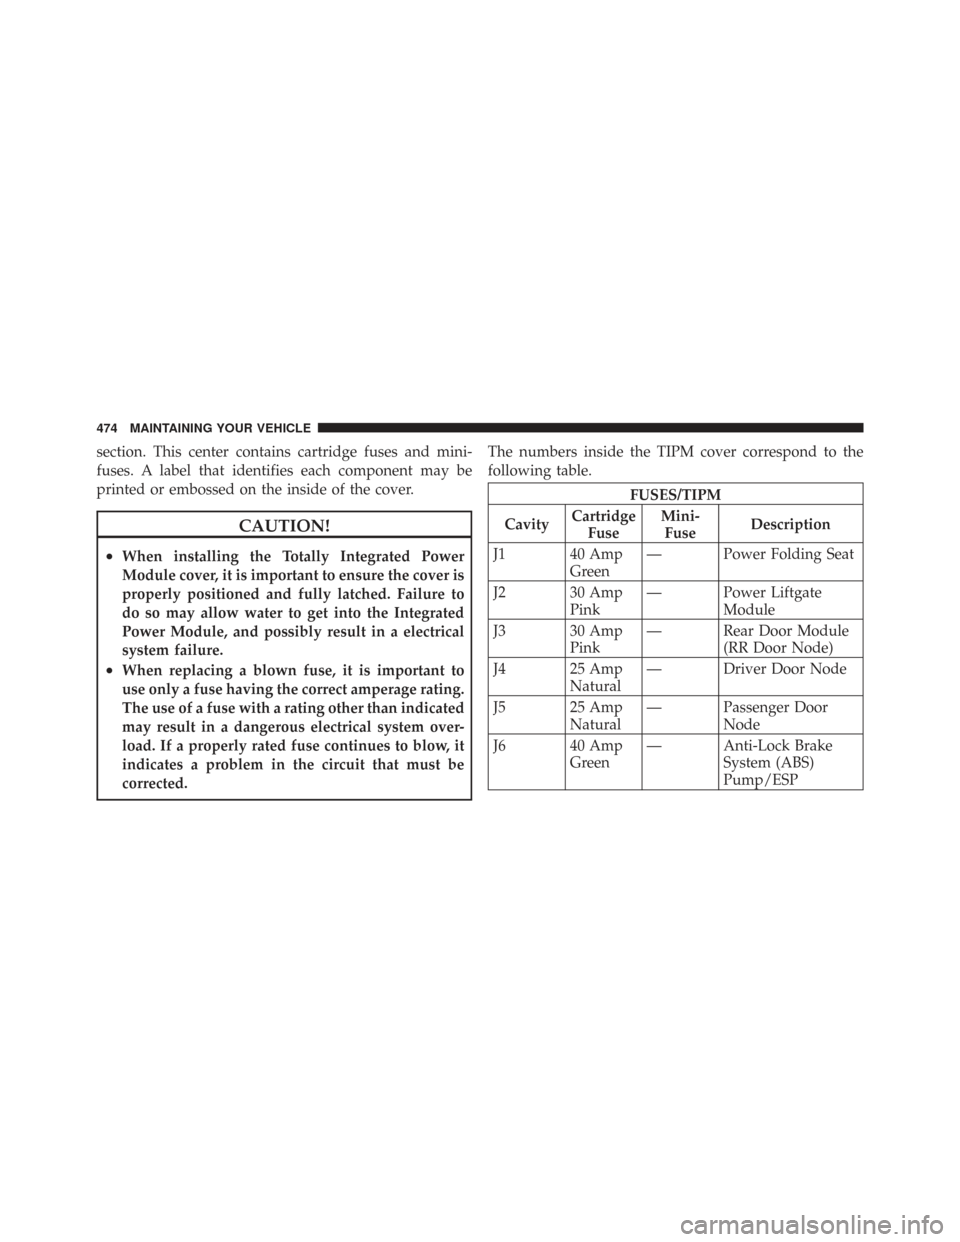
section. This center contains cartridge fuses and mini-
fuses. A label that identifies each component may be
printed or embossed on the inside of the cover.
CAUTION!
•When installing the Totally Integrated Power
Module cover, it is important to ensure the cover is
properly positioned and fully latched. Failure to
do so may allow water to get into the Integrated
Power Module, and possibly result in a electrical
system failure.
•When replacing a blown fuse, it is important to
use only a fuse having the correct amperage rating.
The use of a fuse with a rating other than indicated
may result in a dangerous electrical system over-
load. If a properly rated fuse continues to blow, it
indicates a problem in the circuit that must be
corrected.The numbers inside the TIPM cover correspond to the
following table.
FUSES/TIPM
Cavity Cartridge
Fuse Mini-
Fuse Description
J1 40 Amp Green— Power Folding Seat
J2 30 Amp Pink— Power Liftgate
Module
J3 30 Amp Pink— Rear Door Module
(RR Door Node)
J4 25 Amp Natural— Driver Door Node
J5 25 Amp Natural— Passenger Door
Node
J6 40 Amp Green— Anti-Lock Brake
System (ABS)
Pump/ESP
474 MAINTAINING YOUR VEHICLE
Page 477 of 543
FUSES/TIPM
Cavity Cartridge
Fuse Mini-
Fuse Description
J7 30 Amp Pink— Anti-Lock Brake
System (ABS)
Valve/ESP
J8 40 Amp Green— Power Memory
Seat (If Equipped)
J9 40 Amp Green— PZEV Motor/Flex
Fuel
J10 30 Amp Pink— Headlamp Wash
Relay/Manifold
Tuning Valve
J11 30 Amp Pink— Power Sliding Door
Module/Thatchum
Relay Lock Feed
J13 60 Amp Yellow— Ignition Off Draw
(IOD) — MainFUSES/TIPM
Cavity Cartridge
Fuse Mini-
Fuse Description
J14 40 Amp Green— Rear Window De-
fogger
J15 30 Amp Pink— Rear Blower
J17 40 Amp Green— Starter Solenoid
J18 20 Amp Blue— Powertrain Control
Module (PCM)
Trans Range
J19 60 Amp Yellow— Radiator Fan
J20 30 Amp Pink— Front Wiper LO/HI
J21 20 Amp Blue— Front/Rear Washer
7
MAINTAINING YOUR VEHICLE 475
Page 483 of 543
FUSES/TIPM
Cavity Cartridge
Fuse Mini-
Fuse Description
M34 — 10 Amp RedPark Assist (PRK
ASST), Heater Ven-
tilation, Air Condi-
tioning Module
(HVAC MOD),
Headlamp Wash
(HDLP WASH),
Compass (COM-
PAS), IR Sensor,
Rear Camera, Lamp
Door FT Drv/Pass,
Lamp Flashlight,
AHLM, Relay Die-
sel Cabin Heater,
Rad Fan Diesel
M35 — 10 Amp RedHeated MirrorsFUSES/TIPM
Cavity Cartridge
Fuse Mini-
Fuse Description
M36 — 20 Amp YellowPower Outlet #3
(BATT)
M37 — 10 Amp RedAnti-Lock Brake
System (ABS), Elec-
tronic Stability Pro-
gram (ESP), Stop
Lamp Switch (STP
LP SW), Fuel Pump
Rly Hi Control
M38 — 25 Amp NaturalDoor Lock/Unlock
Motors (LOCK/
UNLOCK MTRS),
Liftgate Lock/
Unlock Motors
The heated mirrors, lower instrument panel power outlet
and removable floor console, when in the front position
7
MAINTAINING YOUR VEHICLE 481