Page 137 of 475
Voice Training
For users experiencing difficulty with the system recog-
nizing their voice commands or numbers, the UConnect�
system Voice Training feature may be used.
1. Press the VR hard-key, say “System Setup” and once
you are in that menu then say “Voice Training.” This will
train your own voice to the system and will improve
recognition.
2. Repeat the words and phrases when prompted by the
UConnect�System. For best results, the Voice Training
session should be completed when the vehicle is parked,
engine running, all windows closed, and the blower fan
switched off. This procedure may be repeated with a new
user. The system will adapt to the last trained voice only.
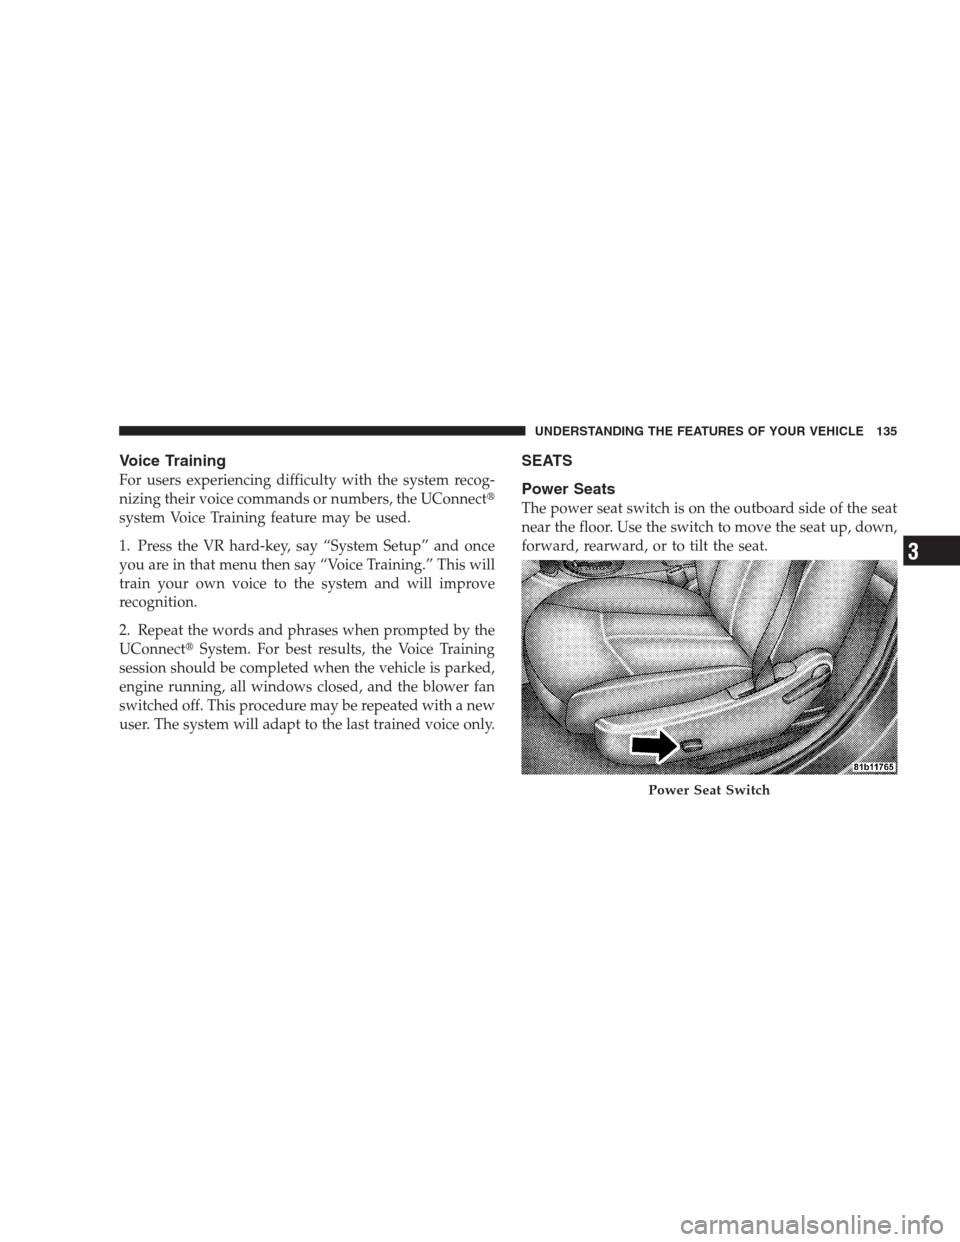
SEATS
Power Seats
The power seat switch is on the outboard side of the seat
near the floor. Use the switch to move the seat up, down,
forward, rearward, or to tilt the seat.
Power Seat Switch
UNDERSTANDING THE FEATURES OF YOUR VEHICLE 135
3
Page 146 of 475

Headlights And Parking Lights
Turn the end of the multifunction lever to the first detent
for parking light operation. Turn the end of the lever to
the second detent for headlight operation.
Automatic Headlights — If Equipped
This system automatically turns the headlights on or off
according to ambient light levels. To turn the system on,
turn the end of the multifunction lever to the AUTO
position. When the system is on, the Headlight Time
Delay feature is also on. This means the headlights will
stay on for up to 90 seconds after you turn the ignition
switch to the LOCK position. To turn the Automatic
System off, turn the end of the multifunction lever out of
the AUTO position.
NOTE:The engine must be running before the head-
lights will turn on in the Automatic mode.
Headlights with Wipers (Available with Auto
Headlights Only)
When this feature is active, the headlights will turn on
approximately 10 seconds after the wipers are turned on
if the multifunction lever is placed in the AUTO position.
Headlight Switch
144 UNDERSTANDING THE FEATURES OF YOUR VEHICLE
Page 147 of 475

In addition, the headlights will turn off when the wipers
are turned off if they were turned on by this feature.
The Headlights with Wipers feature can be turned on or
off through the Electronic Vehicle Information Center
(EVIC) — if equipped. For details, refer to ”Headlights
with Wipers,” under “Personal Settings (Customer-
Programmable Features)” under “Electronic Vehicle In-
formation Center” in Section 4 of this manual.
Headlight Time Delay — If Equipped
This feature is particularly useful when exiting your
vehicle in an unlit area. It provides the safety of headlight
illumination for about 90 seconds after turning the igni-
tion switch to the LOCK position.
To activate the delay, turn the ignition switch to the
LOCK position while the headlights are still on. Then,
turn off the headlights within 45 seconds. The delay
interval begins when you turn off the headlights. Only
the headlights will illuminate during this time.If you turn the headlights, parking lights, or ignition
switch ON again, the system will cancel the delay.
If you turn the headlights off before the ignition, they will
turn off in the normal manner.
The Headlight delay time is programmable on vehicles
equipped with the Electronic Vehicle Information Center
(EVIC). For details, refer to “Headlights Off Delay,”
under “Personal Settings (Customer-Programmable Fea-
tures)” under “Electronic Vehicle Information Center
(EVIC)” in Section 4 of this manual.
Daytime Running Lights (DRL) — If Equipped
The high beam headlights will turn on as Daytime
Running Lights (DRL) and operate at DRL (lower) inten-
sity, whenever the ignition is ON, the engine is running,
the headlight switch is off, the parking brake is off, the
turn signal is off, and the shift lever is in any position
except PARK.
UNDERSTANDING THE FEATURES OF YOUR VEHICLE 145
3
Page 167 of 475
NOTE:If desired, the instrument panel power outlet
can be converted by your authorized dealer to provide
power with the ignition switch while in the LOCK
position.The center console power outlet is powered directly from
the battery (power available at all times). Items plugged
into this outlet may discharge the battery and/or prevent
engine starting.
Instrument Panel Power OutletConsole Interior
UNDERSTANDING THE FEATURES OF YOUR VEHICLE 165
3
Page 168 of 475

WARNING!
To avoid serious injury or death:
•Do not use a three-prong adapter.
•Do not insert any objects into the receptacles.
•Do not touch with wet hands.
•Close the lid when not in use and while driving
the vehicle.
•If this outlet is mishandled, it may cause an
electric shock and failure.
CAUTION!
•Many accessories that can be plugged in draw
power from the vehicle’s battery, even when not in
use (i.e., cellular phones, etc.). Eventually, if
plugged in long enough, the vehicle’s battery will
discharge sufficiently to degrade battery life
and/or prevent engine starting.
•Accessories that draw higher power (i.e., coolers,
vacuum cleaners, lights, etc.) will degrade the
battery even more quickly. Only use these inter-
mittently and with greater caution.
•After the use of high power draw accessories, or
long periods of the vehicle not being started (with
accessories still plugged in), the vehicle must be
driven a sufficient length of time to allow the
generator to recharge the vehicle’s battery.
166 UNDERSTANDING THE FEATURES OF YOUR VEHICLE
Page 183 of 475

INSTRUMENT CLUSTER DESCRIPTIONS
1. Fuel Gauge
When the ignition switch is in the ON position, the
pointer will show the level of fuel remaining in the fuel
tank.
2. Fuel Door Reminder
This is a reminder that the Fuel Filler Door is
located on the left side of the vehicle.
3. Temperature Gauge
The temperature gauge shows engine coolant tempera-
ture. Any reading below the red area of the gauge shows
that the engine cooling system is operating properly. The
gauge pointer may show a higher than normal tempera-
ture when driving in hot weather, up mountain grades, in
heavy stop and go traffic, or when towing a trailer.If the pointer rises to theH(red) mark, the instrument
cluster will sound a chime. Pull over and stop the vehicle.
Idle the vehicle with the air conditioner turned off until
the pointer drops back into the normal range. If the
pointer remains on theH(red) mark, turn the engine off
immediately and call for service.
There are steps that you can take to slow down an
impending overheat condition. If your air conditioning is
on, turn it off. The air conditioning system adds heat to
the engine cooling system and turning off the A/C
removes this heat. You can also turn the Temperature
control to maximum heat, the Mode control to Floor and
the Fan control to High. This allows the heater core to act
as a supplement to the radiator and aids in removing heat
from the engine cooling system.
4. Speedometer
Indicates the vehicle speed in miles per hour (MPH) and
kilometers per hour (km/h).
UNDERSTANDING YOUR INSTRUMENT PANEL 181
4
Page 185 of 475

9. Seat Belt Reminder Light
When the ignition switch is first turned ON, this
light will come on for about six seconds. A chime
will sound if you have not pulled the shoulder belt
out of the retractor. This is a reminder to “buckle up”. If
you do not buckle up, the light will remain on.
10. Oil Pressure Warning Light
This light indicates low engine oil pressure. The
light will come on and remain on when the
ignition switch is turned from the OFF to the ON
position, and the light will turn off after the engine is
started. If the bulb does not come on during starting,
have the system checked by an authorized dealer.
If the light comes on and remains on while driving, stop
the vehicle and shut off the engine.DO NOT OPERATE
THE VEHICLE UNTIL THE CAUSE IS CORRECTED.The light does not show the quantity of oil in the engine.
This can be determined using the procedure shown in
Section 7.
11. Engine Temperature Warning Light
This light warns of an overheated engine condi-
tion. If the engine is critically hot, a warning chime
will sound 10 times. After the chime turns off, the
engine will still be critically hot until the light goes out.
12. Tachometer
The silver area of the scale shows the permissible engine
revolutions-per-minute (rpm x 1000) for each gear range.
Before reaching the red area, ease up on the accelerator to
prevent engine damage.
13. Shift Lever Indicator
This display indicator shows the automatic transmission
shift lever selection.
UNDERSTANDING YOUR INSTRUMENT PANEL 183
4
Page 186 of 475

NOTE:You must apply the brakes before shifting from
PARK.
14. Odometer/Trip Odometer
The odometer shows the total distance the vehicle has
been driven. U.S. federal regulations require that upon
transfer of vehicle ownership, the seller certify to the
purchaser the correct mileage that the vehicle has been
driven. Therefore, if the odometer reading is changed
during repair or replacement, be sure to keep a record of
the reading before and after the service so that the correct
mileage can be determined.
The two trip odometers show individual trip mileage. To
switch from odometer to trip odometers, press and
release the Trip Odometer button. To reset a trip odom-
eter, display the desired trip odometer to be reset then
push and hold the button until the display resets (ap-
proximately 2 seconds). Refer to “Trip Odometer Button”
for additional information.Vehicle Warning Messages
When the appropriate conditions exist, “door,” “deck,”
“LoW TirE,” “CHAngE OIL,” “GASCAP” or “HOTOIL”
will display in the odometer.
NOTE:If the instrument cluster is equipped with the
optional Electronic Vehicle Information Center (EVIC),
then all warnings including ”Low Tire,” “Door Ajar” and
“Trunk Ajar” will only display in the EVIC. (Refer to
“Electronic Vehicle Information Center (EVIC)” in this
section for specific messages).
LoW TirE
When the appropriate condition exists the odometer
display will toggle between LoW and TirE for three
cycles.
HOTOIL
When this message is displayed there is an engine
over-temperature condition.
184 UNDERSTANDING YOUR INSTRUMENT PANEL