Page 36 of 475

Smart Glass Feature — Convertible only
The door window will lower slightly if the window is
fully up when opening the door. The window will return
to its full up position after closing the door. This action
allows the door to open without resistance and prevents
window and top seal damage.
Auto Window Down — If Equipped
The front window controls on the driver and passenger
door trim panels have an Auto Down feature. These
switches are labeled AUTO to indicate this capability.
Push the window switch past the first detent, release, and
the window will go down automatically.
To open the window part way, push the window switch
to the first detent and release it when you want the
window to stop.
To cancel the Auto Down movement, operate the switch
either in the up or down direction and release the switch.For vehicles not equipped with the Electronic Vehicle
Information Center (EVIC), the power window switches
will remain active for 45 seconds after the ignition switch
is turned to the LOCK position. Opening either door will
cancel this feature.
For vehicles equipped with EVIC, the power window
switches will remain active for up to 10 minutes after the
ignition switch is turned to the LOCK position. Opening
either door will cancel this feature. The time for this
feature is programmable. For details, refer to “Key-Off
Power Delay,” under “Personal Settings (Customer-
Programmable Features)” under “Electronic Vehicle In-
formation Center (EVIC)” in Section 4 of this manual.
Reset Window Smart Glass Feature for
Opening/Closing the Door
If the vehicle battery goes dead, the window Smart Glass
Feature for opening and closing the door will be disabled.
34 THINGS TO KNOW BEFORE STARTING YOUR VEHICLE
Page 37 of 475

To reactivate the window Smart Glass Feature, perform
the following steps after vehicle power is restored.
1. Lowering all four windows to the full open position.
2. Press and hold the Power Top Switch in the Close
direction. Once the Power Top becomes fully closed, all
four windows will start closing.
3. Continue to hold the Power Top Switch an additional
two seconds after the windows are fully closed.
4. Push all the window switches down firmly to open the
windows completely and continue to hold the switch
down for an additional two seconds after the window is
fully open.
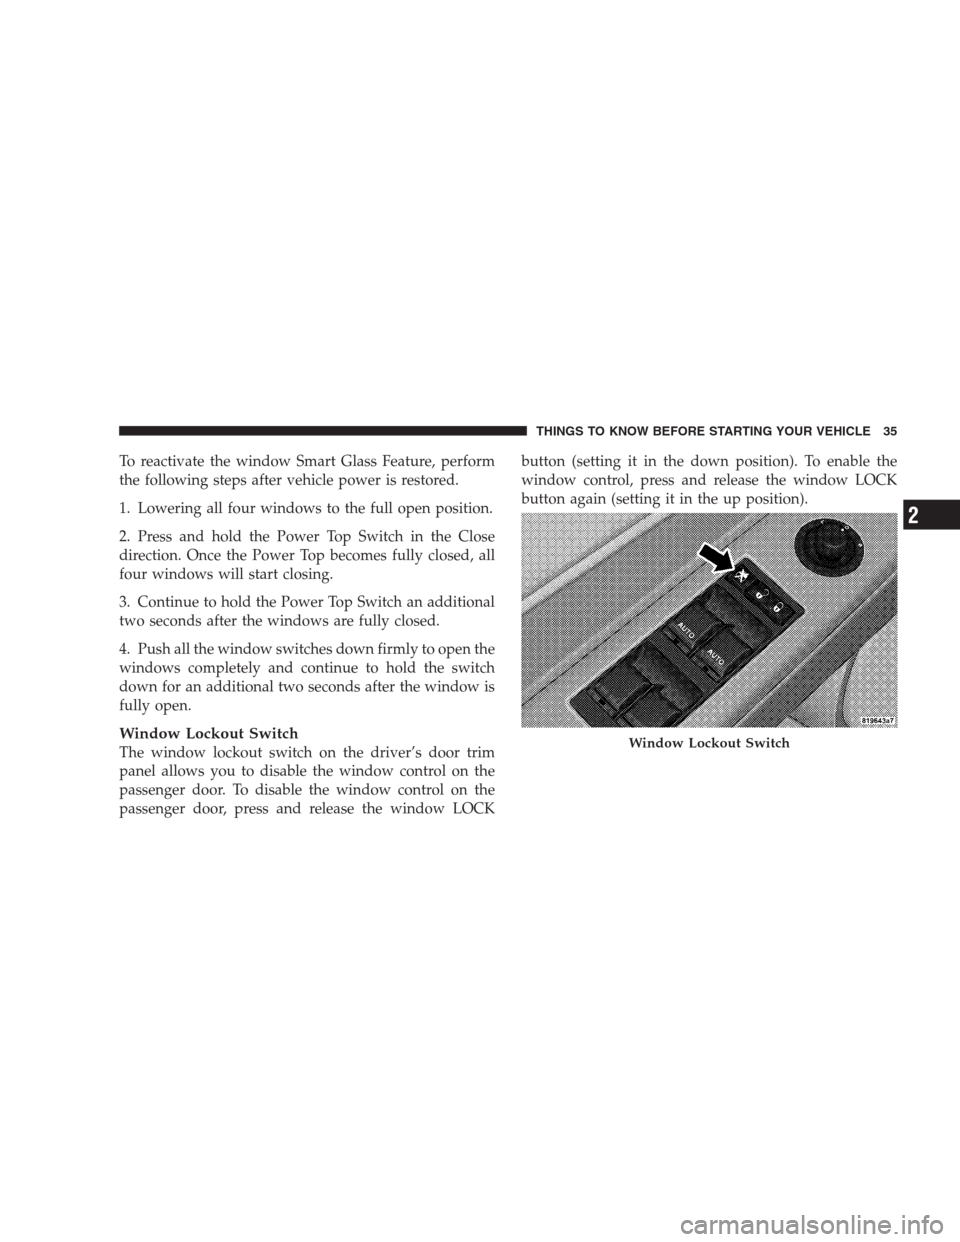
Window Lockout Switch
The window lockout switch on the driver’s door trim
panel allows you to disable the window control on the
passenger door. To disable the window control on the
passenger door, press and release the window LOCKbutton (setting it in the down position). To enable the
window control, press and release the window LOCK
button again (setting it in the up position).Window Lockout Switch
THINGS TO KNOW BEFORE STARTING YOUR VEHICLE 35
2
Page 38 of 475

Wind Buffeting
Wind buffeting can be described as the perception of
pressure on the ears or a helicopter type sound in the
ears. Your vehicle may exhibit wind buffeting with one
window down in certain open or partially open posi-
tions. This is a normal occurrence and can be minimized.
If the buffeting occurs with one window open, then open
both windows together to minimize the buffeting.
TRUNK LOCK AND RELEASE
To unlatch the trunk lid from inside the vehicle, press and
release the TRUNK RELEASE Button located on the
instrument panel to the left of the steering wheel.
NOTE:The convertible top must be either closed and
latched or open and latched.The trunk release button on the
dash will be disabled if the vehicle
is locked by pressing the power
door lock switch or by pressing
the LOCK button on the Remote
Keyless Entry (RKE) transmitter.
The trunk release button will be
enabled when the vehicle is un-
locked by the RKE or if the key is
inserted into the ignition and
turned to ON or START.
NOTE:This provides a locked area in the vehicle even
if the convertible top is open.
To unlatch the trunk lid from outside the vehicle, press
and release the TRUNK RELEASE button on the RKE
transmitter two times.
Trunk Release
Button
36 THINGS TO KNOW BEFORE STARTING YOUR VEHICLE
Page 70 of 475

Remind all children in the vehicle that the seat belts are
not toys and should not be played with, and never leave
your child unattended in the vehicle.
Installing the LATCH-Compatible Child Restraint
System
We urge that you carefully follow the directions of the
manufacturer when installing your child restraint. Not all
child restraint systems will be installed as described here.
Again, carefully follow the installation instructions that
were provided with the child restraint system.
The rear seat lower anchorages are round bars,
located at the rear of the seat cushion where it
meets the seatback, and are just visible when
you lean into the rear seat to install the child
restraint. You will easily feel them if you run your finger
along the intersection of the seatback and seat cushion
surfaces.In addition, there are tether strap anchorages
behind each rear seating position. Access ports
to the tether anchors are located in the panel
between the rear seat and the rear window. The
tether anchors are underneath access covers in the carpet
covering the back of the seat where you see this symbol.
Many, but not all restraint systems will be equipped with
separate straps on each side, with each having a hook or
connector for attachment to the lower anchorage and a
means of adjusting the tension in the strap. Forward-
facing toddler restraints and some rear-facing infant
restraints will also be equipped with a tether strap, a
hook for attachment to the tether strap anchorage and a
means of adjusting the tension of the strap.
You will first loosen the adjusters on the lower straps and
on the tether strap so that you can more easily attach the
hooks or connectors to the vehicle anchorages. Next,
attach the lower hooks or connectors over the top of the
68 THINGS TO KNOW BEFORE STARTING YOUR VEHICLE
Page 76 of 475

Exhaust Gas
WARNING!
•Exhaust gases can injure or kill. They contain
carbon monoxide (CO), which is colorless and
odorless. Breathing it can make you unconscious
and can eventually poison you. To avoid breathing
(CO), follow these safety tips:
Do not run the engine in a closed garage or in confined
areas any longer than needed to move your vehicle in or
out of the area.
If it is necessary to sit in a parked vehicle with the engine
running, adjust your heating or cooling controls to force
outside air into the vehicle. Set the blower at high speed.If you are required to drive with the trunk open, make
sure that all windows are closed, and the blower switch
on the climate control is set at high speed. DO NOT use
the recirculation mode.
The best protection against carbon monoxide entry into
the vehicle body is a properly maintained engine exhaust
system.
Whenever a change is noticed in the sound of the exhaust
system, when exhaust fumes can be detected inside the
vehicle, or when the underside or rear of the vehicle is
damaged, have a competent mechanic inspect the com-
plete exhaust system and adjacent body areas for broken,
damaged, deteriorated, or mispositioned parts. Open
seams or loose connections could permit exhaust fumes
to seep into the passenger compartment. In addition,
inspect the exhaust system each time the vehicle is raised
for lubrication or oil change. Replace as required.
74 THINGS TO KNOW BEFORE STARTING YOUR VEHICLE
Page 82 of 475
▫Gate Operator/Canadian Programming.... 162
▫Security........................... 163
▫Troubleshooting Tips.................. 163
▫General Information.................. 164
�Electrical Power Outlets................. 164
�Cigar Lighter And Ash Receiver —
If Equipped.......................... 167
�Cupholders.......................... 167
▫Front Seat Cupholder................. 167▫Heated Or Cooled Cupholder —
If Equipped........................ 168
▫Rear Seat Cupholders................. 169
�Console Features...................... 170
▫Storage........................... 170
▫Sliding Armrest — If Equipped.......... 172
�Rear Window Features.................. 173
▫Rear Window Defroster — If Equipped..... 173
80 UNDERSTANDING THE FEATURES OF YOUR VEHICLE
Page 83 of 475

CONVERTIBLE TOP OPERATION
WARNING!
The convertible top does not provide the structural
protection that a reinforced metal roof does and the
fabric top cannot be expected to prevent the ejection
of the occupants of a vehicle in a collision. Therefore,
it is important that all occupants wear their seat belts
at all times when riding in a convertible. Studies
have shown that it is generally safer to remain inside
a vehicle during a collision than to be ejected from
the vehicle.
You can lower or raise the power convertible top from
inside the vehicle or lower the top remotely using the
Remote Keyless Entry (RKE) transmitter. Either operation
takes approximately 30 seconds. The entire process, in-
cluding unlatching or latching the top at the windshield
header is automatic.The top does take up some space in the trunk when
retracted. However, the trunk will still hold a significant
amount of cargo.
When operating the power convertible top, the trunk lid
will pivot at the rear of the vehicle, swing open by the
rear window, and then pivot backward. This allows room
for the top to retract into or unfold from its stowage area
in the trunk.
When lowering the top, the system extends the hard
tonneau cover, which stows conveniently underneath the
trunk lid. The tonneau cover closes the area between the
rear seats and the trunk lid to conceal the top when
stowed.
When raising the top, the system retracts the hard
tonneau cover back into its stowage area underneath the
trunk lid.
UNDERSTANDING THE FEATURES OF YOUR VEHICLE 81
3
Page 86 of 475

CAUTION! (Continued)
Failure to follow these cautions can cause damage to
the convertible top components, trunk contents, and
the vehicle interior.
CAUTION!
•Do not operate the power top with the hydraulic
pump valve open.
•Do not allow the top to remain in the suspended
position. After approximately 10 minutes in the
suspended position, the hydraulic pressure will
release, which will allow the top and the trunk lid
to lower. Pressing the power top switch will cancel
this operation.
(Continued)
CAUTION! (Continued)
•Always use a normal ice scraper to remove snow or
ice from the rear window. Use of a sharp object or
other tools could scratch the fabric or panels when
removing snow or ice.
•Always close the top when leaving your vehicle so
as not to leave the interior exposed to potentially
damaging outdoor conditions.
•Do not leave the top lowered for several weeks at
a time. Close it occasionally to prevent discolora-
tion in the folds of the fabric and to allow the
creases to smooth out. This is especially important
if the top was stowed when not completely dry.
Failure to follow these cautions can cause damage
to the convertible top components, trunk contents,
and the vehicle interior.
84 UNDERSTANDING THE FEATURES OF YOUR VEHICLE