Page 289 of 410
Towing Requirements — Trailer Lights And Wiring
Whenever you pull a trailer, regardless of the trailer size,
stop lights and turn signals on the trailer are required for
motoring safety.
The Trailer Tow Package may include a four–or seven-pin
connector wiring harness. Use a factory approved trailer
harness and connector.
NOTE:Do not cut or splice wiring into the vehicles
wiring harness.
The electrical connections are all complete to the vehicle
but you must mate the harness to a trailer connector.
Refer to the following four-pin connector and seven-pin
connector illustrations.
Four-Pin Connector
1 — Female Pins 4 — Park
2 — Male Pin 5 — Left Stop/Turn
3 — Ground 6 — Right Stop/Turn
5
STARTING AND OPERATING 287
Page 308 of 410

▫Exhaust System ..................... 321
▫ Cooling System ..................... 323
▫ Brake System ....................... 329
▫ Automatic Transaxle .................. 331
▫ Manual Transaxle .................... 334
▫ Appearance Care And Protection From
Corrosion .......................... 334
� Fuses .............................. 340
▫ Integrated Power Module (IPM) .......... 340
� Vehicle Storage ....................... 344
� Replacement Bulbs .................... 344 �
Bulb Replacement ..................... 345
▫ Headlights ......................... 345
▫ Front Parking, Turn Signal, And Side Marker
Lights ............................ 346
▫ Front Fog Lights — If Equipped .......... 347
▫ Tail/Stop Lights And Rear
Turn Signal Lights .................... 347
▫ Backup Lights ...................... 348
▫ Center High-Mounted Stop Light (CHMSL) . . 348
� Fluids And Capacities .................. 349
� Fluids, Lubricants And Genuine Parts ....... 350
▫ Engine ............................ 350
▫ Chassis ........................... 351
306 MAINTAINING YOUR VEHICLE
Page 340 of 410

Cleaning Interior Trim
Interior Trim should be cleaned starting with a damp
cloth, a damp cloth with MOPAR�Total Clean, then
MOPAR� Spot & Stain Remover if absolutely necessary.
Do not use harsh cleaners or Armorall. Use MOPAR �
Total Clean to clean vinyl upholstery
Cleaning Leather Upholstery
MOPAR� Total Clean is specifically recommended for
leather upholstery.
Your leather upholstery can be best preserved by regular
cleaning with a damp soft cloth. Small particles of dirt
can act as an abrasive and damage the leather upholstery,
and should be removed promptly with a damp cloth.
Stubborn soils can be removed easily with a soft cloth
and MOPAR� Total Clean. Care should be taken to avoid
soaking your leather upholstery with any liquid. Please
do not use polishes, oils, cleaning fluids, solvents, deter-
gents, or ammonia-based cleaners to clean your leather upholstery. Application of a leather conditioner is not
required to maintain the original condition.
WARNING!
Do not use volatile solvents for cleaning purposes.
Many are potentially flammable, and if used in
closed areas they may cause respiratory harm.
Cleaning Headlights
Your vehicle has plastic headlights that are lighter and
less susceptible to stone breakage than glass headlights.
Plastic is not as scratch resistant as glass and therefore
different lens cleaning procedures must be followed.
To minimize the possibility of scratching the lenses and
reducing light output, avoid wiping with a dry cloth. To
remove road dirt, wash with a mild soap solution fol-
lowed by rinsing.
338 MAINTAINING YOUR VEHICLE
Page 347 of 410
LIGHTS BULBS — ExteriorBulb No.
Low Beam Headlight ................... 9006XS
High Beam Headlight ................... 9005XS
Front Park/Turn Signal/
Side Marker Light ................... 4157NAKX
Front Fog Light ......................... 9145
Center High-Mounted Stop Light
(CHMSL) (Sedan) ................... 921–W16W
Rear Tail/Stop .......................... 3157
Rear Turn Signal ....................... 3757A
Backup Light ..................... 3157-P27/7W
License Light ........................... 168BULB REPLACEMENT
Headlights
CAUTION!
Do not touch the new headlight bulb with your
fingers. Oil contamination will severely shorten bulb
life.
1. Remove the headlight access cover splash shield,
located in the front wheel well opening.
7
MAINTAINING YOUR VEHICLE 345
Page 348 of 410
2. Disconnect the electrical connector(s).
3. Rotate the socket to the left one-quarter turn, and
replace the bulb.Front Parking, Turn Signal, and Side Marker
Lights
1. Remove the headlight access cover splash shield,
located in the front wheel well opening.
2. Disconnect the electrical connector.
346 MAINTAINING YOUR VEHICLE
Page 349 of 410
3. Rotate the socket to the left one-quarter turn, and
replace the bulb.
Front Fog Lights — If Equipped
1. Remove the fasteners attaching the lower splash
shield to gain access to the fog light.
2. Twist and remove the bulb from the fog light housing.
3. Disconnect the electrical connector and replace bulb.
Tail/Stop Lights and Rear Turn Signal Lights
1. Remove the screw attaching the tail light housing and
remove the housing from the vehicle.
2. Twist the bulb socket one—quarter turn to remove it
from the housing.3. Pull the bulb out of the socket and replace.
7
MAINTAINING YOUR VEHICLE 347
Page 350 of 410
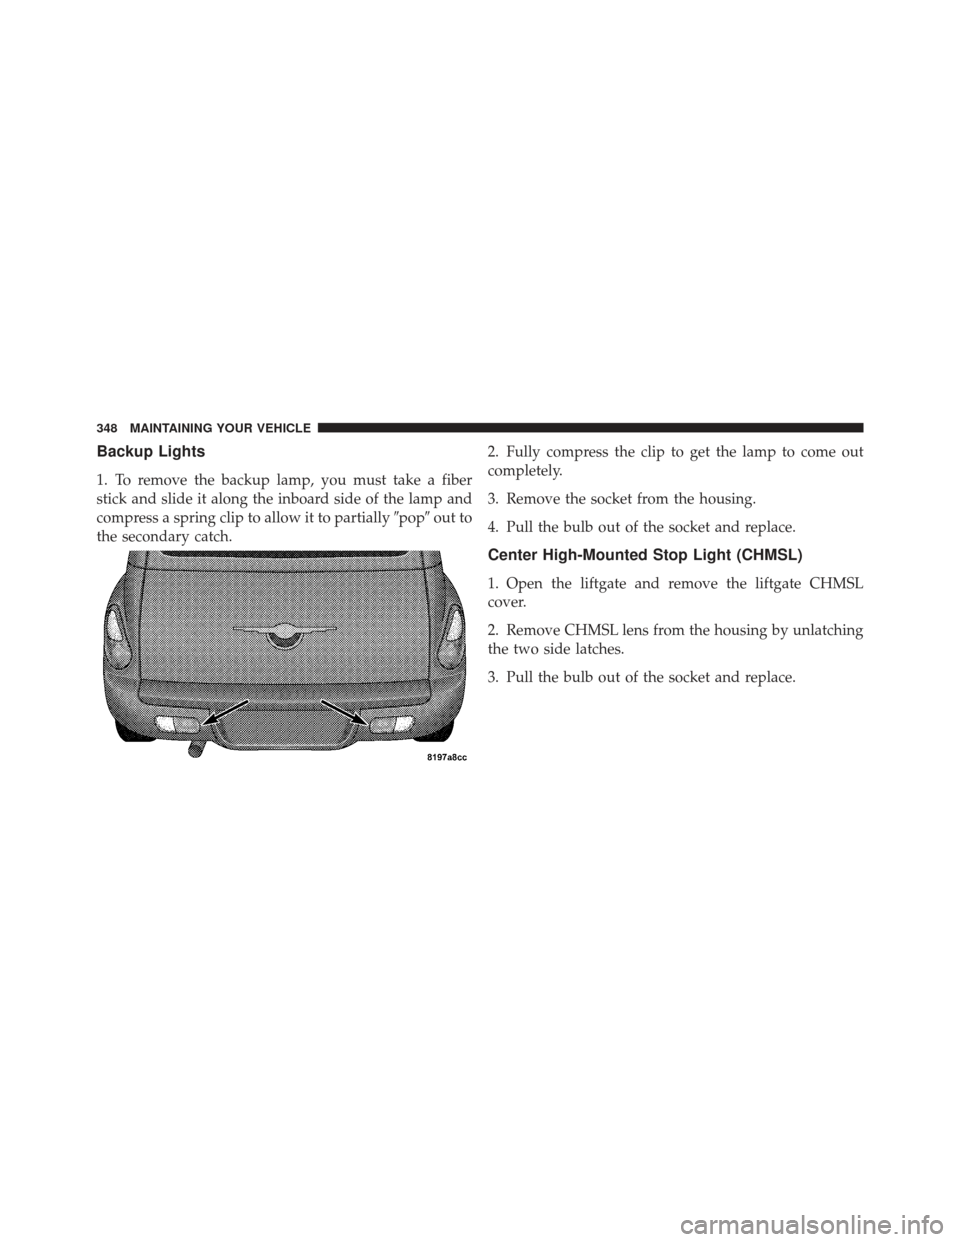
Backup Lights
1. To remove the backup lamp, you must take a fiber
stick and slide it along the inboard side of the lamp and
compress a spring clip to allow it to partially�pop�out to
the secondary catch. 2. Fully compress the clip to get the lamp to come out
completely.
3. Remove the socket from the housing.
4. Pull the bulb out of the socket and replace.
Center High-Mounted Stop Light (CHMSL)
1. Open the liftgate and remove the liftgate CHMSL
cover.
2. Remove CHMSL lens from the housing by unlatching
the two side latches.
3. Pull the bulb out of the socket and replace.
348 MAINTAINING YOUR VEHICLE
Page 358 of 410

At Each Stop for Fuel
•
Check the engine oil level about five minutes after a
fully warmed engine is shut off. Checking the oil level
while the vehicle is on level ground will improve the
accuracy of the oil level reading. Add oil only when
the level is at or below the ADD or MIN mark.
•Check the windshield washer solvent and add if
required.
Once a Month
•
Check tire pressure and look for unusual wear or
damage.
•Inspect the battery and clean and tighten the terminals
as required.
•Check the fluid levels of coolant reservoir, brake
master cylinder and transaxle, and add as needed.
•Check all lights and all other electrical items for correct
operation.
•Check rubber seals on each side of the radiator for
proper fit.
At Each Oil Change
•
Change the engine oil filter.
•Inspect the exhaust system.
•Inspect the brake hoses.
•Inspect the CV joints and front suspension compo-
nents.
•Check the automatic transaxle fluid level.
•Check the manual transaxle fluid level and fill plug
condition.
•Check the coolant level, hoses, and clamps.
8
MA I
N T
E
N A
N CE
S
C
H E
D
U L
E
S356 MAINTENANCE SCHEDULES


.
3. Rotate the socket to the left one-quarter turn, and
replace the bulb.Front Parking, Turn Signal, and Side Marker
Lights
1. Remove the headlight access cov")