2009 CHRYSLER 300 SRT check oil
[x] Cancel search: check oilPage 79 of 493

If you are required to drive with the trunk open, make
sure that all windows are closed and the climate control
BLOWER switch is set at high speed. DO NOT use the
recirculation mode.
The best protection against carbon monoxide entry into
the vehicle body is a properly maintained engine exhaust
system.
Whenever a change is noticed in the sound of the exhaust
system, when exhaust fumes can be detected inside the
vehicle, or when the underside or rear of the vehicle is
damaged, have a competent mechanic inspect the com-
plete exhaust system and adjacent body areas for broken,
damaged, deteriorated, or mispositioned parts. Open
seams or loose connections could permit exhaust fumes
to seep into the passenger compartment. In addition,
inspect the exhaust system each time the vehicle is raised
for lubrication or oil change. Replace as required.Safety Checks You Should Make Inside The
Vehicle
Seat Belts
Inspect the belt system periodically, checking for cuts,
frays, and loose parts. Damaged parts must be replaced
immediately. Do not disassemble or modify the system.
Front seat belt assemblies must be replaced after a
collision. Rear seat belt assemblies must be replaced after
a collision if they have been damaged (i.e., bent retractor,
torn webbing, etc.). If there is any question regarding belt
or retractor condition, replace the belt.
Airbag Warning Light
The light should come on and remain on for six to eight
seconds as a bulb check when the ignition switch is first
turned ON. If the light is not lit during starting, see your
authorized dealer. If the light stays on, flickers, or comes
on while driving, have the system checked by an autho-
rized dealer.
THINGS TO KNOW BEFORE STARTING YOUR VEHICLE 77
2
Page 80 of 493

Defroster
Check operation by selecting the defrost mode and place
the blower control on high speed. You should be able to
feel the air directed against the windshield. See your
authorized dealer for service if your defroster is
inoperable.
Periodic Safety Checks You Should Make Outside
The Vehicle
Tires
Examine tires for excessive tread wear and uneven wear
patterns. Check for stones, nails, glass, or other objects
lodged in the tread. Inspect the tread and sidewall for
cuts and cracks. Check the wheel nuts for tightness.
Check the tires (including spare) for proper pressure.
Lights
Have someone observe the operation of exterior lights
while you work the controls. Check turn signal and high
beam indicator lights on the instrument panel.
Door Latches
Check for positive closing, latching, and locking.
Fluid Leaks
Check area under vehicle after overnight parking for fuel,
engine coolant, oil, or other fluid leaks. Also, if gasoline
fumes are detected or if fuel, power steering fluid, or
brake fluid leaks are suspected, the cause should be
located and corrected immediately.
78 THINGS TO KNOW BEFORE STARTING YOUR VEHICLE
Page 212 of 493

WARNING!
A hot engine cooling system is dangerous. You or
others could be badly burned by steam or boiling
coolant. You may want to call a service center if your
vehicle overheats. If you decide to look under the
hood yourself, refer to Section 7 and follow the
warnings under the Cooling System Pressure Cap
paragraph.
15. Trip Odometer Button
Press this button to change the display from odometer to
either of two trip odometer settings. The letter “A” or “B”
will appear when in the trip odometer mode. Push in and
hold the button for two seconds to reset the trip odometer
to 0 miles (km). The odometer must be in TRIP mode to
reset it.16. High Beam Light
This light will turn on when the high beam
headlights are ON. Push the multifunction lever
away from the steering wheel to switch the headlights to
high beam.
17. Shift Lever Indicator
This display indicator shows the automatic transmission
shift lever selection.
18. Seat Belt Reminder Light
This light will turn on for five to eight seconds as
a bulb check when the ignition switch is first
turned ON. A chime will sound if the driver’s seat
belt is unbuckled during the bulb check. The Seat Belt
Warning Light will flash, or remain on continuously, if
the driver’s seat belt remains unbuckled after the bulb
check or when driving.
210 UNDERSTANDING YOUR INSTRUMENT PANEL
Page 216 of 493
The MIL flashes to alert you to serious conditions that
could lead to immediate loss of power or severe catalytic
converter damage. The vehicle should be serviced as
soon as possible if this occurs.
25. Oil Pressure Warning Light
This light indicates low engine oil pressure. The
light should turn on momentarily when the engine
is started. If the light turns on while driving, stop the
vehicle, and shut OFF the engine as soon as possible. A
single chime will sound when this light turns on.
Do not operate the vehicle until the cause is corrected.
This light does not show how much oil is in the engine.
The engine oil level must be checked using the procedure
shown in Section 7.ELECTRONIC VEHICLE INFORMATION CENTER
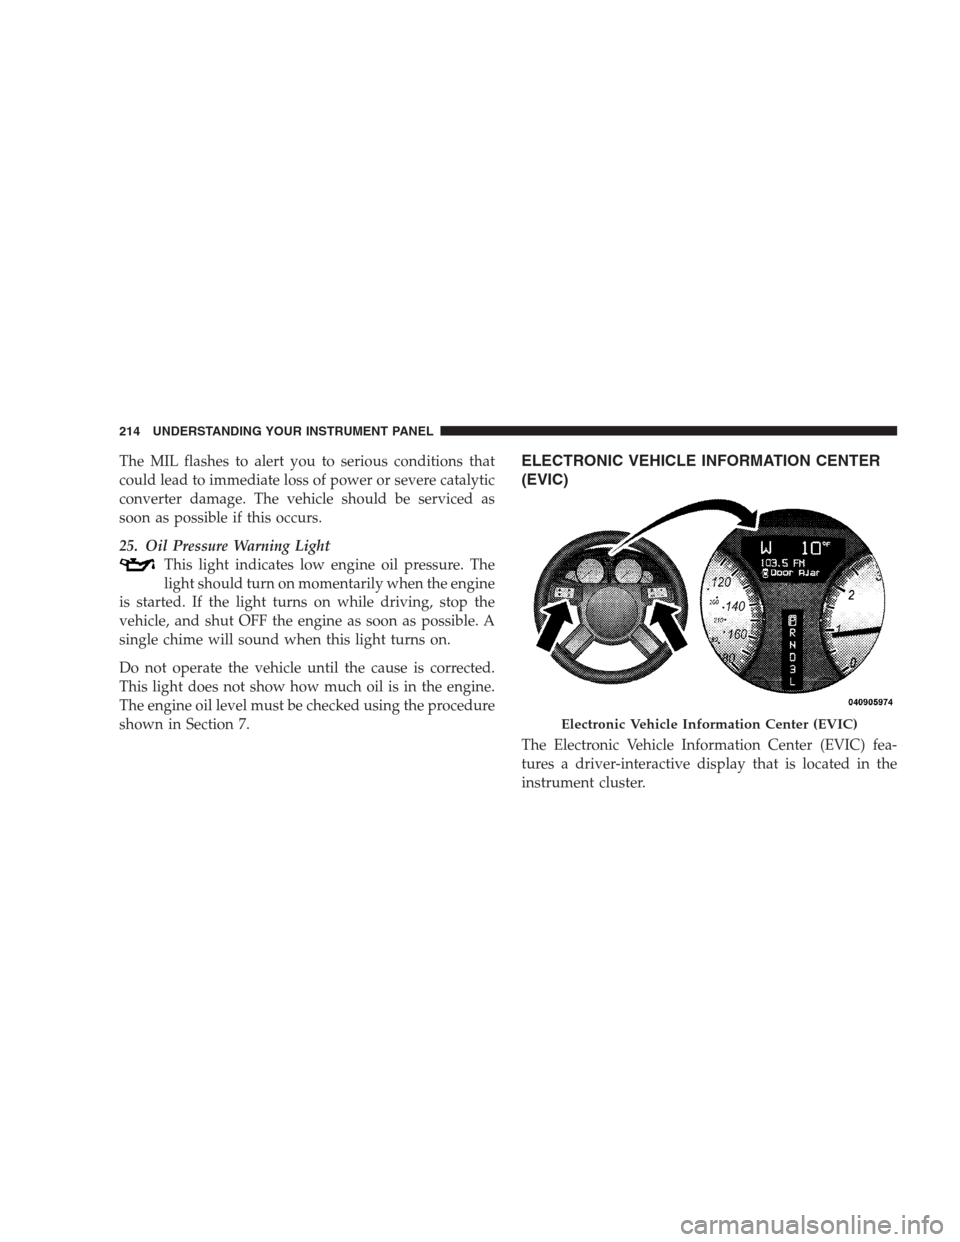
(EVIC)
The Electronic Vehicle Information Center (EVIC) fea-
tures a driver-interactive display that is located in the
instrument cluster.
Electronic Vehicle Information Center (EVIC)
214 UNDERSTANDING YOUR INSTRUMENT PANEL
Page 402 of 493
could adversely affect the engine or vehicle performance.
These items should be inspected if a malfunction is
observed or suspected.
Engine Oil
Checking Oil Level
To assure proper engine lubrication, the engine oil must
be maintained at the correct level. Check the oil level at
regular intervals, such as every fuel stop.
The best time to check the engine oil level is about five
minutes after a fully warmed engine is shut off or before
starting the engine after it has sat overnight.
Checking the oil while the vehicle is on level ground will
improve the accuracy of the oil level readings. Maintain
the oil level in the “SAFE” range. Adding 1.0 qt (1.0 l) of
oil when the reading is at the bottom of the “SAFE” range
will result in an oil level at the top of the “SAFE” range
on these engines.
CAUTION!
Overfilling or underfilling will cause oil aeration or
loss of oil pressure. This could damage your engine.
Change Engine Oil
Refer to the “Maintenance Schedule” in Section 8 for
proper maintenance intervals.
NOTE: Under no circumstances should oil change
intervals exceed 6,000 miles (10 000 km) or six months,
whichever occurs first.
Engine Oil Selection
For best performance and maximum protection under all
types of operating conditions, the manufacturer only
recommends full synthetic engine oils that meet the
American Petroleum Institute (API) categories of SM or
SM/CF, and meet the requirements of Chrysler Material
Standard MS-10725.
400 MAINTAINING YOUR VEHICLE
Page 408 of 493
include cleaning of the condenser fins and a performance
test. Drive belt tension should also be checked at this
time.
WARNING!
•Use only refrigerants and compressor lubricants
approved by the manufacturer for your air condi-
tioning system. Some unapproved refrigerants are
flammable and can explode, injuring you. Other
unapproved refrigerants or lubricants can cause
the system to fail, requiring costly repairs. Refer to
Section 3 of the Warranty Information book for
further warranty information.
•The air conditioning system contains refrigerant
under high pressure. To avoid risk of personal
injury or damage to the system, adding refrigerant
or any repair requiring lines to be disconnected
should be done by an experienced technician.
Refrigerant Recovery and Recycling
R-134a Air Conditioning Refrigerant is a hydrofluoro-
carbon (HFC) that is endorsed by the Environmental
Protection Agency and is an ozone-saving product. How-
ever, the manufacturer recommends that air conditioning
service be performed by authorized dealers or other
service facilities using recovery and recycling equipment.
NOTE:Use only manufacturer approved A/C system
sealers, stop leak products, seal conditioners, compressor
oil, and refrigerants.
A/C Air Filter
The filter is located in the fresh air inlet under the hood,
behind a removable panel in the cowl on the passenger
side of the vehicle, next to the windshield wipers. When
installing a new filter, ensure its proper orientation. To
replace the filter remove the access door in the cowl
screen by pressing the retaining clips. Slide the lid on the
filter adapter forward and down and remove the used
406 MAINTAINING YOUR VEHICLE
Page 410 of 493
Avoid using the wiper blades to remove frost or ice from
the windshield. Keep the blade rubber out of contact with
petroleum products such as engine oil, gasoline, etc.
Windshield Washers
The windshield washer fluid reservoir is located in the
front of the engine compartment. Be sure to check the
fluid level in the reservoir at regular intervals. Fill the
reservoir with windshield washer solvent (not radiator
antifreeze) and operate the system for a few seconds to
flush out the residual water.
When refilling the washer fluid reservoir, apply some
washer fluid to a cloth or towel and wipe the wiper
blades clean. This will help blade performance.
To prevent freeze-up of your windshield washer system
in cold weather, select a solution or mixture that meets or
exceeds the temperature range of your climate. This
rating information can be found on most washer fluid
containers.The fluid reservoir will hold nearly 1 gal (4 l) of washer
fluid when the message “Low Washer Fluid” appears in
the Electronic Vehicle Information Center (EVIC).WARNING!
Commercially available windshield washer solvents
are flammable. They could ignite and burn you. Care
must be exercised when filling or working around
the washer solution.
Exhaust System
The best protection against carbon monoxide entry into
the vehicle body is a properly maintained engine exhaust
system.
Whenever a change is noticed in the sound of the exhaust
system, when exhaust fumes can be detected inside the
vehicle, or when the underside or rear of the vehicle is
damaged, have a competent mechanic inspect the com-
plete exhaust system and adjacent body areas for broken,
408 MAINTAINING YOUR VEHICLE
Page 419 of 493
Master Cylinder - Brake Fluid Level Check
Check the fluid level in the master cylinder immediately
if the brake system warning light indicates system fail-
ure.
Check the fluid level in the master cylinder when per-
forming underhood services.
Clean the top of the master cylinder area before removing
the cap. Add fluid to bring the level up to the top of the
“FULL” mark on the side of the master cylinder reservoir.
Overfilling of fluid is not recommended because it may
cause leaking in the system.
Add enough fluid to bring the level up to the require-
ments described on the brake fluid reservoir. With disc
brakes, fluid level can be expected to fall as the brake
pads wear. However, low fluid level may be caused by a
leak and a checkup may be needed.Use only manufacturer’s recommended brake fluid. Re-
fer to “Fluids, Lubricants, and Genuine Parts” in this
section for the correct fluid type.
WARNING!
•Overfilling the brake fluid reservoir can result in
spilling brake fluid on hot engine parts and the
brake fluid catching fire.
•Use of a brake fluid that may have a lower initial
boiling point, or is unidentified as to specification,
may result in sudden brake failure during hard
prolonged braking. You could have an accident.
Use only brake fluid that has been in a tightly closed
container to avoid contamination from foreign matter or
moisture.
MAINTAINING YOUR VEHICLE 417
7