Page 290 of 493
Refer to your Video Entertainment System (VES)™, RER
Navigation or REN Multimedia User Manuals for de-
tailed operating instructions.
VIDEO ENTERTAINMENT SYSTEM (VES)™ — IF
EQUIPPED
The optional Video Entertainment System (VES)™ in-
cludes the following components for rear seat entertain-
ment:
•A diagonal 7 in (17.8 cm) Liquid Crystal Display (LCD)
screen integrated into the center console armrest. The
screen features brightness control for optimum day-
time and nighttime viewing.
Opening the Rear Seat VES™
288 UNDERSTANDING YOUR INSTRUMENT PANEL
Page 291 of 493
•The LCD screen swings up from the rear of the armrest
to allow the rear seat passenger(s) to view the display.
NOTE:Close the armrest after the LCD screen has been
raised to its viewing position.•The touch screen radio and DVD player controls allow
front seat operation for easy setup in the case of
younger rear seat passengers.
•A battery-powered infrared remote control snaps into
a molded compartment in the center console armrest
upper storage bin.
VES™ Video Screen
VES™ Remote Control
UNDERSTANDING YOUR INSTRUMENT PANEL 289
4
Page 292 of 493
•Two wireless infrared headsets allow rear seat passen-
gers to listen to the same or individual audio sources.
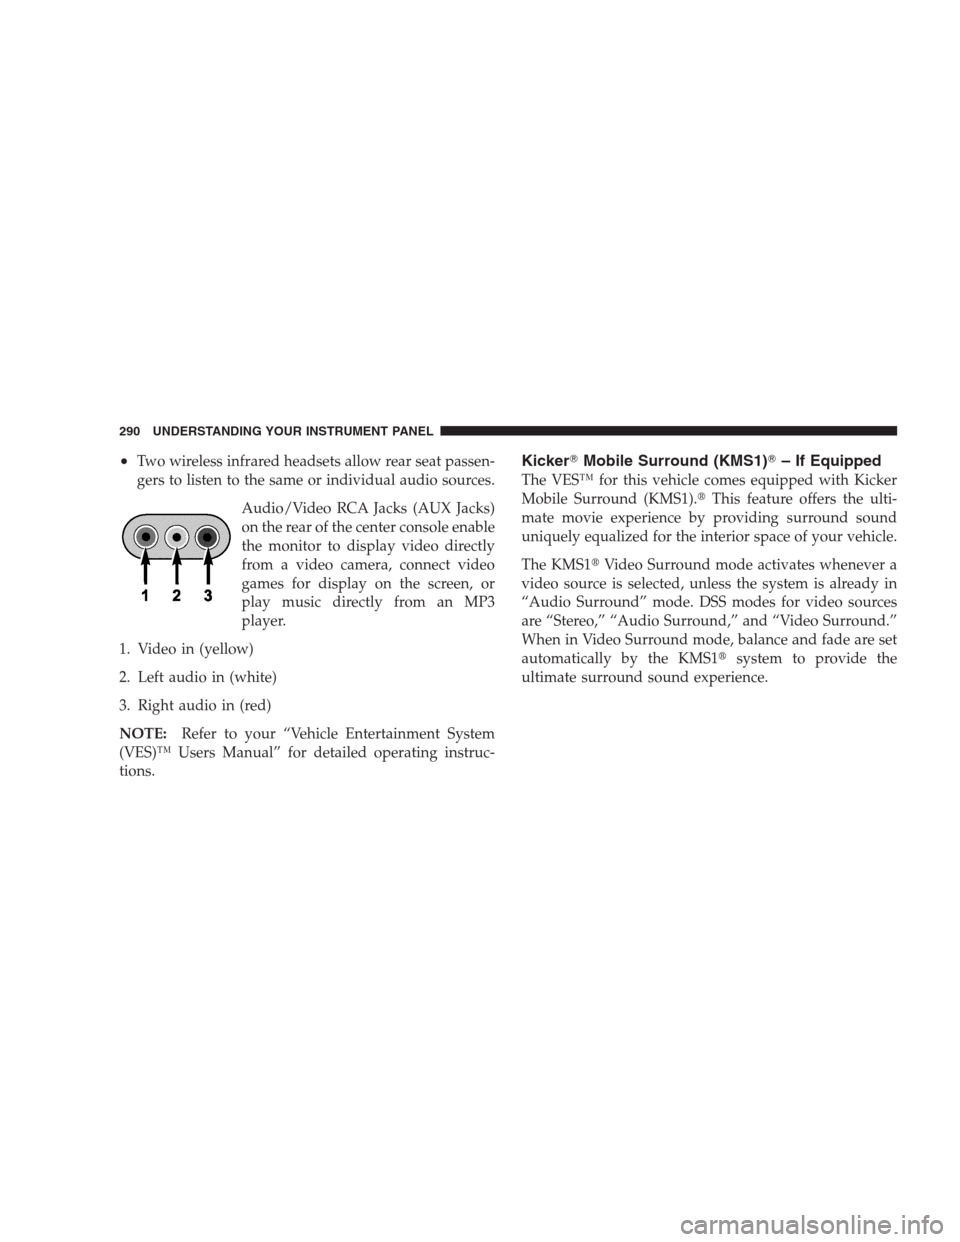
Audio/Video RCA Jacks (AUX Jacks)
on the rear of the center console enable
the monitor to display video directly
from a video camera, connect video
games for display on the screen, or
play music directly from an MP3
player.
1. Video in (yellow)
2. Left audio in (white)
3. Right audio in (red)
NOTE:Refer to your “Vehicle Entertainment System
(VES)™ Users Manual” for detailed operating instruc-
tions.Kicker�Mobile Surround (KMS1)�– If Equipped
The VES™ for this vehicle comes equipped with Kicker
Mobile Surround (KMS1).�This feature offers the ulti-
mate movie experience by providing surround sound
uniquely equalized for the interior space of your vehicle.
The KMS1�Video Surround mode activates whenever a
video source is selected, unless the system is already in
“Audio Surround” mode. DSS modes for video sources
are “Stereo,” “Audio Surround,” and “Video Surround.”
When in Video Surround mode, balance and fade are set
automatically by the KMS1�system to provide the
ultimate surround sound experience.
290 UNDERSTANDING YOUR INSTRUMENT PANEL
Page 293 of 493
REMOTE SOUND SYSTEM CONTROLS — IF
EQUIPPED
The remote sound system controls are located on the
surface of the steering wheel at the three and nine o’clock
positions.The remote sound system controls are located on the
surface of the steering wheel at the three and nine o’clock
positions.
Vehicles equipped with steering wheel-mounted buttons
are also equipped with the Electronic Vehicle Information
Center (EVIC). The EVIC features a driver-interactive
display which is located in the instrument cluster.
The VOLUME button controls the sound level
of the sound system. Press the top of the
VOLUME button to increase the sound level.
Press the bottom of the VOLUME button to
decrease the sound level.
Remote Sound System Controls
VOL-
UME
Button
UNDERSTANDING YOUR INSTRUMENT PANEL 291
4
Page 294 of 493
Press the AUDIO MODE button to select the
Compass/Temp/Audio screen. This screen
displays radio and media mode information
depending on which radio is in the vehicle.
If the Compass/Temp/Audio screen is already displayed
when the AUDIO MODE button is pressed, then the
mode will change (i.e. from AM to FM, to Media mode,
etc., depending on which radio is in the vehicle).
When the EVIC is in the Compass/Temp/
Audio screen, press the FUNCTION SELECT
button to operate various radio, media, and
Universal Customer Interface (UCI) functions
(i.e., advance presets, select next folder, jump to
or start playing songs in playlists, etc., depend-
ing on which radio is in the vehicle and if
equipped with UCI).When the EVIC is in the Compass/Temp/
Audio screen, press the SCROLL button to seek
up and down radio stations, tracks, chapters,
files, etc., depending on which radio is in the
vehicle.
CD/DVD MAINTENANCE
To keep a CD/DVD in good condition, take the following
precautions:
1. Handle the disc by its edge; avoid touching the
surface.
2. If the disc is stained, clean the surface with a soft cloth,
wiping from center to edge.
3. Do not apply paper or tape to the disc; avoid scratch-
ing the disc.
4. Do not use solvents such as benzene, thinner, cleaners,
or antistatic sprays.
AUDIO
MODE
Button
FUNC-
TION
SELECT
Button
SCROLL
Button
292 UNDERSTANDING YOUR INSTRUMENT PANEL
Page 320 of 493
When parking on a flat surface, place the shift lever in the
PARK position first, and then apply the parking brake.
When parking on a hill, it is important to set the parking
brake before placing the shift lever in PARK, otherwise
the load on the transmission locking mechanism may
make it difficult to move the shift lever out of PARK. As
an added precaution, turn the front wheels toward the
curb on a downhill grade and away from the curb on an
uphill grade.
WARNING!
Never use PARK position on an automatic transmis-
sion as a substitute for the parking brake. Always
apply parking brake fully when parked to guard
against vehicle movement and possible injury or
damage.
The following indicators should be used to ensure that
you have engaged the shift lever in the PARK position:
•When shifting into PARK, move the shift lever all the
way forward and left until it stops and is fully seated.
•Look at the shift indicator display on the instrument
panel to ensure it is in the P position.
CAUTION!
Damage to the shifter could result if the shift lever is
moved out of PARK before the ignition is turned
from the LOCK to ON position.
REVERSE
Shift into REVERSE gear only when the vehicle is com-
pletely stopped.
NEUTRAL
In NEUTRAL, no power is transmitted from the engine to
the drive axle. When the brakes are released, the vehicle
can be moved freely (pushed or towed). Do not engage
318 STARTING AND OPERATING
Page 323 of 493
Have the transmission checked at your authorized dealer
as soon as possible.
If the problem has been momentary, the transmission can
be reset to regain all forward gears.
Permanent Transmission Limp Home Mode
Permanent Limp Home Mode will be activated if the
transmission enters temporary Limp Home Mode three
times. Follow the reset procedure described under “Tem-
porary Transmission Limp Home Mode” in this section.
In Permanent Limp Home Mode, PARK, REVERSE, and
NEUTRAL will continue to operate. Second gear will
operate in the DRIVE position. The Malfunction Indicator
Light (MIL) may illuminate.
AUTOSTICK�
Autostick�is a driver-interactive transmission that offers
manual gear shifting to provide you with more control of
the vehicle. Autostick�allows you to maximize engine
braking, eliminate undesirable upshifts and downshifts,
and improve overall vehicle performance. This system
can also provide you with more control during passing,
city driving, cold slippery conditions, mountain driving,
trailer towing, and many other situations.
Autostick�Operation
By placing the shift lever in the DRIVE position, it can be
moved from side to side. This allows the driver to select
a higher or lower range of gears. Moving the shift lever to
the left (-) triggers a downshift and to the right (+) an
upshift. The gear position will display in the instrument
cluster on the transmission range indicator.
STARTING AND OPERATING 321
5
Page 324 of 493
NOTE:
•In Autostick�mode, the transmission will only shift
up and down when the driver manually moves the
shift lever right (D+) or left (D-).
•An UPSHIFT message will appear in the Electronic
Vehicle Information Center (EVIC) portion of the in-
strument cluster when using Autostick�. This message
appears in order to alert the driver to upshift to the
next gear. The UPSHIFT message will display while
operating the vehicle at higher engine revolutions per
minute (RPM).
You can shift in or out of the Autostick�mode at any time
without taking your foot off the accelerator pedal. When
you wish to engage Autostick�, simply move the shift
lever to the right (D+) or left (D-) while in the DRIVE
position. The transmission will remain in the current gear
until an upshift or downshift is chosen. When you wish
to disengage Autostick�, hold the shift lever to the rightfor at least one second. The transmission will now
operate automatically, shifting between the five available
gears.
Autostick�General Information
•
You can start out in 1st or 2nd gear. The system will
ignore attempts to upshift at too low of a vehicle
speed.
•The transmission will automatically downshift to 1st
gear when coming to a stop.
•Starting out in 2nd gear is helpful in snowy or icy
conditions.
•Avoid using speed control when Autostick�is en-
gaged.
•The transmission will not automatically shift up when
maximum engine speed is reached while Autostick�is
engaged.
322 STARTING AND OPERATING