Page 369 of 526
Should this occur, you should stop as soon as possible
and inflate all of the tires with low pressure (including
those flashing in the EVIC graphic) to the vehicle’s
recommended cold placard pressure value. Once the
system receives the updated tire pressures, the system
will automatically update, the graphic display in the
EVIC will stop flashing, and the TPM Telltale Light willturn off. The vehicle may need to be driven for up to
20 minutes above 15 mph (25 km/h) in order for the
TPMS to receive this information.
Check TPMS Warning
If a system fault is detected, the TPM Telltale Light will
flash on and off for 75 seconds and then remain on solid.
The system fault will also sound a chime. In addition, the
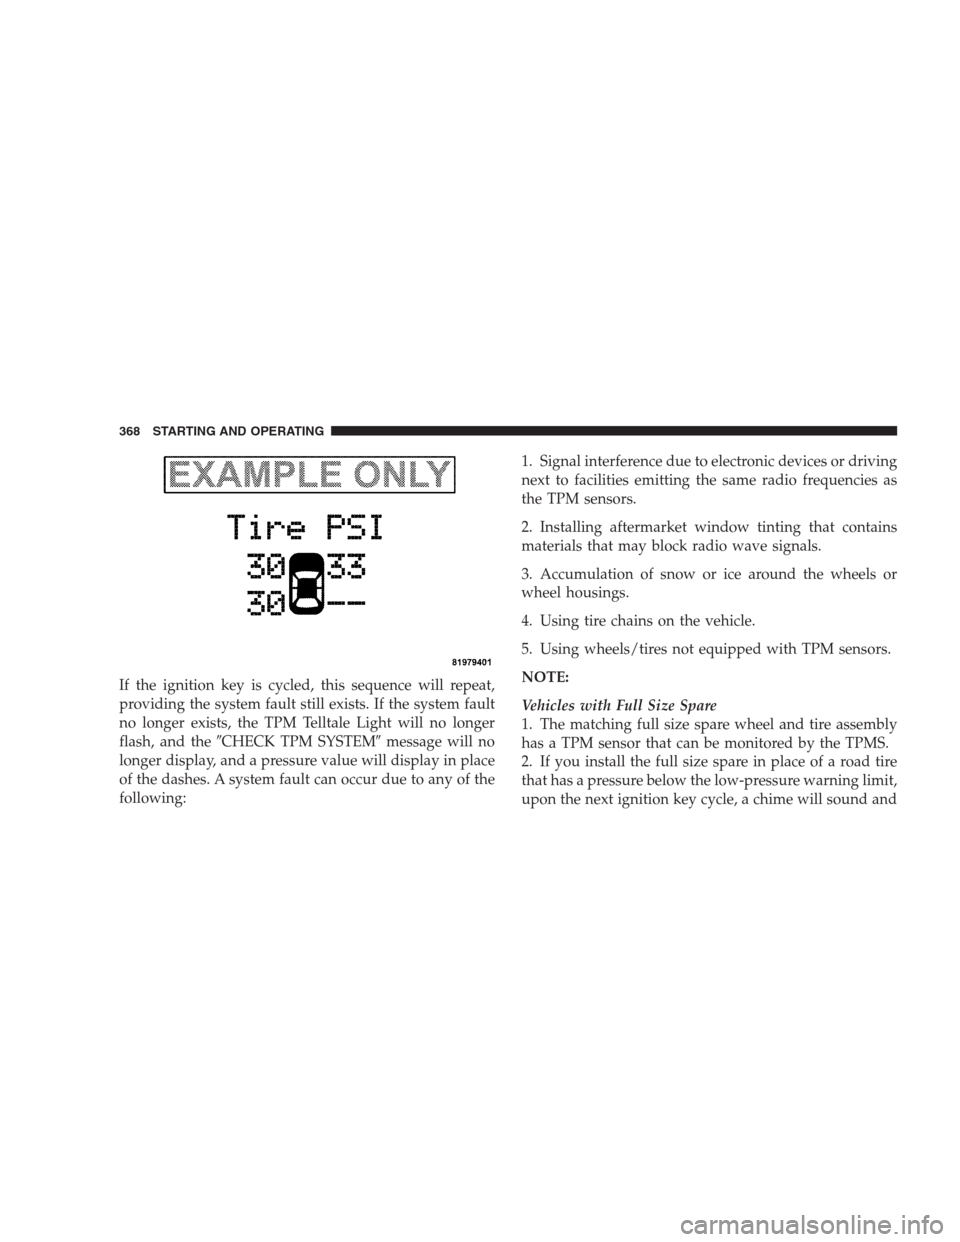
EVIC will display a�CHECK TPM SYSTEM�message for
three seconds and then display dashes (- -) in place of the
pressure value to indicate which sensor is not being
received.
STARTING AND OPERATING 367
5
Page 370 of 526
If the ignition key is cycled, this sequence will repeat,
providing the system fault still exists. If the system fault
no longer exists, the TPM Telltale Light will no longer
flash, and the�CHECK TPM SYSTEM�message will no
longer display, and a pressure value will display in place
of the dashes. A system fault can occur due to any of the
following:1. Signal interference due to electronic devices or driving
next to facilities emitting the same radio frequencies as
the TPM sensors.
2. Installing aftermarket window tinting that contains
materials that may block radio wave signals.
3. Accumulation of snow or ice around the wheels or
wheel housings.
4. Using tire chains on the vehicle.
5. Using wheels/tires not equipped with TPM sensors.
NOTE:
Vehicles with Full Size Spare
1. The matching full size spare wheel and tire assembly
has a TPM sensor that can be monitored by the TPMS.
2. If you install the full size spare in place of a road tire
that has a pressure below the low-pressure warning limit,
upon the next ignition key cycle, a chime will sound and
368 STARTING AND OPERATING
Page 371 of 526
the TPM Telltale Light will turn ON. In addition, the
EVIC will display a low pressure message and a graphic
showing the low tire pressure value flashing.
3. After driving the vehicle for up to 20 minutes above
15 mph (25 km/h) the TPM Telltale Light will turn OFF,
as long as no tire pressure is below the low-pressure
warning limit in any of the four active road tires.
NOTE:
Vehicles with Compact Spare
1. The compact spare tire does not have a TPM sensor.
Therefore, the TPMS will not monitor the pressure in the
compact spare tire.
2. If you install the compact spare tire in place of a road
tire that has a pressure below the low-pressure warning
limit, upon the next ignition key cycle, the TPM Telltale
Light will remain ON and a chime will sound. In
addition, the graphic in the EVIC will still display a
flashing pressure value.3. After driving the vehicle for up to 20 minutes above
15 mph (25 km/h), the TPM Telltale Light will flash on
and off for 75 seconds and then remain on solid. In
addition, the EVIC will display a�CHECK TPM SYS-
TEM�message for three seconds and then display dashes
(- -) in place of the pressure value.
4. For each subsequent ignition key cycle, a chime will
sound, the TPM Telltale Light will flash on and off for
75 seconds and then remain on solid, and the EVIC will
display a�CHECK TPM SYSTEM�message for three
seconds and then display dashes (- -) in place of the
pressure value.
5. Once you repair or replace the original road tire and
reinstall it on the vehicle in place of the compact spare,
the TPMS will update automatically. In addition, the
TPM Telltale Light will turn OFF and the graphic in the
EVIC will display a new pressure value instead of dashes
(- -), as long as no tire pressure is below the low-pressure
warning limit in any of the four active road tires. The
STARTING AND OPERATING 369
5
Page 376 of 526
•An out-of-tune engine or certain fuel or ignition mal-
functions can cause the catalytic converter to overheat.
If you notice a pungent burning odor or some light
smoke, your engine may be out of tune or malfunc-
tioning and may require immediate service. Contact
your authorized dealer for service assistance.
•The use of fuel additives, which are now being sold as
octane enhancers, is not recommended. Most of these
products contain high concentrations of methanol.
Fuel system damage or vehicle performance problems
resulting from the use of such fuels or additives is not
the responsibility of the manufacturer.
NOTE:Intentional tampering with the emissions con-
trol system can result in civil penalties being assessed
against you.
Carbon Monoxide Warnings
WARNING!
Carbon monoxide (CO) in exhaust gases is deadly.
Follow the precautions below to prevent carbon
monoxide poisoning:
•Do not inhale exhaust gases. They contain carbon
monoxide, a colorless and odorless gas, which can kill.
Never run the engine in a closed area, such as a
garage, and never sit in a parked vehicle with the
engine running for an extended period. If the vehicle is
stopped in an open area with the engine running for
more than a short period, adjust the ventilation system
to force fresh, outside air into the vehicle.
374 STARTING AND OPERATING
Page 378 of 526
CAUTION!
•Damage to the fuel system or emissions control
system could result from using an improper fuel
tank filler tube cap (gas cap).
(Continued)
CAUTION! (Continued)
•A poorly fitting gas cap could let impurities into
the fuel system.
•A poorly fitting gas cap may cause the Malfunc-
tion Indicator Light (MIL) to turn on.
•To avoid fuel spillage and overfilling, do not “top
off” the fuel tank after filling. When the fuel
nozzle “clicks” or shuts off, the fuel tank is full.
WARNING!
•Never have any smoking materials lit in or near
the vehicle when the gas cap is removed or the
tank filled.
•Never add fuel to the vehicle when the engine is
running.
(Continued)
Gas Cap Tether Hook
376 STARTING AND OPERATING
Page 405 of 526
4. Place the jack underneath the lift area that is closest to
the flat tire. Turn the jack screw clockwise to firmly
engage the jack saddle with the lift area of the sill flange.
5. Raise the vehicle just enough to remove the flat tire
and install the spare tire.
WARNING!
Raising the vehicle higher than necessary can make
the vehicle less stable. It could slip off the jack and
hurt someone near it. Raise the vehicle only enough
to remove the tire.
6. Remove the lug nuts, wheel cover (if equipped), and
tire. Remove the cover by hand. Do not pry it off.
7. Mount the spare tire.
NOTE:For vehicles so equipped, do not attempt to
install a center cap or wheel cover on the compact spare.However, when reinstalling the road tire, follow the
procedure under “Wheel Cover or Center Cap Installa-
tion” in place of the remaining steps in this procedure.
8. Install the lug nuts with the cone shaped end of the
nut toward the wheel. Lightly tighten the lug nuts. To
avoid the risk of forcing the vehicle off the jack, do not
tighten the lug nuts fully until the vehicle is lowered to
the ground.
9. Lower the vehicle to the ground by turning the jack
handle counterclockwise.
10. Finish tightening the lug nuts. Push down on the
wrench while tightening for increased leverage. Alternate
lug nuts until each nut has been tightened twice. The
correct tightness of each lug nut is 100 ft/lb. (135 N·m). If
in doubt about the correct tightness, have them checked
with a torque wrench by your authorized dealer or at a
service station.
WHAT TO DO IN EMERGENCIES 403
6
Page 409 of 526
3. Align the valve notch in the wheel cover with the
valve stem on the wheel. Install the cover by hand,
snapping the cover over the two lug nuts. Do not use a
hammer or excessive force to install the cover.
4. Install the remaining lug nuts with the cone shaped
end of the nut toward the wheel. Lightly tighten the lug
nuts. To avoid the risk of forcing the vehicle off the jack,
do not tighten the lug nuts fully until the vehicle is
lowered to the ground.
5. Lower the vehicle to the ground by turning the jack
handle counterclockwise.
6. Finish tightening the lug nuts. Push down on the
wrench while tightening for increased leverage. Alternate
lug nuts until each nut has been tightened twice. The
correct tightness of each lug nut is 100 ft/lb. (135 N·m). If
in doubt about the correct tightness, have them checked
with a torque wrench by your authorized dealer or at a
service station.7. For vehicles equipped with center caps, install the
center cap by hand. Do not use a hammer or excessive
force to install the center cap.
8. Stow the jack, tools, and spare tire. Make sure the base
of the jack faces the rear of the vehicle before tightening
down the fastener.
WARNING!
A loose tire or jack thrown forward in a collision or
hard stop could endanger the occupants of the ve-
hicle. Always stow the jack parts and the spare tire in
the places provided.
WHAT TO DO IN EMERGENCIES 407
6
Page 412 of 526
WARNING!
•You should not try to start your vehicle by pushing
or towing.
•Do not connect the cable to the negative post of the
discharged battery. The resulting electrical spark
could cause the battery to explode.
•During cold weather when temperatures are be-
low the freezing point, electrolyte in a discharged
battery may freeze. Do not attempt jump-starting
because the battery could rupture or explode. The
battery temperature must be brought above the
freezing point before attempting jump-start.
7. Start the engine in the vehicle that has the booster
battery. Let the engine idle a few minutes then start the
engine in the vehicle with the discharged battery.
NOTE:Refer to�Synchronizing ESP�under�Electronic
Stability Program�in Section 5 if the ESP/BAS light (in
Jump-Starting
1 — Engine Ground
2 — Positive Battery Post 410 WHAT TO DO IN EMERGENCIES