Page 402 of 526
Preparations For Jacking
1. Park the vehicle on a firm level surface as far from the
edge of the roadway as possible. Avoid icy or slippery
areas.
2. Set the parking brake.
3. Place the shift lever into PARK.
4. Turn OFF the ignition.
5. Turn on the Hazard Warning flashers.
6. Block the front and rear of the
wheel diagonally opposite of the jack-
ing position. For example, if changing
the right front tire, block the left rear
wheel.NOTE:Passengers should not remain in the vehicle
when the vehicle is being jacked.
Jacking and Changing a Tire
WARNING!
Carefully follow these tire changing warnings to
help prevent personal injury or damage to your
vehicle:
•Always park on a firm, level surface as far from
the edge of the roadway as possible before raising
the vehicle.
•Block the wheel diagonally opposite the wheel to
be raised.
•Set the parking brake firmly and set an automatic
transmission in PARK; a manual transmission in
REVERSE.
(Continued)
400 WHAT TO DO IN EMERGENCIES
Page 410 of 526

JUMP-STARTING PROCEDURES
WARNING!
•Take care to avoid the radiator cooling fan when-
ever the hood is raised. It can start anytime the
ignition switch is ON. You can be hurt by the fan.
•Do not attempt to push or tow your vehicle to get
it started. Vehicles equipped with an automatic
transmission cannot be started this way. Unburned
fuel could enter the catalytic converter and once
the engine has started, ignite and damage the
converter and vehicle. If the vehicle has a dis-
charged battery, booster cables may be used to
obtain a start from another vehicle. This type of
start can be dangerous if done improperly, so
follow this procedure carefully.
(Continued)
WARNING! (Continued)
•Battery fluid is a corrosive acid solution; do not
allow battery fluid to contact eyes, skin, or cloth-
ing. Don’t lean over battery when attaching
clamps or allow the clamps to touch each other. If
acid splashes in eyes or on skin, flush contami-
nated area immediately with large quantities of
water.
•A battery generates hydrogen gas, which is flam-
mable and explosive. Keep flame or spark away
from the vent holes.
•Do not use a booster battery or any other booster
source with an output that exceeds 12-Volts.
•The battery in this vehicle has a vent hose that
should not be disconnected and should only be
replaced with a battery of the same type (vented).
408 WHAT TO DO IN EMERGENCIES
Page 418 of 526

▫Windshield Washers/Headlight Washers
— If Equipped...................... 431
▫Exhaust System..................... 432
▫Cooling System..................... 435
▫Brake System....................... 440
▫Automatic Transmission............... 442
▫All Wheel Drive (AWD) — If Equipped.... 443
▫Appearance Care And Protection From
Corrosion.......................... 444
�Fuses.............................. 449
▫Integrated Power Module.............. 449
▫Rear Power Distribution Center.......... 451
�Vehicle Storage....................... 456
�Replacement Bulbs.................... 456�Bulb Replacement..................... 458
▫Low Beam Headlight, High Beam Headlight,
Park/Turn Light, Inner Park Light, And
Outer Park Light – 300 Models........... 458
▫Low Beam Headlight, High Beam Headlight,
And Park/Turn Light – 300C............ 460
▫Backup Light, Side Marker Light, And
Tail/Stop Turn Light — 300 Models....... 461
▫Tail/Stop, Tail, Turn Signal Light, And
Backup Light — 300C Models........... 464
▫License Light....................... 467
�Fluids And Capacities.................. 468
�Fluids, Lubricants, And Genuine Parts....... 470
▫Engine............................ 470
▫Chassis........................... 471
416 MAINTAINING YOUR VEHICLE
Page 422 of 526

ONBOARD DIAGNOSTIC SYSTEM — OBD II
Your vehicle is equipped with a sophisticated onboard
diagnostic system called OBD II. This system monitors
the performance of the emissions, engine, and automatic
transmission control systems. When these systems are
operating properly, your vehicle will provide excellent
performance and fuel economy, as well as engine emis-
sions well within current government regulations.
If any of these systems require service, the OBD II system
will turn on the Malfunction Indicator Light (MIL). It will
also store diagnostic codes and other information to
assist your service technician in making repairs. Al-
though your vehicle will usually be drivable and not
need towing, see your authorized dealer for service as
soon as possible.CAUTION!
Prolonged driving with the MIL on could cause
further damage to the emissions control system. It
could also affect fuel economy and driveability. The
vehicle must be serviced before any emissions tests
can be performed.
If the MIL is flashing while the engine is running,
severe catalytic converter damage and power loss
will soon occur. Immediate service is required.
Loose Fuel Filler Cap
If the vehicle diagnostic system determines that the fuel
filler cap is loose, improperly installed, or damaged, a
“Check Gascap” message will display in the Electronic
Vehicle Information Center (EVIC) (if equipped). If this
occurs, tighten the fuel filler cap properly and press the
TRIP ODOMETER button to turn off the message. If the
problem continues, the message will appear the next time
the vehicle is started.
420 MAINTAINING YOUR VEHICLE
Page 444 of 526

Use only brake fluid that has been in a tightly closed
container to avoid contamination from foreign matter or
moisture.
CAUTION!
Do not allow petroleum-based fluid to contaminate
the brake fluid. Seal damage may result.
Automatic Transmission
Fluid Level Check
Regular automatic transmission fluid level checks are not
required. For this reason, the dipstick is omitted.
If you notice fluid loss or gear shift malfunction, have
your authorized dealer check the transmission fluid level.
CAUTION!
•Using a transmission fluid other than the manu-
facturer’s recommended fluid may cause deterio-
ration in transmission shift quality and/or torque
converter shudder. Using a transmission fluid
other than that recommended by the manufacturer
will result in more frequent fluid and filter
changes. Refer to “Fluids, Lubricants, and Genu-
ine Parts” in this section for the correct fluid type.
•The fluid level is preset at the factory and it does
not require adjustment under normal operating
conditions. If a transmission fluid leak occurs,
visit your authorized dealer immediately. Severe
damage to the transmission may occur. Your au-
thorized dealer has the proper tools to adjust the
fluid level accurately.
442 MAINTAINING YOUR VEHICLE
Page 445 of 526

Fluid and Filter Changes
Refer to the “Maintenance Schedule” in Section 8 for
proper maintenance intervals.
If the transmission is disassembled for any reason, the
fluid and filter should be changed.
Selection of Lubricant
It is important that the proper lubricant is used in the
transmission to assure optimum transmission perfor-
mance. Use only manufacturer ’s recommended transmis-
sion fluid. Refer to “Fluids, Lubricants, and Genuine
Parts” in this section for the correct fluid type. It is
important that the transmission fluid be maintained at
the prescribed level using the recommended fluid. No
chemical flushes should be used in any transmission;
only the approved lubricant may be used.
Special Additives
Automatic Transmission Fluid (ATF) is an engineered
product and its performance may be impaired by supple-
mental additives. Therefore, do not add any fluid addi-
tives to the transmission. The only exception to this
policy is the use of special dyes to aid in detecting fluid
leaks. In addition, avoid using transmission sealers as
they may adversely affect seals.
All Wheel Drive (AWD) — If Equipped
The all wheel drive system consists of a transfer case and
front differential. The exterior surface of these compo-
nents should be inspected for evidence of fluid leaks.
Confirmed leaks should be repaired as soon as possible.
The transfer case fluid fill/inspection plug is located in
the middle of the rear housing. To inspect the transfer
case fluid level, remove the fill/inspection plug. The
fluid level should be even with the bottom of the hole.
Use this plug to add fluid as required.
MAINTAINING YOUR VEHICLE 443
7
Page 473 of 526
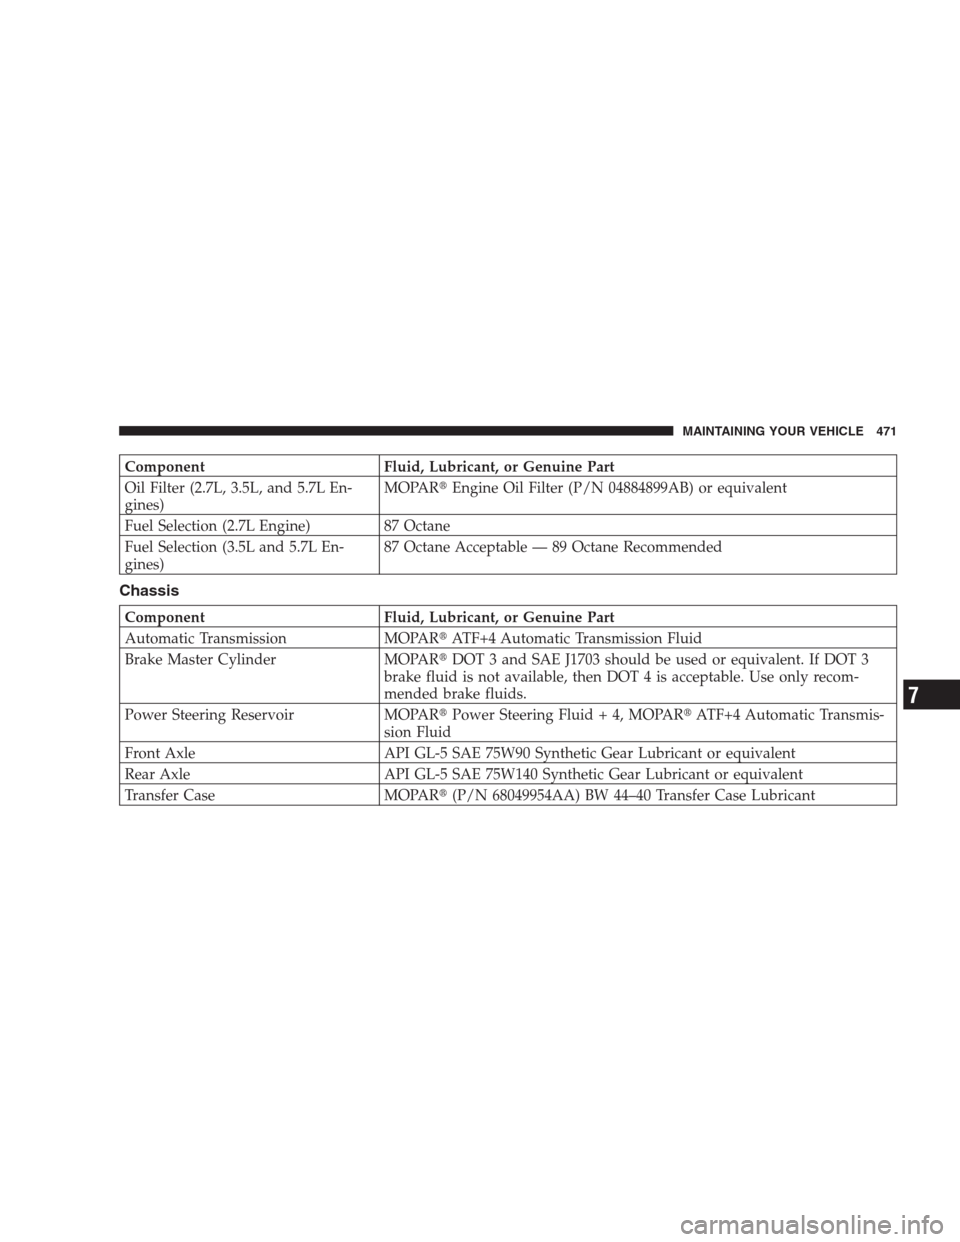
Component Fluid, Lubricant, or Genuine Part
Oil Filter (2.7L, 3.5L, and 5.7L En-
gines)MOPAR�Engine Oil Filter (P/N 04884899AB) or equivalent
Fuel Selection (2.7L Engine) 87 Octane
Fuel Selection (3.5L and 5.7L En-
gines)87 Octane Acceptable — 89 Octane Recommended
Chassis
Component Fluid, Lubricant, or Genuine Part
Automatic Transmission MOPAR�ATF+4 Automatic Transmission Fluid
Brake Master Cylinder MOPAR�DOT 3 and SAE J1703 should be used or equivalent. If DOT 3
brake fluid is not available, then DOT 4 is acceptable. Use only recom-
mended brake fluids.
Power Steering Reservoir MOPAR�Power Steering Fluid + 4, MOPAR�ATF+4 Automatic Transmis-
sion Fluid
Front Axle API GL-5 SAE 75W90 Synthetic Gear Lubricant or equivalent
Rear Axle API GL-5 SAE 75W140 Synthetic Gear Lubricant or equivalent
Transfer Case MOPAR�(P/N 68049954AA) BW 44–40 Transfer Case Lubricant
MAINTAINING YOUR VEHICLE 471
7
Page 483 of 526
 or
54 Months Maintenance
Service Schedule
❏Change the engine oil and engine oil
filter.
❏Rotate tires.
❏Inspect the rear axle fluid. Inspect the
front axle fluid — All")
54,000 Miles (90,000 km) or
54 Months Maintenance
Service Schedule
❏Change the engine oil and engine oil
filter.
❏Rotate tires.
❏Inspect the rear axle fluid. Inspect the
front axle fluid — All Wheel Drive
(AWD).
Odometer Reading Date
Repair Order # Dealer Code
Signature Authorized Chrysler Dealer
60,000 Miles (100,000 km) or 60 Months Maintenance Service
Schedule
❏Change the engine oil and engine oil filter.
❏Rotate tires.
❏Replace the engine air cleaner filter.
❏Replace the spark plugs (2.7L and 5.7L Engines).
❏Replace the air conditioning filter (if equipped)
❏Inspect the brake linings; replace if necessary.
❏Adjust parking brake on vehicles equipped with four-wheel disc brakes.
❏Change the automatic transmission fluid and filter if using your vehicle for any of the
following: police, taxi, fleet, or frequent trailer towing.
❏Change the transfer case fluid if using your vehicle for any of the following: police, taxi,
fleet, or frequent trailer towing — All Wheel Drive (AWD).
❏Flush and replace the engine coolant at 60 months if not done at 102,000 miles
(170 000 km).
Odometer Reading Date
Repair Order # Dealer Code
Signature Authorized Chrysler Dealer
MAINTENANCE SCHEDULES 481
8
M
A
I
N
T
E
N
A
N
C
E
S
C
H
E
D
U
L
E
S