Page 383 of 464

If a Tire Goes Flat
It is unusual for a tire to blowout while you are driving,
especially if you maintain your vehicle’s tires properly.
If air goes out of a tire, it is much more likely to leak
out slowly. But if you should ever have a blowout, here
are a few tips about what to expect and what to do:
If a front tire fails, the �at tire creates a drag that pulls
the vehicle toward that side. Take your foot off the
accelerator pedal and grip the steering wheel �rmly.
Steer to maintain lane position, and then gently brake
to a stop well out of the traffic lane.
A rear blowout, particularly on a curve, acts much like a
skid and may require the same correction you would use
in a skid. In any rear blowout remove your foot from the
accelerator pedal. Get the vehicle under control by
steering the way you want the vehicle to go. It may be
very bumpy and noisy, but you can still steer. Gently
brake to a stop, well off the road if possible.{CAUTION:
Lifting a vehicle and getting under it to do
maintenance or repairs is dangerous without the
appropriate safety equipment and training. The jack
provided with your vehicle is designed only for
changing a �at tire. If it is used for anything else,
you or others could be badly injured or killed if the
vehicle slips off the jack. Use the jack provided with
your vehicle only for changing a �at tire.
If a tire goes �at, the next part shows how to use the
jacking equipment to change a �at tire safely.
5-73
Page 384 of 464

Changing a Flat Tire
If a tire goes �at, avoid further tire and wheel damage
by driving slowly to a level place. Turn on your vehicle’s
hazard warning �ashers. SeeHazard Warning Flashers
on page 3-6for more information.
{CAUTION:
Changing a tire can be dangerous. The vehicle
can slip off the jack and roll over or fall on you or
other people. You and they could be badly injured
or even killed. Find a level place to change your
tire. To help prevent the vehicle from moving:
1. Set the parking brake �rmly.
2. Put the shift lever in P (Park).
3. Turn off the engine and do not restart while
the vehicle is raised.
4. Do not allow passengers to remain in the
vehicle.
CAUTION: (Continued)
CAUTION: (Continued)
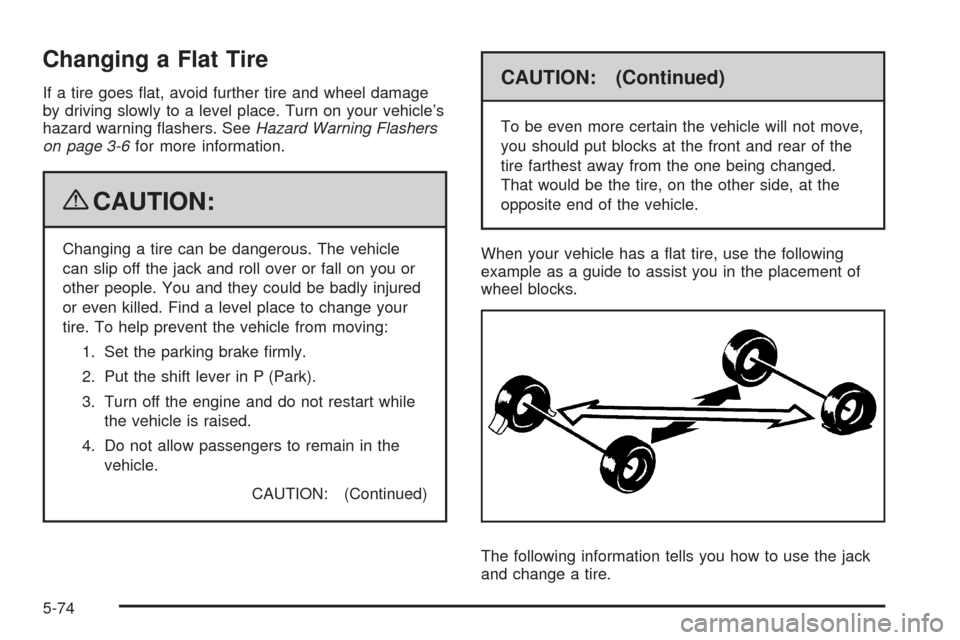
To be even more certain the vehicle will not move,
you should put blocks at the front and rear of the
tire farthest away from the one being changed.
That would be the tire, on the other side, at the
opposite end of the vehicle.
When your vehicle has a �at tire, use the following
example as a guide to assist you in the placement of
wheel blocks.
The following information tells you how to use the jack
and change a tire.
5-74
Page 387 of 464

3. Tilt the retainer at the end of the cable to remove
the compact spare tire, so it can be pulled up
through the wheel opening.
The hoist is used to store a full-size or a �at road
tire under the vehicle. SeeStoring a Flat or Spare
Tire and Tools on page 5-86for more information.
4. Remove the compact spare tire from the cable.If the compact spare tire will not lower, check under the
vehicle to see if the tire is hanging loose and the cable
end and spring under the wheel plate are missing. If so,
the secondary latch system is engaged. SeeSecondary
Latch System on page 5-84.
To continue changing the �at tire, seeRemoving the
Flat Tire and Installing the Spare Tire on page 5-77.
Removing the Flat Tire and
Installing the Spare Tire
Your vehicle may have aluminum wheels. If so, you will
see exposed stainless steel wheel nuts. Use the wheel
wrench to loosen all of the wheel nuts. Do not remove
them yet.
Your vehicle may have steel wheel covers. To remove
the wheel covers and wheel nut caps, loosen the plastic
nut caps with the wheel wrench in a counterclockwise
direction. If needed, �nish loosening them with your
�ngers. The plastic nut caps will not come off.
Use the �at end of the wheel wrench and pry along the
edge of the cover until it comes off. The edge of the
wheel cover could be sharp, so do not try to remove
it with your bare hands. Do not drop the cover or lay it
face down, as it could become scratched or damaged.
5-77
Page 388 of 464

Store the wheel cover securely in the rear of the vehicle
until you have the �at tire repaired or replaced. Once
the wheel cover has been removed, use the following
procedure to remove the �at tire and install the spare tire.
1. Do a safety check is done before proceeding.
SeeChanging a Flat Tire on page 5-74for more
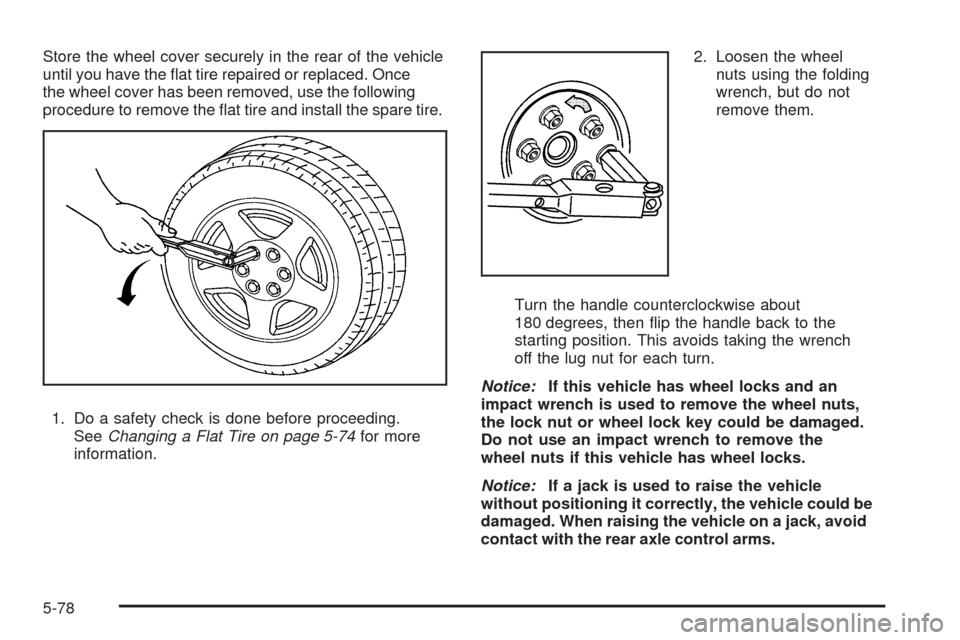
information.2. Loosen the wheel
nuts using the folding
wrench, but do not
remove them.
Turn the handle counterclockwise about
180 degrees, then �ip the handle back to the
starting position. This avoids taking the wrench
off the lug nut for each turn.
Notice:If this vehicle has wheel locks and an
impact wrench is used to remove the wheel nuts,
the lock nut or wheel lock key could be damaged.
Do not use an impact wrench to remove the
wheel nuts if this vehicle has wheel locks.
Notice:If a jack is used to raise the vehicle
without positioning it correctly, the vehicle could be
damaged. When raising the vehicle on a jack, avoid
contact with the rear axle control arms.
5-78
Page 389 of 464

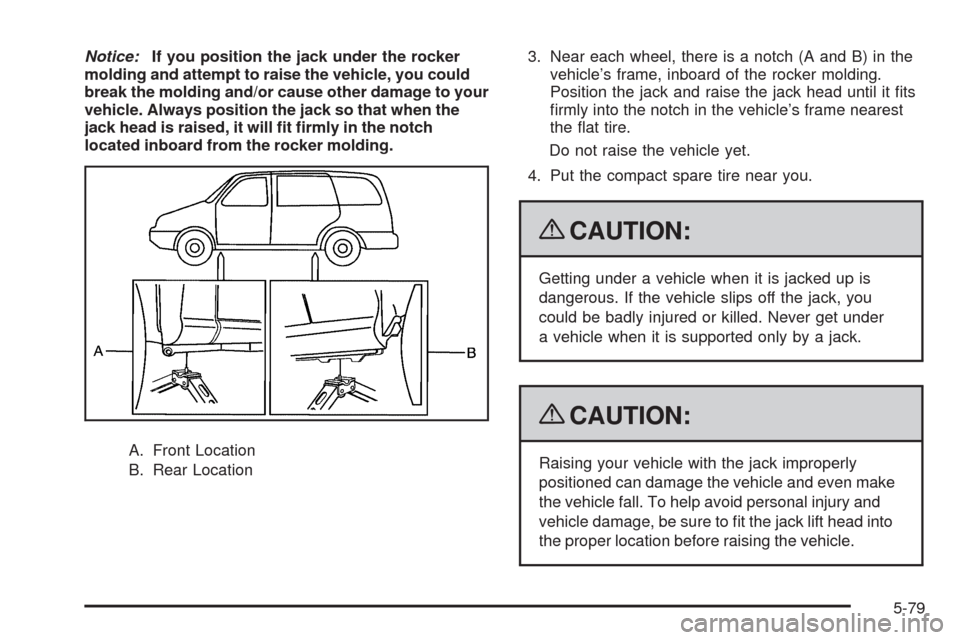
Notice:If you position the jack under the rocker
molding and attempt to raise the vehicle, you could
break the molding and/or cause other damage to your
vehicle. Always position the jack so that when the
jack head is raised, it will �t �rmly in the notch
located inboard from the rocker molding.
A. Front Location
B. Rear Location3. Near each wheel, there is a notch (A and B) in the
vehicle’s frame, inboard of the rocker molding.
Position the jack and raise the jack head until it �ts
�rmly into the notch in the vehicle’s frame nearest
the �at tire.
Do not raise the vehicle yet.
4. Put the compact spare tire near you.
{CAUTION:
Getting under a vehicle when it is jacked up is
dangerous. If the vehicle slips off the jack, you
could be badly injured or killed. Never get under
a vehicle when it is supported only by a jack.
{CAUTION:
Raising your vehicle with the jack improperly
positioned can damage the vehicle and even make
the vehicle fall. To help avoid personal injury and
vehicle damage, be sure to �t the jack lift head into
the proper location before raising the vehicle.
5-79
Page 390 of 464
5. Attach the folding wrench (A) to the jack (B), and
turn the wrench clockwise to raise the jack head
approximately 3 inches (7.6 cm).6. Raise the vehicle by turning the folding wrench
clockwise in the jack. Raise the vehicle far enough
off the ground so there is enough room for the
compact spare tire to �t under the wheel well.
7. Remove all the wheel nuts and take off the �at tire.
5-80
Page 391 of 464
{CAUTION:
Rust or dirt on a wheel, or on the parts to which
it is fastened, can make wheel nuts become loose
after time. The wheel could come off and cause an
accident. When changing a wheel, remove any rust
or dirt from places where the wheel attaches to the
vehicle. In an emergency, use a cloth or a paper
towel to do this; but be sure to use a scraper or wire
brush later, if needed, to get all the rust or dirt off.
SeeChanging a Flat Tire on page 5-74.
{CAUTION:
Never use oil or grease on bolts or nuts because
the nuts might come loose. The vehicle’s wheel
could fall off, causing a crash.
8. Remove any rust or dirt
from the wheel bolts,
mounting surfaces
and spare wheel.
5-81
Page 392 of 464
9. Install the compact
spare tire and put the
wheel nuts back on with
the rounded end of the
nuts toward the wheel.
Tighten each nut by hand until the wheel is held
against the hub.
10. Lower the vehicle by attaching the folding wheel
wrench to the jack and turning the wrench
counterclockwise. Lower the jack completely.
5-82